Page 291 of 450
17
.
7
2
3
4
5
6
Audio and Telematics
Level 1Level 2Level 3Comments
Navigation
Stations
Activate or deactivate the content available (stations, car parks, risk areas and danger areas). Car park
Danger area
Map color Select day or night mode for display of the map.
POI on map
Travel
Select the POIs available.
Active life
Commercial
Public
Geographic
Select all Select or deselect all.
Save your choice or selection.
View map
Modify city Select or modify a city.
Weather
Display on the map the content available in non-connected mode.
Petrol Station
Car park
Tr a f f i c
Danger area
Select POI Select from the POIs available.
Zoom out / zoom in using the touch buttons or
with two fingers on the screen.
Page 293 of 450
19
.
Audio and Telematics
Level 3Level 4Level 5Comments
Zoom in Zoom in around the city selected.
Around the vehicle
Select a location option. On the route
At the destination
Weather Weather information transmitted in TMC mode.
Filling stations
Filling stations around the vehicle
Display the list of POIs.
Filling stations on the route
Filling stations at the destination
Car park
Car parks around the vehicle
Car parks on the route
Car parks at the destination
Zoom out / zoom in using the touch buttons or
with two fingers on the screen.
Page 307 of 450
33
.
7
28
27
26
29
30
Audio and Telematics
Level 1Level 2Level 3Comments
Navigation Select the orientation of the map; north up, vehicle direction up or perspective.
Navigation
TOMTOM TR AFFIC
On connection of the system to a network, "TOMTOM TR AFFIC" is displayed instead of "TMC", for use of all of the options available, in real time.
Navigation
Weather
Select the options. The map display the route chosen, depending on options.
Stations
Car park
Tr a f f i c
Danger area
Map color Select the display mode for the map.
POI on map
Commercial
Select the POIs available.
Geographic
Leisure
Public
Travel
Save the options.
View map Modify city Select or change a city.
Zoom out / zoom in using the touch buttons or with two fingers on the screen.
Page 309 of 450
35
.
31
32
Audio and Telematics
Level 3Level 4Level 5Comments
Select city Select or change a city.
Around the vehicle
Select or change a city. On the route
At the destination
Weather Weather information Display the weather forecast for the day or the following days.
Filling stations
Filling stations around the vehicle
Display the list of filling stations and the associated information (address, prices, fuels, ...).
Filling stations on the route
Filling stations at the destination
By distance
By price
Car park
Car parks around the vehicle
Display the list of car parks and the associated information (address, distance, spaces available, price, ...).
Car parks on the route
Car parks at the destination
Sor t by distance
Sort by spaces
Sor t by price
Zoom out / zoom in using the touch buttons or with two fingers on the screen.
Page 319 of 450

45
.
2
Audio and Telematics
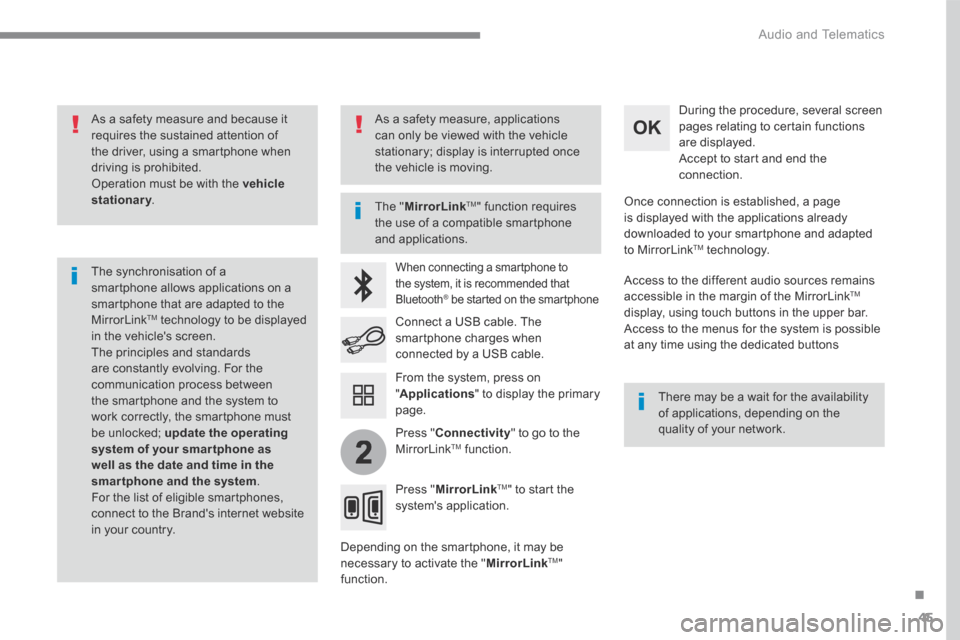
As a safety measure and because it requires the sustained attention of the driver, using a smartphone when driving is prohibited. Operation must be with the vehicle stationary . stationary . stationary
The synchronisation of a smartphone allows applications on a smartphone that are adapted to the MirrorLink TM technology to be displayed in the vehicle's screen. The principles and standards are constantly evolving. For the communication process between the smartphone and the system to work correctly, the smartphone must be unlocked; update the operating system of your smar tphone as well as the date and time in the smartphone and the system. For the list of eligible smartphones, connect to the Brand's internet website in your country.
The " MirrorLinkTM " function requires the use of a compatible smartphone
and applications.
There may be a wait for the availability of applications, depending on the quality of your network.
When connecting a smartphone to the system, it is recommended that Bluetooth ® be started on the smartphone ® be started on the smartphone ®
Depending on the smartphone, it may be necessary to activate the " MirrorLinkTM " function.
During the procedure, several screen pages relating to certain functions are displayed. Accept to start and end the connection.
Connect a USB cable. The smartphone charges when connected by a USB cable.
Press " MirrorLinkTM " to start the system's application.
Once connection is established, a page is displayed with the applications already downloaded to your smartphone and adapted to MirrorLink TM t e c h n o l o g y .
Access to the different audio sources remains accessible in the margin of the MirrorLink TM
display, using touch buttons in the upper bar. Access to the menus for the system is possible at any time using the dedicated buttons
From the system, press on " Applications " to display the primary page.
As a safety measure, applications can only be viewed with the vehicle stationary; display is interrupted once the vehicle is moving.
Press " Connectivity " to go to the MirrorLink TM function.
Page 335 of 450

61
.
1
2
2
2
Audio and Telematics
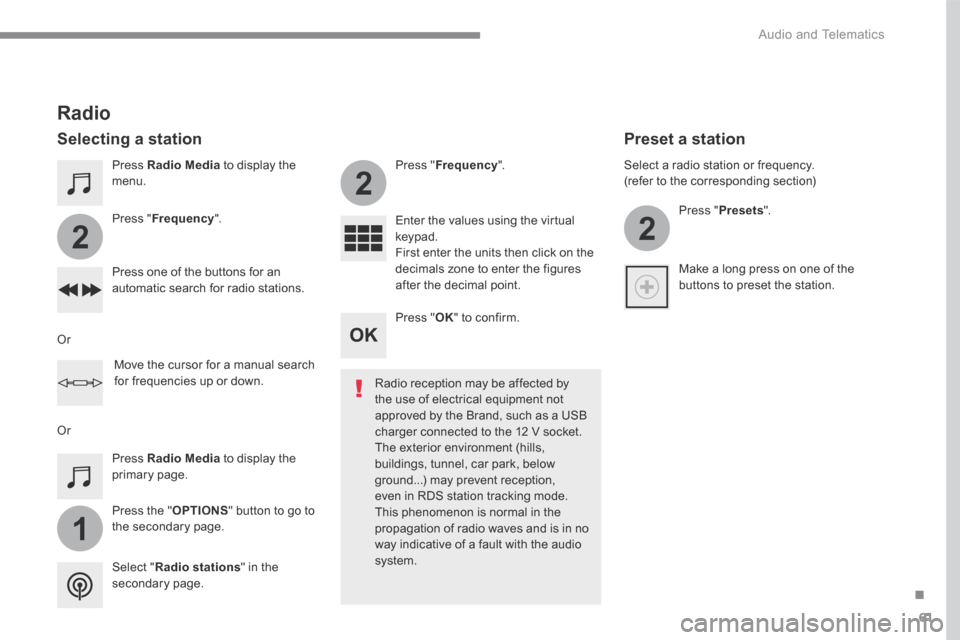
Press Radio Media to display the menu.
Press the " OPTIONS " button to go to the secondary page.
Press " Frequency ".
Press " Frequency ".
Enter the values using the virtual keypad. First enter the units then click on the decimals zone to enter the figures after the decimal point. Press one of the buttons for an automatic search for radio stations.
Press Radio Media to display the primary page.
Radio
Selecting a station
Radio reception may be affected by the use of electrical equipment not approved by the Brand, such as a USB
charger connected to the 12 V socket. The exterior environment (hills, buildings, tunnel, car park, below ground...) may prevent reception, even in RDS station tracking mode. This phenomenon is normal in the propagation of radio waves and is in no way indicative of a fault with the audio system. Select " Radio stations " in the secondary page.
Or
Or
Move the cursor for a manual search for frequencies up or down.
Select a radio station or frequency. (refer to the corresponding section)
Press " Presets ".
Make a long press on one of the buttons to preset the station.
Preset a station
Press " OK " to confirm.
Page 338 of 450

64
Audio and Telematics
Media
USB port Selecting the source
Select " Source ".
Press Radio Media to display the primary page.
The system builds playlists (in temporary memory), an operation which can take from a few seconds to several minutes at the first connection. Reduce the number of non-music files and the number of folders to reduce the waiting time. The playlists are updated every time the ignition is switched off or connection of a USB memory stick. The lists are memorised: if they are not modified, the subsequent loading time will be shorter.
Insert the USB memory stick into the USB port or connect the USB device to the USB port using a suitable cable (not supplied).
Auxiliary (AUX) socket
First adjust the volume of your portable device (to a high level). Then adjust the volume of your audio system. Display and management of the controls are via the portable device.
This source is only available if "Auxiliary input" has been checked in the audio settings.
(depending on equipment)
Connect the portable device (MP3 player…) to the auxiliary Jack socket using an audio cable (not supplied).
Choose the source.
Bluetooth ® Bluetooth ® Bluetooth audio streaming ® audio streaming ®
Streaming allows you to listen to music from your telephone.
The Bluetooth profile must be activated. First adjust the volume on your portable device (to a high level). Then adjust the volume of your audio system.
If play does not start automatically, it may be necessary to start the audio playback from the telephone. Control is from the portable device or by using the system's touch buttons.
Once connected in streaming mode, the telephone is considered to be a media source.
To protect the system, do not use a USB hub.
CD player (depending on equipment)
Insert the CD in the player.
Page 370 of 450
96
Audio and Telematics
Transversal-Citroen_en_Chap02_RCC-2-2-0_ed01-2016
First steps
With the engine running, a press mutes the sound. With the ignition off, a press turns the system on.
Volume.
Use the buttons either side of or below the touch screen for access to the menus, then press the virtual buttons in the touch screen. All of the touch areas of the screen are white. Press in the grey zone to go back a level or confirm. Press the back arrow to go back a level or confirm.
The touch screen is of the "capacitive" type. To clean the screen, use a soft, non-abrasive cloth (spectacles cloth) with no additional product. Do not use sharp objects on the screen. Do not touch the screen with wet hands.