2017 CITROEN C-ZERO display
[x] Cancel search: displayPage 51 of 174

49
In order to programme the heating, air
conditioning or demisting functions, the
following conditions must be met.
-
T
he drive selector is in position P .
-
T
he switch is on LOCK .
-
T
he vehicle is connected using the
normal charging cable.
-
A
ll of the doors are closed correctly.
-
T
he battery charge level is
sufficient (one bar minimum).
Cancelling the programmed
settings
Using the remote control
Using the switch
Place the vehicle's switch in the ON position
then return it to the LOCK position.
Programming the interior temperature
Activation of the functions
Switch on the remote control.
Press the MODE button to select the interior
temperature programming.
This function is used to programme the
switching on of:
- t
he heating.
-
t
he air conditioning.
-
t
he demisting.
Press the immediate charging button,
then press the on/off button briefly to
transmit the data to the vehicle.
One of these symbols is displayed on the
screen. It indicates the current status of the
interior temperature.
Use the arrows to select the function required.
Press the on/off button briefly to transit the data
to the vehicle.
The progammed values set using
the remote control are cancelled
automatically each time the vehicle is
started.
For maximum effectiveness of
the programming of the interior
temperature, ensure that all of the
vehicle's windows are closed.
3
Ease of use and comfort
Page 55 of 174

53
Lighting controls
Main lighting
The various front and rear lamps of the vehicle
are designed to adapt the lighting progressively
in relation to the climatic conditions and so
ensure the best visibility for the driver:
-
s
idelamps, to be seen,
-
d
ipped beam headlamps to see without
dazzling other drivers,
-
m
ain beam headlamps to see clearly when
the road is clear.
Additional lighting
Other lamps are provided to fulfil the
requirements of particular driving conditions:
-
a r
ear foglamp to be seen from a distance,
-
f
ront foglamps for even better visibility,
-
d
aytime running lamps to be seen during
the day.
Selection ring for main lighting
mode
Turn the ring to position the symbol required
facing the mark.
Automatic illumination of headlamps. Sidelamps only.
Dipped or main beam headlamps.
Stalk for switching headlamp beam
Pull the stalk to switch the lighting between
dipped / main beam headlamps.
In the lighting off and sidelamps modes, the
driver can switch on the main beam headlamps
temporarily ("headlamp flash") by maintaining a
pull on the stalk.
Displays
Illumination of the corresponding indicator lamp
in the instrument panel confirms the lighting
switched on.
Lighting off.
4
Lighting and visibility
Page 67 of 174

65
Anti-slip regulation (ASR)
and electronic stability
programme (ESP)
Trajectory control systems
Deactivation
In exceptional conditions (starting a vehicle
which is bogged down, stuck in snow, on soft
ground, ...), it may be advisable to deactivate
the ASR and ESP systems to regain grip.
F
P
ress this button button, located on the
dashboard to the right of the steering
wheel, until the corresponding symbol
appears in the instrument panel screen.
Activation
These systems are activated automatically
each time the vehicle is started.
They come into operation in the event of a grip
or trajectory problem. The display of this symbol indicates
that the ASR and ESP systems are
deactivated.
Reactivation
These systems are not reactivated
automatically.
F
P
ress this button again to reactivate them
manually.
The symbol going off in the instrument panel
indicates the reactivation of the ASR and ESP
systems.
The anti-slip regulation (also known as Traction
Control) optimises traction to limit wheel spin,
by acting on the brakes of the driving wheels
and on the engine.
The electronic stability programme acts on the
brake of one or more wheels and on the engine
to keep the vehicle on the trajectory required
by the driver, within the limits of the laws of
physics.
This is indicated by flashing of this
symbol in the instrument panel. The ASR /ESP systems offer should not
encourage the driver to take extra risks
or drive at high speed.
The correct functioning of these
systems depends on observation of
the manufacturer's recommendations
regarding the wheels (tyres and rims),
the braking components, the electronic
components and the assembly
and repair procedures used by the
CITROËN dealer network.
After an impact, have these systems
checked by a CITROËN dealer or a
qualified workshop.
Operating fault
The display of this message
in the instrument panel
indicates a malfunction of
these systems.
Contact a CITROËN dealer or a qualified
workshop to have the ASR /ESP systems
checked.
Excessive wheel spin may damage your
vehicle's differential.
5
Safety
Page 69 of 174

67
Seat belts
Front seat belts
Fastening
F Pull the strap, then insert the tongue in the buckle A.
F
C
heck that the seat belt is fastened
correctly by pulling the strap.
Front seat belt not fastened /
unfastened warning lamp
If the driver does not fasten their seat belt
within one minute after switching on the
ignition, the warning lamp flashes accompanied
by an intermittent audible signal.
After about 90 seconds, the warning lamp, the
audible signal and the display stop, and then
return until the driver fastens their seat belt.
If the seat belt is unfastened while the vehicle
is moving , you are warned by the same alerts.
The front seat belts are fitted with a
pretensioning and force limiting system.
This system improves safety in the front
seats in the event of a front or side impact.
Depending on the severity of the impact,
the pretensioning system instantly tightens the
seat belts against the body of the occupants.
The pretensioning seat belts are active when
the ignition is on.
The force limiter reduces the pressure of the
seat belt on the chest of the occupant,
so improving their protection.
Unfastening
F Press the red button on the buckle A
.When the ignition is switched on, this
warning lamp comes on accompanied
by an audible signal for a few seconds
if the driver and/or passenger has not
fastened their seat belt.
5
Safety
Page 92 of 174

90
P. Park.
This position is used for starting the vehicle.
To come out of the P position, you must have
your foot on the brake.
R. Reverse.
N. Neutral.
D. Drive (For ward).
Drive selector
Selector positions
When you move the drive selector through the
grille to select a position, the corresponding
indicator is displayed in the instrument panel.
Displays in the instrument panel
With the motor running, P appears in the
instrument panel screen.
F
P
ress the brake pedal to come out of
position P .
F
S
elect for ward ( D) or reverse ( R) gear.
F
R
elease the parking brake.
F
T
ake your foot off the brake pedal, the
vehicle then moves off slowly to facilitate
manoeuvring.
F
A
ccelerate to go for wards or backwards.
F
"
D" or "R" appears in the instrument panel
screen.
Moving off
Driving
Page 96 of 174

94
The under-inflation alert is only reliable
if the system has been reinitialised
with the four tyre pressures correctly
adjusted.Go to a CITROËN dealer or a qualified
workshop
to have the system checked
or, following the repair of a puncture, to
have the original wheel, equipped with a
sensor, refitted.
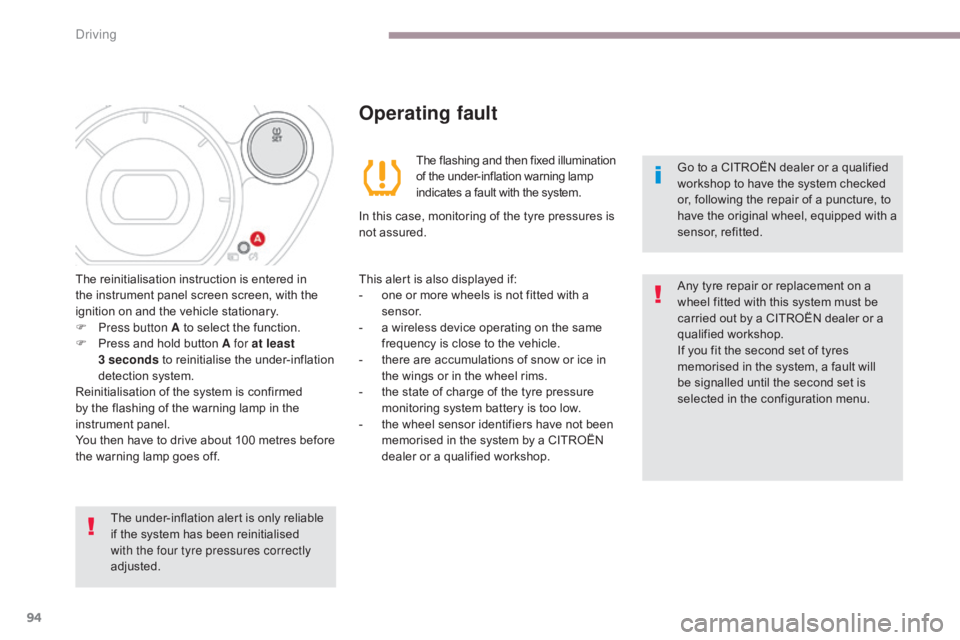
The reinitialisation instruction is entered in
the instrument panel screen screen, with the
ignition on and the vehicle stationary.
F
P
ress button A to select the function.
F
P
ress and hold button A for at least
3
seconds
to reinitialise the under-inflation
detection system.
Reinitialisation of the system is confirmed
by the flashing of the warning lamp in the
instrument panel.
You then have to drive about 100 metres before
the warning lamp goes off.
Operating fault
The flashing and then fixed illumination
of the under-inflation warning lamp
indicates a fault with the system.
In this case, monitoring of the tyre pressures is
not assured.
This alert is also displayed if:
-
o
ne or more wheels is not fitted with a
sensor.
-
a w
ireless device operating on the same
frequency is close to the vehicle.
-
t
here are accumulations of snow or ice in
the wings or in the wheel rims.
-
t
he state of charge of the tyre pressure
monitoring system battery is too low.
-
t
he wheel sensor identifiers have not been
memorised in the system by a CITROËN
dealer or a qualified workshop. Any tyre repair or replacement on a
wheel fitted with this system must be
carried out by a CITROËN dealer or a
qualified workshop.
If you fit the second set of tyres
memorised in the system, a fault will
be signalled until the second set is
selected in the configuration menu.
Driving
Page 101 of 174

99
F Check that the charging lamp in the instrument panel and
the green CHARGING lamp of
the control unit are on fixed.
The start of charging may be
accompanied by the noise of a fan
running. This noise is per fectly normal.
The charge may be interrupted at any
time by withdrawing the charging plug.
If this is not the case, charging has not
started; repeat the procedure, ensuring that all
connections are correct.
The state of charge indicator for the main
battery is displayed in the instrument panel and
the number of bars illuminated increases as the
battery is charged.
If exceptionally you have to interrupt the
charge by disconnecting the charging
cable from the power point, it is
essential to first press the Manual Stop
button on the control unit.Control unit
There are four indicator lamps:
- S TOP: on red.
I
t indicates that charging has been
interrupted by a press on the Manual Stop
button. This action is essential before
disconnecting the charging cable from the
power point when charging.
-
P
OWER : on green.
I
t indicates that the electric connection has
been established. If it does not come on,
check that the connections are correct. If
the problem persists, contact a CITROËN
dealer or a qualified workshop.
-
F
A U LT : on red.
I
t indicates the presence of a fault. Check
that the connections are correct. If this
warning lamp does not go off, contact a
CITROËN dealer or a qualified workshop.
-
C
HARGING : on green.
I
t indicates that charging is in progress.
If it does not come on, check that the
connections are correct. If the problem
persists, contact a CITROËN dealer or a
qualified workshop.
7
Practical information
Page 148 of 174

146
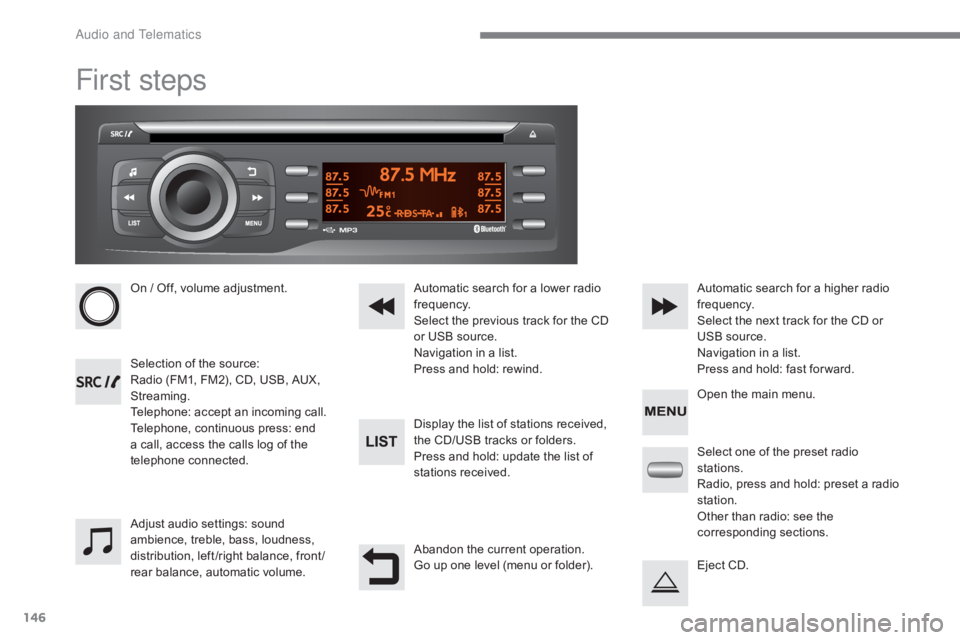
First steps
On / Off, volume adjustment.
Selection of the source:
Radio (FM1, FM2), CD, USB, AUX,
Streaming.
Telephone: accept an incoming call.
Telephone, continuous press: end
a call, access the calls log of the
telephone connected.Display the list of stations received,
the CD/USB tracks or folders.
Press and hold: update the list of
stations received. Automatic search for a lower radio
frequency.
Select the previous track for the CD
or USB source.
Navigation in a list.
Press and hold: rewind.Automatic search for a higher radio
frequency.
Select the next track for the CD or
USB source.
Navigation in a list.
Press and hold: fast for ward.
Adjust audio settings: sound
ambience, treble, bass, loudness,
distribution, left /right balance, front /
rear balance, automatic volume. Abandon the current operation.
Go up one level (menu or folder).Select one of the preset radio
stations.
Radio, press and hold: preset a radio
station.
Other than radio: see the
corresponding sections.
Eject CD. Open the main menu.
Audio and Telematics