2017 CITROEN C-ZERO DAG service indicator
[x] Cancel search: service indicatorPage 4 of 174

.
.
Instrument panel 10
Indicator and warning lamps
1
1
Main battery state of charge indicator
1
9
Energy consumption / generation indicator
2
0
Distance recorder
2
1
Trip distance recorder
2
1
Lighting dimmer
2
2
Service indicator
2
2
Range indicator
2
4Remote control key
2
5
Doors 28
Boot
2
9
Electric windows
3
0
Charging flaps
3
1
Front seats 3 2
Rear seats
3
4
Mirrors
36
Interior fittings
3
8
Ventilation
4
1
Heating
4
3
Air conditioning
4
3
Front demist - defrost
4
6
Rear screen demist - defrost
4
6
Remote control
4
7Lighting controls
5
3
Automatic illumination of headlamps
5
5
Headlamp adjustment
5
6
Wiper control
5
6
Courtesy lamp
5
7
General safety recommendations 5 8
Hazard warning lamps
5
9
Automatic operation of brake lamps
5
9
Horn
5
9
Pedestrian horn
6
0
Emergency or assistance
6
1
Braking assistance systems
6
3
Trajectory control systems
6
5
Engine brake reduction indicator lamp
6
6
Seat belts
6
7
Airbags
7
0
Child seats
7
4
Deactivating the passenger front airbag
7
7
ISOFIX
83
Child lock
8
6
Over view
Eco-driving
Instruments Access
Ease of use and comfort Lighting and visibility
Safety
Contents
Page 12 of 174

10
C-Zero_en_Chap01_instruments-de-bord_ed01-2016
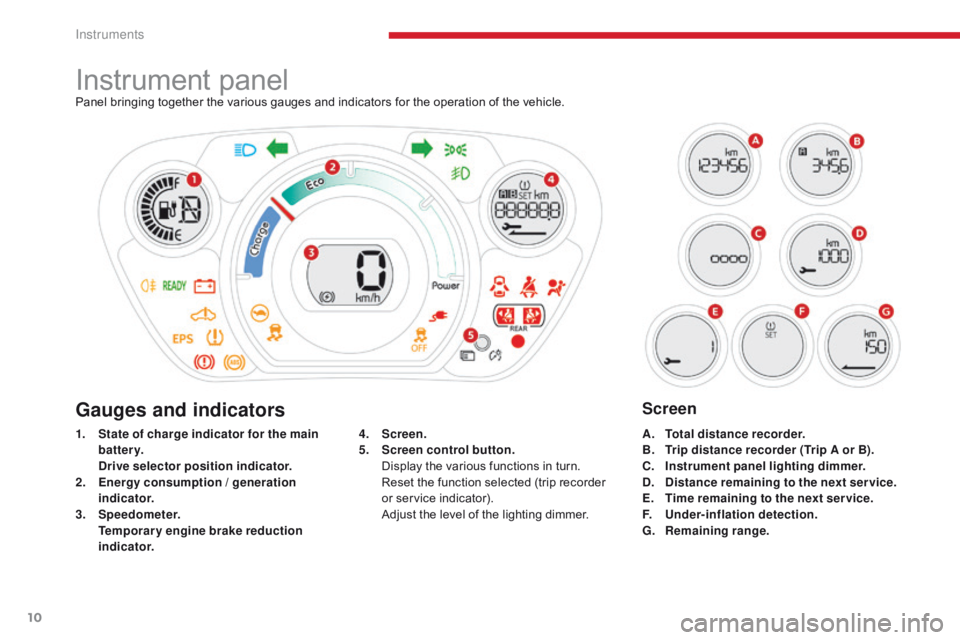
Instrument panelPanel bringing together the various gauges and indicators for the operation of the vehicle.
1.
S
tate of charge indicator for the main
battery.
D
rive selector position indicator.
2.
E
nergy consumption / generation
indicator.
3.
S
peedometer.
T
emporary engine brake reduction
indicator. A.
T
otal distance recorder.
B.
T
rip distance recorder (Trip A or B).
C.
I
nstrument panel lighting dimmer.
D.
D
istance remaining to the next service.
E.
T
ime remaining to the next ser vice.
F.
U
nder-inflation detection.
G.
R
emaining range.
4.
S
creen.
5.
S
creen control button.
D
isplay the various functions in turn.
R
eset the function selected (trip recorder
or service indicator).
A
djust the level of the lighting dimmer.
Gauges and indicatorsScreen
Instruments
Page 24 of 174

22
C-Zero_en_Chap01_instruments-de-bord_ed01-2016
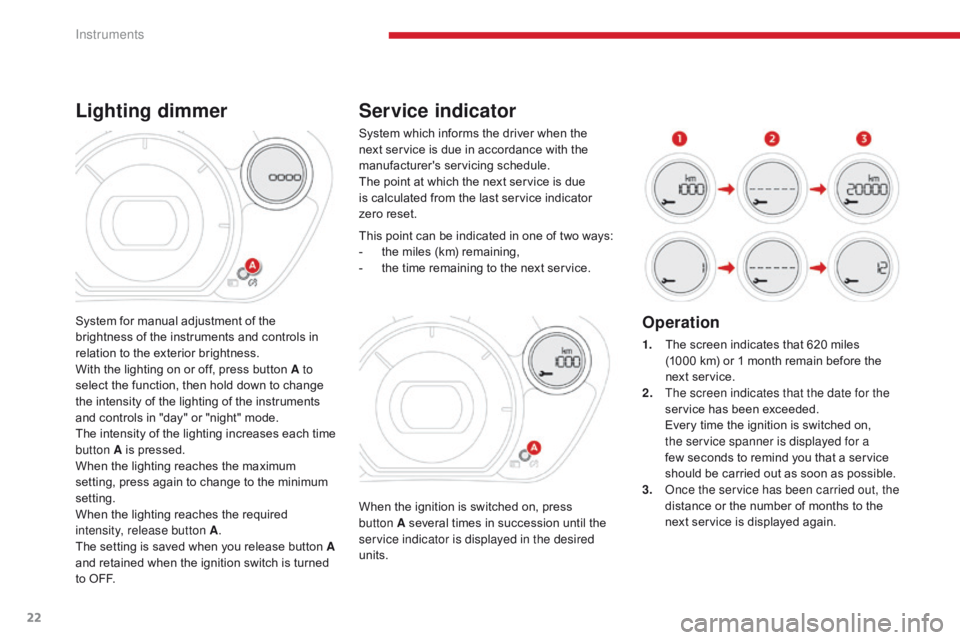
Service indicator
When the ignition is switched on, press
button A several times in succession until the
service indicator is displayed in the desired
units. This point can be indicated in one of two ways:
-
t
he miles (km) remaining,
-
t
he time remaining to the next service.
Operation
1. The screen indicates that 620 miles
(1000 km) or 1 month remain before the
next service.
2.
T
he screen indicates that the date for the
service has been exceeded.
E
very time the ignition is switched on,
the service spanner is displayed for a
few seconds to remind you that a service
should be carried out as soon as possible.
3.
O
nce the service has been carried out, the
distance or the number of months to the
next service is displayed again.
System which informs the driver when the
next service is due in accordance with the
manufacturer's servicing schedule.
The point at which the next service is due
is calculated from the last service indicator
zero
reset.
System for manual adjustment of the
brightness of the instruments and controls in
relation to the exterior brightness.
With the lighting on or off, press button A to
select the function, then hold down to change
the intensity of the lighting of the instruments
and controls in "day" or "night" mode.
The intensity of the lighting increases each time
button A is pressed.
When the lighting reaches the maximum
setting, press again to change to the minimum
setting.
When the lighting reaches the required
intensity, release button A .
The setting is saved when you release button A
and retained when the ignition switch is turned
to OFF.
Lighting dimmer
Instruments
Page 25 of 174

23
C-Zero_en_Chap01_instruments-de-bord_ed01-2016
The display of "---", indicating that the
service date has arrived, comes on
automatically after a certain time and
distance travelled. The screen then
indicates the time remaining before the
next service is due.
Resetting the service indicator to zero
After each service, the service indicator should
be rest to zero.
The procedures is as follows:
F
S
witch off the ignition (switch in the LOCK
or ACC position).
F
P
ress the reset button A several times in
succession until the service indicator is
displayed.
F
P
ress and hold the reset button for a few
seconds until the spanner flashes .
F
P
ress the reset button while the spanner is
flashing to change the display from "---" to
"CLEAR" .
T
he distance (or time) remaining before the
next service is due is displayed.
1
Instruments
Page 63 of 174

61
C-Zero_en_Chap05_securite_ed01-2016
Emergency or assistance call
Localised Emergency Call
In an emergency, press this
button for more than 2 seconds.
Flashing of the green indicator
lamp and a voice message
confirm that the call has
been made to the "Localised
Emergency Call"* centre.
Pressing this button again immediately cancels
the call.
The green indicator lamp goes off.
The green indicator lamp remains on (without
flashing) when communication is established.
It goes off at the end of the call.
Localised Emergency Call immediately locates
your vehicle, makes contact with you in your
language**
and - if necessary - organises
sending of the appropriate emergency
services**. In countries where the service is not
operational, or if the locating service has been
expressly declined, the call is directed straight
to the emergency services (112) without
location. If an impact is detected by the airbag
control unit, and independently of
the deployment of any airbags, an
emergency call is made automatically.
*
D
epending on the terms and conditions for
the service, available from dealers, and
technological and technical limits.
**
D
epending on the geographic cover for
"Localised Emergency Call", "Localised
Assistance Call" and the official national
language selected by the owner of the
vehicle. The list of countries covered by Telematic
services is available at dealers or on the
website in your country. If you benefit from the C
ITROËN
C
onnect Box offer with the SOS and
assistance pack included, there are
additional services available to you in
your personal space, via your country's
website.
5
Safety
Page 64 of 174

62
C-Zero_en_Chap05_securite_ed01-2016
Localised Assistance Call
To reactivate geo-location, simultaneously
press the "Localised Emergency Call" and
"Localised Assistance Call" buttons again,
followed by a press on "Localised Assistance
Call" to confirm.
Operation of the systemPress this button for more than
2 seconds to request assistance
if the vehicle breaks down. If you purchased your vehicle outside
the Brand's dealer network, we suggest
that you have a dealer check and, if
desired, modify the configuration of
these services.
In a multi-lingual country, configuration
is possible in the official national
language of your choice.
For technical reasons, particularly
to improve the quality of Telematic
services to customers, the
manufacturer reserves the right to carry
out updates to the vehicle's on-board
telematic system.
The fault with the system does not
prevent the vehicle being driven. When the ignition is switched on,
the green indicator lamp comes
on for 3 seconds indicating that
the system is operating correctly.
If the orange indicator lamp
flashes then goes off: the system
has a fault.
If the orange indicator lamp is on fixed: the
back-up battery should be replaced.
In both cases, the emergency and assistance
calls service may not work.
Contact a qualified repairer as soon as
possible. A voice message confirms that the call has
been made**.
**
D
epending on the geographic cover for
"Localised Emergency Call", "Localised
Assistance Call" and the official national
language selected by the owner of the
vehicle. The list of countries covered by Telematic
services is available at dealers or on your
country's website.
Pressing this button again immediately cancels
the request.
The cancellation is confirmed by a voice
message.
Geo-location
You can deactivate geo-location by
simultaneously pressing the "Localised
Emergency Call" and "Localised Assistance
Call" buttons, followed by a press on "Localised
Assistance Call" to confirm.
Safety
Page 168 of 174

166
Seats, rear .....................................................34
Sel ector, drive ............................................... 90
S
erial number, vehicle
................................14
3
Service indicator
........................................... 2
2
Sidelamps
........................................... 1
29, 132
Side repeater
..............................
................131
Snow chains
................................................ 12
5
Socket, 12 V accessory
..........................3
8, 39
Speedometer
..............................
..................10
Stability control (ESP)
...................................65
S
tarting the vehicle
.................................8
8, 90
Stopping the vehicle
...............................8
8, 90
Storage
................
.......................................... 38
Sun visor
....................................................... 39
T
echnical data
..................................... 14
0, 141
Third brake lamp
......................................... 13
3
Total distance recorder
................................. 21
T
owing another vehicle
...............................13
9
Traction control (ASR)
..................................65
T
raffic information (TA)
...............................14
8
Ty r e s
......................................................9
2, 144
Tyre under-inflation detection
........... 1
7, 24, 92
T
Under-inflation detection, tyre. ......... 17, 24, 92
Unlocking from the inside .............................28
U
SB player
..............................................3
8, 40
U
Ventilation ................................................41- 4 3
Warning and indicator lamps
..............................
................ 11, 14, 15
Warning lamp, seat belts
..............................67
We
ights
...............
........................................ 141
Wheel, spare
............................................... 14
4
Window controls
........................................... 3
0
Wiper blades (changing)
............................. 11
2
Wiper, rear ..................................................... 57
Wipers
........................................................... 56
S
afety, children
......................7
4-76, 81, 83, 84
Screen menu map
....................................... 15
7
Screenwash
..............................
.................... 56
Seat belts
.......................................... 6
7- 69, 80
Seats, front
...............................
..................... 32
Seats, heated
...............................
................. 34
V
W
S
Protecting children ................. 7 4-76, 81, 83 - 86
Puncture ................ ...................................... 117
Radio
...............
............................................ 147
Range
................
...................................... 21, 24
Rear screen, demisting
................................. 46
R
echarging the main battery
........................97
R
ecirculation / exterior air intake
..................43
R
eminder, lighting on
.................................... 54
R
emote control
........................................ 2
7, 47
Removing a wheel
..............................
........121
Removing the mat
...............................
..........39
Replacing bulbs
..............................
....126, 131
Replacing fuses
..............................
............13 4
Replacing the passenger
compartment filter
.................................... 111
R
eservoir, screenwash
............................... 10
9
Reversing lamps
......................................... 13
2
R
Alphabetical index