2017 CITROEN BERLINGO ELECTRIC ESP
[x] Cancel search: ESPPage 169 of 328

167
Berlingo-2-VU_en_Chap09_Caract_technique_ed01-2015Berlingo-2-VU_en_Chap09_Caract_technique_ed01-2015
WEIGHTS An D TOWED LOADS
These values, expressed in kg, can be
found on the manufacturer's VIN plate
or label.
The maximum weights and towed
loads for your vehicle can be found on
the vehicle's registration certificate. The recommended nose weight is
the downward force on the towball
(removable with or without tools).
In each country, it is imperative that
the maximum towed loads authorised
by local legislation are complied
with. To find out your vehicle's towing
capacities and its gross train weight,
consult a CITROËN dealer.
The kerb weight is equal to the weight
without load + driver (75 kg) + fuel tank
filled to 90%.
The GTW and towed load values
indicated are valid up to a maximum
altitude of 1000 metres. The value of
the towed load mentioned must be
reduced by 10 % for each additional
1000 metres.
With load transfer, the braked trailer
weight can be increased, on condition
that the equivalent of this load is
removed from the vehicle so that the
GTW is not exceeded. High ambient temperatures
may result in a reduction in the
performance of the vehicle in
order to protect the engine. When
the ambient temperature is higher
than 37 °C, limit the towed weight.
The location of the manufacturer's
plate is given in chapter 9,
"Identification markings" section.
EnGInE CHARACTERISTICS
The engine characteristics (capacity,
maximum power, maximum power
speed, fuel, CO
2 emissions...) for your
vehicle are given in the registration
document.
These characteristics correspond to the
values type-approved on a test bed,
under conditions defined in European
legislation (Directive 1999/99/EC).
For more information, refer to the
manufacturer's website or sales
brochure for the model. Contact
a CITROËN dealer or a qualified
workshop. GVW : gross vehicle weight, the
maximum authorised weight.
GTW : gross train weight, the
maximum weight for vehicle plus trailer.
Towing with a lightly loaded
vehicle can adversely affect road
holding.
Towing a trailer increases braking
distances.
When towing, the maximum permitted
speed is reduced (comply with the
legislation in force in the country).
TECHnICAL DATA
9
Weights
Page 197 of 328

195
Berlingo-2-VU_en_Chap10a_SMEGplus_ed01-2015
Select a radio station or frequency (refer to the
corresponding section).Radio Media
Press on to display the
primary page.
Press on the secondary page.
Select " Settings ".
Select " Radio".
Activate/deactivate " RDS
options ".
Press on Radio Media t
o display the
primary page.
Press on the secondary page. Press on "
Preset".
Select a number in the list to preset the
previously chosen radio station.
A long press on a number presets (memorises)
the station.
Press on Frequency
.
Enter the frequency in full (e.g.:
92.10 MHz) using the keypad then
" Confirm ".
Changing radio station
Pressing the name of the current radio station
brings up a list.
To change radio station press the name of the
desired station.
o
r Press Radio Media to display the
primary page.
Select " Save".
Preset a station Activate/ Deactivate RDS
OR
THE
n
a
press on this button presets all of
the stations one after the other.
Recall pre-set stations
RDS, if activated, allows you to continue
listening to the same station by automatic
retuning to alternative frequencies.
However, in certain conditions, coverage
of an RDS station may not be assured
throughout the entire country as radio
stations do not cover 100 % of the
territory. This explains the loss of
reception of the station during a journey.
Audio and Telematics
TECHnOLOGY on BOARD
10
Page 199 of 328

197
Berlingo-2-VU_en_Chap10a_SMEGplus_ed01-2015
Select change of source. Press on Radio Media to display the
primary page.
Select " DAB Radio ".
Select " List" in the primary page.
Select the radio station from the list offered. Press on Radio Media
to display the
primary page.
Press on the secondary page.
Select " Settings ".
Select " RADIO".
Select " Digital/FM auto
tracking " then "Confirm ".
DAB / FM auto tracking
Digital radio
"DAB" does not cover 100% of the
te r r i to r y.
When the digital radio signal is poor,
"DAB
/ FM auto tracking" allows you to
continue listening to the same station,
by automatically switching to the
corresponding "FM" analogue station
(if there is one). If "DAB
/ FM auto tracking" is activated,
there is a difference of a few seconds
when the system switches to "FM"
analogue radio with sometimes a
variation in volume.
When the digital signal is restored,
the system automatically changes back
to "DAB".
Digital radio provides higher quality
reception and also the graphical display
of current information on the radio
station being listened to. Select "List" in
the primary page.
The range of multiplexes available is
displayed in alphabetical order.
If the "DAB" station being listened to
is not available on "FM" ("DAB/FM"
option greyed out), or "DAB
/ FM auto
tracking" is not activated, the sound
will cut out while the digital signal is too
weak.
or
Select " Radio list " in the secondary
page.
audio and Telematics
TECHnoLoGY on boaRd
10
Page 210 of 328

208
Berlingo-2-VU_en_Chap10a_SMEGplus_ed01-2015
Audio settings
Press Settings to display the primary
page.
Select " Audio settings ".
Select " Ambience "
o
r "Balance "
o
r "Sound effects "
o
r "Ringtones "
o
r "Voice ". On-board audio: Arkamys© Sound
Staging optimises sound distribution in
the the passenger compartment.
The distribution (or spatialisation using
the Arkamys® system) of sound is an
audio process that allows the audio
quality to be adapted to the number of
passengers in the vehicle.
Available only with the 6 -speaker
configuration.
The audio settings (Ambience , Bass,
Tr e b l e and Loudness ) are different
and independent for each sound
source.
The settings for F-R balance and L- R
balance are common to all sources.
-
" A
mbience " (choice of 6 musical
ambiences)
-
" Ba
ss "
-
" T
r e b l e "
-
" L
oudness " (Activate/Deactivate)
-
" B
alance " ("Driver ", "All
passengers ", "Front only ")
-
A
udible response from touch
screen "
-
" V
olume linked to vehicle
speed: " (Activate/Deactivate)
Audio and Telematics
Page 244 of 328

242
Berlingo-2-VU_en_Chap10b_RD45_ed01-2015
Screen menu map(s)
Radio- CD
REG mode
CD repeat
Shuffle play
Vehicle config*
R wiper in rev
Options
Diagnostic
RDS options
View
Abandon
1
2
3
3
1
2
2
2
2
1
2
Screen A
* The settings vary according to the trim level of the vehicle.
Guide lighting
2
Units
Temperature: °Celsius / °Fahrenheit
Fuel consumption: KM/L - L/100 - MPG
1
2
2
Display adjust
Month
Day
Hour
Minutes Ye a r
12 H/24 H mode
Language
Italiano
ned
erlands
Portuguès
Português do Brasil Français
Deutsch
Čeština English
Hr vatski Español
Magyar
1
2
2
2
2
2
2
2
1
2
2
2
2
2
2
2
2
2
2
Audio and Telematics
Page 276 of 328

18
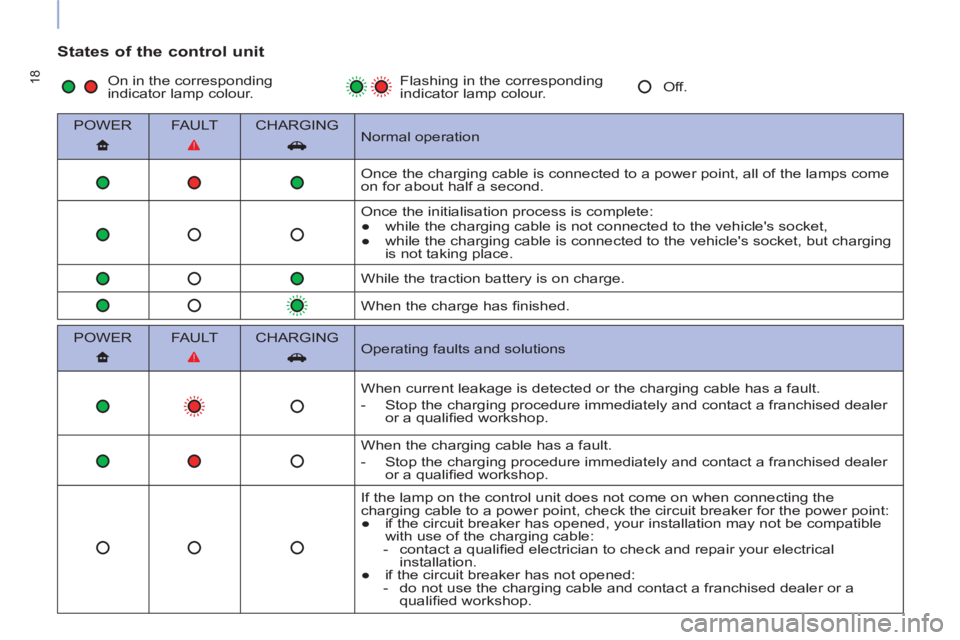
States of the control unit
POWER
FAULT
CHARGING
Normal operation
Once the charging cable is connected to a power point, all of the lamps come
on for about half a second.
Once the initialisation process is complete:
●
while the charging cable is not connected to the vehicle's socket,
●
while the charging cable is connected to the vehicle's socket, but charging
is not taking place.
While the traction battery is on charge.
When the charge has fi nished.
POWER
FAULT
CHARGING
Operating faults and solutions
When current leakage is detected or the charging cable has a fault.
- Stop the charging procedure immediately and contact a franchised dealer
or a qualifi ed workshop.
When the charging cable has a fault.
- Stop the charging procedure immediately and contact a franchised dealer
or a qualifi ed workshop.
If the lamp on the control unit does not come on when connecting the
charging cable to a power point, check the circuit breaker for the power point:
●
if the circuit breaker has opened, your installation may not be compatible
with use of the charging cable:
- contact a qualifi ed electrician to check and repair your electrical
installation.
●
if the circuit breaker has not opened:
- do not use the charging cable and contact a franchised dealer or a
qualifi ed workshop.
On in the corresponding
indicator lamp colour. Flashing in the corresponding
indicator lamp colour. Off.
Page 285 of 328

27
ANCILLARIES BATTERY
Charging the battery with a
battery charger
Do not charge the battery without
fi rst disconnecting the terminals
and removing the battery from the
front compartment.
Do not disconnect the
terminals when this indicator
warning lamp is on, nor when
the vehicle itself is on charge.
Before disconnection
Switch off the ignition and wait
two minutes before disconnecting
the battery.
After reconnection
After any reconnection of the battery,
switch on the ignition and wait
1 minute before starting, so as to
allow initialisation of the electronic
systems. However, if some minor
problems remain after carrying out this
operation, contact a franchised dealer
or a qualifi ed workshop. Remember
to enter the radio pre-sets yourself,
referring to the corresponding section
in the handbook.
- Remove the battery fi xing 1
,
- lift the protective cover on
the ( -
) terminal,
- disconnect the cable from
the ( -
) post
- lift the protective cover on
the ( +
) terminal 2
,
- slacken the nut 3
,
- disconnect the cable from
the ( +
) post,
- remove the battery,
- charge the battery following the
instructions on use provided by
the manufacturer of the battery
charger,
- reconnect the battery starting with
the cable on the ( +
) post.
Ensure that the battery posts and
terminals are clean. If they are
covered with sulphates (whitish or
greenish deposit), remove them and
clean them.
Page 312 of 328

18
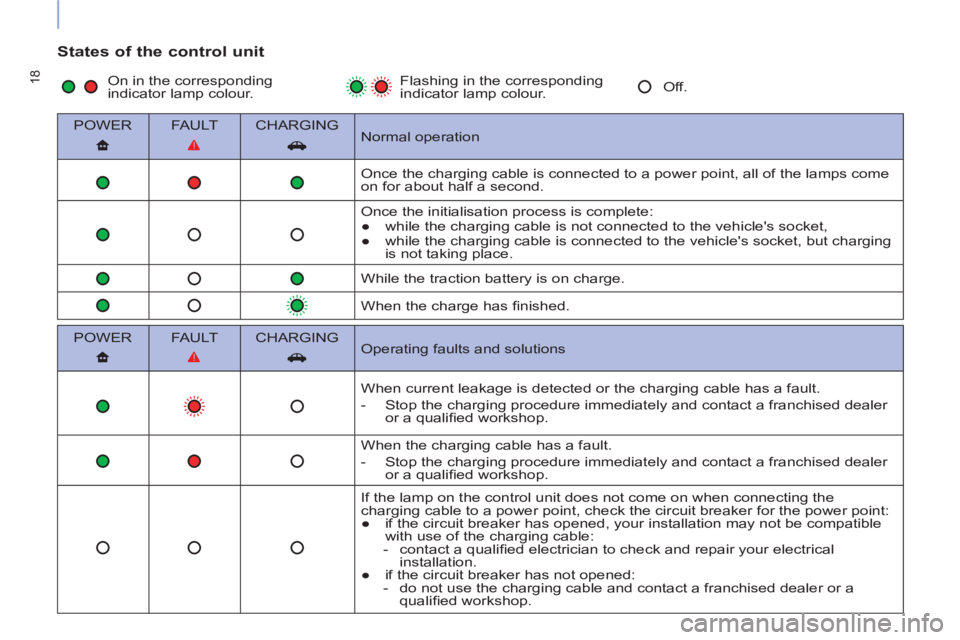
States of the control unit
POWER
FAULT
CHARGING
Normal operation
Once the charging cable is connected to a power point, all of the lamps come
on for about half a second.
Once the initialisation process is complete:
●
while the charging cable is not connected to the vehicle's socket,
●
while the charging cable is connected to the vehicle's socket, but charging
is not taking place.
While the traction battery is on charge.
When the charge has fi nished.
POWER
FAULT
CHARGING
Operating faults and solutions
When current leakage is detected or the charging cable has a fault.
- Stop the charging procedure immediately and contact a franchised dealer
or a qualifi ed workshop.
When the charging cable has a fault.
- Stop the charging procedure immediately and contact a franchised dealer
or a qualifi ed workshop.
If the lamp on the control unit does not come on when connecting the
charging cable to a power point, check the circuit breaker for the power point:
●
if the circuit breaker has opened, your installation may not be compatible
with use of the charging cable:
- contact a qualifi ed electrician to check and repair your electrical
installation.
●
if the circuit breaker has not opened:
- do not use the charging cable and contact a franchised dealer or a
qualifi ed workshop.
On in the corresponding
indicator lamp colour. Flashing in the corresponding
indicator lamp colour. Off.