2017 CHEVROLET SUBURBAN power steering
[x] Cancel search: power steeringPage 268 of 465
Chevrolet Tahoe/Suburban Owner Manual (GMNA-Localizing-U.S./Canada/
Mexico-9955986) - 2017 - crc - 7/5/16
Driving and Operating 267
SeeTow/Haul Mode Light 0154 and
Hill and Mountain Roads 0243.
Also see “Tow/Haul Mode” under
Towing Equipment 0310.
Tow/Haul Mode Grade Braking
Tow/Haul Mode Grade Braking is
only enabled while the Tow/Haul
Mode is selected and the vehicle is
not in the Range Selection Mode.
See “Tow/Haul Mode” listed
previously and Manual Mode0265.
Tow/Haul Mode Grade Braking
assists in maintaining desired
vehicle speeds when driving on
downhill grades by using the engine
and transmission to slow the
vehicle. To disable or enable Tow/Haul
Grade Braking within the current
ignition key cycle, press and hold
the Tow/Haul button for
five seconds. When the button is
released, the requested mode
change is made. A DIC message is
displayed. See
Transmission
Messages 0175.
See Towing Equipment 0310.
For other forms of grade braking,
see Automatic Transmission 0262
and Cruise Control 0278.
Drive Systems
Four-Wheel Drive
If equipped, four-wheel drive
engages the front axle for extra
traction.
Caution
Do not drive on clean, dry
pavement in 4
mand 4n(if
equipped) for an extended period
of time. These conditions may
cause premature wear on the
vehicle’s powertrain.
Driving on clean, dry pavement in
4HI or 4LO may:
. Cause a vibration to be felt in
the steering system.
. Cause tires to wear faster.
. Make the transfer case harder to
shift, and cause it to run noisier.
Page 269 of 465
Chevrolet Tahoe/Suburban Owner Manual (GMNA-Localizing-U.S./Canada/
Mexico-9955986) - 2017 - crc - 7/5/16
268 Driving and Operating
{Warning
Shifting the transfer case to
N (Neutral) can cause the vehicle
to roll even if the transmission is
in P (Park). You or someone else
could be seriously injured. Be
sure to set the parking brake
before placing the transfer case in
N (Neutral). SeeParking
Brake 0273.
Caution
Extended high-speed operation in
4
nmay damage or shorten the
life of the drivetrain.
Engagement noise and bump when
shifting between 4
nand 4mor from
N (Neutral), with the engine running,
is normal.
Shifting into 4
nwill turn Traction
Control and StabiliTrak®off. See
Traction Control/Electronic Stability
Control 0274.
Two Speed Automatic
Transfer Case
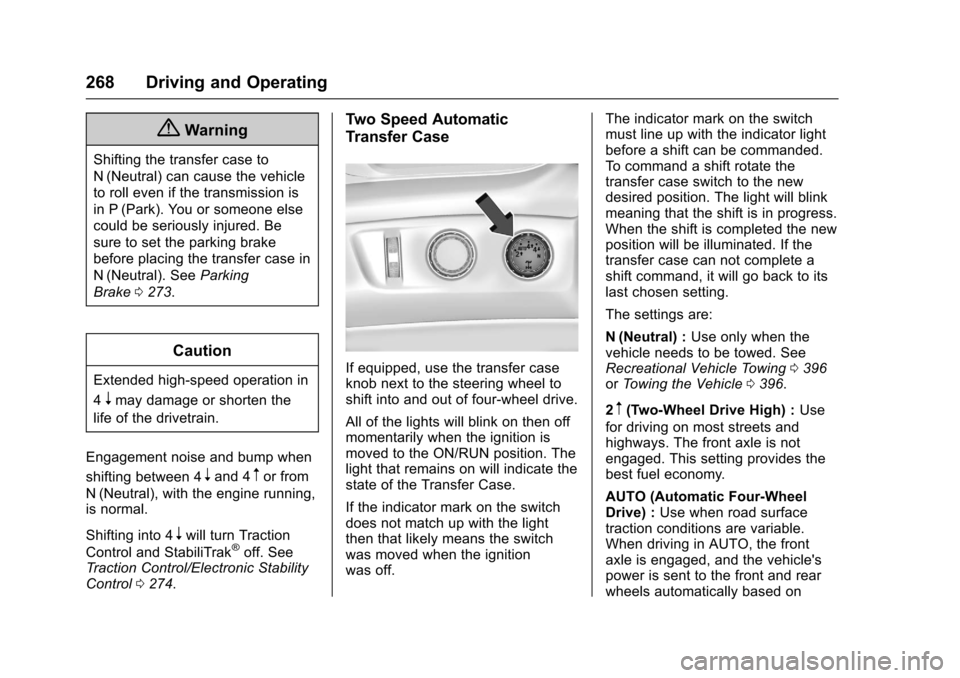
If equipped, use the transfer case
knob next to the steering wheel to
shift into and out of four-wheel drive.
All of the lights will blink on then off
momentarily when the ignition is
moved to the ON/RUN position. The
light that remains on will indicate the
state of the Transfer Case.
If the indicator mark on the switch
does not match up with the light
then that likely means the switch
was moved when the ignition
was off. The indicator mark on the switch
must line up with the indicator light
before a shift can be commanded.
To command a shift rotate the
transfer case switch to the new
desired position. The light will blink
meaning that the shift is in progress.
When the shift is completed the new
position will be illuminated. If the
transfer case can not complete a
shift command, it will go back to its
last chosen setting.
The settings are:
N (Neutral) :
Use only when the
vehicle needs to be towed. See
Recreational Vehicle Towing 0396
or Towing the Vehicle 0396.
2
m(Two-Wheel Drive High) : Use
for driving on most streets and
highways. The front axle is not
engaged. This setting provides the
best fuel economy.
AUTO (Automatic Four-Wheel
Drive) : Use when road surface
traction conditions are variable.
When driving in AUTO, the front
axle is engaged, and the vehicle's
power is sent to the front and rear
wheels automatically based on
Page 272 of 465
Chevrolet Tahoe/Suburban Owner Manual (GMNA-Localizing-U.S./Canada/
Mexico-9955986) - 2017 - crc - 7/5/16
Driving and Operating 271
4. Turn the transfer case knob tothe desired setting.
After the transfer case has
shifted out of N (Neutral), the
N (Neutral) light will go out.
5. Release the parking brake.
6. Start the engine and shift the transmission to the
desired gear.
Single Speed Automatic
Transfer Case
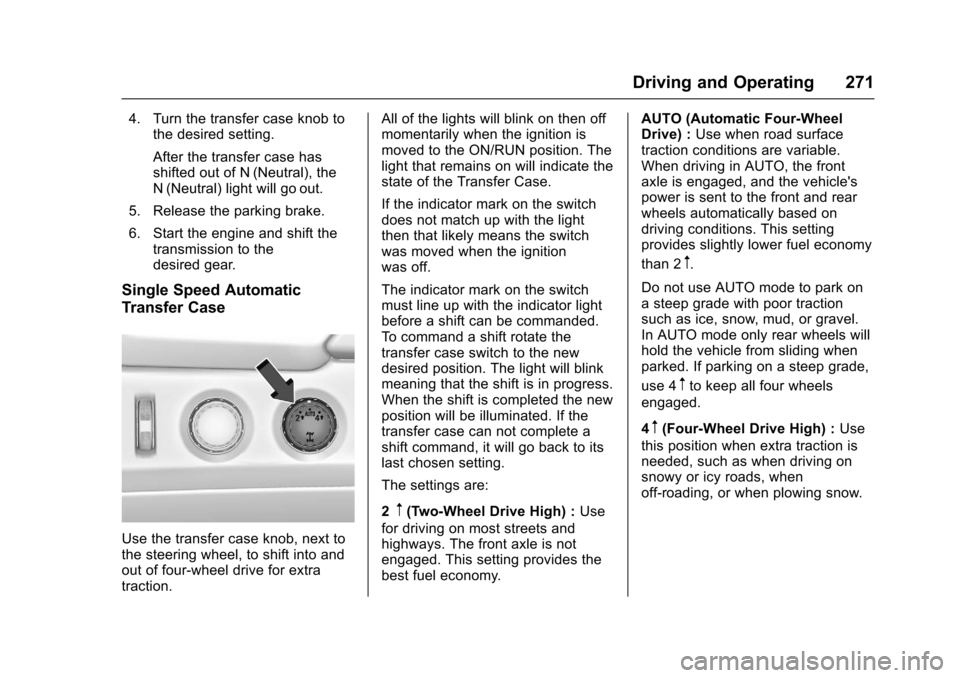
Use the transfer case knob, next to
the steering wheel, to shift into and
out of four-wheel drive for extra
traction. All of the lights will blink on then off
momentarily when the ignition is
moved to the ON/RUN position. The
light that remains on will indicate the
state of the Transfer Case.
If the indicator mark on the switch
does not match up with the light
then that likely means the switch
was moved when the ignition
was off.
The indicator mark on the switch
must line up with the indicator light
before a shift can be commanded.
To command a shift rotate the
transfer case switch to the new
desired position. The light will blink
meaning that the shift is in progress.
When the shift is completed the new
position will be illuminated. If the
transfer case can not complete a
shift command, it will go back to its
last chosen setting.
The settings are:
2
m(Two-Wheel Drive High) :
Use
for driving on most streets and
highways. The front axle is not
engaged. This setting provides the
best fuel economy. AUTO (Automatic Four-Wheel
Drive) :
Use when road surface
traction conditions are variable.
When driving in AUTO, the front
axle is engaged, and the vehicle's
power is sent to the front and rear
wheels automatically based on
driving conditions. This setting
provides slightly lower fuel economy
than 2
m.
Do not use AUTO mode to park on
a steep grade with poor traction
such as ice, snow, mud, or gravel.
In AUTO mode only rear wheels will
hold the vehicle from sliding when
parked. If parking on a steep grade,
use 4
mto keep all four wheels
engaged.
4
m(Four-Wheel Drive High) : Use
this position when extra traction is
needed, such as when driving on
snowy or icy roads, when
off-roading, or when plowing snow.
Page 274 of 465
Chevrolet Tahoe/Suburban Owner Manual (GMNA-Localizing-U.S./Canada/
Mexico-9955986) - 2017 - crc - 7/5/16
Driving and Operating 273
Using ABS
Do not pump the brakes. Just hold
the brake pedal down firmly and let
ABS work. You may hear the ABS
pump or motor operating and feel
the brake pedal pulsate. This is
normal.
Braking in Emergencies
ABS allows you to steer and brake
at the same time. In many
emergencies, steering can help
more than even the very best
braking.
Parking Brake
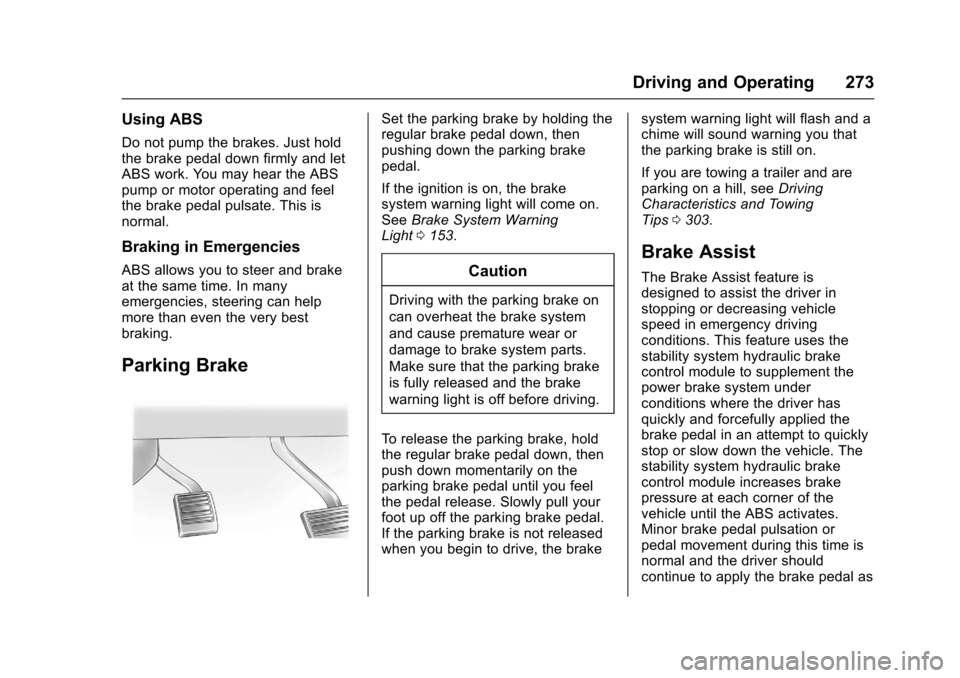
Set the parking brake by holding the
regular brake pedal down, then
pushing down the parking brake
pedal.
If the ignition is on, the brake
system warning light will come on.
SeeBrake System Warning
Light 0153.
Caution
Driving with the parking brake on
can overheat the brake system
and cause premature wear or
damage to brake system parts.
Make sure that the parking brake
is fully released and the brake
warning light is off before driving.
To release the parking brake, hold
the regular brake pedal down, then
push down momentarily on the
parking brake pedal until you feel
the pedal release. Slowly pull your
foot up off the parking brake pedal.
If the parking brake is not released
when you begin to drive, the brake system warning light will flash and a
chime will sound warning you that
the parking brake is still on.
If you are towing a trailer and are
parking on a hill, see
Driving
Characteristics and Towing
Tips 0303.
Brake Assist
The Brake Assist feature is
designed to assist the driver in
stopping or decreasing vehicle
speed in emergency driving
conditions. This feature uses the
stability system hydraulic brake
control module to supplement the
power brake system under
conditions where the driver has
quickly and forcefully applied the
brake pedal in an attempt to quickly
stop or slow down the vehicle. The
stability system hydraulic brake
control module increases brake
pressure at each corner of the
vehicle until the ABS activates.
Minor brake pedal pulsation or
pedal movement during this time is
normal and the driver should
continue to apply the brake pedal as
Page 315 of 465
Chevrolet Tahoe/Suburban Owner Manual (GMNA-Localizing-U.S./Canada/
Mexico-9955986) - 2017 - crc - 7/5/16
314 Driving and Operating
{Warning
Connecting a trailer that has an
air brake system may result in
reduced or complete loss of trailer
braking. There may be an
increase in stopping distance or
trailer instability which could
result in personal injury or
damage to the vehicle, trailer,
or other property. Use the ITBC
system only with electric or
electric over hydraulic trailer
brakes.Trailer Brake Control Panel
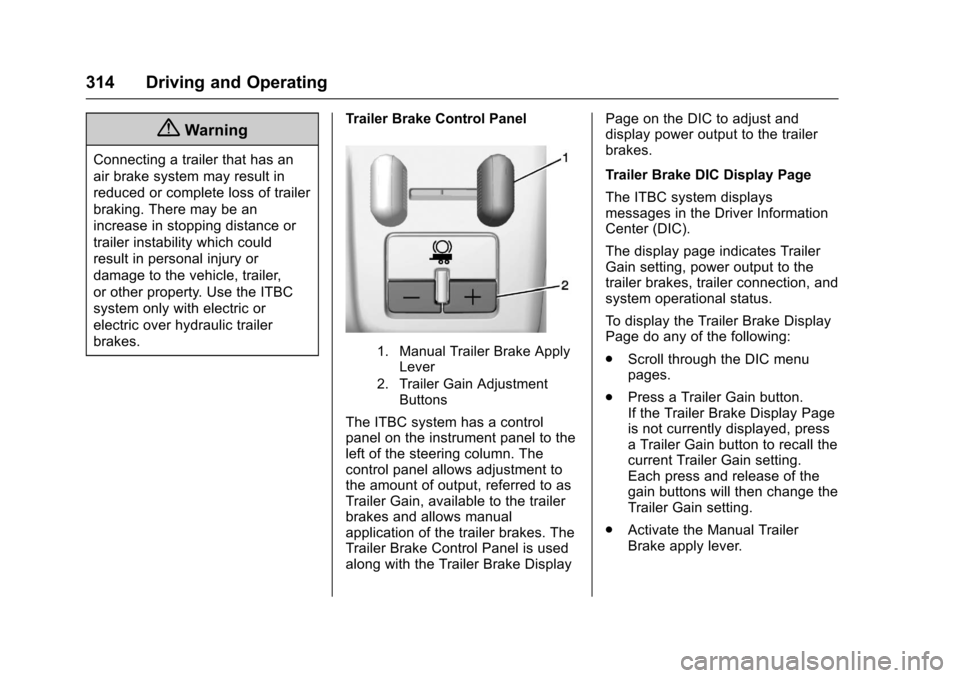
1. Manual Trailer Brake Apply
Lever
2. Trailer Gain Adjustment Buttons
The ITBC system has a control
panel on the instrument panel to the
left of the steering column. The
control panel allows adjustment to
the amount of output, referred to as
Trailer Gain, available to the trailer
brakes and allows manual
application of the trailer brakes. The
Trailer Brake Control Panel is used
along with the Trailer Brake Display Page on the DIC to adjust and
display power output to the trailer
brakes.
Trailer Brake DIC Display Page
The ITBC system displays
messages in the Driver Information
Center (DIC).
The display page indicates Trailer
Gain setting, power output to the
trailer brakes, trailer connection, and
system operational status.
To display the Trailer Brake Display
Page do any of the following:
.
Scroll through the DIC menu
pages.
. Press a Trailer Gain button.
If the Trailer Brake Display Page
is not currently displayed, press
a Trailer Gain button to recall the
current Trailer Gain setting.
Each press and release of the
gain buttons will then change the
Trailer Gain setting.
. Activate the Manual Trailer
Brake apply lever.
Page 320 of 465
Chevrolet Tahoe/Suburban Owner Manual (GMNA-Localizing-U.S./Canada/
Mexico-9955986) - 2017 - crc - 7/5/16
Vehicle Care 319
Vehicle Care
General Information
General Information . . . . . . . . . . 320
California Proposition65 Warning . . . . . . . . . . . . . . . . . 320
California Perchlorate Materials Requirements . . . . . 321
Accessories and Modifications . . . . . . . . . . . . . . . . 321
Vehicle Checks
Doing Your OwnService Work . . . . . . . . . . . . . . . 322
Hood . . . . . . . . . . . . . . . . . . . . . . . . . 322
Engine Compartment Overview . . . . . . . . . . . . . . . . . . . . 323
Engine Oil . . . . . . . . . . . . . . . . . . . . 325
Engine Oil Life System . . . . . . . 327
Automatic Transmission Fluid . . . . . . . . . . . . . . . . . . . . . . . . 328
Engine Air Cleaner/Filter . . . . . . 331
Cooling System . . . . . . . . . . . . . . 332
Engine Coolant . . . . . . . . . . . . . . . 333
Engine Overheating . . . . . . . . . . 336
Engine Fan . . . . . . . . . . . . . . . . . . . 337
Power Steering Fluid . . . . . . . . . 338
Washer Fluid . . . . . . . . . . . . . . . . . 338
Brakes . . . . . . . . . . . . . . . . . . . . . . . 338
Brake Fluid . . . . . . . . . . . . . . . . . . . 339 Battery - North America . . . . . . 340
Four-Wheel Drive . . . . . . . . . . . . . 341
Front Axle . . . . . . . . . . . . . . . . . . . . 341
Rear Axle . . . . . . . . . . . . . . . . . . . . 342
Noise Control System . . . . . . . . 343
Starter Switch Check . . . . . . . . . 344
Automatic Transmission Shift
Lock Control Function
Check . . . . . . . . . . . . . . . . . . . . . . . 344
Ignition Transmission Lock Check . . . . . . . . . . . . . . . . . . . . . . . 344
Park Brake and P (Park) Mechanism Check . . . . . . . . . . 345
Wiper Blade Replacement . . . . 345
Glass Replacement . . . . . . . . . . 346
Windshield Replacement . . . . . 346
Headlamp Aiming
Headlamp Aiming . . . . . . . . . . . . 347
Bulb Replacement
Bulb Replacement . . . . . . . . . . . . 347
Halogen Bulbs . . . . . . . . . . . . . . . . 347
High Intensity Discharge (HID) Lighting . . . . . . . . . . . . . . . . . . . . . 347
LED Lighting . . . . . . . . . . . . . . . . . 347
Headlamps . . . . . . . . . . . . . . . . . . . 348
Fog Lamps . . . . . . . . . . . . . . . . . . . 348
Front Turn Signal Lamps . . . . . 348 Taillamps, Turn Signal,
Stoplamps, and Back-Up
Lamps . . . . . . . . . . . . . . . . . . . . . . 349
License Plate Lamp . . . . . . . . . . 350
Replacement Bulbs . . . . . . . . . . . 351
Electrical System
Electrical System Overload . . . 351
Fuses . . . . . . . . . . . . . . . . . . . . . . . . 351
Engine Compartment Fuse Block . . . . . . . . . . . . . . . . . . . . . . . . 352
Instrument Panel Fuse Block (Left) . . . . . . . . . . . . . . . . . 356
Instrument Panel Fuse Block (Right) . . . . . . . . . . . . . . . . . . . . . . 359
Rear Compartment Fuse Block . . . . . . . . . . . . . . . . . . . . . . . . 361
Wheels and Tires
Tires . . . . . . . . . . . . . . . . . . . . . . . . . . 362
All-Season Tires . . . . . . . . . . . . . . 363
Winter Tires . . . . . . . . . . . . . . . . . . 363
Low-Profile Tires . . . . . . . . . . . . . 364
All-Terrain Tires . . . . . . . . . . . . . . . 364
Tire Sidewall Labeling . . . . . . . . 364
Tire Designations . . . . . . . . . . . . . 365
Tire Terminology and
Definitions . . . . . . . . . . . . . . . . . . 366
Tire Pressure . . . . . . . . . . . . . . . . . 369
Tire Pressure for High-Speed
Operation . . . . . . . . . . . . . . . . . . . 370
Page 339 of 465
Chevrolet Tahoe/Suburban Owner Manual (GMNA-Localizing-U.S./Canada/
Mexico-9955986) - 2017 - crc - 7/5/16
338 Vehicle Care
Power Steering Fluid
For a heavy-duty Suburban, see the
Suburban Heavy-Duty Package
supplement.
Washer Fluid
What to Use
When windshield washer fluid needs
to be added, be sure to read the
manufacturer's instructions before
use. Use a fluid that has sufficient
protection against freezing in an
area where the temperature may fall
below freezing.
Adding Washer Fluid
The vehicle has a low washer fluid
message on the DIC that comes on
when the washer fluid is low. The
message is displayed for
15 seconds at the start of each
ignition cycle. When the WASHER
FLUID LOW ADD FLUID message
displays, washer fluid will need to
be added to the windshield washer
fluid reservoir.
Open the cap with the washer
symbol on it. Add washer fluid until
the tank is full. SeeEngine
Compartment Overview 0323 for
reservoir location.
Caution
. Do not use washer fluid that
contains any type of water
repellent coating. This can
cause the wiper blades to
chatter or skip.
. Do not use engine coolant
(antifreeze) in the
windshield washer. It can
damage the windshield
washer system and paint.
. Do not mix water with
ready-to-use washer fluid.
Water can cause the
solution to freeze and
(Continued)
Caution (Continued)
damage the washer fluid
tank and other parts of the
washer system.
. When using concentrated
washer fluid, follow the
manufacturer instructions for
adding water.
. Fill the washer fluid tank
only three-quarters full when
it is very cold. This allows
for fluid expansion if
freezing occurs, which could
damage the tank if it is
completely full.
Brakes
Disc brake pads have built-in wear
indicators that make a high-pitched
warning sound when the brake pads
are worn and new pads are needed.
The sound can come and go or can
be heard all the time when the
vehicle is moving, except when
applying the brake pedal firmly.
Page 358 of 465
Chevrolet Tahoe/Suburban Owner Manual (GMNA-Localizing-U.S./Canada/
Mexico-9955986) - 2017 - crc - 7/5/16
Vehicle Care 357
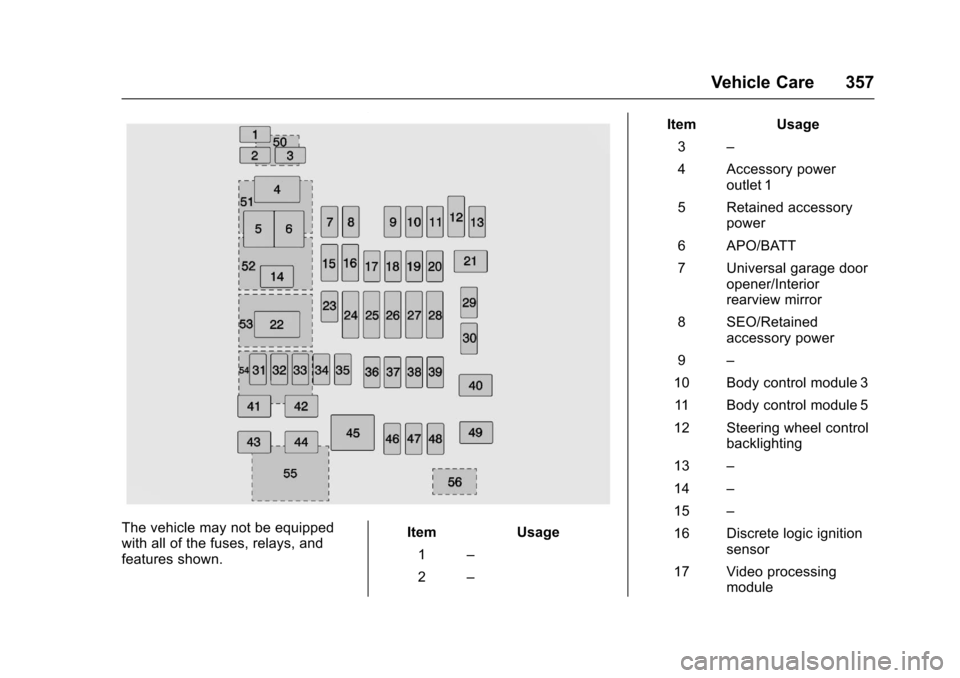
The vehicle may not be equipped
with all of the fuses, relays, and
features shown.Item Usage
1 –
2 – Item Usage
3 –
4 Accessory power outlet 1
5 Retained accessory power
6 APO/BATT
7 Universal garage door opener/Interior
rearview mirror
8 SEO/Retained accessory power
9 –
10 Body control module 3
11 Body control module 5
12 Steering wheel control backlighting
13 –
14 –
15 –
16 Discrete logic ignition sensor
17 Video processing module