2017 CHEVROLET SONIC wheel
[x] Cancel search: wheelPage 200 of 342
Chevrolet Sonic Owner Manual (GMNA-Localizing-U.S./Canada-10122660) -2017 - crc - 5/13/16
Driving and Operating 199
To t u r n T C S a n d S t a b i l i T r a k o n
again, press and releaseg.The
traction off lightiand StabiliTrak
OFF lightgin the instrument cluster
turn off.
Adding accessories can affect thevehicle performance. SeeAccessories andModifications0214.
Cruise Control
If the vehicle is equipped with cruisecontrol, a speed of about 40 km/h(25 mph) or more can be maintainedwithout keeping your foot on theaccelerator. Cruise control does notwork at speeds below 40 km/h(25 mph).
{Warning
Cruise control can be dangerous
where you cannot drive safely at
asteadyspeed.Donotuse
cruise control on winding roads or
in heavy traffic.
Cruise control can be dangerous
on slippery roads. On such roads,
fast changes in tire traction can
cause excessive wheel slip, and
you could lose control. Do not use
cruise control on slippery roads.
If the vehicle's Traction ControlSystem (TCS) or StabiliTrak systembegins to limit wheel spin whileusing cruise control, the cruisecontrol will automatically disengage.
SeeTr a c t i o n C o n t r o l / E l e c t r o n i cStability Control0197.Ifacollisionalert occurs when cruise control isactivated, cruise control isdisengaged. SeeForward CollisionAlert (FCA) System0204.Whenroad conditions allow you to safelyuse it again, the cruise control canbe turned back on.
If the brakes are applied, cruisecontrol disengages.
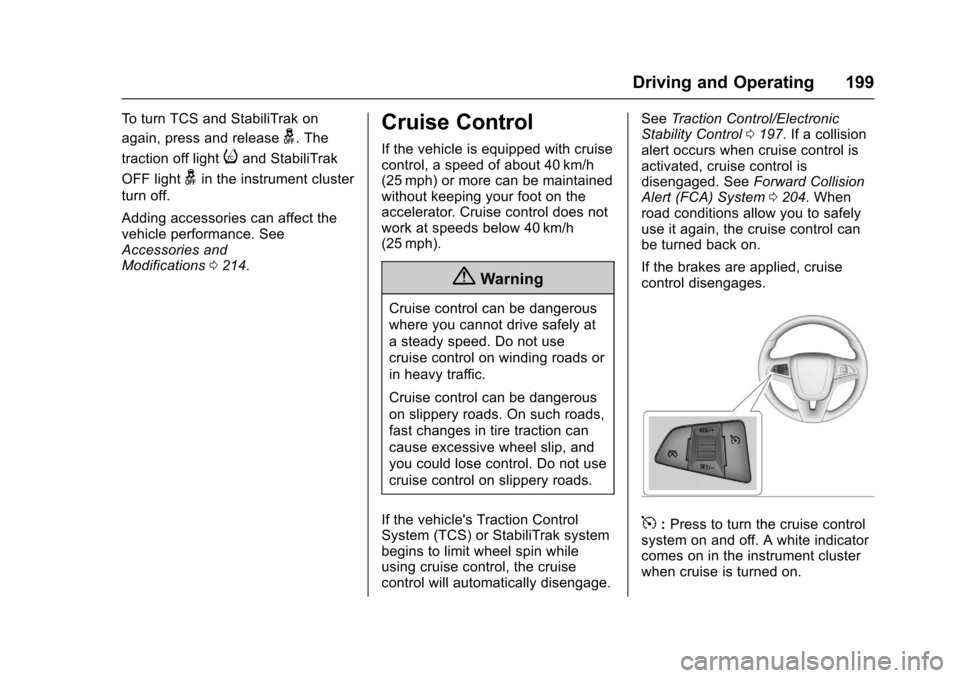
5:Press to turn the cruise controlsystem on and off. A white indicatorcomes on in the instrument clusterwhen cruise is turned on.
Page 201 of 342
Chevrolet Sonic Owner Manual (GMNA-Localizing-U.S./Canada-10122660) -2017 - crc - 5/13/16
200 Driving and Operating
RES/+ :If there is a set speed inmemory, move the thumbwheel upbriefly to resume to that speed orhold upward to accelerate. If cruisecontrol is already active, use toincrease vehicle speed.
SET/✓:Move the thumbwheel downbriefly to set the speed and activatecruise control. If cruise control isalready active, use to decreasespeed.
*:Press to disengage cruisecontrol without erasing the setspeed from memory.
Setting Cruise Control
If5is on when not in use, SET/- or
RES/+ could get bumped and gointo cruise when not desired. Keep5off when cruise control is notbeing used.
To s e t c r u i s e c o n t r o l :
1. Press5to turn the cruise
system on.
2. Get to the speed desired.
3. Move the thumbwheel down toSET/- and release it.
4. Take your foot off theaccelerator pedal.
The cruise control indicator on theinstrument cluster turns green aftercruise control has been set to thedesired speed. SeeInstrumentCluster0107.
Resuming a Set Speed
If the cruise control is set at adesired speed and then the brakesor clutch for manual transmissions
are applied or*is pressed, the
cruise control is disengaged withouterasing the set speed from memory.
Once the vehicle reaches about40 km/h (25 mph) or more, move thethumbwheel up toward RES/+briefly. The vehicle returns to theprevious set speed.
Increasing Speed While UsingCruise Control
If the cruise control system isalready activated:
.Move the thumbwheel up towardRES/+ and hold it until thedesired speed is reached, thenrelease it.
.To i n c r e a s e t h e v e h i c l e s p e e d i nsmall increments, move thethumbwheel up toward RES/+briefly and then release it. Foreach press, the vehicle goesabout 1.6 km/h (1 mph) faster.
The speedometer reading can bedisplayed in either English or metricunits. SeeDriver Information Center(DIC)0121.Theincrementvalueused depends on the unitsdisplayed.
Reducing Speed While UsingCruise Control
If the cruise control system isalready activated:
.Move the thumbwheel towardSET/✓and hold until the desiredlower speed is reached, thenrelease it.
.To d e c r e a s e t h e v e h i c l e s p e e d i nsmaller increments, move thethumbwheel toward SET/✓briefly. For each press, thevehicle goes about 1.6 km/h(1 mph) slower.
Page 202 of 342
Chevrolet Sonic Owner Manual (GMNA-Localizing-U.S./Canada-10122660) -2017 - crc - 5/13/16
Driving and Operating 201
The speedometer reading can bedisplayed in either English or metricunits. SeeDriver Information Center(DIC)0121.Theincrementvalueused depends on the unitsdisplayed.
Passing Another Vehicle WhileUsing Cruise Control
Use the accelerator pedal toincrease the vehicle speed. Whenyou take your foot off the pedal, thevehicle slows down to the previousset cruise control speed. Whilepressing the accelerator pedal orshortly following the release tooverride cruise control, brieflymoving the thumbwheel towardSET/- will result in cruise control setto the current vehicle speed.
Using Cruise Control on Hills
How well cruise control works onhills depends on the vehicle speed,load, and the steepness of the hills.When going up steep hills, youmight have to step on theaccelerator pedal to maintain thevehicle speed. When goingdownhill, you might have to brake orshift to a lower gear to keep your
speed down. If the brake pedal isapplied, cruise control willdisengage.
Ending Cruise Control
There are four ways to end cruisecontrol:
.To d i s e n g a g e c r u i s e c o n t r o l ,step lightly on the brake pedal orclutch for manual transmission.
.Press*.
.Shift the transmission toN(Neutral).
.To t u r n o f f c r u i s e c o n t r o l ,
press5.
Erasing Speed Memory
The cruise control set speed is
erased from memory if5is pressed
or if the ignition is turned off.
Driver Assistance
Systems
Rear Vision
Camera (RVC)
This vehicle may have the RVCsystem. Read this entire sectionbefore using it.
The RVC system can assist thedriver when backing up bydisplaying a view of the area behindthe vehicle.
{Warning
The camera(s) do not display
children, pedestrians, bicyclists,
crossing traffic, animals, or any
other object outside of the
cameras’field of view, below the
bumper, or under the vehicle.
Shown distances may be different
from actual distances. Do not
drive or park the vehicle using
only these camera(s). Always
check behind and around the
(Continued)
Page 206 of 342
Chevrolet Sonic Owner Manual (GMNA-Localizing-U.S./Canada-10122660) -2017 - crc - 5/13/16
Driving and Operating 205
Warning (Continued)
closely, FCA may not provide a
warning with enough time to help
avoid a crash. It also may not
provide any warning at all. FCA
does not warn of pedestrians,
animals, signs, guardrails,
bridges, construction barrels,
or other objects. Be ready to take
action and apply the brakes. See
Defensive Driving0172.
FCA can be disabled with the FCAsteering wheel control.
Detecting the Vehicle Ahead
FCA warnings will not occur unlessthe FCA system detects a vehicleahead. When a vehicle is detected,the vehicle ahead indicator willdisplay green. Vehicles may not be
detected on curves, highway exitramps, or hills, due to poor visibility;or if a vehicle ahead is partiallyblocked by pedestrians or otherobjects. FCA will not detect anothervehicle ahead until it is completelyin the driving lane.
{Warning
FCA does not provide a warning
to help avoid a crash, unless it
detects a vehicle. FCA may not
detect a vehicle ahead if the FCA
sensor is blocked by dirt, snow,
or ice, or if the windshield is
damaged. It may also not detect a
vehicle on winding or hilly roads,
or in conditions that can limit
visibility such as fog, rain,
or snow, or if the headlamps or
windshield are not cleaned or in
proper condition. Keep the
windshield, headlamps, and FCA
sensors clean and in good repair.
Collision Alert
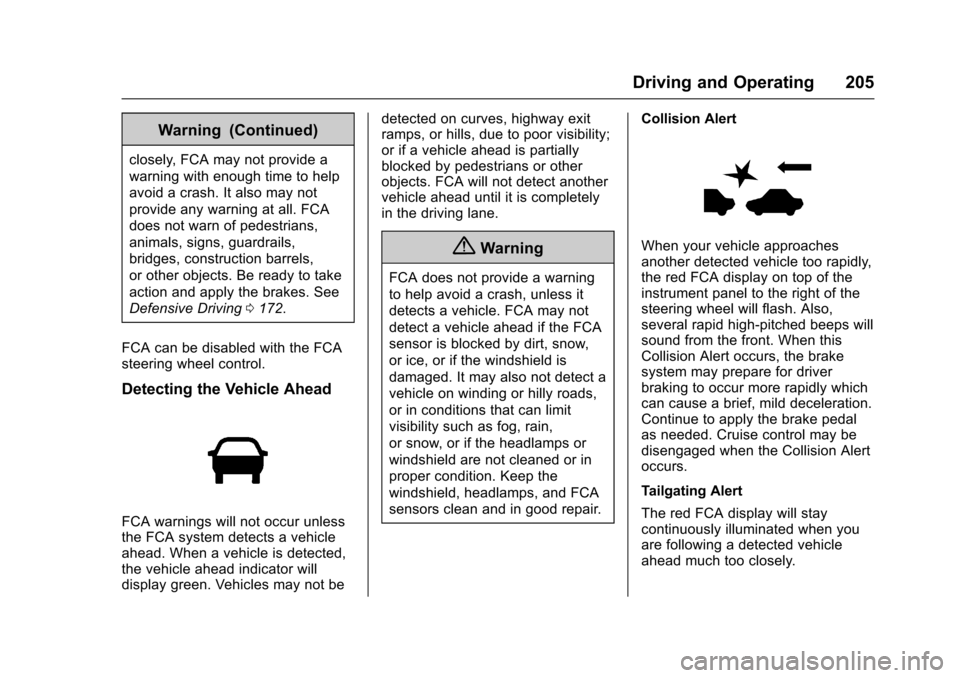
When your vehicle approachesanother detected vehicle too rapidly,the red FCA display on top of theinstrument panel to the right of thesteering wheel will flash. Also,several rapid high-pitched beeps willsound from the front. When thisCollision Alert occurs, the brakesystem may prepare for driverbraking to occur more rapidly whichcan cause a brief, mild deceleration.Continue to apply the brake pedalas needed. Cruise control may bedisengaged when the Collision Alertoccurs.
Tailgating Alert
The red FCA display will staycontinuously illuminated when youare following a detected vehicleahead much too closely.
Page 207 of 342
Chevrolet Sonic Owner Manual (GMNA-Localizing-U.S./Canada-10122660) -2017 - crc - 5/13/16
206 Driving and Operating
Selecting the Alert Timing
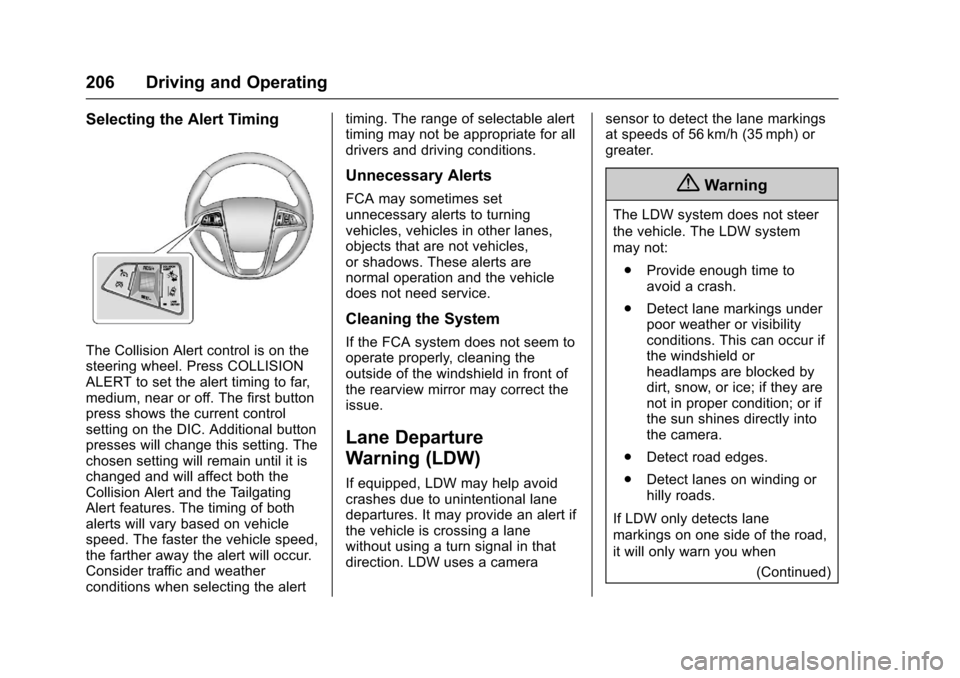
The Collision Alert control is on thesteering wheel. Press COLLISIONALERT to set the alert timing to far,medium, near or off. The first buttonpress shows the current controlsetting on the DIC. Additional buttonpresses will change this setting. Thechosen setting will remain until it ischanged and will affect both theCollision Alert and the TailgatingAlert features. The timing of bothalerts will vary based on vehiclespeed. The faster the vehicle speed,the farther away the alert will occur.Consider traffic and weatherconditions when selecting the alert
timing. The range of selectable alerttiming may not be appropriate for alldrivers and driving conditions.
Unnecessary Alerts
FCA may sometimes setunnecessary alerts to turningvehicles, vehicles in other lanes,objects that are not vehicles,or shadows. These alerts arenormal operation and the vehicledoes not need service.
Cleaning the System
If the FCA system does not seem tooperate properly, cleaning theoutside of the windshield in front ofthe rearview mirror may correct theissue.
Lane Departure
Warning (LDW)
If equipped, LDW may help avoidcrashes due to unintentional lanedepartures. It may provide an alert ifthe vehicle is crossing a lanewithout using a turn signal in thatdirection. LDW uses a camera
sensor to detect the lane markingsat speeds of 56 km/h (35 mph) orgreater.
{Warning
The LDW system does not steer
the vehicle. The LDW system
may not:
.Provide enough time toavoid a crash.
.Detect lane markings underpoor weather or visibilityconditions. This can occur ifthe windshield orheadlamps are blocked bydirt, snow, or ice; if they arenot in proper condition; or ifthe sun shines directly intothe camera.
.Detect road edges.
.Detect lanes on winding orhilly roads.
If LDW only detects lane
markings on one side of the road,
it will only warn you when
(Continued)
Page 213 of 342

Chevrolet Sonic Owner Manual (GMNA-Localizing-U.S./Canada-10122660) -2017 - crc - 5/13/16
212 Vehicle Care
Vehicle Care
General Information
General Information . . . . . . . . . . 213California Proposition65 Warning . . . . . . . . . . . . . . . . . 213California PerchlorateMaterials Requirements . . . . . 213Accessories andModifications . . . . . . . . . . . . . . . . 214
Vehicle Checks
Doing Your OwnService Work . . . . . . . . . . . . . . . 214Hood . . . . . . . . . . . . . . . . . . . . . . . . . 215Engine CompartmentOverview . . . . . . . . . . . . . . . . . . . . 217Engine Oil . . . . . . . . . . . . . . . . . . . . 220Engine Oil Life System . . . . . . . 222Automatic TransmissionFluid . . . . . . . . . . . . . . . . . . . . . . . . 223Manual Transmission Fluid . . . 224Hydraulic Clutch . . . . . . . . . . . . . . 224Engine Air Cleaner/Filter . . . . . . 224Cooling System . . . . . . . . . . . . . . 226Engine Coolant . . . . . . . . . . . . . . . 227Engine Overheating . . . . . . . . . . 230Washer Fluid . . . . . . . . . . . . . . . . . 231Brakes . . . . . . . . . . . . . . . . . . . . . . . 232Brake Fluid . . . . . . . . . . . . . . . . . . . 233
Battery - North America . . . . . . 234Starter Switch Check . . . . . . . . . 234Automatic Transmission ShiftLock Control FunctionCheck . . . . . . . . . . . . . . . . . . . . . . . 235Ignition Transmission LockCheck . . . . . . . . . . . . . . . . . . . . . . . 235Park Brake and P (Park)Mechanism Check . . . . . . . . . . 236Wiper Blade Replacement . . . . 236
Headlamp Aiming
Headlamp Aiming . . . . . . . . . . . . 237
Bulb Replacement
Bulb Replacement . . . . . . . . . . . . 238Halogen Bulbs . . . . . . . . . . . . . . . . 238Headlamps and Front TurnSignal . . . . . . . . . . . . . . . . . . . . . . . 238Fog Lamps . . . . . . . . . . . . . . . . . . . 239Ta i l l a m p s , T u r n S i g n a l ,Stoplamps, and Back-UpLamps . . . . . . . . . . . . . . . . . . . . . . 240License Plate Lamp . . . . . . . . . . 241Replacement Bulbs . . . . . . . . . . . 241
Electrical System
Electrical System Overload . . . 242Fuses and Circuit Breakers . . . 242Engine Compartment FuseBlock . . . . . . . . . . . . . . . . . . . . . . . . 243
Instrument Panel FuseBlock . . . . . . . . . . . . . . . . . . . . . . . . 246
Wheels and Tires
Tires . . . . . . . . . . . . . . . . . . . . . . . . . . 248All-Season Tires . . . . . . . . . . . . . . 249Winter Tires . . . . . . . . . . . . . . . . . . 249Summer Tires . . . . . . . . . . . . . . . . 250Tire Sidewall Labeling . . . . . . . . 250Tire Designations . . . . . . . . . . . . . 252Tire Terminology andDefinitions . . . . . . . . . . . . . . . . . . 253Tire Pressure . . . . . . . . . . . . . . . . . 256Tire Pressure MonitorSystem . . . . . . . . . . . . . . . . . . . . . . 257Tire Pressure MonitorOperation . . . . . . . . . . . . . . . . . . . 258Tire Inspection . . . . . . . . . . . . . . . . 260Tire Rotation . . . . . . . . . . . . . . . . . 261When It Is Time for NewTires . . . . . . . . . . . . . . . . . . . . . . . . 262Buying New Tires . . . . . . . . . . . . . 263Different Size Tires andWheels . . . . . . . . . . . . . . . . . . . . . . 264Uniform Tire QualityGrading . . . . . . . . . . . . . . . . . . . . . 264Wheel Alignment and TireBalance . . . . . . . . . . . . . . . . . . . . . 266Wheel Replacement . . . . . . . . . . 266Tire Chains . . . . . . . . . . . . . . . . . . . 267If a Tire Goes Flat . . . . . . . . . . . . 267
Page 233 of 342
Chevrolet Sonic Owner Manual (GMNA-Localizing-U.S./Canada-10122660) -2017 - crc - 5/13/16
232 Vehicle Care
Caution (Continued)
.Do not mix water withready-to-use washer fluid.Water can cause thesolution to freeze anddamage the washer fluidtank and other parts of thewasher system.
.When using concentratedwasher fluid, follow themanufacturer instructions foradding water.
.Fill the washer fluid tankonly three-quarters full whenit is very cold. This allowsfor fluid expansion iffreezing occurs, which coulddamage the tank if it iscompletely full.
Brakes
Disc brake pads have built-in wearindicators that make a high-pitchedwarning sound when the brake padsare worn and new pads are needed.The sound can come and go or can
be heard all the time when thevehicle is moving, except whenapplying the brake pedal firmly.
{Warning
The brake wear warning sound
means that soon the brakes will
not work well. That could lead to
acrash.Whenthebrakewear
warning sound is heard, have the
vehicle serviced.
Caution
Continuing to drive with worn-out
brake pads could result in costly
brake repair.
Some driving conditions or climatescan cause a brake squeal when thebrakes are first applied or lightlyapplied. This does not meansomething is wrong with the brakes.
Properly torqued wheel nuts arenecessary to help prevent brakepulsation. When tires are rotated,inspect brake pads for wear and
evenly tighten wheel nuts in theproper sequence to torquespecifications. SeeCapacities andSpecifications0304.
Brake pads should be replaced ascomplete sets.
Brake Pedal Travel
See your dealer if the brake pedaldoes not return to normal height,or if there is a rapid increase inpedal travel. This could be a signthat brake service may be required.
Replacing Brake System Parts
Always replace brake system partswith new, approved replacementparts. If this is not done, the brakesmay not work properly. The brakingperformance expected can changein many other ways if the wrongreplacement brake parts areinstalled or if parts are improperlyinstalled.
Page 240 of 342
Chevrolet Sonic Owner Manual (GMNA-Localizing-U.S./Canada-10122660) -2017 - crc - 5/13/16
Vehicle Care 239
8. Install the headlamp bulbaccess cover.
9. For the driver side bulb,replace the windshield washerbottle filler neck by turning itone-quarter turn clockwise intothe bottle.
Turn Signal Lamp
1. Open the hood. SeeHood0215.
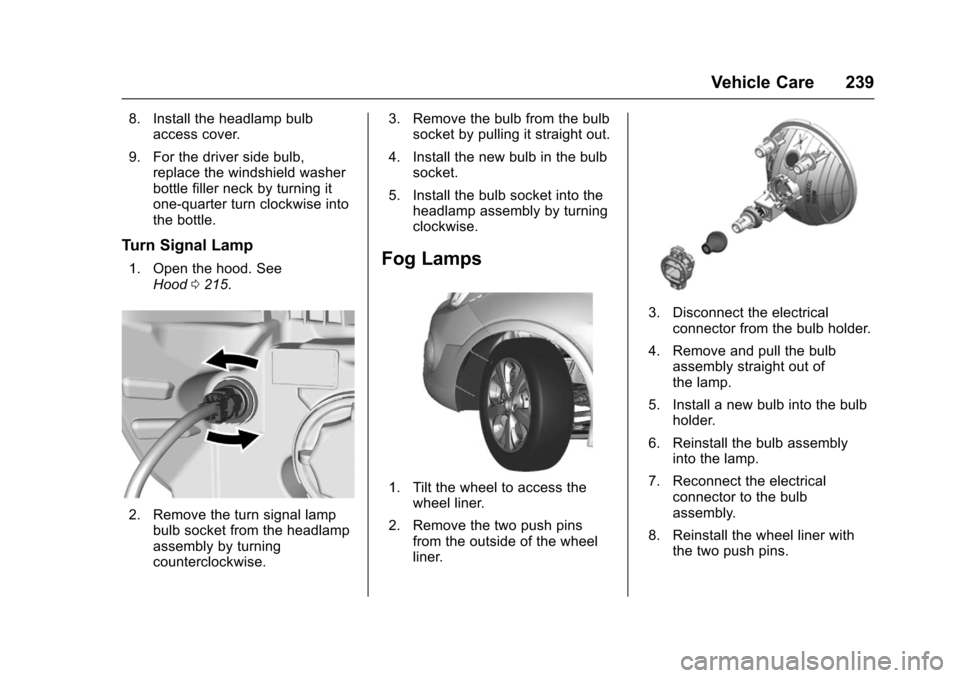
2. Remove the turn signal lampbulb socket from the headlampassembly by turningcounterclockwise.
3. Remove the bulb from the bulbsocket by pulling it straight out.
4. Install the new bulb in the bulbsocket.
5. Install the bulb socket into theheadlamp assembly by turningclockwise.
Fog Lamps
1. Tilt the wheel to access thewheel liner.
2. Remove the two push pinsfrom the outside of the wheelliner.
3. Disconnect the electricalconnector from the bulb holder.
4. Remove and pull the bulbassembly straight out ofthe lamp.
5. Install a new bulb into the bulbholder.
6. Reinstall the bulb assemblyinto the lamp.
7. Reconnect the electricalconnector to the bulbassembly.
8. Reinstall the wheel liner withthe two push pins.