2017 CHEVROLET SONIC headlamp
[x] Cancel search: headlampPage 207 of 342
Chevrolet Sonic Owner Manual (GMNA-Localizing-U.S./Canada-10122660) -2017 - crc - 5/13/16
206 Driving and Operating
Selecting the Alert Timing
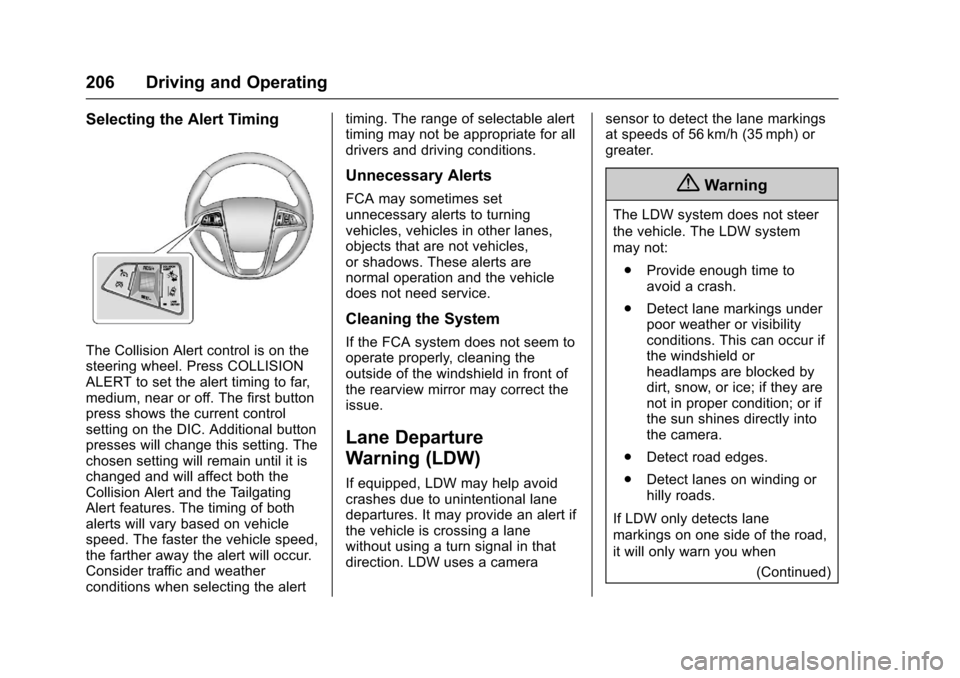
The Collision Alert control is on thesteering wheel. Press COLLISIONALERT to set the alert timing to far,medium, near or off. The first buttonpress shows the current controlsetting on the DIC. Additional buttonpresses will change this setting. Thechosen setting will remain until it ischanged and will affect both theCollision Alert and the TailgatingAlert features. The timing of bothalerts will vary based on vehiclespeed. The faster the vehicle speed,the farther away the alert will occur.Consider traffic and weatherconditions when selecting the alert
timing. The range of selectable alerttiming may not be appropriate for alldrivers and driving conditions.
Unnecessary Alerts
FCA may sometimes setunnecessary alerts to turningvehicles, vehicles in other lanes,objects that are not vehicles,or shadows. These alerts arenormal operation and the vehicledoes not need service.
Cleaning the System
If the FCA system does not seem tooperate properly, cleaning theoutside of the windshield in front ofthe rearview mirror may correct theissue.
Lane Departure
Warning (LDW)
If equipped, LDW may help avoidcrashes due to unintentional lanedepartures. It may provide an alert ifthe vehicle is crossing a lanewithout using a turn signal in thatdirection. LDW uses a camera
sensor to detect the lane markingsat speeds of 56 km/h (35 mph) orgreater.
{Warning
The LDW system does not steer
the vehicle. The LDW system
may not:
.Provide enough time toavoid a crash.
.Detect lane markings underpoor weather or visibilityconditions. This can occur ifthe windshield orheadlamps are blocked bydirt, snow, or ice; if they arenot in proper condition; or ifthe sun shines directly intothe camera.
.Detect road edges.
.Detect lanes on winding orhilly roads.
If LDW only detects lane
markings on one side of the road,
it will only warn you when
(Continued)
Page 208 of 342
Chevrolet Sonic Owner Manual (GMNA-Localizing-U.S./Canada-10122660) -2017 - crc - 5/13/16
Driving and Operating 207
Warning (Continued)
departing the lane on the side
where it has detected a lane
marking. Always keep your
attention on the road and
maintain proper vehicle position
within the lane, or vehicle
damage, injury, or death could
occur. Always keep the
windshield, headlamps, and
camera sensors clean and in
good repair. Do not use LDW in
bad weather conditions.
How the System Works
The LDW camera sensor is on thewindshield ahead of the rearviewmirror.
To t u r n L D W o n a n d o f f , p r e s s@on
the center console. The controlindicator will light when LDW is on.
When LDW is on,@is green if
LDW is available to warn of a lanedeparture. If the vehicle crosses adetected lane marking without using
the turn signal in that direction,@
changes to amber and flashes.Additionally, there will be threebeeps on the right or left, dependingon the lane departure direction.
When the System Does Not
Seem To Work Properly
The system may not detect lanes aswell when there are:
.Close vehicles ahead.
.Sudden lighting changes, suchas when driving through tunnels.
.Banked roads.
If the LDW system is not functioningproperly when lane markings areclearly visible, cleaning thewindshield may help.
LDW alerts may occur due to tarmarks, shadows, cracks in the road,temporary or construction lanemarkings, or other roadimperfections. This is normal systemoperation; the vehicle does not needservice. Turn LDW off if theseconditions continue.
Fuel
GM recommends the use of TOPTIER Detergent Gasoline®to keepthe engine cleaner and reduceengine deposits. Seewww.toptiergas.com for a list of TOPTIER Detergent Gasoline marketersand applicable countries.
Do not use any fuel labeled E85 orFlexFuel. Do not use gasoline withethanol levels greater than 15% byvolume.
Use regular unleaded gasolinemeeting ASTM specification D4814with a posted octane rating of 87 orhigher. Do not use gasoline with a
Page 213 of 342

Chevrolet Sonic Owner Manual (GMNA-Localizing-U.S./Canada-10122660) -2017 - crc - 5/13/16
212 Vehicle Care
Vehicle Care
General Information
General Information . . . . . . . . . . 213California Proposition65 Warning . . . . . . . . . . . . . . . . . 213California PerchlorateMaterials Requirements . . . . . 213Accessories andModifications . . . . . . . . . . . . . . . . 214
Vehicle Checks
Doing Your OwnService Work . . . . . . . . . . . . . . . 214Hood . . . . . . . . . . . . . . . . . . . . . . . . . 215Engine CompartmentOverview . . . . . . . . . . . . . . . . . . . . 217Engine Oil . . . . . . . . . . . . . . . . . . . . 220Engine Oil Life System . . . . . . . 222Automatic TransmissionFluid . . . . . . . . . . . . . . . . . . . . . . . . 223Manual Transmission Fluid . . . 224Hydraulic Clutch . . . . . . . . . . . . . . 224Engine Air Cleaner/Filter . . . . . . 224Cooling System . . . . . . . . . . . . . . 226Engine Coolant . . . . . . . . . . . . . . . 227Engine Overheating . . . . . . . . . . 230Washer Fluid . . . . . . . . . . . . . . . . . 231Brakes . . . . . . . . . . . . . . . . . . . . . . . 232Brake Fluid . . . . . . . . . . . . . . . . . . . 233
Battery - North America . . . . . . 234Starter Switch Check . . . . . . . . . 234Automatic Transmission ShiftLock Control FunctionCheck . . . . . . . . . . . . . . . . . . . . . . . 235Ignition Transmission LockCheck . . . . . . . . . . . . . . . . . . . . . . . 235Park Brake and P (Park)Mechanism Check . . . . . . . . . . 236Wiper Blade Replacement . . . . 236
Headlamp Aiming
Headlamp Aiming . . . . . . . . . . . . 237
Bulb Replacement
Bulb Replacement . . . . . . . . . . . . 238Halogen Bulbs . . . . . . . . . . . . . . . . 238Headlamps and Front TurnSignal . . . . . . . . . . . . . . . . . . . . . . . 238Fog Lamps . . . . . . . . . . . . . . . . . . . 239Ta i l l a m p s , T u r n S i g n a l ,Stoplamps, and Back-UpLamps . . . . . . . . . . . . . . . . . . . . . . 240License Plate Lamp . . . . . . . . . . 241Replacement Bulbs . . . . . . . . . . . 241
Electrical System
Electrical System Overload . . . 242Fuses and Circuit Breakers . . . 242Engine Compartment FuseBlock . . . . . . . . . . . . . . . . . . . . . . . . 243
Instrument Panel FuseBlock . . . . . . . . . . . . . . . . . . . . . . . . 246
Wheels and Tires
Tires . . . . . . . . . . . . . . . . . . . . . . . . . . 248All-Season Tires . . . . . . . . . . . . . . 249Winter Tires . . . . . . . . . . . . . . . . . . 249Summer Tires . . . . . . . . . . . . . . . . 250Tire Sidewall Labeling . . . . . . . . 250Tire Designations . . . . . . . . . . . . . 252Tire Terminology andDefinitions . . . . . . . . . . . . . . . . . . 253Tire Pressure . . . . . . . . . . . . . . . . . 256Tire Pressure MonitorSystem . . . . . . . . . . . . . . . . . . . . . . 257Tire Pressure MonitorOperation . . . . . . . . . . . . . . . . . . . 258Tire Inspection . . . . . . . . . . . . . . . . 260Tire Rotation . . . . . . . . . . . . . . . . . 261When It Is Time for NewTires . . . . . . . . . . . . . . . . . . . . . . . . 262Buying New Tires . . . . . . . . . . . . . 263Different Size Tires andWheels . . . . . . . . . . . . . . . . . . . . . . 264Uniform Tire QualityGrading . . . . . . . . . . . . . . . . . . . . . 264Wheel Alignment and TireBalance . . . . . . . . . . . . . . . . . . . . . 266Wheel Replacement . . . . . . . . . . 266Tire Chains . . . . . . . . . . . . . . . . . . . 267If a Tire Goes Flat . . . . . . . . . . . . 267
Page 238 of 342
Chevrolet Sonic Owner Manual (GMNA-Localizing-U.S./Canada-10122660) -2017 - crc - 5/13/16
Vehicle Care 237
3. Install the new blade onto thearm and make sure the tabsare fully set in the lockedposition.
4. Repeat the steps for the otherwiper.
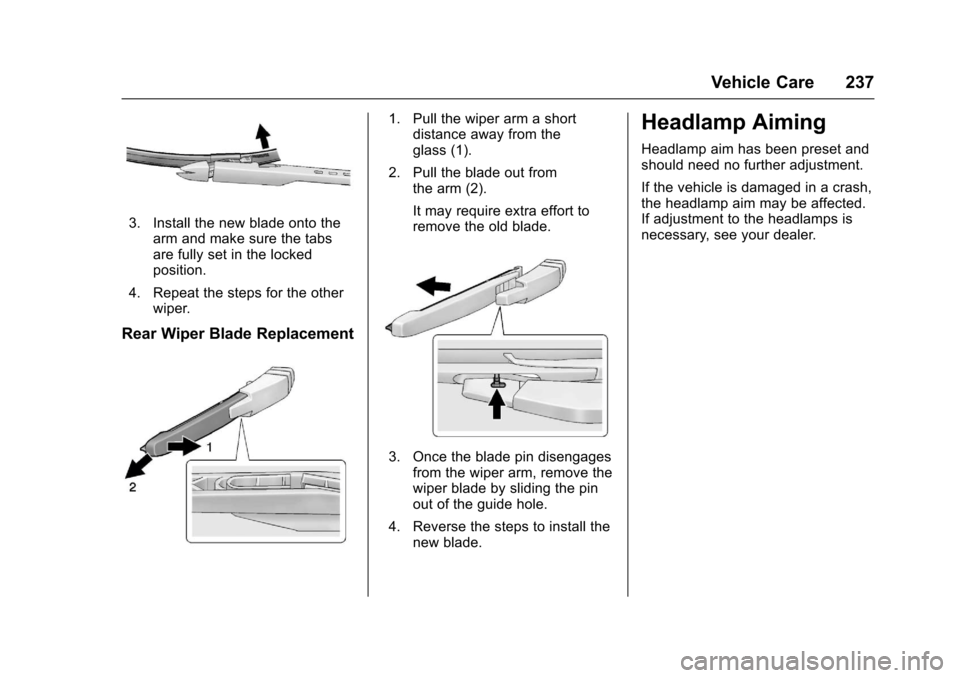
Rear Wiper Blade Replacement
1. Pull the wiper arm a shortdistance away from theglass (1).
2. Pull the blade out fromthe arm (2).
It may require extra effort toremove the old blade.
3. Once the blade pin disengagesfrom the wiper arm, remove thewiper blade by sliding the pinout of the guide hole.
4. Reverse the steps to install thenew blade.
Headlamp Aiming
Headlamp aim has been preset andshould need no further adjustment.
If the vehicle is damaged in a crash,the headlamp aim may be affected.If adjustment to the headlamps isnecessary, see your dealer.
Page 239 of 342
Chevrolet Sonic Owner Manual (GMNA-Localizing-U.S./Canada-10122660) -2017 - crc - 5/13/16
238 Vehicle Care
Bulb Replacement
For the proper type of replacementbulbs, seeReplacementBulbs0241.
For any bulb-changing procedurenot listed in this section, contactyour dealer.
Halogen Bulbs
{Warning
Halogen bulbs have pressurized
gas inside and can burst if you
drop or scratch the bulb. You or
others could be injured. Be sure
to read and follow the instructions
on the bulb package.
Headlamps and Front
Turn Signal
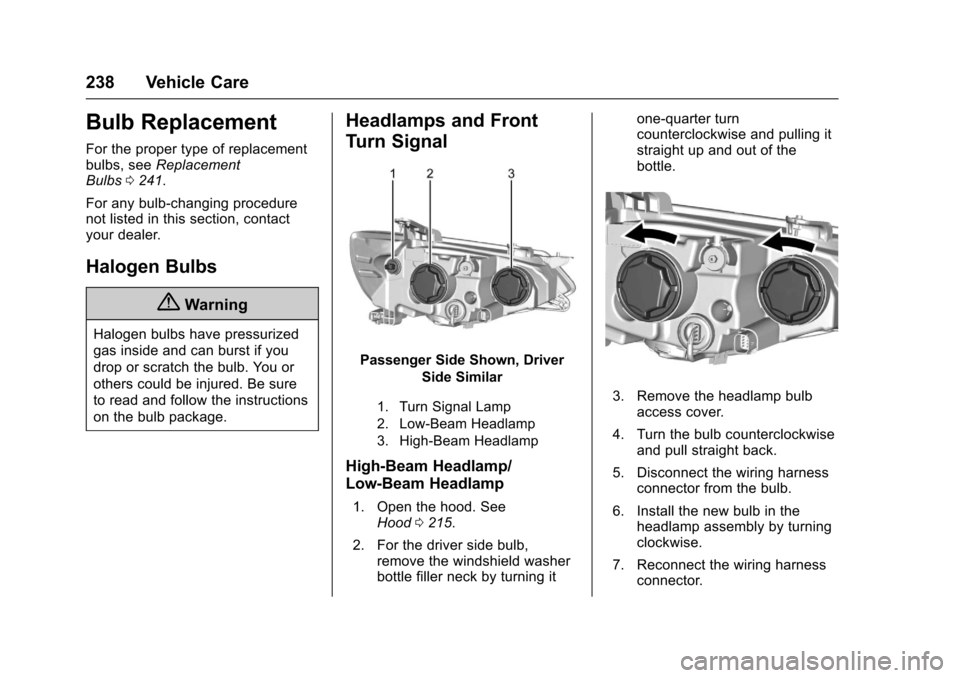
Passenger Side Shown, Driver
Side Similar
1. Turn Signal Lamp
2. Low-Beam Headlamp
3. High-Beam Headlamp
High-Beam Headlamp/
Low-Beam Headlamp
1. Open the hood. SeeHood0215.
2. For the driver side bulb,remove the windshield washerbottle filler neck by turning it
one-quarter turncounterclockwise and pulling itstraight up and out of thebottle.
3. Remove the headlamp bulbaccess cover.
4. Turn the bulb counterclockwiseand pull straight back.
5. Disconnect the wiring harnessconnector from the bulb.
6. Install the new bulb in theheadlamp assembly by turningclockwise.
7. Reconnect the wiring harnessconnector.
Page 240 of 342
Chevrolet Sonic Owner Manual (GMNA-Localizing-U.S./Canada-10122660) -2017 - crc - 5/13/16
Vehicle Care 239
8. Install the headlamp bulbaccess cover.
9. For the driver side bulb,replace the windshield washerbottle filler neck by turning itone-quarter turn clockwise intothe bottle.
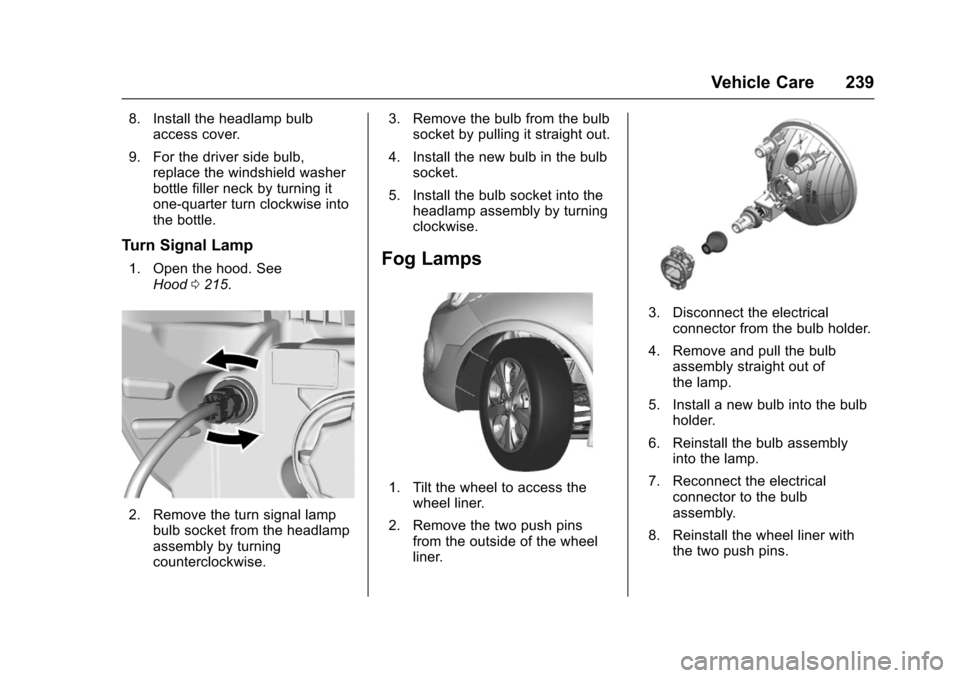
Turn Signal Lamp
1. Open the hood. SeeHood0215.
2. Remove the turn signal lampbulb socket from the headlampassembly by turningcounterclockwise.
3. Remove the bulb from the bulbsocket by pulling it straight out.
4. Install the new bulb in the bulbsocket.
5. Install the bulb socket into theheadlamp assembly by turningclockwise.
Fog Lamps
1. Tilt the wheel to access thewheel liner.
2. Remove the two push pinsfrom the outside of the wheelliner.
3. Disconnect the electricalconnector from the bulb holder.
4. Remove and pull the bulbassembly straight out ofthe lamp.
5. Install a new bulb into the bulbholder.
6. Reinstall the bulb assemblyinto the lamp.
7. Reconnect the electricalconnector to the bulbassembly.
8. Reinstall the wheel liner withthe two push pins.
Page 242 of 342
Chevrolet Sonic Owner Manual (GMNA-Localizing-U.S./Canada-10122660) -2017 - crc - 5/13/16
Vehicle Care 241
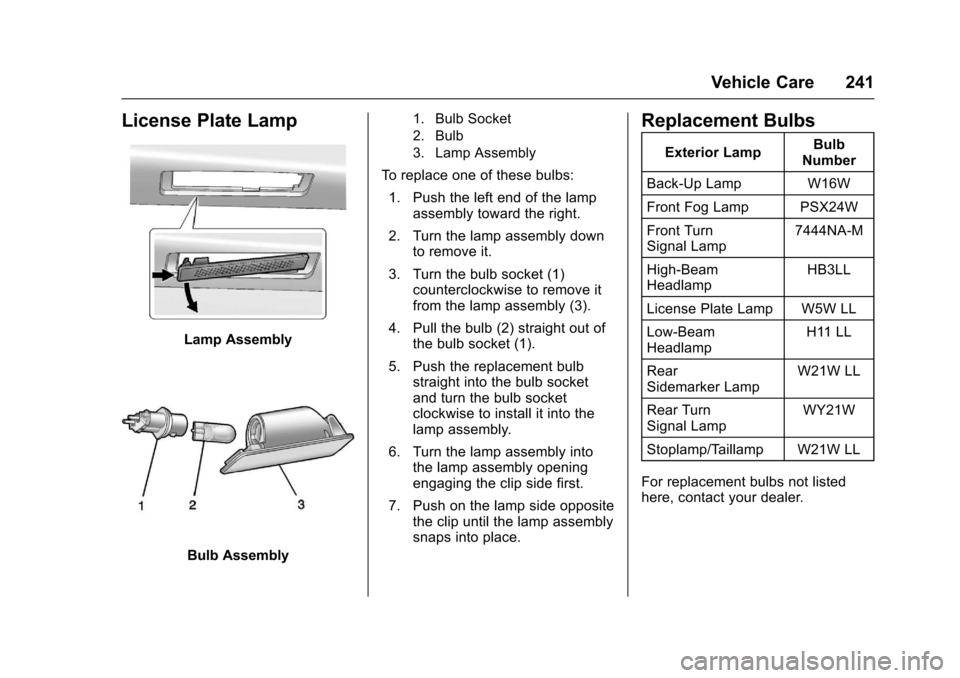
License Plate Lamp
Lamp Assembly
Bulb Assembly
1. Bulb Socket
2. Bulb
3. Lamp Assembly
To r e p l a c e o n e o f t h e s e b u l b s :
1. Push the left end of the lampassembly toward the right.
2. Turn the lamp assembly downto remove it.
3. Turn the bulb socket (1)counterclockwise to remove itfrom the lamp assembly (3).
4. Pull the bulb (2) straight out ofthe bulb socket (1).
5. Push the replacement bulbstraight into the bulb socketand turn the bulb socketclockwise to install it into thelamp assembly.
6. Turn the lamp assembly intothe lamp assembly openingengaging the clip side first.
7. Push on the lamp side oppositethe clip until the lamp assemblysnaps into place.
Replacement Bulbs
Exterior LampBulbNumber
Back-Up Lamp W16W
Front Fog Lamp PSX24W
Front TurnSignal Lamp7444NA-M
High-BeamHeadlampHB3LL
License Plate Lamp W5W LL
Low-BeamHeadlampH11 LL
RearSidemarker LampW21W LL
Rear TurnSignal LampWY21W
Stoplamp/Taillamp W21W LL
For replacement bulbs not listedhere, contact your dealer.
Page 243 of 342

Chevrolet Sonic Owner Manual (GMNA-Localizing-U.S./Canada-10122660) -2017 - crc - 5/13/16
242 Vehicle Care
Electrical System
Electrical System
Overload
The vehicle has fuses and circuitbreakers to protect against anelectrical system overload.
When the current electrical load istoo heavy, the circuit breaker opensand closes, protecting the circuituntil the current load returns tonormal or the problem is fixed. Thisgreatly reduces the chance of circuitoverload and fire caused byelectrical problems.
Fuses and circuit breakers protectpower devices in the vehicle.
Replace a bad fuse with a new oneof the identical size and rating.
If there is a problem on the road andafuseneedstobereplaced,thesame amperage fuse can beborrowed. Choose some feature ofthe vehicle that is not needed to useand replace it as soon as possible.
Headlamp Wiring
An electrical overload may causethe lamps to go on and off, or insome cases to remain off. Have theheadlamp wiring checked right awayif the lamps go on and off orremain off.
Windshield Wipers
If the wiper motor overheats due toheavy snow or ice, the windshieldwipers will stop until the motor coolsand will then restart.
Although the circuit is protectedfrom electrical overload, overloaddue to heavy snow or ice maycause wiper linkage damage.Always clear ice and heavy snowfrom the windshield before using thewindshield wipers.
If the overload is caused by anelectrical problem and not snow orice, be sure to get it fixed.
Fuses and Circuit
Breakers
The wiring circuits in the vehicle areprotected from short circuits by acombination of fuses, circuitbreakers, and fusible thermal links.This greatly reduces the chance offires caused by electrical problems.
Look at the silver-colored bandinside the fuse. If the band is brokenor melted, replace the fuse. Be sureyou replace a bad fuse with a newone of the identical size and rating.