2017 CHEVROLET ORLANDO warning light
[x] Cancel search: warning lightPage 207 of 372
Black plate (27,1)Chevrolet Orlando Owner Manual - 2013 - CRC - 6/5/12
Driving and Operating 9-27
Parking Brake
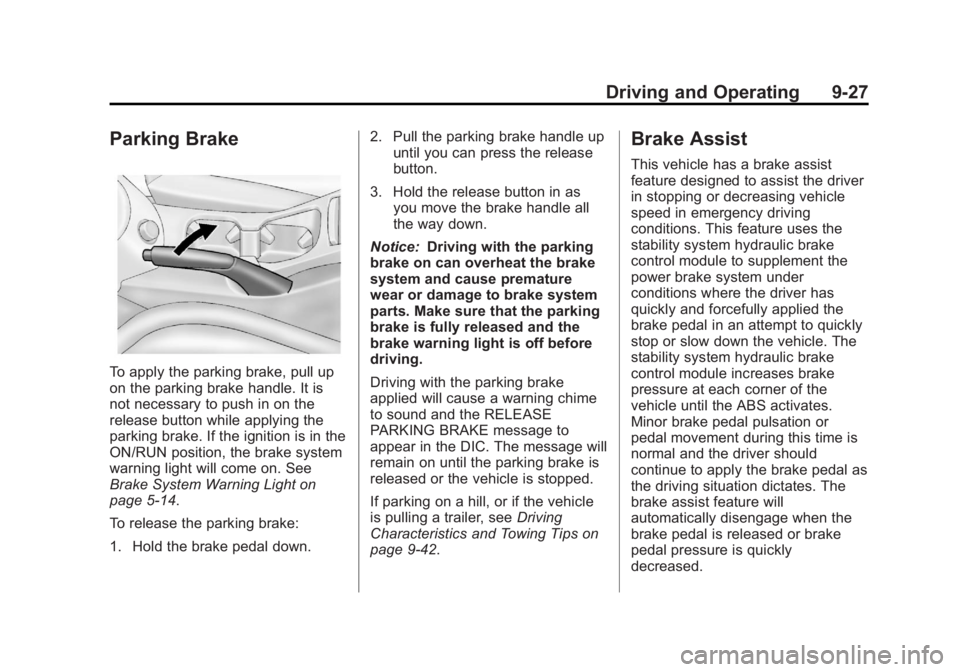
To apply the parking brake, pull up
on the parking brake handle. It is
not necessary to push in on the
release button while applying the
parking brake. If the ignition is in the
ON/RUN position, the brake system
warning light will come on. See
Brake System Warning Light on
page 5‑14.
To release the parking brake:
1. Hold the brake pedal down.2. Pull the parking brake handle up
until you can press the release
button.
3. Hold the release button in as you move the brake handle all
the way down.
Notice: Driving with the parking
brake on can overheat the brake
system and cause premature
wear or damage to brake system
parts. Make sure that the parking
brake is fully released and the
brake warning light is off before
driving.
Driving with the parking brake
applied will cause a warning chime
to sound and the RELEASE
PARKING BRAKE message to
appear in the DIC. The message will
remain on until the parking brake is
released or the vehicle is stopped.
If parking on a hill, or if the vehicle
is pulling a trailer, see Driving
Characteristics and Towing Tips on
page 9‑42.
Brake Assist
This vehicle has a brake assist
feature designed to assist the driver
in stopping or decreasing vehicle
speed in emergency driving
conditions. This feature uses the
stability system hydraulic brake
control module to supplement the
power brake system under
conditions where the driver has
quickly and forcefully applied the
brake pedal in an attempt to quickly
stop or slow down the vehicle. The
stability system hydraulic brake
control module increases brake
pressure at each corner of the
vehicle until the ABS activates.
Minor brake pedal pulsation or
pedal movement during this time is
normal and the driver should
continue to apply the brake pedal as
the driving situation dictates. The
brake assist feature will
automatically disengage when the
brake pedal is released or brake
pedal pressure is quickly
decreased.
Page 213 of 372

Black plate (33,1)Chevrolet Orlando Owner Manual - 2013 - CRC - 6/5/12
Driving and Operating 9-33
Ending Cruise Control
There are three ways to end cruise
control:
.To disengage cruise control,
step lightly on the brake pedal or
clutch for a manual transmission.
.Press*on the steering wheel.
.To turn off cruise control, press1on the steering wheel.
Erasing Speed Memory
The cruise control set speed is
erased from memory if
1is pressed
or if the ignition is turned off.
Object Detection
Systems
Ultrasonic Parking Assist
For vehicles with the Ultrasonic
Rear Parking Assist (URPA) system,
it assists the driver with parking and
avoiding objects while in
R (Reverse). URPA operates at
speeds less than 8 km/h (5 mph),
and the sensors on the rear bumper
detect objects up to 2.5 m (8 ft)
behind the vehicle, and at least
20 cm (8 in) off the ground.
{WARNING
The URPA system does not
detect children, pedestrians,
bicyclists, animals, or objects
below the bumper or that are too
close or too far from the vehicle.
It is not available at speeds
greater than 8 km/h (5 mph). To
prevent injury, death, or vehicle
(Continued)
WARNING (Continued)
damage, even with URPA, always
check the area around the vehicle
and check all mirrors before
backing.
How the System Works
URPA comes on automatically when
the shift lever is moved into
R (Reverse). A single tone sounds
to indicate the system is working.
URPA operates only at speeds less
than 8 km/h (5 mph).
An obstacle is indicated by audible
beeps. The interval between the
beeps becomes shorter as the
vehicle gets closer to the obstacle.
When the distance is less than
30 cm (12 in) the beeping is a
continuous tone for five seconds.
Page 221 of 372
Black plate (41,1)Chevrolet Orlando Owner Manual - 2013 - CRC - 6/5/12
Driving and Operating 9-41
The tethered fuel cap is behind the
fuel door on the vehicle's passenger
side. Turn the fuel cap
counterclockwise to remove. While
refueling, hang the tethered fuel cap
from the disk on the end of the fuel
cap to the mating feature on the fuel
door hinge. Reinstall the cap by
turning it clockwise until it clicks.
Do not top off or overfill the tank.
Wait a few seconds before removing
the nozzle. Clean fuel from painted
surfaces as soon as possible. See
Exterior Care on page 10‑78.
{WARNING
If a fire starts while you are
refueling, do not remove the
nozzle. Shut off the flow of fuel by
shutting off the pump or by
notifying the station attendant.
Leave the area immediately.Notice:
If a new fuel cap is
needed, be sure to get the right
type of cap from your dealer. The
wrong type of fuel cap might not
fit properly, might cause the
malfunction indicator lamp to
light, and could damage the fuel
tank and emissions system. See
Malfunction Indicator Lamp on
page 5‑12.
Filling a Portable Fuel
Container
{WARNING
Filling a portable fuel container
while it is in the vehicle can cause
fuel vapors that can ignite either
by static electricity or other
means. You or others could be
badly burned and the vehicle
could be damaged. Always:
.Use approved fuel
containers.
(Continued)
WARNING (Continued)
.Remove container from
vehicle, trunk, or pickup bed
before filling.
.Place container on the
ground.
.Place the nozzle inside the fill
opening of the container
before dispensing fuel, and
keep it in contact with the fill
opening until filling is
complete.
.Do not smoke while
pumping fuel.
Page 240 of 372
Black plate (12,1)Chevrolet Orlando Owner Manual - 2013 - CRC - 6/5/12
10-12 Vehicle Care
How to Inspect the Engine Air
Cleaner/Filter
To inspect the air cleaner/filter,
remove the filter from the vehicle
and lightly shake the filter to release
loose dust and dirt. If the filter
remains covered with dirt, a new
filter is required.
To inspect or replace the engine air
cleaner/filter:
1. Open the hood. SeeHood on
page 10‑4.
2. Locate the air filter housing on the passenger side of the engine
compartment. See Engine
Compartment Overview on
page 10‑6.
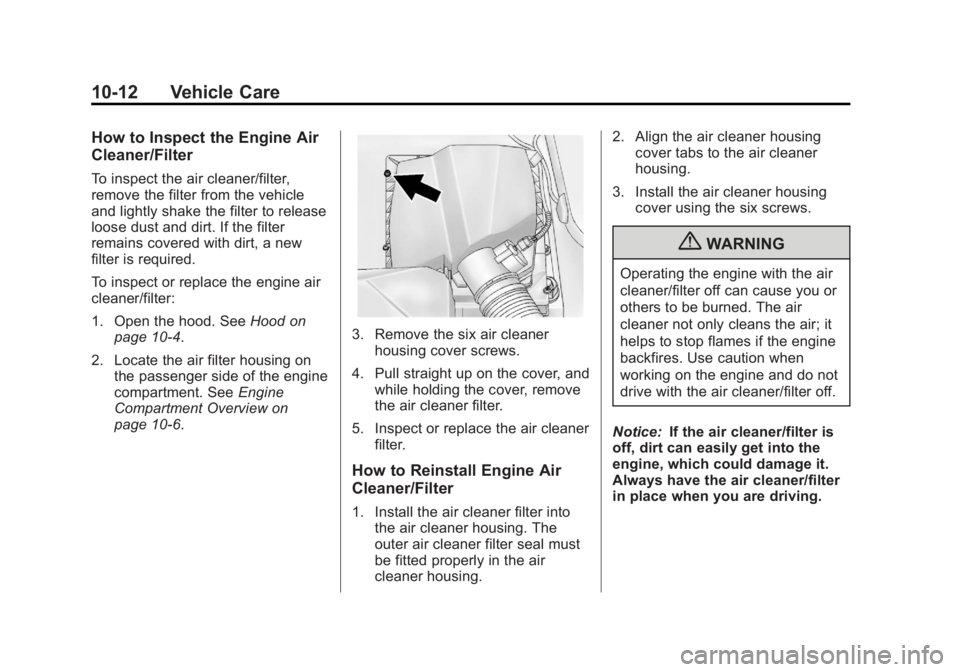
3. Remove the six air cleaner housing cover screws.
4. Pull straight up on the cover, and while holding the cover, remove
the air cleaner filter.
5. Inspect or replace the air cleaner filter.
How to Reinstall Engine Air
Cleaner/Filter
1. Install the air cleaner filter intothe air cleaner housing. The
outer air cleaner filter seal must
be fitted properly in the air
cleaner housing. 2. Align the air cleaner housing
cover tabs to the air cleaner
housing.
3. Install the air cleaner housing cover using the six screws.
{WARNING
Operating the engine with the air
cleaner/filter off can cause you or
others to be burned. The air
cleaner not only cleans the air; it
helps to stop flames if the engine
backfires. Use caution when
working on the engine and do not
drive with the air cleaner/filter off.
Notice: If the air cleaner/filter is
off, dirt can easily get into the
engine, which could damage it.
Always have the air cleaner/filter
in place when you are driving.
Page 247 of 372
Black plate (19,1)Chevrolet Orlando Owner Manual - 2013 - CRC - 6/5/12
Vehicle Care 10-19
Brakes
This vehicle has disc brakes. Disc
brake pads have built-in wear
indicators that make a high-pitched
warning sound when the brake pads
are worn and new pads are needed.
The sound can come and go or be
heard all the time the vehicle is
moving, except when applying the
brake pedal firmly.
{WARNING
The brake wear warning sound
means that soon the brakes will
not work well. That could lead to
a crash. When the brake wear
warning sound is heard, have the
vehicle serviced.
Notice: Continuing to drive with
worn-out brake pads could result
in costly brake repair. Some driving conditions or climates
can cause a brake squeal when the
brakes are first applied or lightly
applied. This does not mean
something is wrong with the brakes.
Properly torqued wheel nuts are
necessary to help prevent brake
pulsation. When tires are rotated,
inspect brake pads for wear and
evenly tighten wheel nuts in the
proper sequence to torque
specifications in
Capacities and
Specifications on page 12‑2.
Brake linings should always be
replaced as complete axle sets.
Brake Pedal Travel
See your dealer if the brake pedal
does not return to normal height,
or if there is a rapid increase in
pedal travel. This could be a sign
that brake service might be
required.
Brake Adjustment
Every time the brakes are applied,
with or without the vehicle moving,
the brakes adjust for wear.
Replacing Brake System Parts
The braking system on a vehicle is
complex. Its many parts have to be
of top quality and work well together
if the vehicle is to have really good
braking. The vehicle was designed
and tested with top-quality brake
parts. When parts of the braking
system are replaced, be sure to get
new, approved replacement parts.
If this is not done, the brakes might
not work properly. For example,
installing disc brake pads that are
wrong for the vehicle, can change
the balance between the front and
rear brakes —for the worse. The
braking performance expected can
change in many other ways if the
wrong replacement brake parts are
installed.
Page 248 of 372
Black plate (20,1)Chevrolet Orlando Owner Manual - 2013 - CRC - 6/5/12
10-20 Vehicle Care
Brake Fluid
The brake master cylinder and, on
manual transmission vehicles, the
clutch hydraulic system use the
same reservoir. SeeEngine
Compartment Overview on
page 10‑6 for the location of the
reservoir. The reservoir is filled with
DOT 4 brake fluid.
There are only two reasons why the
brake fluid level in the reservoir
might go down:
.The brake fluid level goes down
because of normal brake lining
wear. When new linings are
installed, the fluid level goes
back up.
.A fluid leak in the brake/clutch
hydraulic system can also cause
a low fluid level. Have the brake/ clutch hydraulic system fixed,
since a leak means that sooner
or later the brakes will not
work well.
Do not top off the brake/clutch fluid.
Adding fluid does not correct a leak.
If fluid is added when the linings are
worn, there will be too much fluid
when new brake linings are
installed. Add or remove fluid, as
necessary, only when work is done
on the brake/clutch hydraulic
system.
{WARNING
If too much brake fluid is added, it
can spill on the engine and burn,
if the engine is hot enough. You
or others could be burned, and
the vehicle could be damaged.
Add brake fluid only when work is
done on the brake/clutch
hydraulic system.
Checking Brake Fluid
The brake/clutch fluid can be
checked without taking off the cap
by looking at the brake/clutch fluid
reservoir.
The fluid level should be above
MIN. If it is not, have the brake/
clutch hydraulic system checked to
see if there is a leak.
After work is done on the brake/
clutch hydraulic system, make sure
the level is above MIN but not over
the MAX mark.
When the brake/clutch fluid falls to a
low level, the brake warning light
comes on. See Brake System
Warning Light on page 5‑14.
What to Add
Use only new DOT 4 brake fluid
from a sealed container. It is
recommended that the brake/clutch
hydraulic system be flushed and
refilled with new DOT 4 fluid at a
regular maintenance service every
Page 274 of 372

Black plate (46,1)Chevrolet Orlando Owner Manual - 2013 - CRC - 6/5/12
10-46 Vehicle Care
When a low tire pressure condition
is detected, the TPMS illuminates
the low tire pressure warning light
located on the instrument cluster.
If the warning light comes on, stop
as soon as possible and inflate the
tires to the recommended pressure
shown on the Tire and Loading
Information label. SeeVehicle Load
Limits on page 9‑9.
A message to check the pressure in
a specific tire displays in the Driver
Information Center (DIC) display.
The low tire pressure warning light
and the DIC warning message come
on at each ignition cycle until the
tires are inflated to the correct
inflation pressure. Using the DIC,
tire pressure levels can be viewed.
For additional information and details about the DIC operation and
displays see
Driver Information
Center (DIC) on page 5‑21.
The low tire pressure warning light
may come on in cool weather when
the vehicle is first started, and then
turn off as the vehicle is driven. This
could be an early indicator that the
air pressure is getting low and must
be inflated to the proper pressure.
A Tire and Loading Information label
shows the size of the original
equipment tires and the correct
inflation pressure for the tires when
they are cold. See Vehicle Load
Limits on page 9‑9, for an example
of the Tire and Loading Information
label and its location. Also see Tire
Pressure on page 10‑43.
The TPMS can warn about a low
tire pressure condition but it
does not replace normal tire
maintenance. See Tire Inspection
on page 10‑48, Tire Rotation on
page 10‑49 andTires on
page 10‑37. Notice:
Tire sealant materials are
not all the same. A non-approved
tire sealant could damage the
TPMS sensors. TPMS sensor
damage caused by using an
incorrect tire sealant is not
covered by the vehicle
warranty. Always use only the
GM-approved tire sealant
available through your dealer or
included in the vehicle.
Factory-installed Tire Inflator Kits
use a GM-approved liquid tire
sealant. Using non-approved tire
sealants could damage the TPMS
sensors. See Tire Sealant and
Compressor Kit on page 10‑58 for
information regarding the inflator kit
materials and instructions.
Page 275 of 372

Black plate (47,1)Chevrolet Orlando Owner Manual - 2013 - CRC - 6/5/12
Vehicle Care 10-47
TPMS Malfunction Light and
Message
The TPMS will not function properly
if one or more of the TPMS sensors
are missing or inoperable. When the
system detects a malfunction, the
low tire warning light flashes for
about one minute and then stays on
for the remainder of the ignition
cycle. A DIC warning message also
displays. The malfunction light and
DIC warning message come on at
each ignition cycle until the problem
is corrected. Some of the conditions
that can cause these to come
on are:
.One of the road tires has been
replaced with the spare tire. The
spare tire does not have a
TPMS sensor. The malfunction
light and DIC message should
go off after the road tire is
replaced and the sensor
matching process is performed
successfully. See "TPMS Sensor
Matching Process" later in this
section.
.The TPMS sensor matching
process was not done or not
completed successfully after
rotating the tires. The
malfunction light and the DIC
message should go off after
successfully completing the
sensor matching process. See
"TPMS Sensor Matching
Process" later in this section.
.One or more TPMS sensors are
missing or damaged. The DIC
message and the malfunction
light should go off when the
TPMS sensors are installed and
the sensor matching process is
performed successfully. See
your dealer for service.
.Replacement tires or wheels do
not match the original equipment
tires or wheels. Tires and wheels
other than those recommended
could prevent the TPMS from
functioning properly. SeeBuying
New Tires on page 10‑51.
.Operating electronic devices or
being near facilities using radio
wave frequencies similar to the
TPMS could cause the TPMS
sensors to malfunction.
If the TPMS is not functioning
properly, it cannot detect or signal a
low tire condition. See your dealer
for service if the TPMS malfunction
light and DIC message come on
and stay on.
TPMS Sensor Matching
Process
Each TPMS sensor has a unique
identification code. The identification
code needs to be matched to a new
tire/wheel position after rotating the
tires or replacing one or more of the
TPMS sensors. The TPMS sensor
matching process should also be
performed after replacing a spare
tire with a road tire containing the
TPMS sensor. The malfunction
light and the DIC message should
go off at the next ignition cycle.