2017 CHEVROLET MALIBU window
[x] Cancel search: windowPage 343 of 419
Chevrolet Malibu Owner Manual (GMNA-Localizing-U.S./Canada/Mexico-10122664) - 2017 - crc - 5/23/16
342 Vehicle Care
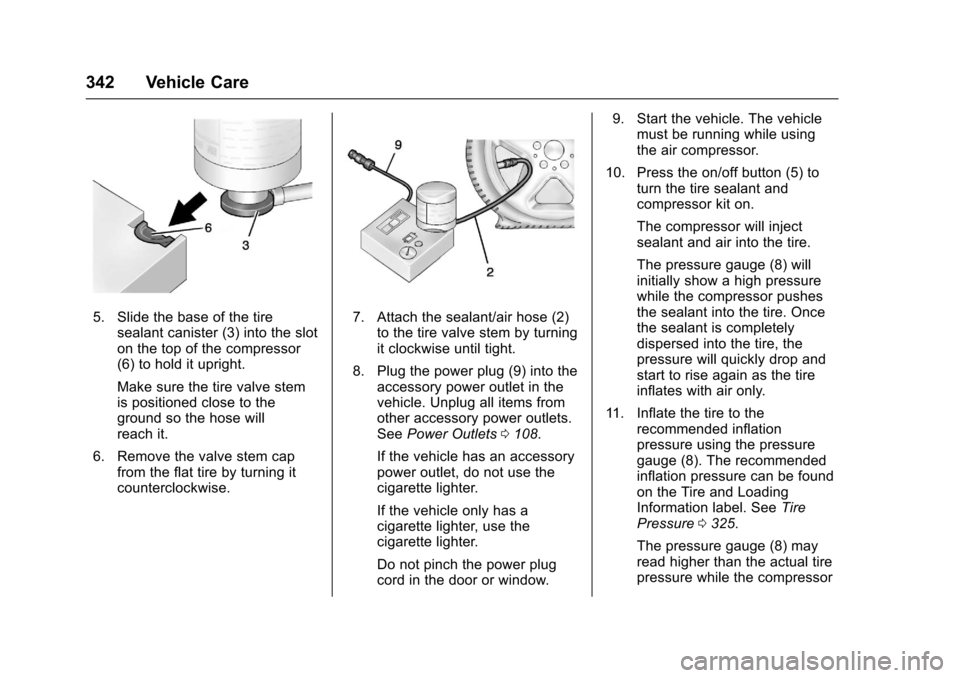
5. Slide the base of the tiresealant canister (3) into the sloton the top of the compressor(6) to hold it upright.
Make sure the tire valve stemis positioned close to theground so the hose willreach it.
6. Remove the valve stem capfrom the flat tire by turning itcounterclockwise.
7. Attach the sealant/air hose (2)to the tire valve stem by turningit clockwise until tight.
8. Plug the power plug (9) into theaccessory power outlet in thevehicle. Unplug all items fromother accessory power outlets.SeePower Outlets0108.
If the vehicle has an accessorypower outlet, do not use thecigarette lighter.
If the vehicle only has acigarette lighter, use thecigarette lighter.
Do not pinch the power plugcord in the door or window.
9. Start the vehicle. The vehiclemust be running while usingthe air compressor.
10. Press the on/off button (5) toturn the tire sealant andcompressor kit on.
The compressor will injectsealant and air into the tire.
The pressure gauge (8) willinitially show a high pressurewhile the compressor pushesthe sealant into the tire. Oncethe sealant is completelydispersed into the tire, thepressure will quickly drop andstart to rise again as the tireinflates with air only.
11 . I n f l a t e t h e t i r e t o t h erecommended inflationpressure using the pressuregauge (8). The recommendedinflation pressure can be foundon the Tire and LoadingInformation label. SeeTirePressure0325.
The pressure gauge (8) mayread higher than the actual tirepressure while the compressor
Page 346 of 419

Chevrolet Malibu Owner Manual (GMNA-Localizing-U.S./Canada/Mexico-10122664) - 2017 - crc - 5/23/16
Vehicle Care 345
1. Remove the compressor fromits storage location. SeeStoring the Tire Sealant andCompressor Kit0346.
2. Remove the air only hose (10)and the power plug (9) from thebottom of the compressor.
3. Place the compressor on theground near the flat tire.
Make sure the tire valve stemis positioned close to theground so the hose willreach it.
4. Remove the valve stem capfrom the flat tire by turning itcounterclockwise.
5. Attach the air only hose (10) tothe tire valve stem by turning itclockwise until tight.
6. Plug the power plug (9) into theaccessory power outlet in thevehicle. Unplug all items fromother accessory power outlets.SeePower Outlets0108.
If the vehicle has an accessorypower outlet, do not use thecigarette lighter.
If the vehicle only has acigarette lighter, use thecigarette lighter.
Do not pinch the power plugcord in the door or window.
7. Start the vehicle. The vehiclemust be running while usingthe air compressor.
8. Press the on/off button (5) toturn the tire sealant andcompressor kit on.
The compressor will inflate thetire with air only.
9. Inflate the tire to therecommended inflationpressure using the pressuregauge (8). The recommendedinflation pressure can be foundon the Tire and LoadingInformation label. SeeTirePressure0325.
The pressure gauge (8) mayread higher than the actual tirepressure while the compressoris on. Turn the compressor offto get an accurate pressure
reading. The compressor maybe turned on/off until thecorrect pressure is reached.
Caution
If the recommended pressure
cannot be reached after
approximately 25 minutes, the
vehicle should not be driven
farther. The tire is too severely
damaged and the tire sealant and
compressor kit cannot inflate the
tire. Remove the power plug from
the accessory power outlet and
unscrew the inflating hose from
the tire valve. SeeRoadside
Assistance Program0387.
10. Press the on/off button (5) toturn the tire sealant andcompressor kit off.
Be careful while handling thecompressor as it could bewarm after usage.
11 . U n p l u g t h e p o w e r p l u g ( 9 ) f r o mthe accessory power outlet inthe vehicle.
Page 360 of 419
Chevrolet Malibu Owner Manual (GMNA-Localizing-U.S./Canada/Mexico-10122664) - 2017 - crc - 5/23/16
Vehicle Care 359
Caution
Do not power wash any
component under the hood that
has thisesymbol.
This could cause damage that
would not be covered by the
vehicle warranty.
If using an automatic car wash,follow the car wash instructions. Thewindshield wiper and rear windowwiper, if equipped, must be off.Remove any accessories that maybe damaged or interfere with the carwash equipment.
Rinse the vehicle well, beforewashing and after, to remove allcleaning agents completely. If theyare allowed to dry on the surface,they could stain.
Dry the finish with a soft, cleanchamois or an all-cotton towel toavoid surface scratches and waterspotting.
Finish Care
Application of aftermarket clearcoatsealant/wax materials is notrecommended. If painted surfacesare damaged, see your dealer tohave the damage assessed andrepaired. Foreign materials such ascalcium chloride and other salts, icemelting agents, road oil and tar, treesap, bird droppings, chemicals fromindustrial chimneys, etc., candamage the vehicle's finish if theyremain on painted surfaces. Washthe vehicle as soon as possible.If necessary, use non-abrasivecleaners that are marked safe forpainted surfaces to remove foreignmatter.
Occasional hand waxing or mildpolishing should be done to removeresidue from the paint finish. Seeyour dealer for approved cleaningproducts.
Do not apply waxes or polishes touncoated plastic, vinyl, rubber,decals, simulated wood, or flat paintas damage can occur.
Caution
Machine compounding or
aggressive polishing on a
basecoat/clearcoat paint finish
may damage it. Use only
non-abrasive waxes and polishes
that are made for a basecoat/
clearcoat paint finish on the
vehicle.
To k e e p t h e p a i n t f i n i s h l o o k i n g n e w,keep the vehicle garaged orcovered whenever possible.
Protecting Exterior Bright MetalMoldings
Caution
Failure to clean and protect the
bright metal moldings can result
in a hazy white finish or pitting.
This damage would not be
covered by the vehicle warranty.
Page 364 of 419
Chevrolet Malibu Owner Manual (GMNA-Localizing-U.S./Canada/Mexico-10122664) - 2017 - crc - 5/23/16
Vehicle Care 363
Original manufacturer replacementparts will provide the corrosionprotection while maintaining thevehicle warranty.
Finish Damage
Quickly repair minor chips andscratches with touch-up materialsavailable from your dealer to avoidcorrosion. Larger areas of finishdamage can be corrected in yourdealer's body and paint shop.
Chemical Paint Spotting
Airborne pollutants can fall uponand attack painted vehicle surfacescausing blotchy, ring-shapeddiscolorations, and small, irregulardark spots etched into the paintsurface. See“Finish Care”previously in this section.
Interior Care
To p r e v e n t d i r t p a r t i c l e a b r a s i o n s ,regularly clean the vehicle's interior.Immediately remove any soils.Newspapers or dark garments cantransfer color to the vehicle’sinterior.
Use a soft bristle brush to removedust from knobs and crevices on theinstrument cluster. Using a mildsoap solution, immediately removehand lotions, sunscreen, and insectrepellent from all interior surfaces orpermanent damage may result.
Use cleaners specifically designedfor the surfaces being cleaned toprevent permanent damage. Applyall cleaners directly to the cleaningcloth. Do not spray cleaners on anyswitches or controls. Removecleaners quickly.
Before using cleaners, read andfollow all safety instructions on thelabel. While cleaning the interior,open the doors and windows to getproper ventilation.
To p r e v e n t d a m a g e , d o n o t c l e a nthe interior using the followingcleaners or techniques:
.Never use a razor or any othersharp object to remove soil fromany interior surface.
.Never use a brush with stiffbristles.
.Never rub any surfaceaggressively or with too muchpressure.
.Do not use laundry detergents ordishwashing soaps withdegreasers. For liquid cleaners,use approximately 20 drops per3.8 L (1 gal) of water.Aconcentratedsoapsolutionwillcreate streaks and attract dirt.Do not use solutions that containstrong or caustic soap.
.Do not heavily saturate theupholstery when cleaning.
.Do not use solvents or cleanerscontaining solvents.
Interior Glass
To c l e a n , u s e a t e r r y c l o t h f a b r i cdampened with water. Wipe dropletsleft behind with a clean dry cloth.If necessary, use a commercialglass cleaner after cleaning withplain water.
Page 365 of 419
Chevrolet Malibu Owner Manual (GMNA-Localizing-U.S./Canada/Mexico-10122664) - 2017 - crc - 5/23/16
364 Vehicle Care
Caution
To p r e v e n t s c r a t c h i n g , n e v e r u s e
abrasive cleaners on automotive
glass. Abrasive cleaners or
aggressive cleaning may damage
the rear window defogger.
Cleaning the windshield with waterduring the first three to six monthsof ownership will reduce tendencyto fog.
Speaker Covers
Va c u u m a r o u n d a s p e a k e r c o v e rgently, so that the speaker will notbe damaged. Clean spots with waterand mild soap.
Coated Moldings
Coated moldings should be cleaned.
.When lightly soiled, wipe with asponge or soft, lint-free clothdampened with water.
.When heavily soiled, use warmsoapy water.
Fabric/Carpet/Suede
Start by vacuuming the surfaceusing a soft brush attachment. If arotating vacuum brush attachment isbeing used, only use it on the floorcarpet. Before cleaning, gentlyremove as much of the soil aspossible:
.Gently blot liquids with a papertowel. Continue blotting until nomore soil can be removed.
.For solid soils, remove as muchas possible prior to vacuuming.
To c l e a n :
1. Saturate a clean, lint-freecolorfast cloth with water.Microfiber cloth isrecommended to prevent linttransfer to the fabric or carpet.
2. Remove excess moisture bygently wringing until water doesnot drip from the cleaning cloth.
3. Start on the outside edge of thesoil and gently rub toward thecenter. Fold the cleaning cloth
to a clean area frequently toprevent forcing the soil in to thefabric.
4. Continue gently rubbing thesoiled area until there is nolonger any color transfer fromthe soil to the cleaning cloth.
5. If the soil is not completelyremoved, use a mild soapsolution followed only by plainwater.
If the soil is not completelyremoved, it may be necessary touse a commercial upholsterycleaner or spot lifter. Test a smallhidden area for colorfastness beforeusing a commercial upholsterycleaner or spot lifter. If ringformation occurs, clean the entirefabric or carpet.
After cleaning, use a paper towel toblot excess moisture.
Page 366 of 419
Chevrolet Malibu Owner Manual (GMNA-Localizing-U.S./Canada/Mexico-10122664) - 2017 - crc - 5/23/16
Vehicle Care 365
Cleaning High Gloss Surfaces
and Vehicle Information and
Radio Displays
Use a microfiber cloth on high glosssurfaces or vehicle displays. First,use a soft bristle brush to removedirt that can scratch the surface.Then gently clean by rubbing with amicrofiber cloth. Never use windowcleaners or solvents. Periodicallyhand wash the microfiber clothseparately, using mild soap. Do notuse bleach or fabric softener. Rinsethoroughly and air dry beforenext use.
Caution
Do not attach a device with a
suction cup to the display. This
may cause damage and would
not be covered by the vehicle
warranty.
Instrument Panel, Leather,
Vinyl, Other Plastic Surfaces,
Low Gloss Paint Surfaces, and
Natural Open Pore Wood
Surfaces
Use a soft microfiber clothdampened with water to removedust and loose dirt. For a morethorough cleaning, use a softmicrofiber cloth dampened with amild soap solution.
Caution
Soaking or saturating leather,
especially perforated leather, as
well as other interior surfaces,
may cause permanent damage.
Wipe excess moisture from these
surfaces after cleaning and allow
them to dry naturally. Never use
heat, steam, or spot removers. Do
not use cleaners that contain
silicone or wax-based products.
Cleaners containing these
solvents can permanently change
(Continued)
Caution (Continued)
the appearance and feel of
leather or soft trim, and are not
recommended.
Do not use cleaners that increasegloss, especially on the instrumentpanel. Reflected glare can decreasevisibility through the windshieldunder certain conditions.
Caution
Use of air fresheners may cause
permanent damage to plastics
and painted surfaces. If an air
freshener comes in contact with
any plastic or painted surface in
the vehicle, blot immediately and
clean with a soft cloth dampened
with a mild soap solution.
Damage caused by air fresheners
would not be covered by the
vehicle warranty.
Page 372 of 419
Chevrolet Malibu Owner Manual (GMNA-Localizing-U.S./Canada/Mexico-10122664) - 2017 - crc - 5/23/16
Service and Maintenance 371
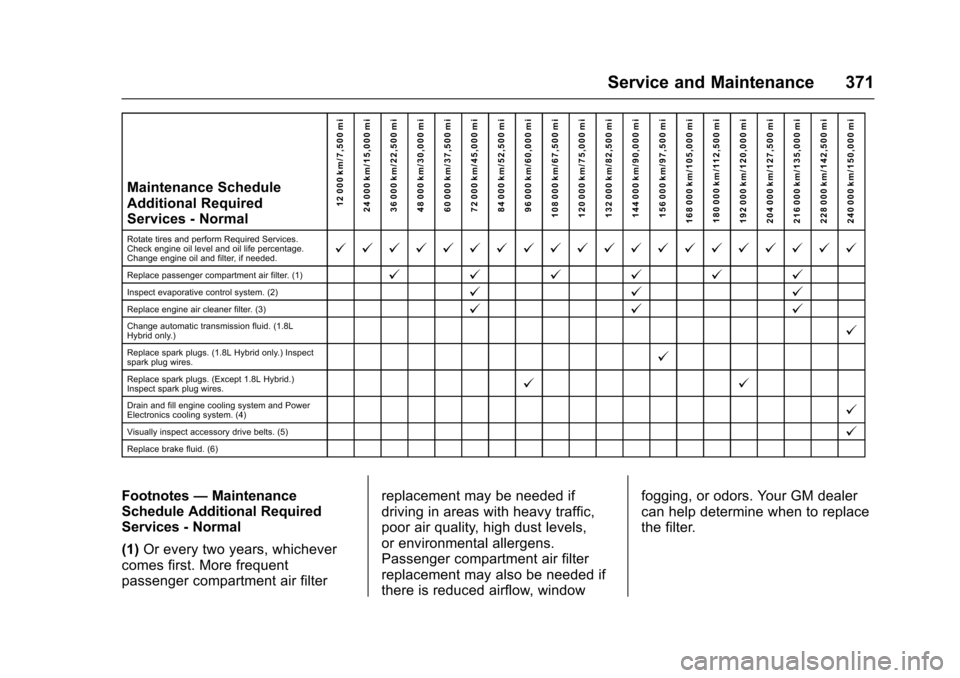
Maintenance ScheduleAdditional RequiredServices - Normal
12 000 km/7,500 mi24 000 km/15,000 mi36 000 km/22,500 mi48 000 km/30,000 mi60 000 km/37,500 mi72 000 km/45,000 mi84 000 km/52,500 mi96 000 km/60,000 mi108 000 km/67,500 mi120 000 km/75,000 mi132 000 km/82,500 mi144 000 km/90,000 mi156 000 km/97,500 mi168 000 km/105,000 mi180 000 km/112,500 mi192 000 km/120,000 mi204 000 km/127,500 mi216 000 km/135,000 mi228 000 km/142,500 mi240 000 km/150,000 mi
Rotate tires and perform Required Services.Check engine oil level and oil life percentage.Change engine oil and filter, if needed.@@@@@@@@@@@@@@@@@@@@
Replace passenger compartment air filter. (1)@@@@@@
Inspect evaporative control system. (2)@@@
Replace engine air cleaner filter. (3)@@@
Change automatic transmission fluid. (1.8LHybrid only.)@
Replace spark plugs. (1.8L Hybrid only.) Inspectspark plug wires.@
Replace spark plugs. (Except 1.8L Hybrid.)Inspect spark plug wires.@@
Drain and fill engine cooling system and PowerElectronics cooling system. (4)@
Visually inspect accessory drive belts. (5)@
Replace brake fluid. (6)
Footnotes—MaintenanceSchedule Additional RequiredServices - Normal
(1)Or every two years, whichevercomes first. More frequentpassenger compartment air filter
replacement may be needed ifdriving in areas with heavy traffic,poor air quality, high dust levels,or environmental allergens.Passenger compartment air filterreplacement may also be needed ifthere is reduced airflow, window
fogging, or odors. Your GM dealercan help determine when to replacethe filter.
Page 374 of 419
Chevrolet Malibu Owner Manual (GMNA-Localizing-U.S./Canada/Mexico-10122664) - 2017 - crc - 5/23/16
Service and Maintenance 373
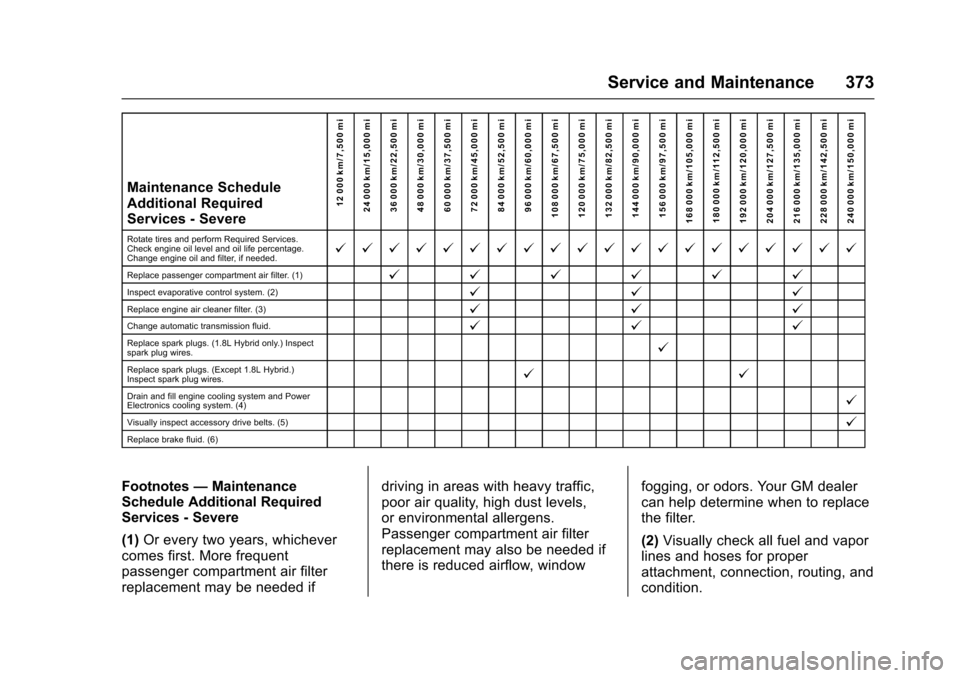
Maintenance ScheduleAdditional RequiredServices - Severe
12 000 km/7,500 mi24 000 km/15,000 mi36 000 km/22,500 mi48 000 km/30,000 mi60 000 km/37,500 mi72 000 km/45,000 mi84 000 km/52,500 mi96 000 km/60,000 mi108 000 km/67,500 mi120 000 km/75,000 mi132 000 km/82,500 mi144 000 km/90,000 mi156 000 km/97,500 mi168 000 km/105,000 mi180 000 km/112,500 mi192 000 km/120,000 mi204 000 km/127,500 mi216 000 km/135,000 mi228 000 km/142,500 mi240 000 km/150,000 mi
Rotate tires and perform Required Services.Check engine oil level and oil life percentage.Change engine oil and filter, if needed.@@@@@@@@@@@@@@@@@@@@
Replace passenger compartment air filter. (1)@@@@@@
Inspect evaporative control system. (2)@@@
Replace engine air cleaner filter. (3)@@@
Change automatic transmission fluid.@@@
Replace spark plugs. (1.8L Hybrid only.) Inspectspark plug wires.@
Replace spark plugs. (Except 1.8L Hybrid.)Inspect spark plug wires.@@
Drain and fill engine cooling system and PowerElectronics cooling system. (4)@
Visually inspect accessory drive belts. (5)@
Replace brake fluid. (6)
Footnotes—MaintenanceSchedule Additional RequiredServices - Severe
(1)Or every two years, whichevercomes first. More frequentpassenger compartment air filterreplacement may be needed if
driving in areas with heavy traffic,poor air quality, high dust levels,or environmental allergens.Passenger compartment air filterreplacement may also be needed ifthere is reduced airflow, window
fogging, or odors. Your GM dealercan help determine when to replacethe filter.
(2)Visually check all fuel and vaporlines and hoses for properattachment, connection, routing, andcondition.