2017 CHEVROLET MALIBU warning
[x] Cancel search: warningPage 304 of 419
Chevrolet Malibu Owner Manual (GMNA-Localizing-U.S./Canada/Mexico-10122664) - 2017 - crc - 5/23/16
Vehicle Care 303
Extended Storage: Remove the12-volt battery black, negative (✓)cable from the battery or use abattery trickle charger.
Remember to reconnect the batterywhen ready to drive the vehicle.
Starter Switch Check
{Warning
When you are doing this
inspection, the vehicle could
move suddenly. If the vehicle
moves, you or others could be
injured.
1. Before starting this check, besure there is enough roomaround the vehicle.
2. Apply both the parking brakeand the regular brake.
Do not use the acceleratorpedal, and be ready to turn offthe engine immediately if itstarts.
3. Try to start the engine in eachgear. The vehicle should startonly in P (Park) or N (Neutral).If the vehicle starts in any otherposition, contact your dealer forservice.
Automatic Transmission
Shift Lock Control
Function Check
{Warning
When you are doing this
inspection, the vehicle could
move suddenly. If the vehicle
moves, you or others could be
injured.
1. Before starting this check, besure there is enough roomaround the vehicle. It should beparked on a level surface.
2. Apply the parking brake. Beready to apply the regularbrake immediately if the vehiclebegins to move.
3. With the engine off, turn theignition on, but do not start theengine. Without applying theregular brake, try to move theshift lever out of P (Park) withnormal effort. If the shift levermoves out of P (Park), contactyour dealer for service.
Park Brake and P (Park)
Mechanism Check
{Warning
When you are doing this check,
the vehicle could begin to move.
Yo u o r o t h e r s c o u l d b e i n j u r e d
and property could be damaged.
Make sure there is room in front
of the vehicle in case it begins to
roll. Be ready to apply the regular
brake at once should the vehicle
begin to move.
Page 306 of 419
Chevrolet Malibu Owner Manual (GMNA-Localizing-U.S./Canada/Mexico-10122664) - 2017 - crc - 5/23/16
Vehicle Care 305
Headlamp Aiming
Headlamp aim has been preset andshould need no further adjustment.
If the vehicle is damaged in a crash,the headlamp aim may be affected.If adjustment to the headlamps isnecessary, see your dealer.
Bulb Replacement
For the proper type of replacementbulbs, seeReplacementBulbs0309.
For any bulb-changing procedurenot listed in this section, contactyour dealer.
Halogen Bulbs
{Warning
Halogen bulbs have pressurized
gas inside and can burst if you
drop or scratch the bulb. You or
others could be injured. Be sure
to read and follow the instructions
on the bulb package.
LED Lighting
This vehicle has several LED lamps.For replacement of any LED lightingassembly, contact your dealer.
Headlamps, Front Turn
Signal, Sidemarker, and
Parking Lamps
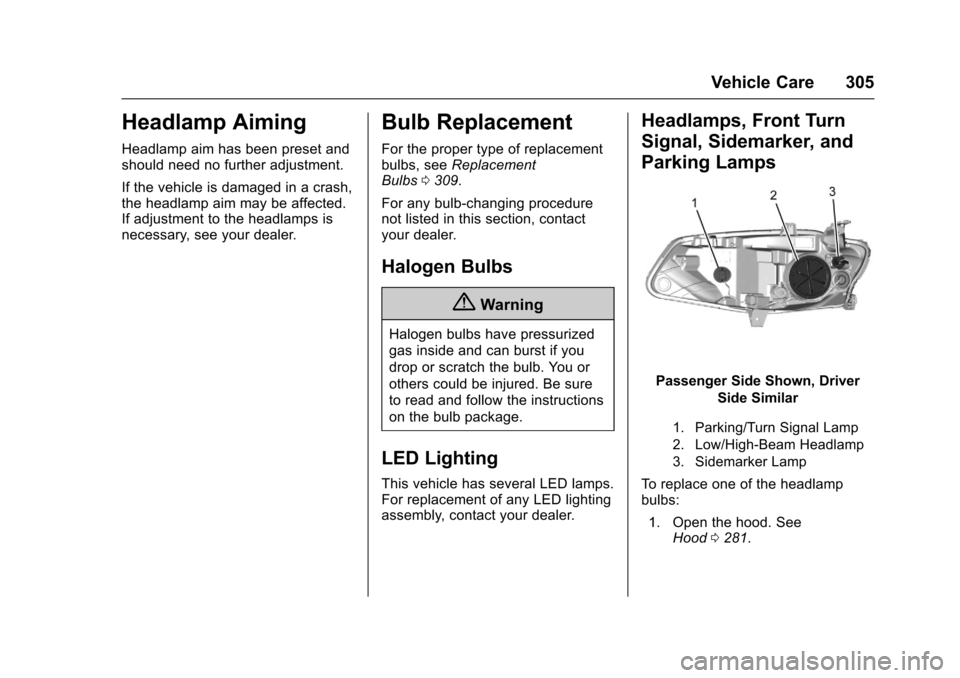
Passenger Side Shown, Driver
Side Similar
1. Parking/Turn Signal Lamp
2. Low/High-Beam Headlamp
3. Sidemarker Lamp
To r e p l a c e o n e o f t h e h e a d l a m pbulbs:
1. Open the hood. SeeHood0281.
Page 310 of 419
Chevrolet Malibu Owner Manual (GMNA-Localizing-U.S./Canada/Mexico-10122664) - 2017 - crc - 5/23/16
Vehicle Care 309
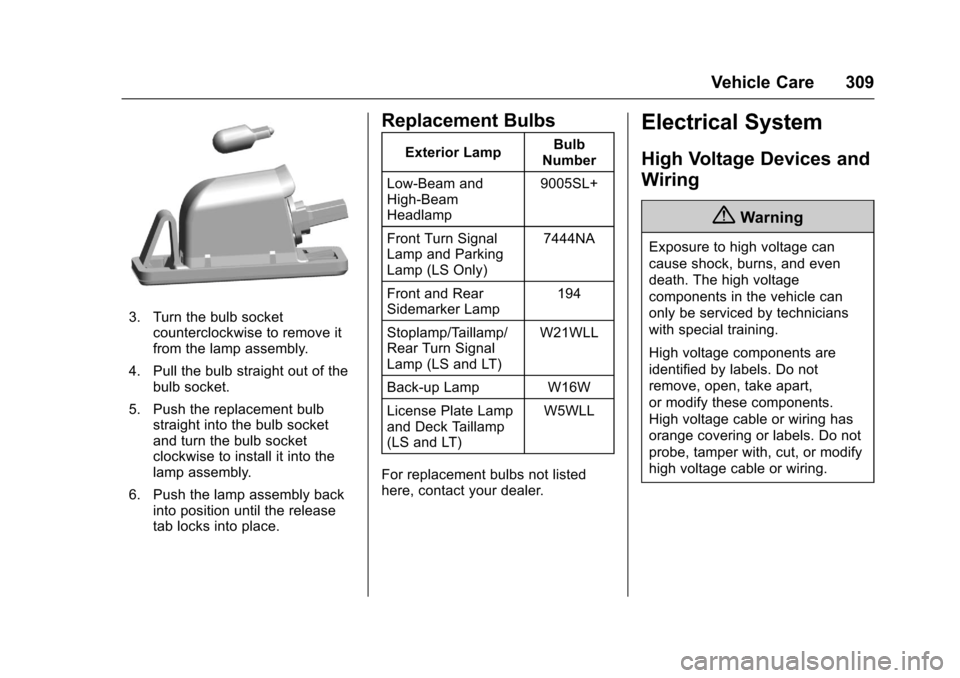
3. Turn the bulb socketcounterclockwise to remove itfrom the lamp assembly.
4. Pull the bulb straight out of thebulb socket.
5. Push the replacement bulbstraight into the bulb socketand turn the bulb socketclockwise to install it into thelamp assembly.
6. Push the lamp assembly backinto position until the releasetab locks into place.
Replacement Bulbs
Exterior LampBulbNumber
Low-Beam andHigh-BeamHeadlamp
9005SL+
Front Turn SignalLamp and ParkingLamp (LS Only)
7444NA
Front and RearSidemarker Lamp194
Stoplamp/Taillamp/Rear Turn SignalLamp (LS and LT)
W21WLL
Back-up Lamp W16W
License Plate Lampand Deck Taillamp(LS and LT)
W5WLL
For replacement bulbs not listedhere, contact your dealer.
Electrical System
High Voltage Devices and
Wiring
{Warning
Exposure to high voltage can
cause shock, burns, and even
death. The high voltage
components in the vehicle can
only be serviced by technicians
with special training.
High voltage components are
identified by labels. Do not
remove, open, take apart,
or modify these components.
High voltage cable or wiring has
orange covering or labels. Do not
probe, tamper with, cut, or modify
high voltage cable or wiring.
Page 318 of 419
Chevrolet Malibu Owner Manual (GMNA-Localizing-U.S./Canada/Mexico-10122664) - 2017 - crc - 5/23/16
Vehicle Care 317
RelaysUsage
K1–
K2 Retained accessorypower relay
K3–
K4–
K5–
Wheels and Tires
Tires
Every new GM vehicle has
high-quality tires made by a
leading tire manufacturer. See
the warranty manual for
information regarding the tire
warranty and where to get
service. For additional
information refer to the tire
manufacturer.
{Warning
.Poorly maintained and
improperly used tires are
dangerous.
.Overloading the tires can
cause overheating as a
result of too much
flexing. There could be a
blowout and a serious
crash. SeeVehicle Load
Limits0222.
(Continued)
Warning (Continued)
.Underinflated tires pose
the same danger as
overloaded tires. The
resulting crash could
cause serious injury.
Check all tires frequently
to maintain the
recommended pressure.
Tire pressure should be
checked when the tires
are cold.
.Overinflated tires are
more likely to be cut,
punctured, or broken by
asuddenimpact—such
as when hitting a pothole.
Keep tires at the
recommended pressure.
.Worn or old tires can
cause a crash. If the
tread is badly worn,
replace them.
(Continued)
Page 319 of 419
Chevrolet Malibu Owner Manual (GMNA-Localizing-U.S./Canada/Mexico-10122664) - 2017 - crc - 5/23/16
318 Vehicle Care
Warning (Continued)
.Replace any tires that
have been damaged by
impacts with potholes,
curbs, etc.
.Improperly repaired tires
can cause a crash. Only
the dealer or an
authorized tire service
center should repair,
replace, dismount, and
mount the tires.
.Do not spin the tires in
excess of 56 km/h
(35 mph) on slippery
surfaces such as snow,
mud, ice, etc. Excessive
spinning may cause the
tires to explode.
SeeTire Pressure for
High-Speed Operation0326for
inflation pressure adjustment for
high-speed driving.
All-Season Tires
This vehicle may come withall-season tires. These tires aredesigned to provide good overallperformance on most road surfacesand weather conditions. Originalequipment tires designed to GM'sspecific tire performance criteriahave a TPC specification codemolded onto the sidewall. Originalequipment all-season tires can beidentified by the last two charactersof this TPC code, which willbe“MS.”
Consider installing winter tires onthe vehicle if frequent driving onsnow or ice-covered roads isexpected. All-season tires provideadequate performance for mostwinter driving conditions, but theymay not offer the same level oftraction or performance as wintertires on snow or ice-covered roads.SeeWinter Tires0318.
Winter Tires
This vehicle was not originallyequipped with winter tires. Wintertires are designed for increasedtraction on snow and ice-coveredroads. Consider installing wintertires on the vehicle if frequentdriving on ice or snow coveredroads is expected. See your dealerfor details regarding winter tireavailability and proper tire selection.Also, seeBuying New Tires0333.
With winter tires, there may bedecreased dry road traction,increased road noise, and shortertread life. After changing to wintertires, be alert for changes in vehiclehandling and braking.
If using winter tires:
.Use tires of the same brand andtread type on all four wheelpositions.
.Use only radial ply tires of thesame size, load range, andspeed rating as the originalequipment tires.
Page 327 of 419
Chevrolet Malibu Owner Manual (GMNA-Localizing-U.S./Canada/Mexico-10122664) - 2017 - crc - 5/23/16
326 Vehicle Care
How to Check
Use a good quality pocket-type
gauge to check tire pressure.
Proper tire inflation cannot be
determined by looking at the tire.
Check the tire inflation pressure
when the tires are cold, meaning
the vehicle has not been driven
for at least three hours or no
more than 1.6 km (1 mi).
Remove the valve cap from the
tire valve stem. Press the tire
gauge firmly onto the valve to
get a pressure measurement.
If the cold tire inflation pressure
matches the recommended
pressure on the Tire and
Loading Information label, no
further adjustment is necessary.
If the inflation pressure is low,
add air until the recommended
pressure is reached. If the
inflation pressure is high, press
on the metal stem in the center
of the tire valve to release air.
Recheck the tire pressure with
the tire gauge.
Put the valve caps back on the
valve stems to keep out dirt and
moisture and prevent leaks. Use
only valve caps designed for the
vehicle by GM. TPMS sensors
could be damaged and would
not be covered by the vehicle
warranty.
Tire Pressure for
High-Speed Operation
{Warning
Driving at high speeds, 160 km/h
(100 mph) or higher, puts
additional strain on tires.
Sustained high-speed driving
causes excessive heat buildup
and can cause sudden tire failure.
This could cause a crash, and
you or others could be killed.
Some high-speed rated tires
require inflation pressure
adjustment for high-speed
operation. When speed limits and
road conditions allow the vehicle
(Continued)
Warning (Continued)
to be driven at high speeds, make
sure the tires are rated for
high-speed operation, are in
excellent condition, and are set to
the correct cold tire inflation
pressure for the vehicle load.
Vehicles with 245/40R19 size tiresrequire inflation pressure adjustmentwhen driving the vehicle at speedsof 160 km/h (100 mph) or higher.Set the cold tire inflation pressure to20 kPa (3 psi) above therecommended cold tire pressureshown on the Tire and LoadingInformation label.
Return the tires to therecommended cold tire inflationpressure when high-speed drivinghas ended. SeeVehicle Load Limits0222andTire Pressure0325.
Page 329 of 419
Chevrolet Malibu Owner Manual (GMNA-Localizing-U.S./Canada/Mexico-10122664) - 2017 - crc - 5/23/16
328 Vehicle Care
Tire Pressure Monitor
Operation
This vehicle may have a TirePressure Monitor System (TPMS).The TPMS is designed to warn thedriver when a low tire pressurecondition exists. TPMS sensors aremounted onto each tire and wheelassembly, excluding the spare tireand wheel assembly. The TPMSsensors monitor the air pressure inthe tires and transmits the tirepressure readings to a receiverlocated in the vehicle.
When a low tire pressure conditionis detected, the TPMS illuminatesthe low tire pressure warning lightlocated on the instrument cluster.If the warning light comes on, stopas soon as possible and inflate thetires to the recommended pressure
shown on the Tire and LoadingInformation label. SeeVehicle LoadLimits0222.
AmessagetocheckthepressureinaspecifictiredisplaysintheDriverInformation Center (DIC). The lowtire pressure warning light and theDIC warning message come on ateach ignition cycle until the tires areinflated to the correct inflationpressure. Using the DIC, tirepressure levels can be viewed. Foradditional information and detailsabout the DIC operation anddisplays seeDriver InformationCenter (DIC) (Base Level)0131orDriver Information Center (DIC)(Uplevel)0134.
The low tire pressure warning lightmay come on in cool weather whenthe vehicle is first started, and thenturn off as the vehicle is driven. Thiscould be an early indicator that theair pressure is getting low andneeds to be inflated to the properpressure.
ATire and Loading Informationlabel, attached to your vehicle,shows the size of the original
equipment tires and the correctinflation pressure for the tires whenthey are cold. SeeVehicle LoadLimits0222,foranexampleoftheTire and Loading Information labeland its location. Also seeTirePressure0325.
The TPMS can warn about a lowtire pressure condition but it doesnot replace normal tiremaintenance. SeeTire Inspection0331,Tire Rotation0331andTires0317.
Caution
Tire sealant materials are not all
the same. A non-approved tire
sealant could damage the TPMS
sensors. TPMS sensor damage
caused by using an incorrect tire
sealant is not covered by the
vehicle warranty. Always use only
the GM approved tire sealant
available through your dealer or
included in the vehicle.
Page 330 of 419
Chevrolet Malibu Owner Manual (GMNA-Localizing-U.S./Canada/Mexico-10122664) - 2017 - crc - 5/23/16
Vehicle Care 329
Factory-installed Tire Inflator Kitsuse a GM-approved liquid tiresealant. Using non-approved tiresealants could damage the TPMSsensors. SeeTire Sealant andCompressor Kit0339forinformation regarding the inflator kitmaterials and instructions.
TPMS Malfunction Light and
Message
The TPMS will not function properlyif one or more of the TPMS sensorsare missing or inoperable. When thesystem detects a malfunction, thelow tire warning light flashes forabout one minute and then stays onfor the remainder of the ignitioncycle. A DIC warning message alsodisplays. The malfunction light andDIC warning message come on ateach ignition cycle until the problemis corrected. Some of the conditionsthat can cause these to comeon are:
.One of the road tires has beenreplaced with the spare tire. Thespare tire does not have aTPMS sensor. The malfunctionlight and DIC message should
go off after the road tire isreplaced and the sensormatching process is performedsuccessfully. See“TPMS SensorMatching Process”later in thissection.
.The TPMS sensor matchingprocess was not done or notcompleted successfully afterrotating the tires. Themalfunction light and the DICmessage should go off aftersuccessfully completing thesensor matching process. See"TPMS Sensor MatchingProcess" later in this section.
.One or more TPMS sensors aremissing or damaged. Themalfunction light and the DICmessage should go off when theTPMS sensors are installed andthe sensor matching process isperformed successfully. Seeyour dealer for service.
.Replacement tires or wheels donot match the original equipmenttires or wheels. Tires and wheelsother than those recommended
could prevent the TPMS fromfunctioning properly. SeeBuyingNew Tires0333.
.Operating electronic devices orbeing near facilities using radiowave frequencies similar to theTPMS could cause the TPMSsensors to malfunction.
If the TPMS is not functioningproperly it cannot detect or signal alow tire condition. See your dealerfor service if the TPMS malfunctionlight and DIC message comes onand stays on.
TPMS Sensor Matching
Process
Each TPMS sensor has a uniqueidentification code. The identificationcode needs to be matched to a newtire/wheel position after rotating thevehicle’stiresorreplacingoneormore of the TPMS sensors. TheTPMS sensor matching processshould also be performed afterreplacing a spare tire with a roadtire containing the TPMS sensor.The malfunction light and the DICmessage should go off at the nextignition cycle. The sensors are