2017 CHEVROLET IMPALA lock
[x] Cancel search: lockPage 57 of 378
Chevrolet Impala Owner Manual (GMNA-Localizing-U.S./Canada-9921197) -
2017 - crc - 3/30/16
56 Seats and Restraints
2. Slide the seat to the desiredposition and release the
handle.
3. Try to move the seat back and forth to be sure it is locked in
place.
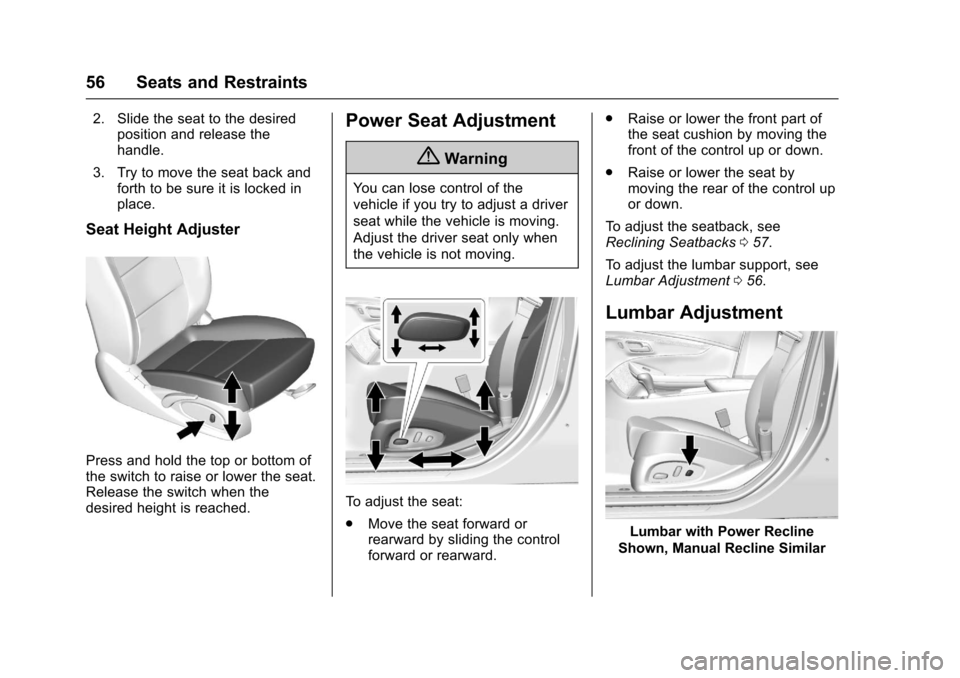
Seat Height Adjuster
Press and hold the top or bottom of
the switch to raise or lower the seat.
Release the switch when the
desired height is reached.
Power Seat Adjustment
{Warning
You can lose control of the
vehicle if you try to adjust a driver
seat while the vehicle is moving.
Adjust the driver seat only when
the vehicle is not moving.
To adjust the seat:
.Move the seat forward or
rearward by sliding the control
forward or rearward. .
Raise or lower the front part of
the seat cushion by moving the
front of the control up or down.
. Raise or lower the seat by
moving the rear of the control up
or down.
To adjust the seatback, see
Reclining Seatbacks 057.
To adjust the lumbar support, see
Lumbar Adjustment 056.
Lumbar Adjustment
Lumbar with Power Recline
Shown, Manual Recline Similar
Page 58 of 378
Chevrolet Impala Owner Manual (GMNA-Localizing-U.S./Canada-9921197) -
2017 - crc - 3/30/16
Seats and Restraints 57
To adjust the lumbar support,
if equipped:
.Press and hold the control
forward to increase or rearward
to decrease lumbar support.
. If equipped with manual recline,
press and hold the top of the
control to increase or the bottom
of the control to decrease the
lumbar support.
Reclining Seatbacks
{Warning
Sitting in a reclined position when
the vehicle is in motion can be
dangerous. Even when buckled
up, the safety belts cannot do
their job.
The shoulder belt will not be
against your body. Instead, it will
be in front of you. In a crash, you
could go into it, receiving neck or
other injuries.
(Continued)
Warning (Continued)
The lap belt could go up over
your abdomen. The belt forces
would be there, not at your pelvic
bones. This could cause serious
internal injuries.
For proper protection when the
vehicle is in motion, have the
seatback upright. Then sit well
back in the seat and wear the
safety belt properly.
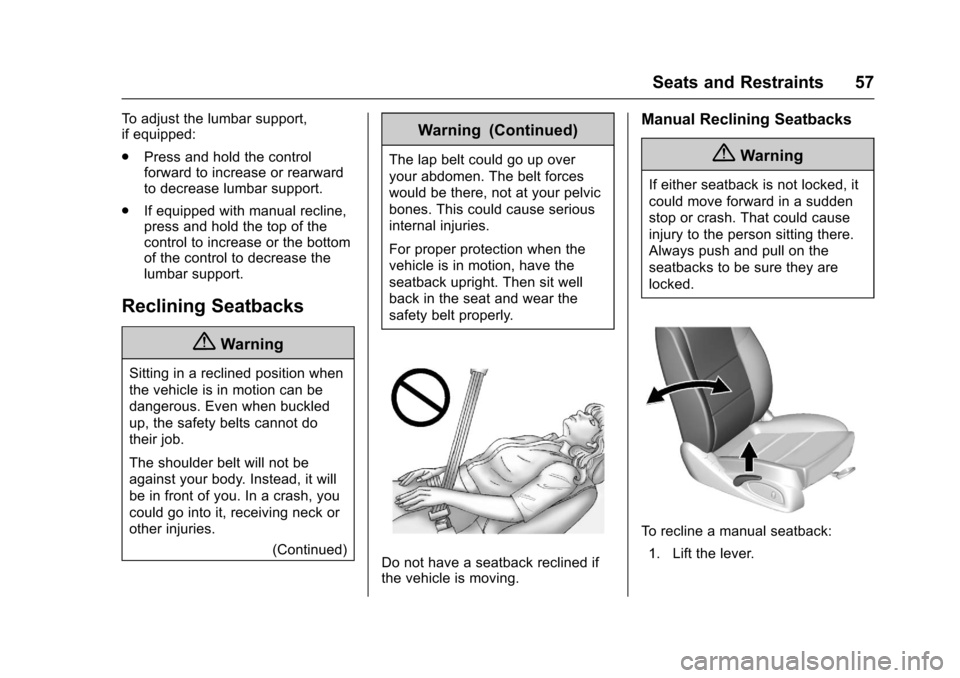
Do not have a seatback reclined if
the vehicle is moving.
Manual Reclining Seatbacks
{Warning
If either seatback is not locked, it
could move forward in a sudden
stop or crash. That could cause
injury to the person sitting there.
Always push and pull on the
seatbacks to be sure they are
locked.
To recline a manual seatback:
1. Lift the lever.
Page 59 of 378
Chevrolet Impala Owner Manual (GMNA-Localizing-U.S./Canada-9921197) -
2017 - crc - 3/30/16
58 Seats and Restraints
2. Move the seatback to thedesired position, and then
release the lever to lock the
seatback in place.
3. Push and pull on the seatback to make sure it is locked.
To return the seatback to the upright
position: 1. Lift the lever fully without applying pressure to the
seatback, and the seatback will
return to the upright position.
2. Push and pull on the seatback to make sure it is locked.
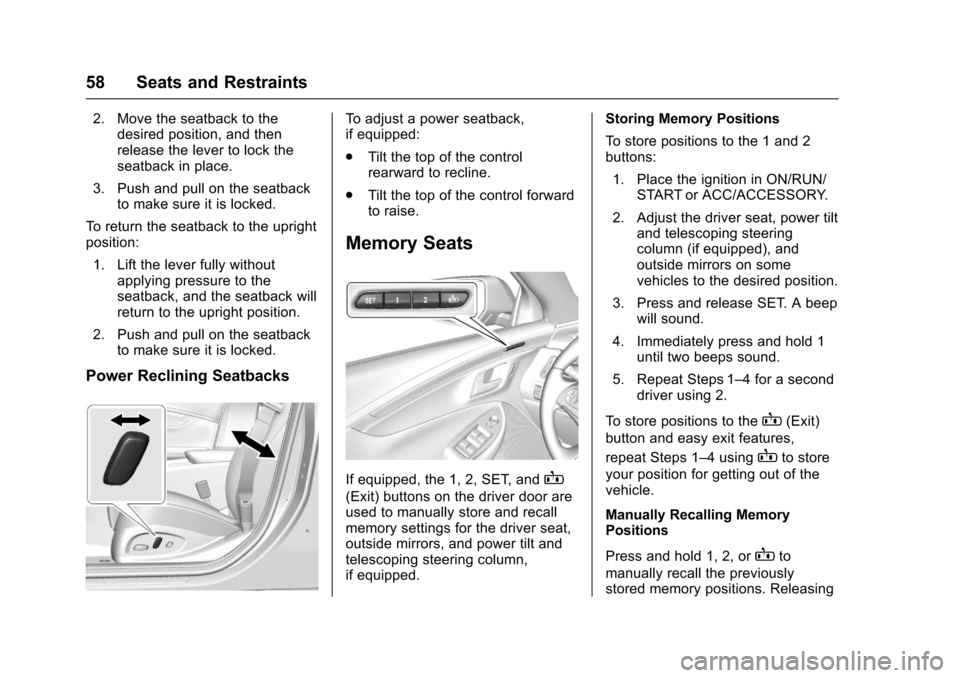
Power Reclining Seatbacks
To adjust a power seatback,
if equipped:
.Tilt the top of the control
rearward to recline.
. Tilt the top of the control forward
to raise.
Memory Seats
If equipped, the 1, 2, SET, andB
(Exit) buttons on the driver door are
used to manually store and recall
memory settings for the driver seat,
outside mirrors, and power tilt and
telescoping steering column,
if equipped. Storing Memory Positions
To store positions to the 1 and 2
buttons:
1. Place the ignition in ON/RUN/ START or ACC/ACCESSORY.
2. Adjust the driver seat, power tilt and telescoping steering
column (if equipped), and
outside mirrors on some
vehicles to the desired position.
3. Press and release SET. A beep will sound.
4. Immediately press and hold 1 until two beeps sound.
5. Repeat Steps 1–4 for a second driver using 2.
To store positions to the
B(Exit)
button and easy exit features,
repeat Steps 1–4 using
Bto store
your position for getting out of the
vehicle.
Manually Recalling Memory
Positions
Press and hold 1, 2, or
Bto
manually recall the previously
stored memory positions. Releasing
Page 60 of 378

Chevrolet Impala Owner Manual (GMNA-Localizing-U.S./Canada-9921197) -
2017 - crc - 3/30/16
Seats and Restraints 59
1, 2, orBbefore the stored
positions are reached stops the
recall.
Automatically Recalling Memory
Positions (Auto Memory Recall)
If programmed on in the vehicle
personalization menu, the Auto
(Automatic) Memory Recall feature
automatically recalls the current
driver ’s previously stored 1 or 2
position when the ignition is
changed from OFF to ON/RUN or
ACC/ACCESSORY.
See “Auto Memory Recall” under
“Comfort and Convenience” in
Vehicle Personalization 0139.
To stop recall movement, press one
of the memory, power mirror,
or power seat controls; or press the
power tilt and telescoping steering
column control (if equipped). Placing
the ignition in LOCK/OFF also stops
the recall.
RKE transmitters are not labeled
with a number. If your memory seat
position is stored to 1 or 2, but this
position is not automatically recalling, then store your positions
to the other button or switch RKE
transmitters with the other driver.
In some vehicles the Driver ID may
be displayed for the first few ignition
cycles if the vehicle’s driver has
changed.
Easy Exit Recall
If programmed on in the vehicle
personalization menu, the easy exit
feature automatically recalls the
previously stored exit position when
exiting the vehicle. See
“Storing
Memory Positions” previously in this
section. See also Vehicle
Personalization 0139.
Easy exit recall automatically
activates when one of the following
occurs:
. The vehicle is turned off and the
driver door is opened within a
short time.
. The vehicle is turned off with the
driver door open. To stop recall movement, press one
of the memory, driver seat, outside
mirror, or power tilt and telescoping
steering column controls.
Obstructions
If something has blocked the driver
seat and/or power tilt and
telescoping steering column (if
equipped) while recalling a memory
position, the recall may stop.
Remove the obstruction. Then do
one of the following:
.
If automatically or manually
recalling the stored memory
position, press and hold the
appropriate manual control for
two seconds. Try recalling again
by pressing the appropriate
memory button.
. If automatically recalling the
position, press and hold the
appropriate manual control for
the memory item that is not
recalling for two seconds. Try
recalling again by opening the
driver door and pressing
Kon
the RKE transmitter.
Page 62 of 378

Chevrolet Impala Owner Manual (GMNA-Localizing-U.S./Canada-9921197) -
2017 - crc - 3/30/16
Seats and Restraints 61
Remote Start Auto Heated and
Ventilated Seats
During a remote start, the heated or
ventilated seats, if equipped, can be
turned on automatically. When it is
cold outside, the heated seats turn
on, and when it is hot outside the
ventilated seats turn on. The heated
or ventilated seats are canceled
when the ignition is turned on. Press
the button to use the heated or
ventilated seats after the vehicle is
started.
The heated or ventilated seat
indicator lights on the button do not
turn on during a remote start.
The heated seat temperature
performance of an unoccupied seat
may be reduced. This is normal.
The heated or ventilated seats will
not turn on during a remote start
unless they are enabled in the
vehicle personalization menu. See
Remote Vehicle Start036 and
Vehicle Personalization 0139.Rear Seats
Folding the Seatback
Either side of the seatback can be
folded for more cargo space. Fold a
seatback only when the vehicle is
not moving.
Caution
Folding a rear seat with the safety
belts still fastened may cause
damage to the seat or the safety
belts. Always unbuckle the safety
belts and return them to their
normal stowed position before
folding a rear seat. To fold the seatback:
Rear Seat with Folding Head
Restraints Shown, Non-Folding Head Restraints Similar
1. Lift the lever on top of the seatback to unlock it.
A tab near the seatback lever
raises when the seatback is
unlocked.
2. Fold the seatback forward. Repeat the steps to fold the
other seatback, if desired.
Page 63 of 378
Chevrolet Impala Owner Manual (GMNA-Localizing-U.S./Canada-9921197) -
2017 - crc - 3/30/16
62 Seats and Restraints
Raising the Seatback
{Warning
If either seatback is not locked, it
could move forward in a sudden
stop or crash. That could cause
injury to the person sitting there.
Always push and pull on the
seatbacks to be sure they are
locked.
{Warning
A safety belt that is improperly
routed, not properly attached,
or twisted will not provide the
protection needed in a crash. The
person wearing the belt could be
seriously injured. After raising the
rear seatback, always check to be
sure that the safety belts are
properly routed and attached, and
are not twisted.To raise a seatback:
1. Lift the seatback up and push it rearward to lock it in place.
A tab near the seatback lever
retracts when the seatback is
locked in place.
2. Push and pull the top of the seatback to be sure it is locked
into position.
3. Repeat the steps to raise the other seatback, if necessary.
When the seat is not in use, it
should be kept in the upright, locked
position.
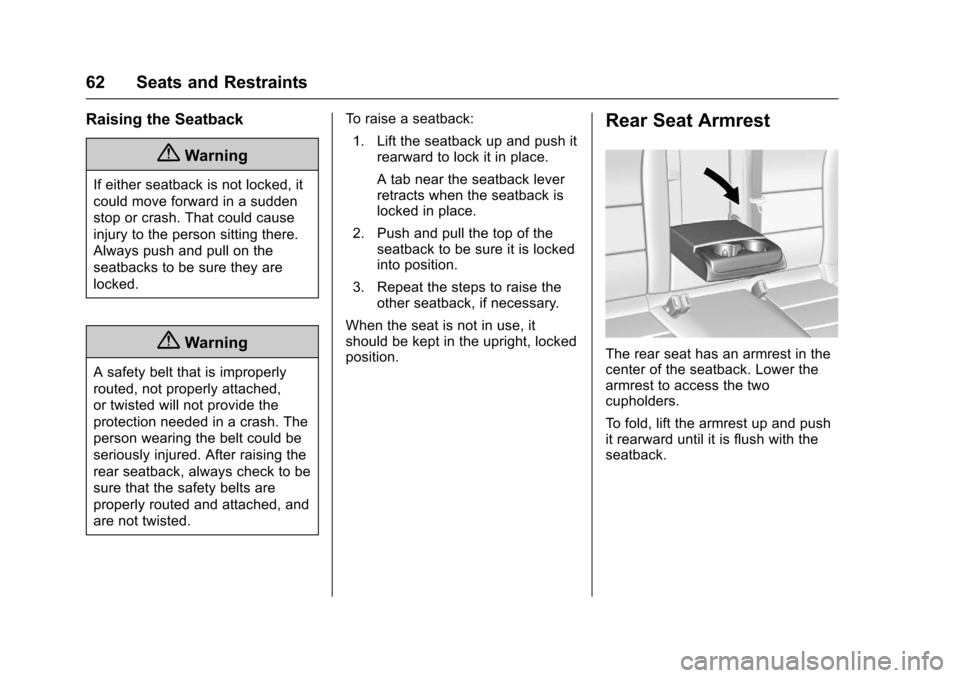
Rear Seat Armrest
The rear seat has an armrest in the
center of the seatback. Lower the
armrest to access the two
cupholders.
To fold, lift the armrest up and push
it rearward until it is flush with the
seatback.
Page 65 of 378
Chevrolet Impala Owner Manual (GMNA-Localizing-U.S./Canada-9921197) -
2017 - crc - 3/30/16
64 Seats and Restraints
Q: If my vehicle has airbags, whyshould I have to wear safety
belts?
A: Airbags are supplemental
systems only. They work with
safety belts —not instead of
them. Whether or not an airbag
is provided, all occupants still
have to buckle up to get the
most protection.
Also, in nearly all states and in
all Canadian provinces, the law
requires wearing safety belts.
How to Wear Safety Belts
Properly
This section is only for people of
adult size.
There are special things to know
about safety belts and children, and
there are different rules for smaller
children and infants. If a child will be
riding in the vehicle, see Older
Children 081 orInfants and Young
Children 083. Follow those rules for
everyone's protection. It is very important for all occupants
to buckle up. Statistics show that
unbelted people are hurt more often
in crashes than those who are
wearing safety belts.
There are important things to know
about wearing a safety belt properly.
.
Sit up straight and always keep
your feet on the floor in front
of you.
. Always use the correct buckle
for your seating position.
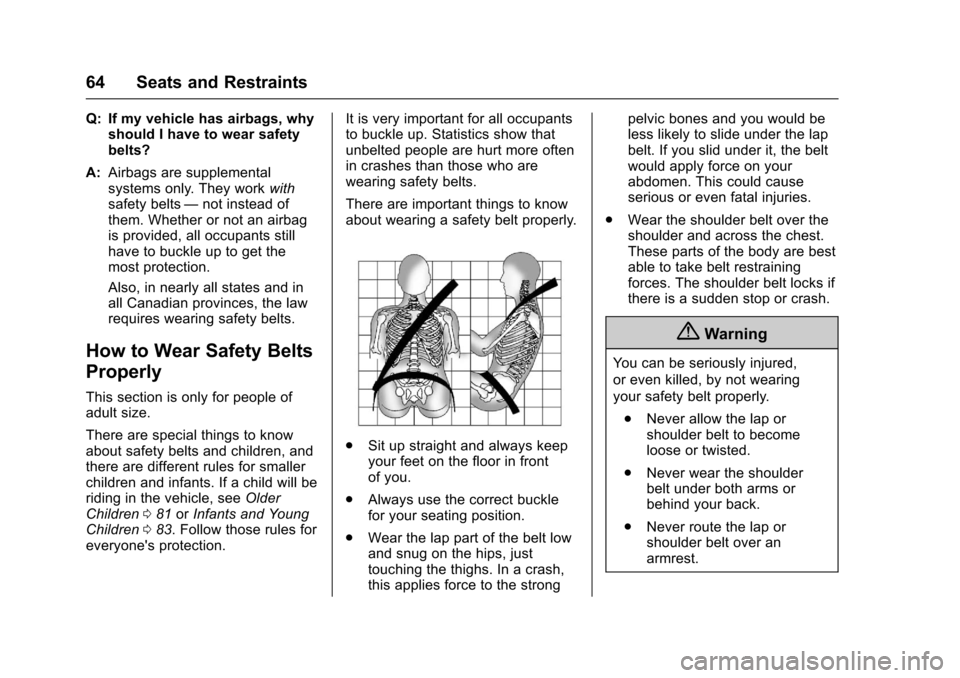
. Wear the lap part of the belt low
and snug on the hips, just
touching the thighs. In a crash,
this applies force to the strong pelvic bones and you would be
less likely to slide under the lap
belt. If you slid under it, the belt
would apply force on your
abdomen. This could cause
serious or even fatal injuries.
. Wear the shoulder belt over the
shoulder and across the chest.
These parts of the body are best
able to take belt restraining
forces. The shoulder belt locks if
there is a sudden stop or crash.
{Warning
You can be seriously injured,
or even killed, by not wearing
your safety belt properly.
. Never allow the lap or
shoulder belt to become
loose or twisted.
. Never wear the shoulder
belt under both arms or
behind your back.
. Never route the lap or
shoulder belt over an
armrest.
Page 66 of 378
Chevrolet Impala Owner Manual (GMNA-Localizing-U.S./Canada-9921197) -
2017 - crc - 3/30/16
Seats and Restraints 65
Lap-Shoulder Belt
All seating positions in the vehicle
have a lap-shoulder belt.
The following instructions explain
how to wear a lap-shoulder belt
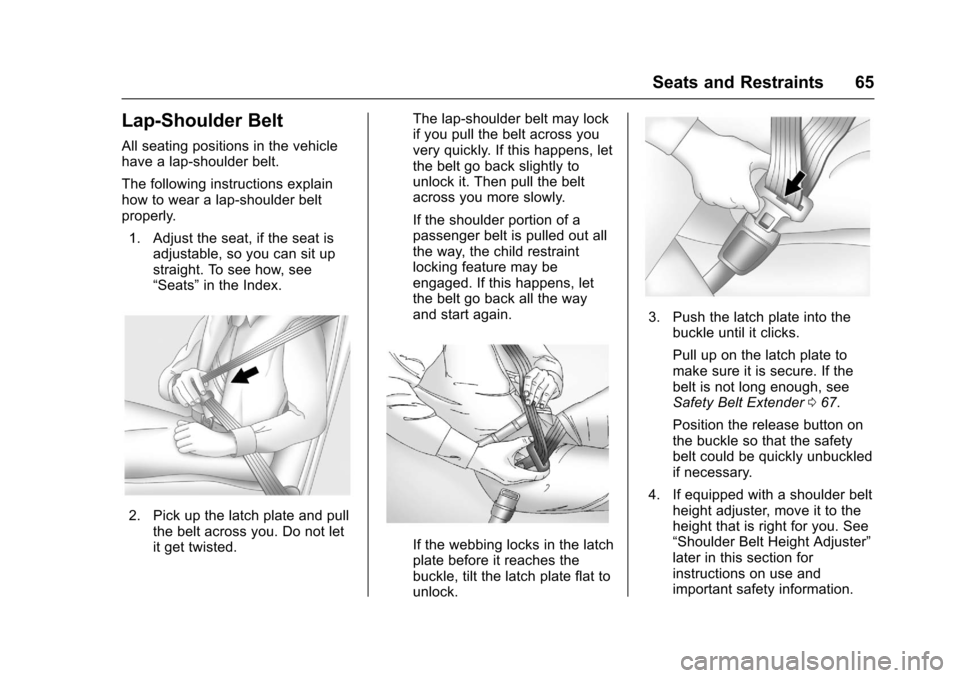
properly.1. Adjust the seat, if the seat is adjustable, so you can sit up
straight. To see how, see
“Seats” in the Index.
2. Pick up the latch plate and pull
the belt across you. Do not let
it get twisted. The lap-shoulder belt may lock
if you pull the belt across you
very quickly. If this happens, let
the belt go back slightly to
unlock it. Then pull the belt
across you more slowly.
If the shoulder portion of a
passenger belt is pulled out all
the way, the child restraint
locking feature may be
engaged. If this happens, let
the belt go back all the way
and start again.
If the webbing locks in the latch
plate before it reaches the
buckle, tilt the latch plate flat to
unlock.
3. Push the latch plate into the
buckle until it clicks.
Pull up on the latch plate to
make sure it is secure. If the
belt is not long enough, see
Safety Belt Extender 067.
Position the release button on
the buckle so that the safety
belt could be quickly unbuckled
if necessary.
4. If equipped with a shoulder belt height adjuster, move it to the
height that is right for you. See
“Shoulder Belt Height Adjuster”
later in this section for
instructions on use and
important safety information.