2017 CHEVROLET IMPALA cooling
[x] Cancel search: coolingPage 266 of 378

Chevrolet Impala Owner Manual (GMNA-Localizing-U.S./Canada-9921197) -
2017 - crc - 3/30/16
Vehicle Care 265
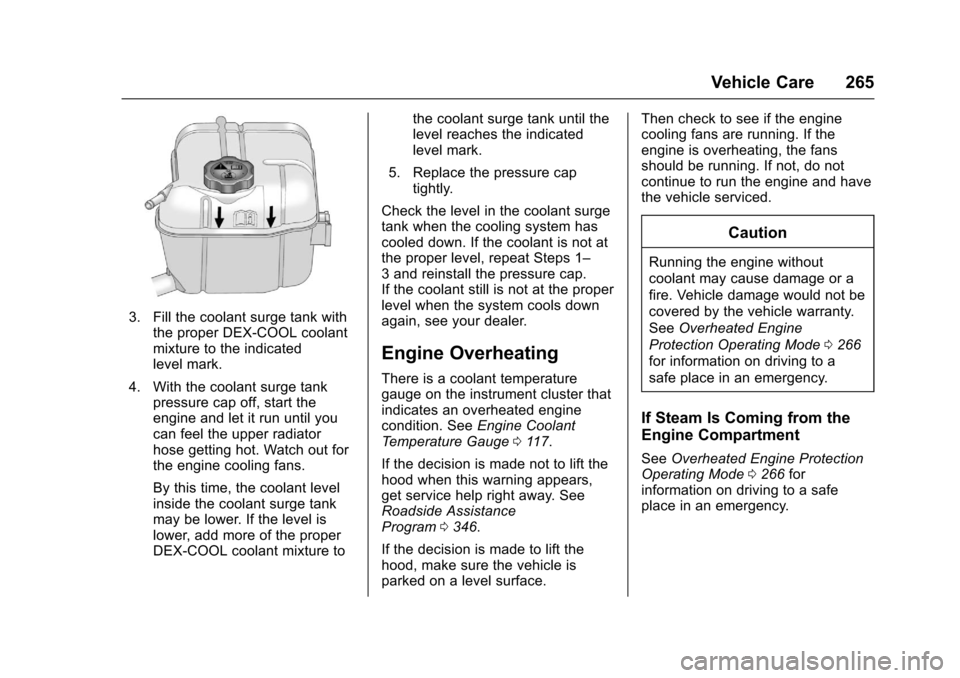
3. Fill the coolant surge tank withthe proper DEX-COOL coolant
mixture to the indicated
level mark.
4. With the coolant surge tank pressure cap off, start the
engine and let it run until you
can feel the upper radiator
hose getting hot. Watch out for
the engine cooling fans.
By this time, the coolant level
inside the coolant surge tank
may be lower. If the level is
lower, add more of the proper
DEX-COOL coolant mixture to the coolant surge tank until the
level reaches the indicated
level mark.
5. Replace the pressure cap tightly.
Check the level in the coolant surge
tank when the cooling system has
cooled down. If the coolant is not at
the proper level, repeat Steps 1–
3 and reinstall the pressure cap.
If the coolant still is not at the proper
level when the system cools down
again, see your dealer.
Engine Overheating
There is a coolant temperature
gauge on the instrument cluster that
indicates an overheated engine
condition. See Engine Coolant
Temperature Gauge 0117.
If the decision is made not to lift the
hood when this warning appears,
get service help right away. See
Roadside Assistance
Program 0346.
If the decision is made to lift the
hood, make sure the vehicle is
parked on a level surface. Then check to see if the engine
cooling fans are running. If the
engine is overheating, the fans
should be running. If not, do not
continue to run the engine and have
the vehicle serviced.
Caution
Running the engine without
coolant may cause damage or a
fire. Vehicle damage would not be
covered by the vehicle warranty.
See
Overheated Engine
Protection Operating Mode 0266
for information on driving to a
safe place in an emergency.
If Steam Is Coming from the
Engine Compartment
See Overheated Engine Protection
Operating Mode 0266 for
information on driving to a safe
place in an emergency.
Page 267 of 378

Chevrolet Impala Owner Manual (GMNA-Localizing-U.S./Canada-9921197) -
2017 - crc - 3/30/16
266 Vehicle Care
If No Steam Is Coming from
the Engine Compartment
If an engine overheat warning is
displayed but no steam can be seen
or heard, the problem might not be
too serious. Sometimes the engine
can get a little too hot when the
vehicle:
.Climbs a long hill on a hot day.
. Stops after high-speed driving.
. Idles for long periods in traffic.
. Tows a trailer.
If the overheat warning displays with
no sign of steam: 1. Turn the air conditioning off.
2. Turn the heater on to the highest temperature and to the
highest fan speed. Open the
windows as necessary.
3. When it is safe to do so, pull off the road, shift to P (Park) or
N (Neutral), and let the
engine idle.
If the coolant temperature gauge is
no longer in the overheat zone, the
vehicle can be driven. Continue to drive the vehicle slowly for about
10 minutes. Keep a safe vehicle
distance from the vehicle in front.
If the warning does not come back
on, continue to drive normally and
have the cooling system checked
for proper fill and function.
If the warning continues, pull over,
stop, and park the vehicle
right away.
If there is no sign of steam, idle the
engine for three minutes while
parked. If the warning is still
displayed, turn off the engine until it
cools down. Also, see
Overheated
Engine Protection Operating
Mode 0266.
Overheated Engine
Protection
Operating Mode
This emergency operating mode
allows the vehicle to be driven to a
safe place in an emergency
situation. If an overheated engine
condition exists, an overheat
protection mode which alternates
firing groups of cylinders helps prevent engine damage. In this
mode, there is significant loss in
power and engine performance.
The engine coolant temperature
gauge indicates if an overheat
condition exists. Driving extended
distances and/or towing a trailer in
the overheat protection mode
should be avoided.
Washer Fluid
What to Use
When windshield washer fluid is
needed, be sure to read the
manufacturer's instructions before
use. If operating the vehicle in an
area where the temperature may fall
below freezing, use a fluid that has
sufficient protection against
freezing.
Adding Washer Fluid
Page 281 of 378

Chevrolet Impala Owner Manual (GMNA-Localizing-U.S./Canada-9921197) -
2017 - crc - 3/30/16
280 Vehicle Care
The vehicle may not be equipped
with all of the fuses, relays, and
features shown.Fuses Usage
1 Transmission control module battery
2 Engine control module battery
3 A/C Clutch
4 –/Engine control
module battery
5 Engine control module/Ignition
6 Front wiper
7 Engine control module
8 Ignition coils –even
9 Ignition coils –odd
10 Engine control module 11 Non-walk PF
12 Starter
13 Transmission control module/Chassis
control module/
Ignition Fuses Usage
14 Cabin/Coolant pump
17 Body/Ignition 2
18 Battery disconnect unit/Ignition
19 Aeroshutter
20 Transmission auxiliary pump
21 Rear power window
22 Sunroof
23 Adaptive cruise control
24 Front power window
25 Retained accessory power
26 ABS pump
27 Electric parking brake
28 Rear defogger
29 Passive entry/Passive start
30 Canister vent solenoid
31 Left front heated seat
32 Body control module 6 Fuses Usage
33 Right front heated seat
34 ABS valve
35 Amplifier
37 Right high-beam headlamp
38 Left high-beam headlamp
41 Vacuum pump
42 Cooling fan k2
44 Starter 2
45 Cooling fan k1
46 Cooling fan
47 Non-walk PT
49 Right HID headlamp
50 Left HID headlamp
51 Horn/Dual horn
52 Display/Ignition
53 Body/Ignition
54 Instrument panel/ Ignition
Page 282 of 378

Chevrolet Impala Owner Manual (GMNA-Localizing-U.S./Canada-9921197) -
2017 - crc - 3/30/16
Vehicle Care 281
FusesUsage
55 Exterior rearview mirror
56 Front washer
60 Heated mirror
62 Obstacle detection
64 Rain sensor/Rear seat audio
66 Trunk release
67 Chassis control module
69 Battery voltage sensor
71 Memory seat
Relays Usage
1 A/C clutch
2 Starter
4 Front wiper speed
5 Front wiper control
6 Cabin/Coolant pump
7 Powertrain
8 Transmission auxiliary pump Relays
Usage
9 Cooling fan k2
10 Cooling fan k3
11 Starter
13 Cooling fan control k1
14 Low-beam HID headlamp
15 Run/Crank
17 Rear defogger
Instrument Panel Fuse
Block
The instrument panel fuse block is
in the instrument panel, on the
driver side of the vehicle.
To access the fuses on vehicles
equipped with a storage bin: 1. Push forward on the top edge of the bin to unlatch it.
2. Press in on the sides of the bin to release it from the
instrument panel.
3. Pivot the door downward, allowing it to hang from the
instrument panel.
4. To close the bin, swing it upward and push in until
closed.
Page 304 of 378

Chevrolet Impala Owner Manual (GMNA-Localizing-U.S./Canada-9921197) -
2017 - crc - 3/30/16
Vehicle Care 303
Caution
The wrong wheel can also cause
problems with bearing life, brake
cooling, speedometer or
odometer calibration, headlamp
aim, bumper height, vehicle
ground clearance, and tire or tire
chain clearance to the body and
chassis.
Used Replacement Wheels
{Warning
Replacing a wheel with a used
one is dangerous. How it has
been used or how far it has been
driven may be unknown. It could
fail suddenly and cause a crash.
When replacing wheels, use a
new GM original equipment
wheel.
Tire Chains
{Warning
Do not use tire chains. There is
not enough clearance. Tire chains
used on a vehicle without the
proper amount of clearance can
cause damage to the brakes,
suspension, or other vehicle
parts. The area damaged by the
tire chains could cause loss of
control and a crash.
Use another type of traction
device only if its manufacturer
recommends it for the vehicle's
tire size combination and road
conditions. Follow that
manufacturer's instructions. To
avoid vehicle damage, drive slow
and readjust or remove the
traction device if it contacts the
vehicle. Do not spin the wheels.
If traction devices are used, install
them on the front tires.
If a Tire Goes Flat
It is unusual for a tire to blow out
while driving, especially if the tires
are maintained properly. SeeTires
0 283. If air goes out of a tire, it is
much more likely to leak out slowly.
But if there ever is a blowout, here
are a few tips about what to expect
and what to do:
If a front tire fails, the flat tire
creates a drag that pulls the vehicle
toward that side. Take your foot off
the accelerator pedal and grip the
steering wheel firmly. Steer to
maintain lane position, and then
gently brake to a stop, well off the
road, if possible.
A rear blowout, particularly on a
curve, acts much like a skid and
may require the same correction as
used in a skid. Stop pressing the
accelerator pedal and steer to
straighten the vehicle. It may be
very bumpy and noisy. Gently brake
to a stop, well off the road,
if possible.
Page 330 of 378

Chevrolet Impala Owner Manual (GMNA-Localizing-U.S./Canada-9921197) -
2017 - crc - 3/30/16
Service and Maintenance 329
Maintenance Schedule
Additional Required
Services - Normal12 000 km/7,500 mi
24 000 km/15,000 mi
36 000 km/22,500 mi
48 000 km/30,000 mi
60 000 km/37,500 mi
72 000 km/45,000 mi
84 000 km/52,500 mi
96 000 km/60,000 mi
108 000 km/67,500 mi
120 000 km/75,000 mi
132 000 km/82,500 mi
144 000 km/90,000 mi
156 000 km/97,500 mi
168 000 km/105,000 mi 180 000 km/112,500 mi
192 000 km/120,000 mi
204 000 km/127,500 mi
216 000 km/135,000 mi
228 000 km/142,500 mi
240 000 km/150,000 mi
Rotate tires and perform Required Services.
Check engine oil level and oil life percentage.
Change engine oil and filter, if needed.@ @ @ @ @ @ @ @ @ @ @ @ @ @ @ @ @ @ @ @
Replace passenger compartment air filter. (1)@ @@@@@
Inspect evaporative control system. (2)@ @@
Replace engine air cleaner filter. (3)@@@
Replace spark plugs. Inspect spark plug wires.@
Drain and fill engine cooling system. (4)@
Visually inspect accessory drive belts. (5)@
Replace brake fluid. (6)
Page 331 of 378

Chevrolet Impala Owner Manual (GMNA-Localizing-U.S./Canada-9921197) -
2017 - crc - 3/30/16
330 Service and Maintenance
Footnotes—Maintenance
Schedule Additional Required
Services - Normal
(1) Or every two years, whichever
comes first. More frequent
passenger compartment air filter
replacement may be needed if
driving in areas with heavy traffic,
poor air quality, high dust levels,
or environmental allergens.
Passenger compartment air filter
replacement may also be needed if
there is reduced airflow, window
fogging, or odors. Your GM dealer
can help determine when to replace
the filter.
(2) Visually check all fuel and vapor
lines and hoses for proper
attachment, connection, routing, and
condition.
(3) Or every four years, whichever
comes first. If driving in dusty
conditions, inspect the filter at each
oil change or more often as needed.
(4) Or every five years, whichever
comes first. See Cooling
System 0261. (5)
Or every 10 years, whichever
comes first. Inspect for fraying,
excessive cracking, or damage;
replace, if needed.
(6) Replace brake fluid every five
years. See Brake Fluid 0268.
Page 332 of 378

Chevrolet Impala Owner Manual (GMNA-Localizing-U.S./Canada-9921197) -
2017 - crc - 3/30/16
Service and Maintenance 331
Maintenance Schedule
Additional Required
Services - Severe12 000 km/7,500 mi
24 000 km/15,000 mi
36 000 km/22,500 mi
48 000 km/30,000 mi
60 000 km/37,500 mi
72 000 km/45,000 mi
84 000 km/52,500 mi
96 000 km/60,000 mi
108 000 km/67,500 mi
120 000 km/75,000 mi
132 000 km/82,500 mi
144 000 km/90,000 mi
156 000 km/97,500 mi
168 000 km/105,000 mi 180 000 km/112,500 mi
192 000 km/120,000 mi
204 000 km/127,500 mi
216 000 km/135,000 mi
228 000 km/142,500 mi
240 000 km/150,000 mi
Rotate tires and perform Required Services.
Check engine oil level and oil life percentage.
Change engine oil and filter, if needed.@ @ @ @ @ @ @ @ @ @ @ @ @ @ @ @ @ @ @ @
Replace passenger compartment air filter. (1)@ @@@@@
Inspect evaporative control system. (2)@ @@
Replace engine air cleaner filter. (3)@@@
Replace spark plugs. Inspect spark plug wires.@
Change automatic transmission fluid.@@@
Drain and fill engine cooling system. (4)@
Visually inspect accessory drive belts. (5)@
Replace brake fluid. (6)
Footnotes—Maintenance
Schedule Additional Required
Services - Severe
(1) Or every two years, whichever
comes first. More frequent
passenger compartment air filter
replacement may be needed if
driving in areas with heavy traffic,
poor air quality, high dust levels,
or environmental allergens. Passenger compartment air filter
replacement may also be needed if
there is reduced airflow, window
fogging, or odors. Your GM dealer
can help determine when to replace
the filter.
(2)
Visually check all fuel and vapor
lines and hoses for proper
attachment, connection, routing, and
condition. (3)
Or every four years, whichever
comes first. If driving in dusty
conditions, inspect the filter at each
oil change or more often as needed.
(4) Or every five years, whichever
comes first. See Cooling
System 0261.