2017 CHEVROLET IMPALA ON RUN
[x] Cancel search: ON RUNPage 51 of 378
Chevrolet Impala Owner Manual (GMNA-Localizing-U.S./Canada-9921197) -
2017 - crc - 3/30/16
50 Keys, Doors, and Windows
2. Place the ignition in ACC/ACCESSORY or ON/RUN.
3. Partially open the window to be programmed, then close it and
continue to pull the switch
briefly after the window has
fully closed.
4. Press the power window switch until the window is fully open
and briefly hold.
Sun Visors
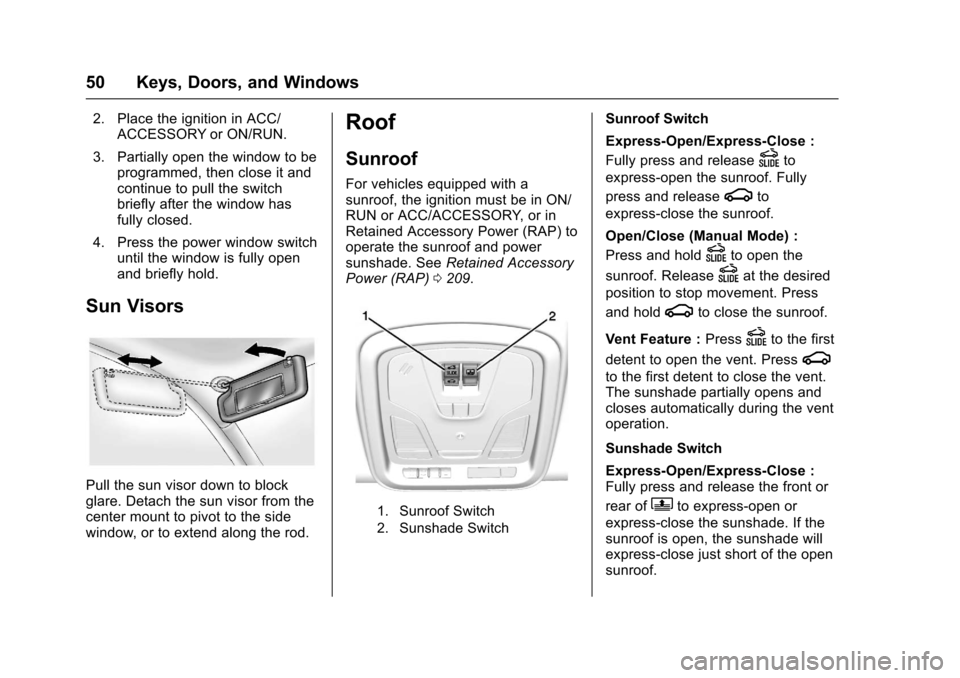
Pull the sun visor down to block
glare. Detach the sun visor from the
center mount to pivot to the side
window, or to extend along the rod.
Roof
Sunroof
For vehicles equipped with a
sunroof, the ignition must be in ON/
RUN or ACC/ACCESSORY, or in
Retained Accessory Power (RAP) to
operate the sunroof and power
sunshade. See Retained Accessory
Power (RAP) 0209.
1. Sunroof Switch
2. Sunshade Switch
Sunroof Switch
Express-Open/Express-Close :
Fully press and release
Dto
express-open the sunroof. Fully
press and release
gto
express-close the sunroof.
Open/Close (Manual Mode) :
Press and hold
Dto open the
sunroof. Release
Dat the desired
position to stop movement. Press
and hold
gto close the sunroof.
Vent Feature : Press
Dto the first
detent to open the vent. Press
g
to the first detent to close the vent.
The sunshade partially opens and
closes automatically during the vent
operation.
Sunshade Switch
Express-Open/Express-Close :
Fully press and release the front or
rear of
Qto express-open or
express-close the sunshade. If the
sunroof is open, the sunshade will
express-close just short of the open
sunroof.
Page 59 of 378
Chevrolet Impala Owner Manual (GMNA-Localizing-U.S./Canada-9921197) -
2017 - crc - 3/30/16
58 Seats and Restraints
2. Move the seatback to thedesired position, and then
release the lever to lock the
seatback in place.
3. Push and pull on the seatback to make sure it is locked.
To return the seatback to the upright
position: 1. Lift the lever fully without applying pressure to the
seatback, and the seatback will
return to the upright position.
2. Push and pull on the seatback to make sure it is locked.
Power Reclining Seatbacks
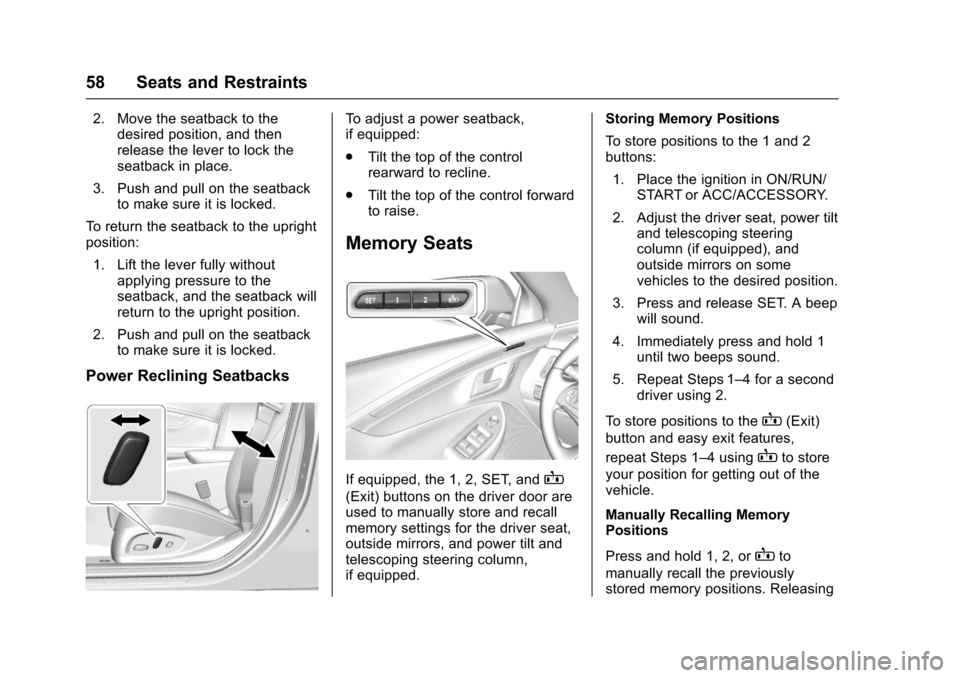
To adjust a power seatback,
if equipped:
.Tilt the top of the control
rearward to recline.
. Tilt the top of the control forward
to raise.
Memory Seats
If equipped, the 1, 2, SET, andB
(Exit) buttons on the driver door are
used to manually store and recall
memory settings for the driver seat,
outside mirrors, and power tilt and
telescoping steering column,
if equipped. Storing Memory Positions
To store positions to the 1 and 2
buttons:
1. Place the ignition in ON/RUN/ START or ACC/ACCESSORY.
2. Adjust the driver seat, power tilt and telescoping steering
column (if equipped), and
outside mirrors on some
vehicles to the desired position.
3. Press and release SET. A beep will sound.
4. Immediately press and hold 1 until two beeps sound.
5. Repeat Steps 1–4 for a second driver using 2.
To store positions to the
B(Exit)
button and easy exit features,
repeat Steps 1–4 using
Bto store
your position for getting out of the
vehicle.
Manually Recalling Memory
Positions
Press and hold 1, 2, or
Bto
manually recall the previously
stored memory positions. Releasing
Page 60 of 378

Chevrolet Impala Owner Manual (GMNA-Localizing-U.S./Canada-9921197) -
2017 - crc - 3/30/16
Seats and Restraints 59
1, 2, orBbefore the stored
positions are reached stops the
recall.
Automatically Recalling Memory
Positions (Auto Memory Recall)
If programmed on in the vehicle
personalization menu, the Auto
(Automatic) Memory Recall feature
automatically recalls the current
driver ’s previously stored 1 or 2
position when the ignition is
changed from OFF to ON/RUN or
ACC/ACCESSORY.
See “Auto Memory Recall” under
“Comfort and Convenience” in
Vehicle Personalization 0139.
To stop recall movement, press one
of the memory, power mirror,
or power seat controls; or press the
power tilt and telescoping steering
column control (if equipped). Placing
the ignition in LOCK/OFF also stops
the recall.
RKE transmitters are not labeled
with a number. If your memory seat
position is stored to 1 or 2, but this
position is not automatically recalling, then store your positions
to the other button or switch RKE
transmitters with the other driver.
In some vehicles the Driver ID may
be displayed for the first few ignition
cycles if the vehicle’s driver has
changed.
Easy Exit Recall
If programmed on in the vehicle
personalization menu, the easy exit
feature automatically recalls the
previously stored exit position when
exiting the vehicle. See
“Storing
Memory Positions” previously in this
section. See also Vehicle
Personalization 0139.
Easy exit recall automatically
activates when one of the following
occurs:
. The vehicle is turned off and the
driver door is opened within a
short time.
. The vehicle is turned off with the
driver door open. To stop recall movement, press one
of the memory, driver seat, outside
mirror, or power tilt and telescoping
steering column controls.
Obstructions
If something has blocked the driver
seat and/or power tilt and
telescoping steering column (if
equipped) while recalling a memory
position, the recall may stop.
Remove the obstruction. Then do
one of the following:
.
If automatically or manually
recalling the stored memory
position, press and hold the
appropriate manual control for
two seconds. Try recalling again
by pressing the appropriate
memory button.
. If automatically recalling the
position, press and hold the
appropriate manual control for
the memory item that is not
recalling for two seconds. Try
recalling again by opening the
driver door and pressing
Kon
the RKE transmitter.
Page 95 of 378
Chevrolet Impala Owner Manual (GMNA-Localizing-U.S./Canada-9921197) -
2017 - crc - 3/30/16
94 Seats and Restraints
at the LATCH path and attempt
to move it side to side and
back and forth. There should
be no more than 2.5 cm (1 in)
of movement for proper
installation.
Replacing LATCH System
Parts After a Crash
{Warning
A crash can damage the LATCH
system in the vehicle. A damaged
LATCH system may not properly
secure the child restraint,
resulting in serious injury or even
death in a crash. To help make
sure the LATCH system is
working properly after a crash,
see your dealer to have the
system inspected and any
necessary replacements made as
soon as possible.
If the vehicle has the LATCH system
and it was being used during a
crash, new LATCH system parts
may be needed. New parts and repairs may be
necessary even if the LATCH
system was not being used at the
time of the crash.
Securing Child Restraints
(With the Safety Belt in
the Rear Seat)
When securing a child restraint in a
rear seating position, study the
instructions that came with the child
restraint to make sure it is
compatible with this vehicle.
If the child restraint has the LATCH
system, see
Lower Anchors and
Tethers for Children (LATCH
System) 088 for how and where to
install the child restraint using
LATCH. If a child restraint is secured
in the vehicle using a safety belt
and it uses a top tether, see Lower
Anchors and Tethers for Children
(LATCH System) 088 for top tether
anchor locations.
Do not secure a child seat in a
position without a top tether anchor
if a national or local law requires
that the top tether be anchored, or if the instructions that come with the
child restraint say that the top strap
must be anchored.
If the child restraint or vehicle seat
position does not have the LATCH
system, you will be using the safety
belt to secure the child restraint.
Be sure to follow the instructions
that came with the child restraint.
If more than one child restraint
needs to be installed in the rear
seat, be sure to read
Where to Put
the Restraint 087.
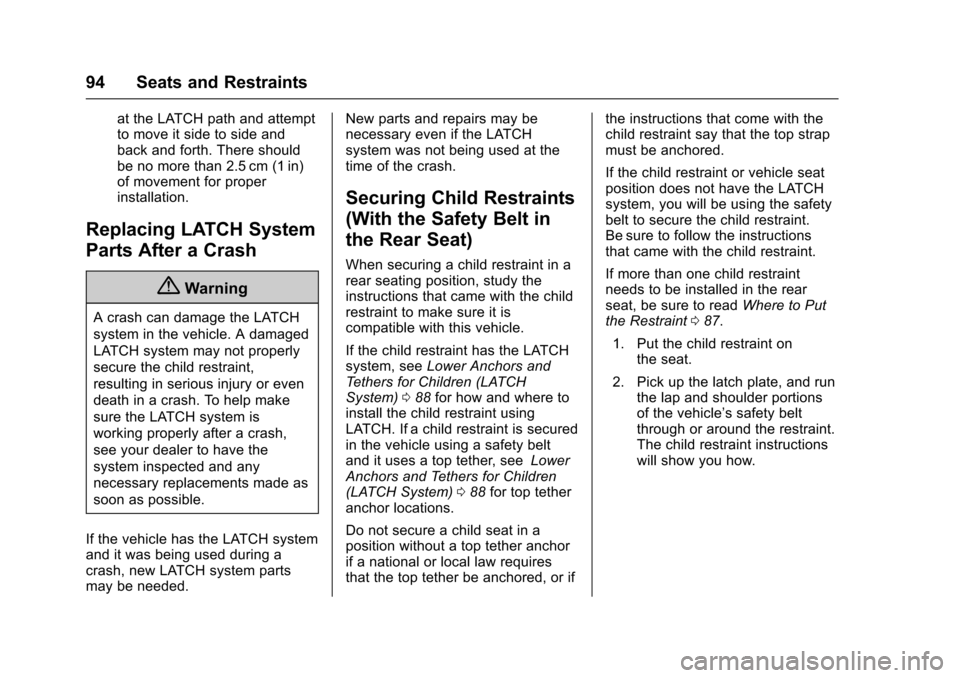
1. Put the child restraint on the seat.
2. Pick up the latch plate, and run the lap and shoulder portions
of the vehicle’s safety belt
through or around the restraint.
The child restraint instructions
will show you how.
Page 98 of 378
Chevrolet Impala Owner Manual (GMNA-Localizing-U.S./Canada-9921197) -
2017 - crc - 3/30/16
Seats and Restraints 97
Warning (Continued)
forward-facing child restraint in
the front outboard passenger
seat, always move the seat as far
back as it will go. It is better to
secure the child restraint in a
rear seat.
SeePassenger Sensing System
0 75 for additional information.
If the child restraint uses a top
tether, see Lower Anchors and
Tethers for Children (LATCH
System) 088 for top tether anchor
locations.
Do not secure a child seat in a
position without a top tether anchor
if a national or local law requires
that the top tether be anchored, or if
the instructions that come with the
child restraint say that the top strap
must be anchored.
In Canada, the law requires that
forward-facing child restraints have
a top tether, and that the tether be
attached. When using the lap-shoulder belt to
secure the child restraint in this
position, follow the instructions that
came with the child restraint and the
following instructions:
1. Move the seat as far back as it will go before securing the
forward-facing child restraint.
Move the seat upward or the
seatback to an upright position,
if needed, to get a tight
installation of the child
restraint.
When the passenger sensing
system has turned off the front
outboard passenger frontal
airbag and knee airbag, the off
indicator on the passenger
airbag status indicator should
light and stay lit when you start
the vehicle. See Passenger
Airbag Status Indicator 0119.
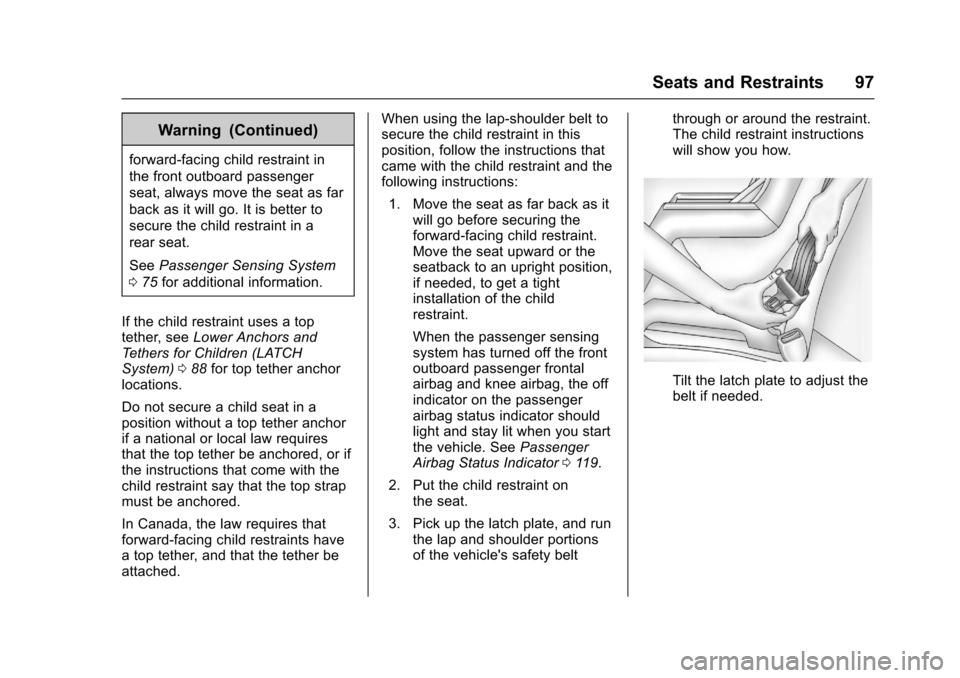
2. Put the child restraint on the seat.
3. Pick up the latch plate, and run the lap and shoulder portions
of the vehicle's safety belt through or around the restraint.
The child restraint instructions
will show you how.
Tilt the latch plate to adjust the
belt if needed.
Page 104 of 378
Chevrolet Impala Owner Manual (GMNA-Localizing-U.S./Canada-9921197) -
2017 - crc - 3/30/16
Storage 103
Convenience Net
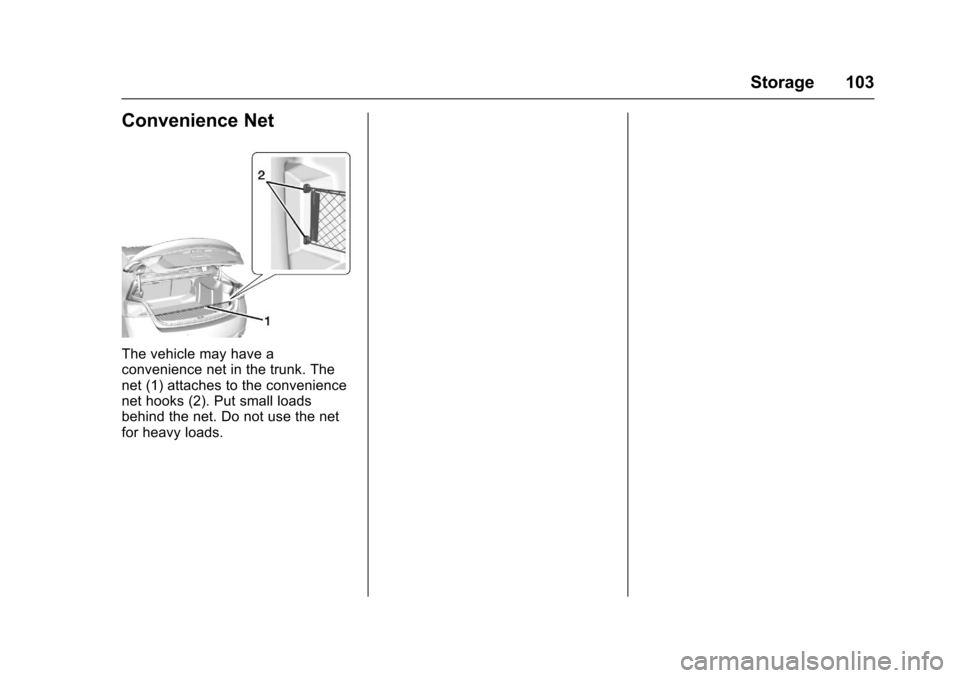
The vehicle may have a
convenience net in the trunk. The
net (1) attaches to the convenience
net hooks (2). Put small loads
behind the net. Do not use the net
for heavy loads.
Page 108 of 378
Chevrolet Impala Owner Manual (GMNA-Localizing-U.S./Canada-9921197) -
2017 - crc - 3/30/16
Instruments and Controls 107
Windshield Wiper/Washer
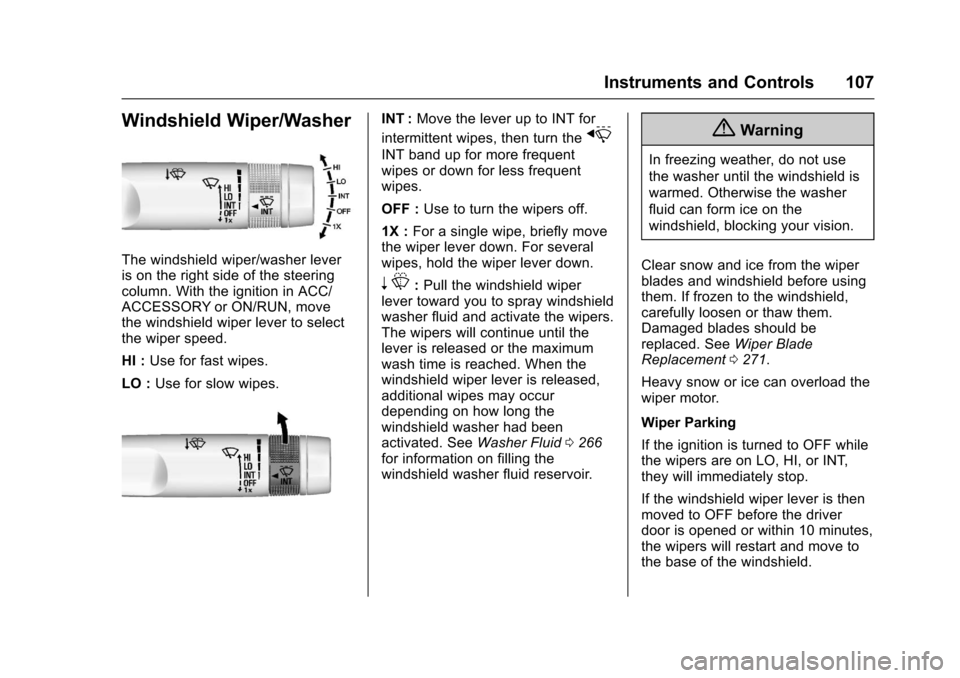
The windshield wiper/washer lever
is on the right side of the steering
column. With the ignition in ACC/
ACCESSORY or ON/RUN, move
the windshield wiper lever to select
the wiper speed.
HI :Use for fast wipes.
LO : Use for slow wipes.
INT : Move the lever up to INT for
intermittent wipes, then turn the
x
INT band up for more frequent
wipes or down for less frequent
wipes.
OFF : Use to turn the wipers off.
1X : For a single wipe, briefly move
the wiper lever down. For several
wipes, hold the wiper lever down.
n L: Pull the windshield wiper
lever toward you to spray windshield
washer fluid and activate the wipers.
The wipers will continue until the
lever is released or the maximum
wash time is reached. When the
windshield wiper lever is released,
additional wipes may occur
depending on how long the
windshield washer had been
activated. See Washer Fluid0266
for information on filling the
windshield washer fluid reservoir.
{Warning
In freezing weather, do not use
the washer until the windshield is
warmed. Otherwise the washer
fluid can form ice on the
windshield, blocking your vision.
Clear snow and ice from the wiper
blades and windshield before using
them. If frozen to the windshield,
carefully loosen or thaw them.
Damaged blades should be
replaced. See Wiper Blade
Replacement 0271.
Heavy snow or ice can overload the
wiper motor.
Wiper Parking
If the ignition is turned to OFF while
the wipers are on LO, HI, or INT,
they will immediately stop.
If the windshield wiper lever is then
moved to OFF before the driver
door is opened or within 10 minutes,
the wipers will restart and move to
the base of the windshield.
Page 109 of 378
Chevrolet Impala Owner Manual (GMNA-Localizing-U.S./Canada-9921197) -
2017 - crc - 3/30/16
108 Instruments and Controls
If the ignition is turned to OFF while
the wipers are performing wipes due
to windshield washing, the wipers
continue to run until they reach the
base of the windshield.
Compass
The vehicle may have a compass
display on the Driver Information
Center (DIC). The compass receives
its heading and other information
from the Global Positioning
System (GPS) antenna,
StabiliTrak
®, and vehicle speed
information.
The compass system is designed to
operate for a certain number of
miles or degrees of turn before
needing a signal from the GPS
satellites. When the compass
display shows CAL, drive the
vehicle for a short distance in an
open area where it can receive a
GPS signal. The compass system
will automatically determine when a
GPS signal is restored and provide a heading again. See
Compass
Messages 0131 for the messages
that may be displayed for the
compass.
Clock (Base Radio)
Setting the Time and Date
To set the time or date:
1. Select SETTINGS from the Home Page, then select Time
and Date Settings.
2. Select the desired function.
3. Turn the MENU knob to increase or decrease the value.
4. Press the MENU knob to go to the next value. After the last
value is selected the system
will update and return to the
SETTINGS menu. Press
q
BACK to go to the last menu
and save the changes.
To set the Auto Set:
1. Select Settings from the Home Page, then select Time and
Date Settings.
2. Select Auto Set. 3. Press the faceplate button just
below Auto Set to turn it on
or off.
Press
qBACK to go to the last
menu and save the changes.
Auto Set requires an OnStar
subscription.
If Auto Set is on, the time displayed
on the clock may not update
immediately when driving into a new
time zone.
To set the clock display:
1. Select Settings from the Home Page, then select Time and
Date Settings.
2. Select Clock Display.
3. Turn the MENU knob to Off or On.
4. Press the MENU knob to select.
Press
qBACK to go to the last
menu and save the changes.