2017 CHEVROLET EXPRESS CARGO VAN wheel
[x] Cancel search: wheelPage 277 of 346
Chevrolet Express Owner Manual (GMNA-Localizing-U.S./Canada/Mexico-9967827) - 2017 - crc - 5/2/16
276 Vehicle Care
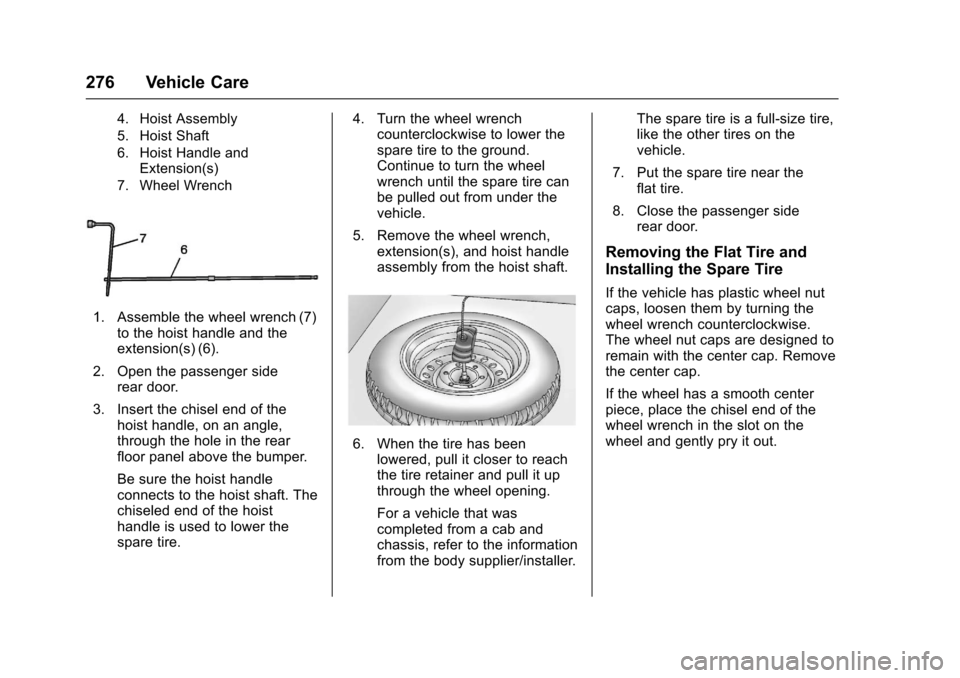
4. Hoist Assembly
5. Hoist Shaft
6. Hoist Handle andExtension(s)
7. Wheel Wrench
1. Assemble the wheel wrench (7)to the hoist handle and theextension(s) (6).
2. Open the passenger siderear door.
3. Insert the chisel end of thehoist handle, on an angle,through the hole in the rearfloor panel above the bumper.
Be sure the hoist handleconnects to the hoist shaft. Thechiseled end of the hoisthandle is used to lower thespare tire.
4. Turn the wheel wrenchcounterclockwise to lower thespare tire to the ground.Continue to turn the wheelwrench until the spare tire canbe pulled out from under thevehicle.
5. Remove the wheel wrench,extension(s), and hoist handleassembly from the hoist shaft.
6. When the tire has beenlowered, pull it closer to reachthe tire retainer and pull it upthrough the wheel opening.
For a vehicle that wascompleted from a cab andchassis, refer to the informationfrom the body supplier/installer.
The spare tire is a full-size tire,like the other tires on thevehicle.
7. Put the spare tire near theflat tire.
8. Close the passenger siderear door.
Removing the Flat Tire and
Installing the Spare Tire
If the vehicle has plastic wheel nutcaps, loosen them by turning thewheel wrench counterclockwise.The wheel nut caps are designed toremain with the center cap. Removethe center cap.
If the wheel has a smooth centerpiece, place the chisel end of thewheel wrench in the slot on thewheel and gently pry it out.
Page 278 of 346
Chevrolet Express Owner Manual (GMNA-Localizing-U.S./Canada/Mexico-9967827) - 2017 - crc - 5/2/16
Vehicle Care 277
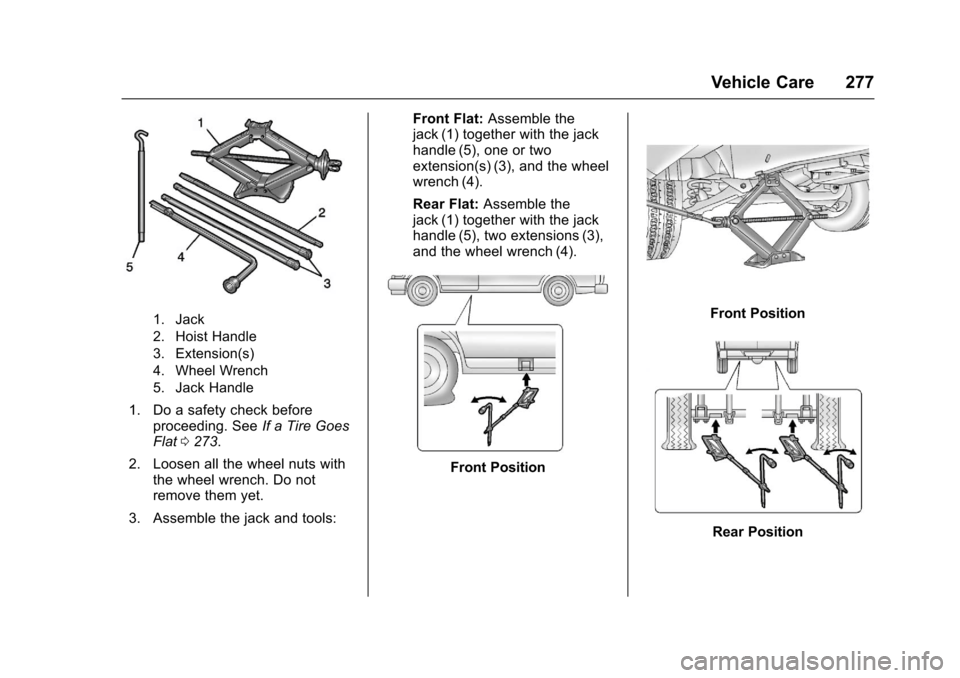
1. Jack
2. Hoist Handle
3. Extension(s)
4. Wheel Wrench
5. Jack Handle
1. Do a safety check beforeproceeding. SeeIf a Tire GoesFlat0273.
2. Loosen all the wheel nuts withthe wheel wrench. Do notremove them yet.
3. Assemble the jack and tools:
Front Flat:Assemble thejack (1) together with the jackhandle (5), one or twoextension(s) (3), and the wheelwrench (4).
Rear Flat:Assemble thejack (1) together with the jackhandle (5), two extensions (3),and the wheel wrench (4).
Front Position
Front Position
Rear Position
Page 279 of 346
Chevrolet Express Owner Manual (GMNA-Localizing-U.S./Canada/Mexico-9967827) - 2017 - crc - 5/2/16
278 Vehicle Care
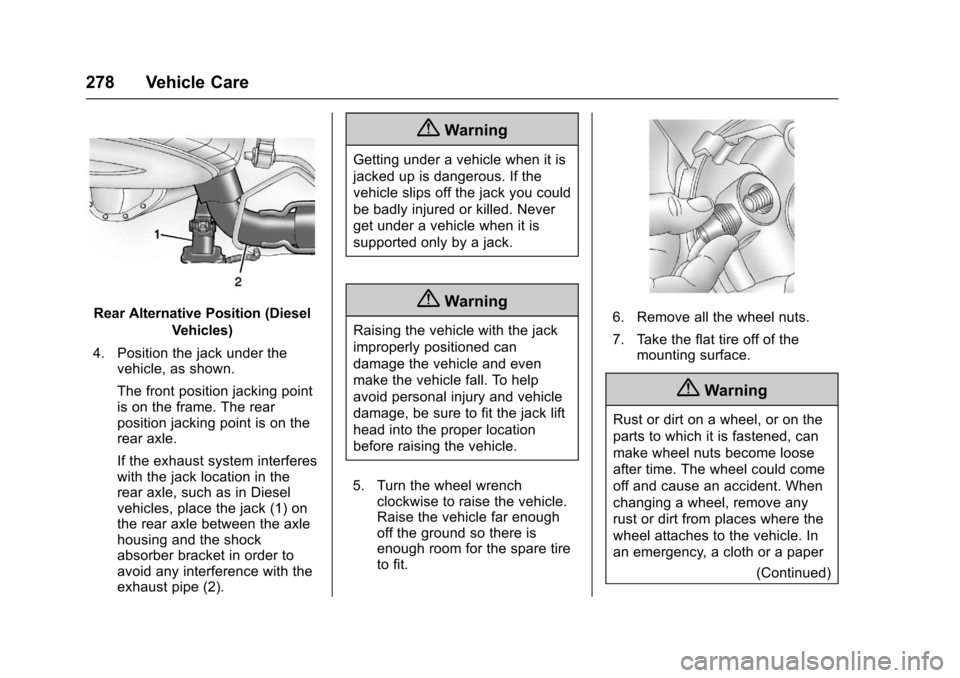
Rear Alternative Position (Diesel
Vehicles)
4. Position the jack under thevehicle, as shown.
The front position jacking pointis on the frame. The rearposition jacking point is on therear axle.
If the exhaust system interfereswith the jack location in therear axle, such as in Dieselvehicles, place the jack (1) onthe rear axle between the axlehousing and the shockabsorber bracket in order toavoid any interference with theexhaust pipe (2).
{Warning
Getting under a vehicle when it is
jacked up is dangerous. If the
vehicle slips off the jack you could
be badly injured or killed. Never
get under a vehicle when it is
supported only by a jack.
{Warning
Raising the vehicle with the jack
improperly positioned can
damage the vehicle and even
make the vehicle fall. To help
avoid personal injury and vehicle
damage, be sure to fit the jack lift
head into the proper location
before raising the vehicle.
5. Turn the wheel wrenchclockwise to raise the vehicle.Raise the vehicle far enoughoff the ground so there isenough room for the spare tireto fit.
6. Remove all the wheel nuts.
7. Take the flat tire off of themounting surface.
{Warning
Rust or dirt on a wheel, or on the
parts to which it is fastened, can
make wheel nuts become loose
after time. The wheel could come
off and cause an accident. When
changing a wheel, remove any
rust or dirt from places where the
wheel attaches to the vehicle. In
an emergency, a cloth or a paper
(Continued)
Page 280 of 346
Chevrolet Express Owner Manual (GMNA-Localizing-U.S./Canada/Mexico-9967827) - 2017 - crc - 5/2/16
Vehicle Care 279
Warning (Continued)
towel can be used; however, use
ascraperorwirebrushlaterto
remove all rust or dirt.
8. Remove any rust or dirt fromthe wheel bolts, mountingsurfaces, and spare wheel.
{Warning
Never use oil or grease on bolts
or nuts because the nuts might
come loose. The vehicle's wheel
could fall off, causing a crash.
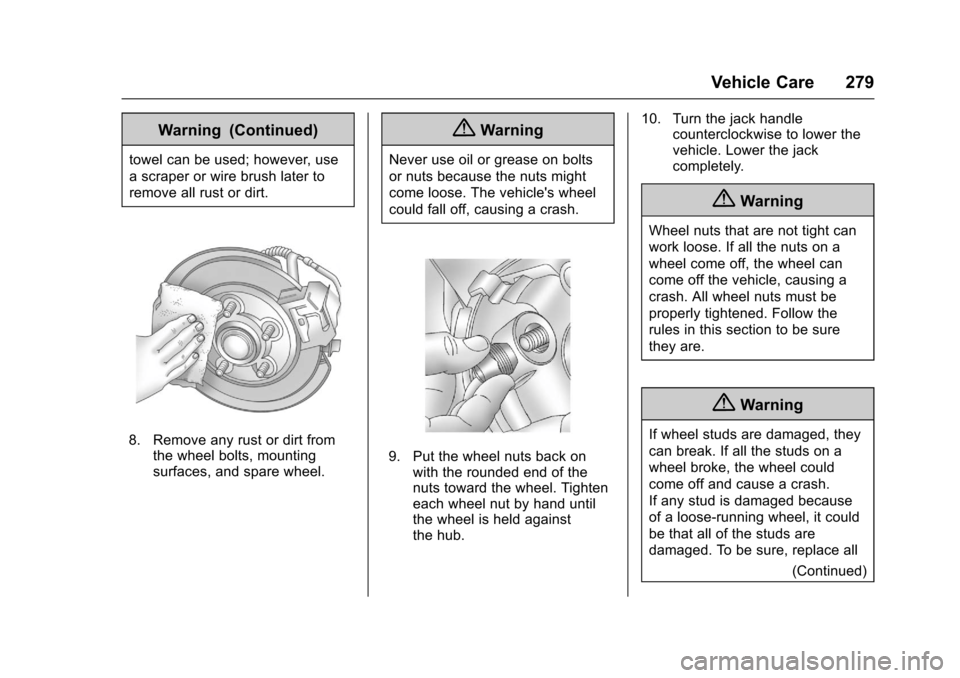
9. Put the wheel nuts back onwith the rounded end of thenuts toward the wheel. Tighteneach wheel nut by hand untilthe wheel is held againstthe hub.
10. Turn the jack handlecounterclockwise to lower thevehicle. Lower the jackcompletely.
{Warning
Wheel nuts that are not tight can
work loose. If all the nuts on a
wheel come off, the wheel can
come off the vehicle, causing a
crash. All wheel nuts must be
properly tightened. Follow the
rules in this section to be sure
they are.
{Warning
If wheel studs are damaged, they
can break. If all the studs on a
wheel broke, the wheel could
come off and cause a crash.
If any stud is damaged because
of a loose-running wheel, it could
be that all of the studs are
damaged. To be sure, replace all
(Continued)
Page 281 of 346
Chevrolet Express Owner Manual (GMNA-Localizing-U.S./Canada/Mexico-9967827) - 2017 - crc - 5/2/16
280 Vehicle Care
Warning (Continued)
studs on the wheel. If the stud
holes in a wheel have become
larger, the wheel could collapse in
operation. Replace any wheel if
its stud holes have become larger
or distorted in any way. Inspect
hubs and hub⇣piloted wheels for
damage. Because of loose
running wheels, piloting pad
damage may occur and require
replacement of the entire hub, for
proper centering of the wheels.
When replacing studs, hubs,
wheel nuts or wheels, be sure to
use GM original equipment parts.
{Warning
Wheel nuts that are improperly or
incorrectly tightened can cause
the wheels to become loose or
come off. The wheel nuts should
be tightened with a torque wrench
to the proper torque specification
(Continued)
Warning (Continued)
after replacing. Follow the torque
specification supplied by the
aftermarket manufacturer when
using accessory locking wheel
nuts. SeeCapacities and
Specifications0309for original
equipment wheel nut torque
specifications.
Caution
Improperly tightened wheel nuts
can lead to brake pulsation and
rotor damage. To avoid expensive
brake repairs, evenly tighten the
wheel nuts in the proper
sequence and to the proper
torque specification. See
Capacities and Specifications
0309for the wheel nut torque
specification.
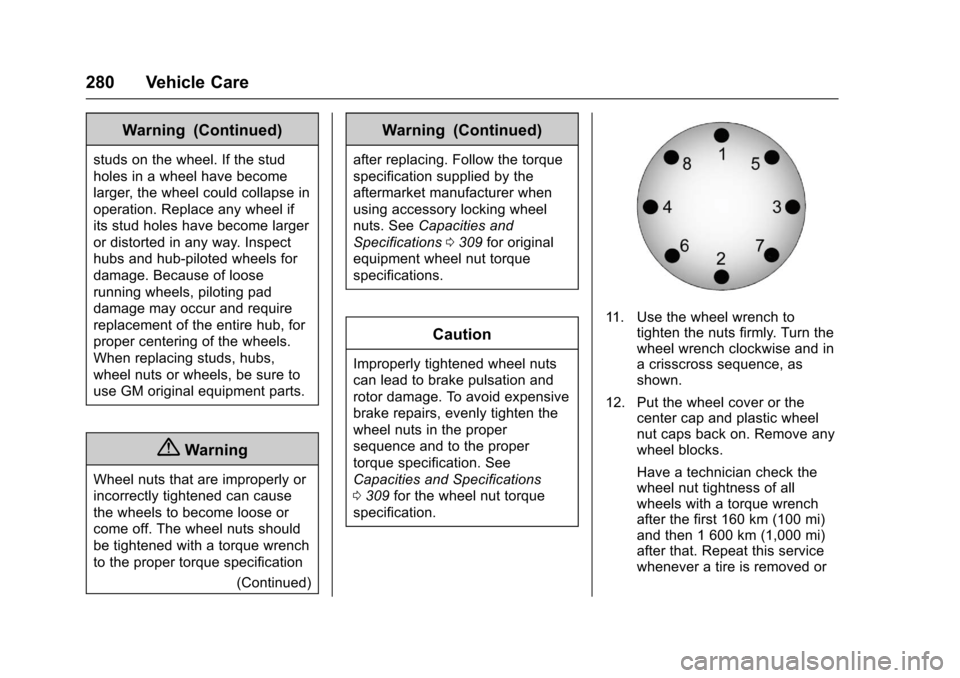
11 . U s e t h e w h e e l w r e n c h t otighten the nuts firmly. Turn thewheel wrench clockwise and inacrisscrosssequence,asshown.
12. Put the wheel cover or thecenter cap and plastic wheelnut caps back on. Remove anywheel blocks.
Have a technician check thewheel nut tightness of allwheels with a torque wrenchafter the first 160 km (100 mi)and then 1 600 km (1,000 mi)after that. Repeat this servicewhenever a tire is removed or
Page 282 of 346
Chevrolet Express Owner Manual (GMNA-Localizing-U.S./Canada/Mexico-9967827) - 2017 - crc - 5/2/16
Vehicle Care 281
serviced. SeeCapacities andSpecifications0309for moreinformation.
Storing a Flat or Spare Tire
and Tools
{Warning
Storing a jack, a tire, or other
equipment in the passenger
compartment of the vehicle could
cause injury. In a sudden stop or
collision, loose equipment could
strike someone. Store all these in
the proper place.
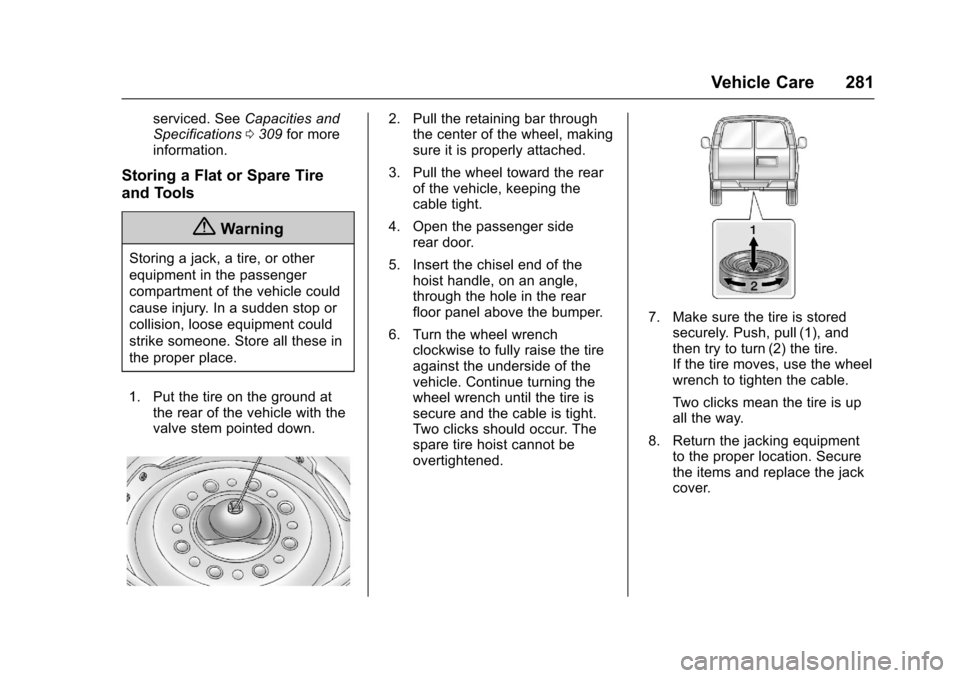
1. Put the tire on the ground atthe rear of the vehicle with thevalve stem pointed down.
2. Pull the retaining bar throughthe center of the wheel, makingsure it is properly attached.
3. Pull the wheel toward the rearof the vehicle, keeping thecable tight.
4. Open the passenger siderear door.
5. Insert the chisel end of thehoist handle, on an angle,through the hole in the rearfloor panel above the bumper.
6. Turn the wheel wrenchclockwise to fully raise the tireagainst the underside of thevehicle. Continue turning thewheel wrench until the tire issecure and the cable is tight.Tw o c l i c k s s h o u l d o c c u r. T h espare tire hoist cannot beovertightened.
7. Make sure the tire is storedsecurely. Push, pull (1), andthen try to turn (2) the tire.If the tire moves, use the wheelwrench to tighten the cable.
Tw o c l i c k s m e a n t h e t i r e i s u pall the way.
8. Return the jacking equipmentto the proper location. Securethe items and replace the jackcover.
Page 283 of 346
Chevrolet Express Owner Manual (GMNA-Localizing-U.S./Canada/Mexico-9967827) - 2017 - crc - 5/2/16
282 Vehicle Care
Full-Size Spare Tire
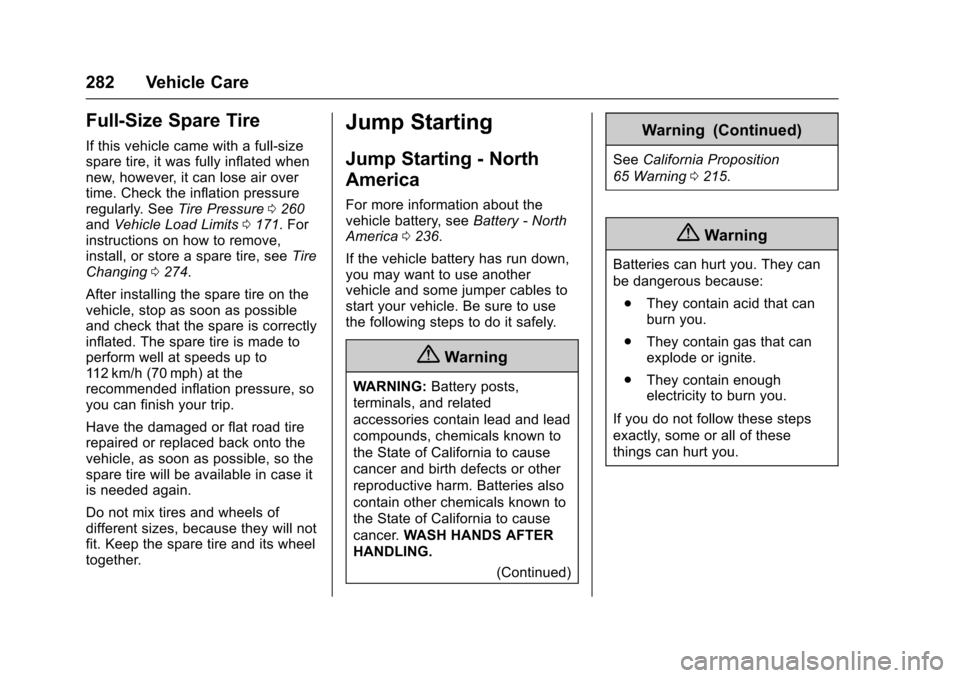
If this vehicle came with a full-sizespare tire, it was fully inflated whennew, however, it can lose air overtime. Check the inflation pressureregularly. SeeTire Pressure0260andVehicle Load Limits0171.Forinstructions on how to remove,install, or store a spare tire, seeTireChanging0274.
After installing the spare tire on thevehicle, stop as soon as possibleand check that the spare is correctlyinflated. The spare tire is made toperform well at speeds up to11 2 k m / h ( 7 0 m p h ) a t t h erecommended inflation pressure, soyou can finish your trip.
Have the damaged or flat road tirerepaired or replaced back onto thevehicle, as soon as possible, so thespare tire will be available in case itis needed again.
Do not mix tires and wheels ofdifferent sizes, because they will notfit. Keep the spare tire and its wheeltogether.
Jump Starting
Jump Starting - North
America
For more information about thevehicle battery, seeBattery - NorthAmerica0236.
If the vehicle battery has run down,you may want to use anothervehicle and some jumper cables tostart your vehicle. Be sure to usethe following steps to do it safely.
{Warning
WA R N I N G :Battery posts,
terminals, and related
accessories contain lead and lead
compounds, chemicals known to
the State of California to cause
cancer and birth defects or other
reproductive harm. Batteries also
contain other chemicals known to
the State of California to cause
cancer.WASH HANDS AFTER
HANDLING.
(Continued)
Warning (Continued)
SeeCalifornia Proposition
65 Warning0215.
{Warning
Batteries can hurt you. They can
be dangerous because:
.They contain acid that canburn you.
.They contain gas that canexplode or ignite.
.They contain enoughelectricity to burn you.
If you do not follow these steps
exactly, some or all of these
things can hurt you.
Page 287 of 346
Chevrolet Express Owner Manual (GMNA-Localizing-U.S./Canada/Mexico-9967827) - 2017 - crc - 5/2/16
286 Vehicle Care
Towing the Vehicle
Caution
Incorrectly towing a disabled
vehicle may cause damage. The
damage would not be covered by
the vehicle warranty.
Do not lash or hook to
suspension components. Use the
proper straps around the tires to
secure the vehicle.
Use only a flatbed tow truck fortowing a disabled vehicle. Neveruse a sling type lift or damage willoccur. Use ramps to help reduceapproach angles if necessary.Atowedvehicleshouldhaveitsdrive wheels off the ground.
Consult a professional towingservice if the disabled vehicle mustbe towed.
Recreational Vehicle
Towing
Recreational vehicle towing meanstowing the vehicle behind anothervehicle, such as behind a motorhome. The two most common typesof recreational vehicle towing areknown as dinghy towing and dollytowing. Dinghy towing is towing thevehicle with all four wheels on theground. Dolly towing is towing thevehicle with two wheels on theground and two wheels up on adevice known as a dolly.
Here are some important things toconsider before recreational vehicletowing:
.What is the towing capacity ofthe towing vehicle? Be sure toread the tow vehiclemanufacturer'srecommendations.
.What is the distance that will betraveled? Some vehicles haverestrictions on how far and howlong they can tow.
.Is the proper towing equipmentgoing to be used? See yourdealer or trailering professionalfor additional advice andequipment recommendations.
.Is the vehicle ready to betowed? Just as preparing thevehicle for a long trip, make surethe vehicle is prepared to betowed.
Caution
Use of a shield mounted in front
of the vehicle grille could restrict
airflow and cause damage to the
transmission. The repairs would
not be covered by the vehicle
warranty. If using a shield, only
use one that attaches to the
towing vehicle.