2017 CHEVROLET EQUINOX turn signal
[x] Cancel search: turn signalPage 186 of 327
Chevrolet Equinox Owner Manual (GMNA-Localizing-U.S./Canada/Mexico-
9918169) - 2017 - CRC - 3/23/16
Driving and Operating 185
Selecting the Alert Timing
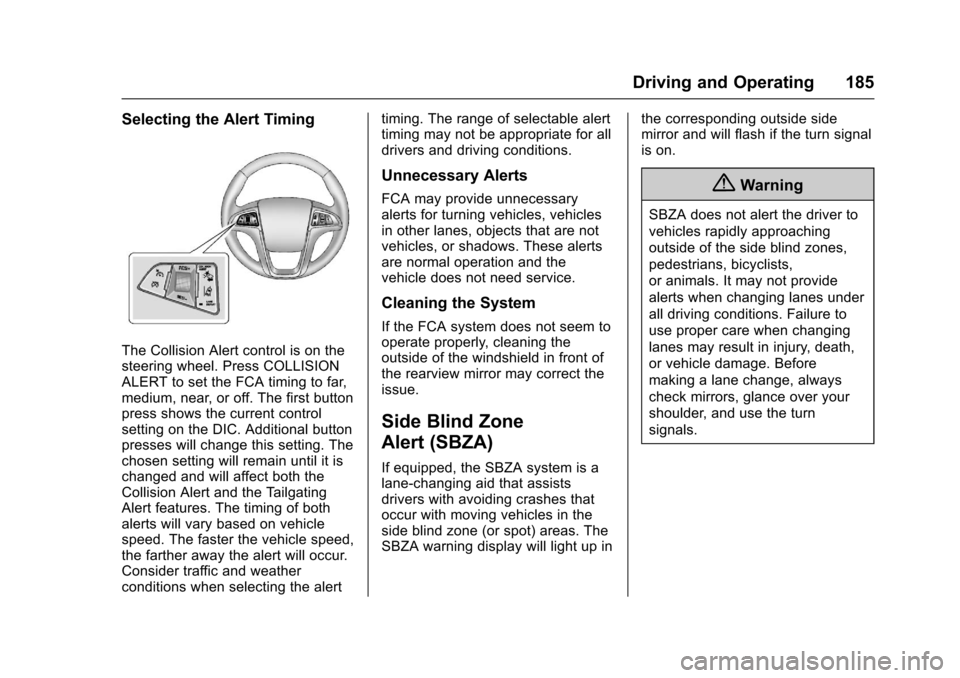
The Collision Alert control is on the
steering wheel. Press COLLISION
ALERT to set the FCA timing to far,
medium, near, or off. The first button
press shows the current control
setting on the DIC. Additional button
presses will change this setting. The
chosen setting will remain until it is
changed and will affect both the
Collision Alert and the Tailgating
Alert features. The timing of both
alerts will vary based on vehicle
speed. The faster the vehicle speed,
the farther away the alert will occur.
Consider traffic and weather
conditions when selecting the alerttiming. The range of selectable alert
timing may not be appropriate for all
drivers and driving conditions.
Unnecessary Alerts
FCA may provide unnecessary
alerts for turning vehicles, vehicles
in other lanes, objects that are not
vehicles, or shadows. These alerts
are normal operation and the
vehicle does not need service.
Cleaning the System
If the FCA system does not seem to
operate properly, cleaning the
outside of the windshield in front of
the rearview mirror may correct the
issue.
Side Blind Zone
Alert (SBZA)
If equipped, the SBZA system is a
lane-changing aid that assists
drivers with avoiding crashes that
occur with moving vehicles in the
side blind zone (or spot) areas. The
SBZA warning display will light up in
the corresponding outside side
mirror and will flash if the turn signal
is on.
{Warning
SBZA does not alert the driver to
vehicles rapidly approaching
outside of the side blind zones,
pedestrians, bicyclists,
or animals. It may not provide
alerts when changing lanes under
all driving conditions. Failure to
use proper care when changing
lanes may result in injury, death,
or vehicle damage. Before
making a lane change, always
check mirrors, glance over your
shoulder, and use the turn
signals.
Page 187 of 327
Chevrolet Equinox Owner Manual (GMNA-Localizing-U.S./Canada/Mexico-
9918169) - 2017 - CRC - 3/23/16
186 Driving and Operating
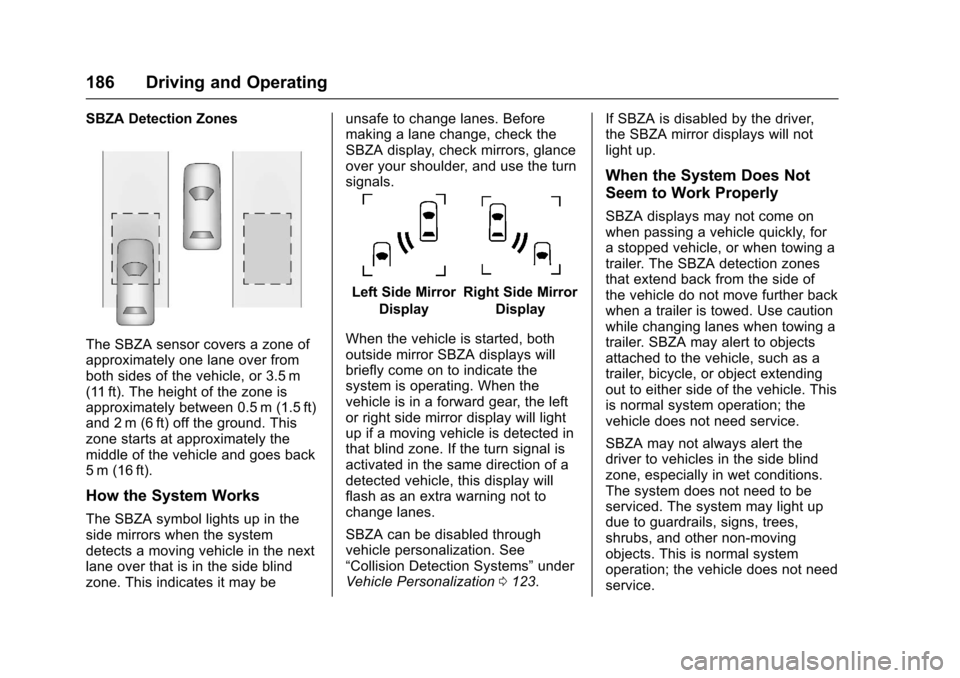
SBZA Detection Zones
The SBZA sensor covers a zone of
approximately one lane over from
both sides of the vehicle, or 3.5 m
(11 ft). The height of the zone is
approximately between 0.5 m (1.5 ft)
and 2 m (6 ft) off the ground. This
zone starts at approximately the
middle of the vehicle and goes back
5 m (16 ft).
How the System Works
The SBZA symbol lights up in the
side mirrors when the system
detects a moving vehicle in the next
lane over that is in the side blind
zone. This indicates it may beunsafe to change lanes. Before
making a lane change, check the
SBZA display, check mirrors, glance
over your shoulder, and use the turn
signals.
Left Side Mirror
DisplayRight Side Mirror Display
When the vehicle is started, both
outside mirror SBZA displays will
briefly come on to indicate the
system is operating. When the
vehicle is in a forward gear, the left
or right side mirror display will light
up if a moving vehicle is detected in
that blind zone. If the turn signal is
activated in the same direction of a
detected vehicle, this display will
flash as an extra warning not to
change lanes.
SBZA can be disabled through
vehicle personalization. See
“Collision Detection Systems” under
Vehicle Personalization 0123. If SBZA is disabled by the driver,
the SBZA mirror displays will not
light up.
When the System Does Not
Seem to Work Properly
SBZA displays may not come on
when passing a vehicle quickly, for
a stopped vehicle, or when towing a
trailer. The SBZA detection zones
that extend back from the side of
the vehicle do not move further back
when a trailer is towed. Use caution
while changing lanes when towing a
trailer. SBZA may alert to objects
attached to the vehicle, such as a
trailer, bicycle, or object extending
out to either side of the vehicle. This
is normal system operation; the
vehicle does not need service.
SBZA may not always alert the
driver to vehicles in the side blind
zone, especially in wet conditions.
The system does not need to be
serviced. The system may light up
due to guardrails, signs, trees,
shrubs, and other non-moving
objects. This is normal system
operation; the vehicle does not need
service.
Page 188 of 327
Chevrolet Equinox Owner Manual (GMNA-Localizing-U.S./Canada/Mexico-
9918169) - 2017 - CRC - 3/23/16
Driving and Operating 187
SBZA may not operate when the
SBZA sensors in the left or right
corners of the rear bumper are
covered with mud, dirt, snow, ice,
or slush, or in heavy rainstorms. For
cleaning instructions, see "Washing
the Vehicle" underExterior Care
0 266. If the DIC displays the
system unavailable message after
cleaning both sides of the vehicle
toward the rear corners of the
vehicle, see your dealer.
If the SBZA displays do not light up
when vehicles are in the blind zone
and the system is clean, the system
may need service. Take the vehicle
to your dealer.
When SBZA is disabled for any
reason other than the driver turning
it off, the Side Blind Zone Alert On
option will not be available on the
personalization menu.
Radio Frequency Information
See Radio Frequency
Statement 0302.
Lane Departure
Warning (LDW)
If equipped, LDW may help avoid
crashes due to unintentional lane
departures. It may provide an alert if
the vehicle is crossing a lane
without using a turn signal in that
direction. LDW uses a camera
sensor to detect the lane markings
at speeds of 56 km/h (35 mph) or
greater.
{Warning
The LDW system does not steer
the vehicle. The LDW system
may not:
. Provide enough time to
avoid a crash.
. Detect lane markings under
poor weather or visibility
conditions. This can occur if
the windshield or
headlamps are blocked by
dirt, snow, or ice; if they are
(Continued)
Warning (Continued)
not in proper condition; or if
the sun shines directly into
the camera.
. Detect road edges.
. Detect lanes on winding or
hilly roads.
If LDW only detects lane
markings on one side of the road,
it will only warn you when
departing the lane on the side
where it has detected a lane
marking. Always keep your
attention on the road and
maintain proper vehicle position
within the lane, or vehicle
damage, injury, or death could
occur. Always keep the
windshield, headlamps, and
camera sensors clean and in
good repair. Do not use LDW in
bad weather conditions.
Page 189 of 327
Chevrolet Equinox Owner Manual (GMNA-Localizing-U.S./Canada/Mexico-
9918169) - 2017 - CRC - 3/23/16
188 Driving and Operating
How the System Works
The LDW camera sensor is on the
windshield ahead of the rearview
mirror.
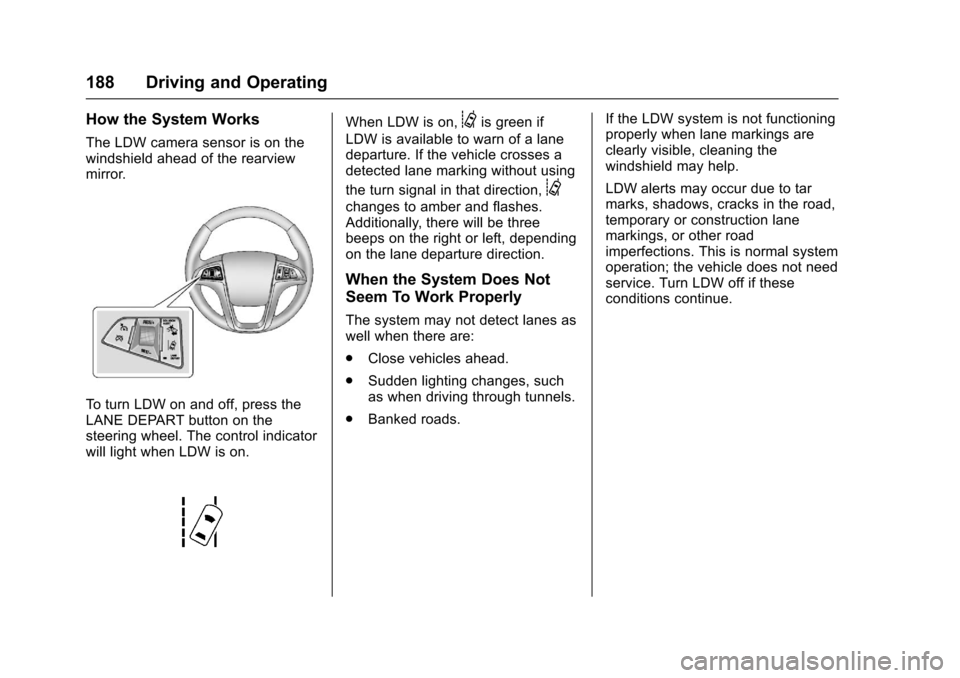
To turn LDW on and off, press the
LANE DEPART button on the
steering wheel. The control indicator
will light when LDW is on.
When LDW is on,@is green if
LDW is available to warn of a lane
departure. If the vehicle crosses a
detected lane marking without using
the turn signal in that direction,
@
changes to amber and flashes.
Additionally, there will be three
beeps on the right or left, depending
on the lane departure direction.
When the System Does Not
Seem To Work Properly
The system may not detect lanes as
well when there are:
. Close vehicles ahead.
. Sudden lighting changes, such
as when driving through tunnels.
. Banked roads. If the LDW system is not functioning
properly when lane markings are
clearly visible, cleaning the
windshield may help.
LDW alerts may occur due to tar
marks, shadows, cracks in the road,
temporary or construction lane
markings, or other road
imperfections. This is normal system
operation; the vehicle does not need
service. Turn LDW off if these
conditions continue.
Page 196 of 327
Chevrolet Equinox Owner Manual (GMNA-Localizing-U.S./Canada/Mexico-
9918169) - 2017 - CRC - 3/23/16
Driving and Operating 195
When turning with a trailer, make
wider turns than normal so the
trailer will not strike soft shoulders,
curbs, road signs, trees or other
objects. Use the turn signal well in
advance and avoid jerky or sudden
maneuvers.
Turn Signals When Towing a
Trailer
The turn signal indicators on the
instrument panel flash whenever
signaling a turn or lane change.
Properly hooked up, the trailer
lamps also flash, telling other
drivers the vehicle is turning,
changing lanes or stopping.
When towing a trailer, the arrows on
the instrument panel flash for turns
even if the bulbs on the trailer are
burned out. Check occasionally to
be sure the trailer bulbs are still
working.
Driving on Grades
Reduce speed and shift to a lower
gear before starting down a long or
steep downgrade. If the
transmission is not shifted down, the
brakes might have to be used so
much that they would get hot and no
longer work well.
The vehicle can tow in D (Drive).
Use a lower gear if the transmission
shifts too often.
When towing at high altitude on
steep uphill grades, engine coolant
boils at a lower temperature than at
normal altitudes. If the engine is
turned off immediately after towing
at high altitude on steep uphill
grades, the vehicle could show
signs similar to engine overheating.
To avoid this, let the engine run
while parked, preferably on level
ground, with the transmission in
P (Park) for a few minutes before
turning the engine off. If the
overheat warning comes on, see
Engine Overheating0217.
Parking on Hills
{Warning
Parking the vehicle on a hill with
the trailer attached can be
dangerous. If something goes
wrong, the rig could start to move.
People can be injured, and both
the vehicle and the trailer can be
damaged. When possible, always
park the rig on a flat surface.
If parking the rig on a hill: 1. Press the brake pedal, but do not shift into P (Park) yet. Turn
the wheels into the curb if
facing downhill or into traffic if
facing uphill.
2. Have someone place chocks under the trailer wheels.
3. When the wheel chocks are in place, release the brake pedal
until the chocks absorb
the load.
Page 201 of 327
Chevrolet Equinox Owner Manual (GMNA-Localizing-U.S./Canada/Mexico-
9918169) - 2017 - CRC - 3/23/16
200 Vehicle Care
Vehicle Care
General Information
General Information . . . . . . . . . . 201
California Proposition65 Warning . . . . . . . . . . . . . . . . . 201
California Perchlorate Materials Requirements . . . . . 201
Accessories and Modifications . . . . . . . . . . . . . . . . 202
Vehicle Checks
Doing Your OwnService Work . . . . . . . . . . . . . . . 202
Hood . . . . . . . . . . . . . . . . . . . . . . . . . 203
Engine Compartment Overview . . . . . . . . . . . . . . . . . . . . 204
Engine Cover . . . . . . . . . . . . . . . . . 207
Engine Oil . . . . . . . . . . . . . . . . . . . . 207
Engine Oil Life System . . . . . . . 210
Automatic Transmission Fluid . . . . . . . . . . . . . . . . . . . . . . . . 211
Engine Air Cleaner/Filter . . . . . . 211
Cooling System . . . . . . . . . . . . . . 212
Engine Coolant . . . . . . . . . . . . . . . 213
Engine Overheating . . . . . . . . . . 217
Power Steering Fluid (2.4L L4 Engine) . . . . . . . . . . . . . . . . . . . . . 218 Power Steering Fluid (3.6L
V6 Engine) . . . . . . . . . . . . . . . . . . 218
Washer Fluid . . . . . . . . . . . . . . . . . 219
Brakes . . . . . . . . . . . . . . . . . . . . . . . 219
Brake Fluid . . . . . . . . . . . . . . . . . . . 220
Battery - North America . . . . . . 221
All-Wheel Drive . . . . . . . . . . . . . . . 222
Starter Switch Check . . . . . . . . . 222
Automatic Transmission Shift Lock Control Function
Check . . . . . . . . . . . . . . . . . . . . . . . 222
Ignition Transmission Lock Check . . . . . . . . . . . . . . . . . . . . . . . 223
Park Brake and P (Park) Mechanism Check . . . . . . . . . . 223
Wiper Blade Replacement . . . . 223
Headlamp Aiming
Headlamp Aiming . . . . . . . . . . . . 225
Bulb Replacement
Bulb Replacement . . . . . . . . . . . . 225
Halogen Bulbs . . . . . . . . . . . . . . . . 225
Fog Lamps . . . . . . . . . . . . . . . . . . . 225
Taillamps, Turn Signal, Stoplamps, and Back-Up
Lamps . . . . . . . . . . . . . . . . . . . . . . 226
License Plate Lamp . . . . . . . . . . 226
Replacement Bulbs . . . . . . . . . . . 227
Electrical System
Fuses . . . . . . . . . . . . . . . . . . . . . . . . 227
Engine Compartment Fuse Block . . . . . . . . . . . . . . . . . . . . . . . . 228
Instrument Panel Fuse Block . . . . . . . . . . . . . . . . . . . . . . . . 231
Wheels and Tires
Tires . . . . . . . . . . . . . . . . . . . . . . . . . . 232
All-Season Tires . . . . . . . . . . . . . . 233
Winter Tires . . . . . . . . . . . . . . . . . . 233
Summer Tires . . . . . . . . . . . . . . . . 234
Tire Sidewall Labeling . . . . . . . . 234
Tire Designations . . . . . . . . . . . . . 236
Tire Terminology and
Definitions . . . . . . . . . . . . . . . . . . 237
Tire Pressure . . . . . . . . . . . . . . . . . 240
Tire Pressure Monitor System . . . . . . . . . . . . . . . . . . . . . . 241
Tire Pressure Monitor Operation . . . . . . . . . . . . . . . . . . . 242
Tire Inspection . . . . . . . . . . . . . . . . 245
Tire Rotation . . . . . . . . . . . . . . . . . 245
When It Is Time for New Tires . . . . . . . . . . . . . . . . . . . . . . . . 246
Buying New Tires . . . . . . . . . . . . . 247
Different Size Tires and Wheels . . . . . . . . . . . . . . . . . . . . . . 248
Uniform Tire Quality Grading . . . . . . . . . . . . . . . . . . . . . 248
Page 227 of 327
Chevrolet Equinox Owner Manual (GMNA-Localizing-U.S./Canada/Mexico-
9918169) - 2017 - CRC - 3/23/16
226 Vehicle Care
Taillamps, Turn Signal,
Stoplamps, and Back-Up
Lamps
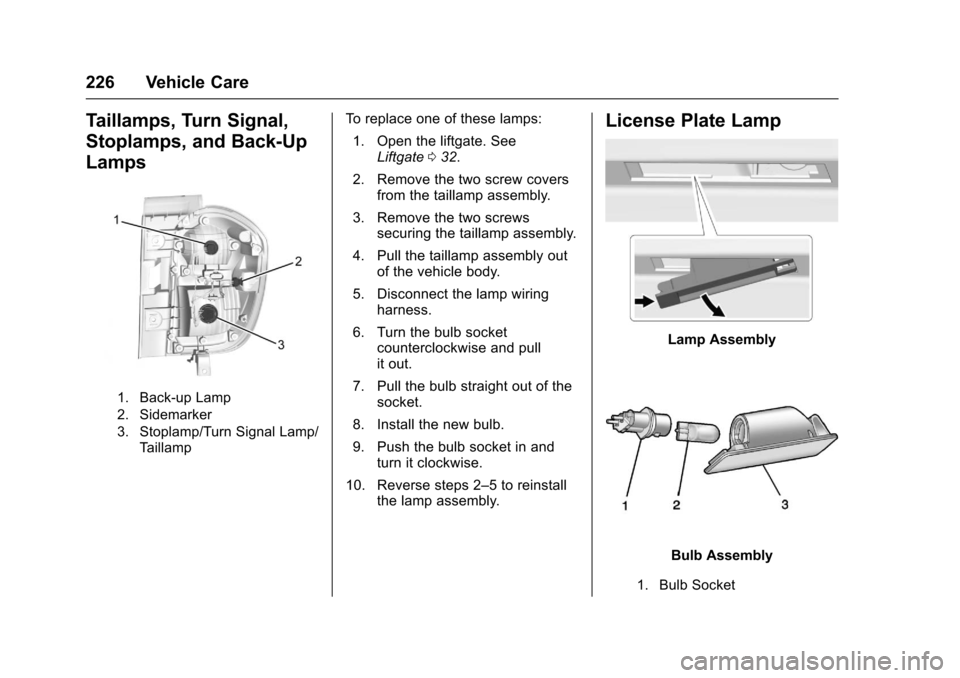
1. Back-up Lamp
2. Sidemarker
3. Stoplamp/Turn Signal Lamp/Taillamp
To replace one of these lamps:
1. Open the liftgate. See Liftgate 032.
2. Remove the two screw covers from the taillamp assembly.
3. Remove the two screws securing the taillamp assembly.
4. Pull the taillamp assembly out of the vehicle body.
5. Disconnect the lamp wiring harness.
6. Turn the bulb socket counterclockwise and pull
it out.
7. Pull the bulb straight out of the socket.
8. Install the new bulb.
9. Push the bulb socket in and turn it clockwise.
10. Reverse steps 2–5 to reinstall the lamp assembly.License Plate Lamp
Lamp Assembly
Bulb Assembly
1. Bulb Socket
Page 228 of 327
Chevrolet Equinox Owner Manual (GMNA-Localizing-U.S./Canada/Mexico-
9918169) - 2017 - CRC - 3/23/16
Vehicle Care 227
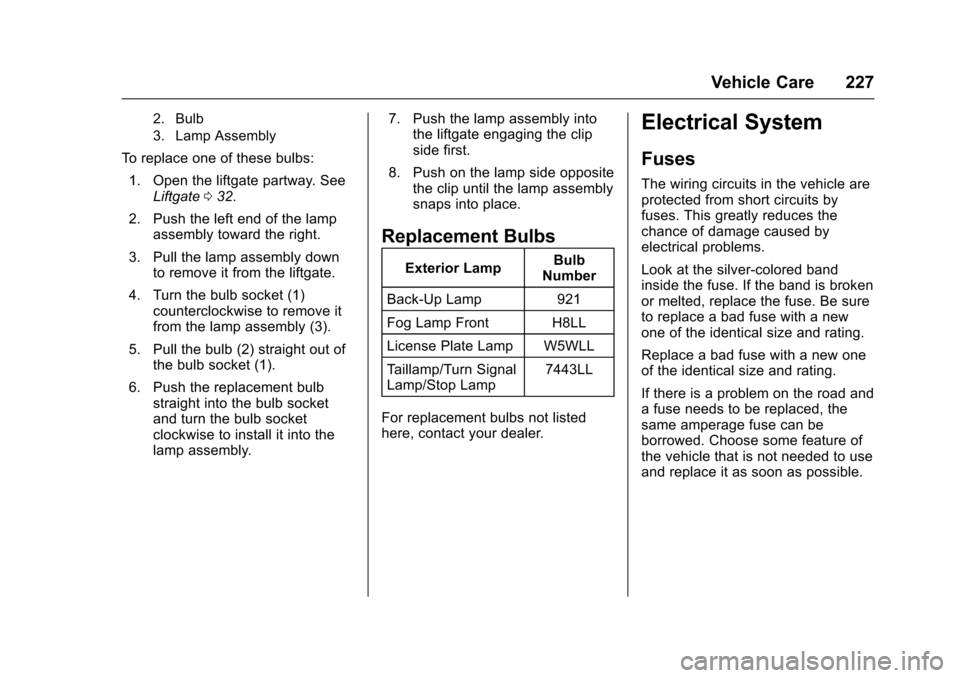
2. Bulb
3. Lamp Assembly
To replace one of these bulbs:1. Open the liftgate partway. See Liftgate 032.
2. Push the left end of the lamp assembly toward the right.
3. Pull the lamp assembly down to remove it from the liftgate.
4. Turn the bulb socket (1) counterclockwise to remove it
from the lamp assembly (3).
5. Pull the bulb (2) straight out of the bulb socket (1).
6. Push the replacement bulb straight into the bulb socket
and turn the bulb socket
clockwise to install it into the
lamp assembly. 7. Push the lamp assembly into
the liftgate engaging the clip
side first.
8. Push on the lamp side opposite the clip until the lamp assembly
snaps into place.
Replacement Bulbs
Exterior Lamp Bulb
Number
Back-Up Lamp 921
Fog Lamp Front H8LL
License Plate Lamp W5WLL
Taillamp/Turn Signal
Lamp/Stop Lamp 7443LL
For replacement bulbs not listed
here, contact your dealer.
Electrical System
Fuses
The wiring circuits in the vehicle are
protected from short circuits by
fuses. This greatly reduces the
chance of damage caused by
electrical problems.
Look at the silver-colored band
inside the fuse. If the band is broken
or melted, replace the fuse. Be sure
to replace a bad fuse with a new
one of the identical size and rating.
Replace a bad fuse with a new one
of the identical size and rating.
If there is a problem on the road and
a fuse needs to be replaced, the
same amperage fuse can be
borrowed. Choose some feature of
the vehicle that is not needed to use
and replace it as soon as possible.