2017 CHEVROLET CRUZE clock
[x] Cancel search: clockPage 108 of 405
Chevrolet Cruze Owner Manual (GMNA-Localizing-U.S./Canada/Mexico-
9803785) - 2017 - CRC - 4/13/16
Instruments and Controls 107
Instruments and
Controls
Controls
Steering Wheel Adjustment . . . 108
Steering Wheel Controls . . . . . . 108
Heated Steering Wheel . . . . . . . 109
Horn . . . . . . . . . . . . . . . . . . . . . . . . . . 109
Windshield Wiper/Washer . . . . 109
Compass . . . . . . . . . . . . . . . . . . . . . 110
Clock . . . . . . . . . . . . . . . . . . . . . . . . . 111
Power Outlets . . . . . . . . . . . . . . . . 112
Wireless Charging . . . . . . . . . . . . 114
Warning Lights, Gauges, and
Indicators
Warning Lights, Gauges, andIndicators . . . . . . . . . . . . . . . . . . . 115
Instrument Cluster . . . . . . . . . . . . 116
Speedometer . . . . . . . . . . . . . . . . . 121
Odometer . . . . . . . . . . . . . . . . . . . . . 121
Trip Odometer . . . . . . . . . . . . . . . . 121
Tachometer . . . . . . . . . . . . . . . . . . . 121
Fuel Gauge . . . . . . . . . . . . . . . . . . . 122
Engine Coolant Temperature Gauge . . . . . . . . . . . . . . . . . . . . . . 123
Safety Belt Reminders . . . . . . . . 124
Airbag Readiness Light . . . . . . . 125 Passenger Airbag Status
Indicator . . . . . . . . . . . . . . . . . . . . 125
Charging System Light . . . . . . . 126
Malfunction Indicator Lamp . . . 126
Brake System Warning Light . . . . . . . . . . . . . . . . . . . . . . . . 128
Antilock Brake System (ABS) Warning Light . . . . . . . . . . . . . . . 129
Up-Shift Light . . . . . . . . . . . . . . . . . 129
Lane Keep Assist (LKA) Light . . . . . . . . . . . . . . . . . . . . . . . . 129
Vehicle Ahead Indicator . . . . . . 130
Traction Off Light . . . . . . . . . . . . . 130
StabiliTrak
®OFF Light . . . . . . . . 130
Traction Control System (TCS)/ StabiliTrak
®Light . . . . . . . . . . . 131
Wait-to-Start Light . . . . . . . . . . . . 131
Tire Pressure Light . . . . . . . . . . . 131
Engine Oil Pressure Light . . . . 132
Low Fuel Warning Light . . . . . . 132
Diesel Exhaust Fluid (DEF) Warning Light . . . . . . . . . . . . . . . 132
Security Light . . . . . . . . . . . . . . . . . 133
High-Beam On Light . . . . . . . . . . 133
Front Fog Lamp Light . . . . . . . . . 133
Lamps On Reminder . . . . . . . . . 133
Cruise Control Light . . . . . . . . . . 133
Door Ajar Light . . . . . . . . . . . . . . . 134
Information Displays
Driver Information Center (DIC) (Base Level) . . . . . . . . . . . . . . . . 134
Driver Information Center (DIC) (Uplevel) . . . . . . . . . . . . . . . . . . . . 137
Vehicle Messages
Vehicle Messages . . . . . . . . . . . . 140
Battery Voltage and ChargingMessages . . . . . . . . . . . . . . . . . . . 140
Brake System Messages . . . . . 140
Compass Messages . . . . . . . . . . 140
Cruise Control Messages . . . . . 141
Door Ajar Messages . . . . . . . . . . 141
Engine Cooling System Messages . . . . . . . . . . . . . . . . . . . 141
Engine Oil Messages . . . . . . . . . 142
Engine Power Messages . . . . . 142
Fuel System Messages . . . . . . . 142
Diesel Exhaust Fluid Messages . . . . . . . . . . . . . . . . . . . 142
Diesel Particulate Filter Messages . . . . . . . . . . . . . . . . . . . 143
Key and Lock Messages . . . . . 143
Lamp Messages . . . . . . . . . . . . . . 144
Object Detection System Messages . . . . . . . . . . . . . . . . . . . 144
Ride Control System Messages . . . . . . . . . . . . . . . . . . . 146
Airbag System Messages . . . . 146
Safety Belt Messages . . . . . . . . 146
Page 112 of 405
Chevrolet Cruze Owner Manual (GMNA-Localizing-U.S./Canada/Mexico-
9803785) - 2017 - CRC - 4/13/16
Instruments and Controls 111
open area where it can receive a
GPS signal. The compass system
will automatically determine when
the GPS signal is restored and
provide a heading again. See
Compass Messages0140 for more
information on the messages that
may be displayed for the compass.
Clock
Base Radio
The infotainment system controls
are used to access the time and
date settings through the menu
system. See Operation0169 on
how to use the menu system.
Setting the Time and Date
When Auto Set is enabled the time
cannot be manually set.
1. Press
{, then touch
SETTINGS.
2. Touch Time and Date, then Set Time or Set Date.
3. Touch + or −to adjust the
value. 4. Touch
RorQto adjust AM or
PM for 12 hour format.
5. Touch
0.
Using Auto Set
1. Press{, then touch
SETTINGS.
2. Touch Time and Date, then Auto Set.
3. Select from the available selections.
4. Touch
0.
Setting the 12/24 Hour Format
1. Press{, then touch
SETTINGS.
2. Touch Time and Date, then select 12h or 24h format.
3. Touch
0.
Setting the Month and Day
Format
1. Press{, then touch
SETTINGS. 2. Touch Time and Date, then Set
Date Format.
3. Select DD/MM/YYYY (day/ month/year), MM/DD/YYYY
(month/day/year), or YYYY/
MM/DD (year/month/day)
format.
4. Touch
0.
Uplevel Radio Using Faceplate
Controls
To set the time or date: 1. Select Home Page, then select SETTINGS.
2. Select Time and Date, then the desired function.
3. Turn the MENU knob to increase or decrease the value.
4. Press the MENU knob to go to the next value. After the last
value is selected, the system
will update and return to the
Settings menu. Press
oBACK
to go to the last menu and
save the changes.
Auto Set requires an OnStar
subscription.
Page 113 of 405
Chevrolet Cruze Owner Manual (GMNA-Localizing-U.S./Canada/Mexico-
9803785) - 2017 - CRC - 4/13/16
112 Instruments and Controls
If auto timing is set, the time
displayed on the clock may not
update immediately when driving
into a new time zone.
To set the clock display:1. Select SETTINGS from the Home Page, then select Time
and Date.
2. Select Clock Display.
3. Turn the MENU knob to Off or On.
4. Press the MENU knob to select.
Press
oBACK to go to the last
menu and save the changes.
Uplevel Radio Using
Touchscreen Controls
The infotainment system controls
are used to access the time and
date settings through the menu
system. See “Using the System”
under “Introduction” in the
infotainment manual. To set the time:
1. Touch SETTINGS from the Home Page, then touch Time
and Date.
2. Touch Set Time and touch
«
orªto increase or decrease
hours, minutes, and AM or PM.
Touch 12–24 Hr for 12 or
24 hour clock.
3. Touch
}to go back to the
previous menu.
Auto Set requires an OnStar
subscription.
If auto timing is set, the time
displayed on the clock may not
update immediately when driving
into a new time zone.
To set the date: 1. Touch SETTINGS from the Home Page, then touch Time
and Date.
2. Touch Set Date and touch
«
orªto increase or decrease
month, day, or year. 3. Touch
}to go back to the
previous menu.
To set the clock display: 1. Touch SETTINGS and touch Time and Date.
2. Touch Clock Display and touch OFF or ON to turn the clock
display off or on.
3. Touch
}to go back to the
previous menu.
The clock settings can also be
accessed by touching the time
display, then touching Set.
Power Outlets
Power Outlet 12-Volt Direct
Current
The accessory power outlet can be
used to plug in electrical equipment,
such as a cell phone or MP3 player.
There is an accessory power outlet
on the center floor console in front
of the shift lever. This outlet is
powered when the ignition is in the
ON/RUN or ACC/ACCESSORY
position, or until the driver door is
Page 152 of 405
Chevrolet Cruze Owner Manual (GMNA-Localizing-U.S./Canada/Mexico-
9803785) - 2017 - CRC - 4/13/16
Instruments and Controls 151
.Rear Camera
. Return to Factory Settings
. Software Information
Detailed information for each menu
follows.
Time and Date
Manually set the time and date. See
Clock 0111.
Language (Language)
Select Language, then select from
the available language(s).
The selected language will display
on the system, and voice
recognition will reflect the selected
language.
Rear Seat Reminder
This allows for a chime and a
message ‘Look in Rear Seat’ when
the rear door has been opened
before or during operation of the
vehicle.
Select Off or On.
Teen Driver
See “Teen Driver” under“Settings”
in the infotainment manual.
Valet Mode
This will lock the infotainment
system and steering wheel controls.
It may also limit access to vehicle
storage locations (if equipped).
To enable valet mode:
1. Enter a four-digit code on the keypad.
2. Select Enter to go to the confirmation screen.
3. Re-enter the four-digit code.
Press LOCK or UNLOCK to lock or
unlock the system. Press Back to go
back to the previous menu.
Radio
Press and the following may
display:
. Manage Favorites
. Number of Favorites Shown
. Audible Touch Feedback
. Text Scroll .
Tone Settings
. Auto Volume
. Maximum Startup Volume
. Audio Cue Volume
Manage Favorites
This allows favorites to be edited.
See “Storing a Station as a
Favorite” inAM-FM Radio 0170 or
“Manage Favorites” in“Settings”
under “Radio” in the infotainment
manual.
Number of Favorites Shown
Press to set the number of favorites
to display.
Select the desired number or select
Auto and the infotainment system
will automatically adjust the number
of favorites shown.
Audible Touch Feedback
This allows Audible Touch
Feedback to be turned on or off.
Select Off or On.
Page 180 of 405
Chevrolet Cruze Owner Manual (GMNA-Localizing-U.S./Canada/Mexico-
9803785) - 2017 - CRC - 4/13/16
Infotainment System 179
Tone Settings
.Touch Tone Settings. The Tone
Settings menu is displayed. See
“Tone Settings” under“Radio
Controls” inOperation 0169.
Auto Volume
. Touch Auto Volume. The Auto
Volume menu is displayed. See
“Auto Volume” under“Radio
Controls” inOperation 0169.
Picture System Information
The infotainment system can view
picture files stored on a USB
storage device and devices that
support Media Transfer
Protocol (MTP).
.
Supported file extensions: .jpg,
.bmp, .png, .gif.
. Animated GIF files are not
supported.
. Some files may not operate due
to a different recording format or
the condition of the file.
Viewing Pictures 1. Connect the USB device to the USB port. 2. Touch the screen to open to full
screen. Touch the screen again
to return to the previous
screen.
If the USB device is already
connected:
1. Press
{.
2. Touch GALLERY.
Some features are disabled while
the vehicle is in motion.
Viewing a Slide Show
1. Touch
zfrom the picture
screen.
2. Touch the screen to cancel the slide show during the slide
show playback.
Viewing a Previous or Next
Picture
Touch
SorTfrom the picture
screen.
Rotating a Picture
Touch
wfrom the picture screen. Enlarging a Picture
Touch
xfrom the picture screen.
Using the USB Picture Menu 1. Touch MENU from the picture screen.
2. Touch the appropriate menu: .Slide Show Time: Allows
selection of the slide show
interval.
. Clock, Temp. Display:
Allows selection of On or
Off to show the clock and
temperature on the full
screen.
. Display Settings: Adjusts
for Brightness and Contrast.
3. Touch
0to exit.
Page 195 of 405
Chevrolet Cruze Owner Manual (GMNA-Localizing-U.S./Canada/Mexico-
9803785) - 2017 - CRC - 4/13/16
194 Climate Controls
When AUTO is lit, all four functions
operate automatically. Each function
can also be manually set and the
setting is displayed. Functions not
manually set will continue to be
automatically controlled, even if the
AUTO indicator is not lit.
For automatic operation:1. Press AUTO.
2. Set the temperature. Allow the system time to stabilize. Then
adjust the temperature as
needed for best comfort.
To improve fuel efficiency and to
cool the vehicle faster, recirculation
may be automatically selected in
warm weather. The recirculation
light will not come on. Press
hto
select recirculation; press it again to
select outside air.
To change English units to metric
units, see “Cluster Menu” then
“Units” underInstrument
Cluster 0116.
Manual Operation
O: Press to turn the climate control
system on or off. Fan Control :
Turn the knob
clockwise or counterclockwise to
increase or decrease the fan speed.
The selected fan speed is indicated
by a number on the display screen.
Press AUTO to return to automatic
operation.
Air Delivery Mode Controls :
Press to change the direction of the
airflow. The indicator light in the
button will turn on. The current
mode appears in the display screen.
Automatic operation is canceled and
manual mode is initiated. Press
AUTO to return to automatic
operation.
To change the current mode, select
one of the following:
Y: Air is directed to the instrument
panel outlets.
\: Air is divided between the
instrument panel outlets and the
floor outlets.
[: Air is directed to the floor
outlets.
-: Clears the windows of fog or
moisture. Air is directed to the
windshield and floor outlets.
0: Clears the windshield of fog or
frost more quickly. Air is directed to
the windshield.
For best results, clear all snow and
ice from the windshield before
defrosting.
Do not drive the vehicle until all
windows are clear.
A/C (Air Conditioning) : Press to
turn the air conditioning on or off.
If the fan is turned off or the outside
temperature falls below freezing, the
air conditioning will not work.
A/C (Comfort/Eco Air
Conditioning) (For Start/Stop
Vehicles) : Press to cycle between
the comfort, eco, and off air
conditioning modes. The indicator
will be lit in comfort and eco modes,
and turns off in the off air
conditioning mode. If the fan is
turned off, the air conditioner will not
run and the indicator light will
turn off.
Page 258 of 405
Chevrolet Cruze Owner Manual (GMNA-Localizing-U.S./Canada/Mexico-
9803785) - 2017 - CRC - 4/13/16
Driving and Operating 257
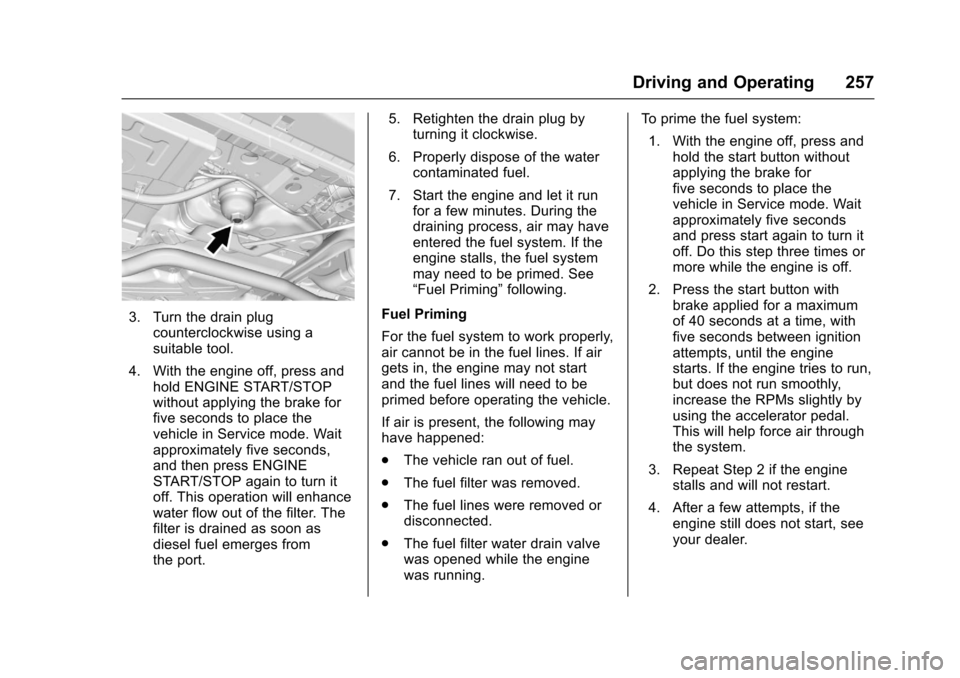
3. Turn the drain plugcounterclockwise using a
suitable tool.
4. With the engine off, press and hold ENGINE START/STOP
without applying the brake for
five seconds to place the
vehicle in Service mode. Wait
approximately five seconds,
and then press ENGINE
START/STOP again to turn it
off. This operation will enhance
water flow out of the filter. The
filter is drained as soon as
diesel fuel emerges from
the port. 5. Retighten the drain plug by
turning it clockwise.
6. Properly dispose of the water contaminated fuel.
7. Start the engine and let it run for a few minutes. During the
draining process, air may have
entered the fuel system. If the
engine stalls, the fuel system
may need to be primed. See
“Fuel Priming” following.
Fuel Priming
For the fuel system to work properly,
air cannot be in the fuel lines. If air
gets in, the engine may not start
and the fuel lines will need to be
primed before operating the vehicle.
If air is present, the following may
have happened:
. The vehicle ran out of fuel.
. The fuel filter was removed.
. The fuel lines were removed or
disconnected.
. The fuel filter water drain valve
was opened while the engine
was running. To prime the fuel system:
1. With the engine off, press and hold the start button without
applying the brake for
five seconds to place the
vehicle in Service mode. Wait
approximately five seconds
and press start again to turn it
off. Do this step three times or
more while the engine is off.
2. Press the start button with brake applied for a maximum
of 40 seconds at a time, with
five seconds between ignition
attempts, until the engine
starts. If the engine tries to run,
but does not run smoothly,
increase the RPMs slightly by
using the accelerator pedal.
This will help force air through
the system.
3. Repeat Step 2 if the engine stalls and will not restart.
4. After a few attempts, if the engine still does not start, see
your dealer.
Page 259 of 405
Chevrolet Cruze Owner Manual (GMNA-Localizing-U.S./Canada/Mexico-
9803785) - 2017 - CRC - 4/13/16
258 Driving and Operating
Running Out of Fuel
(Diesel)
{Warning
Diesel fuel is flammable. It could
start a fire if something ignites it,
and people could be burned. Do
not let it get on hot engine parts,
and keep matches or other
ignition sources away.
If the engine has stalled due to
running out of fuel, add at least
7.6 L (2 gal) of fuel if parked on a
level surface, or up to 18.9 L (5 gal)
of fuel if parked on a slope, and
perform the procedure under “Fuel
Priming” previously in this section.
Fuel Filter Replacement
(Diesel)
{Warning
Diesel fuel is flammable. It could
start a fire if something ignites it,
and people could be burned. Do
not let it get on hot engine parts,
and keep matches or other
ignition sources away.
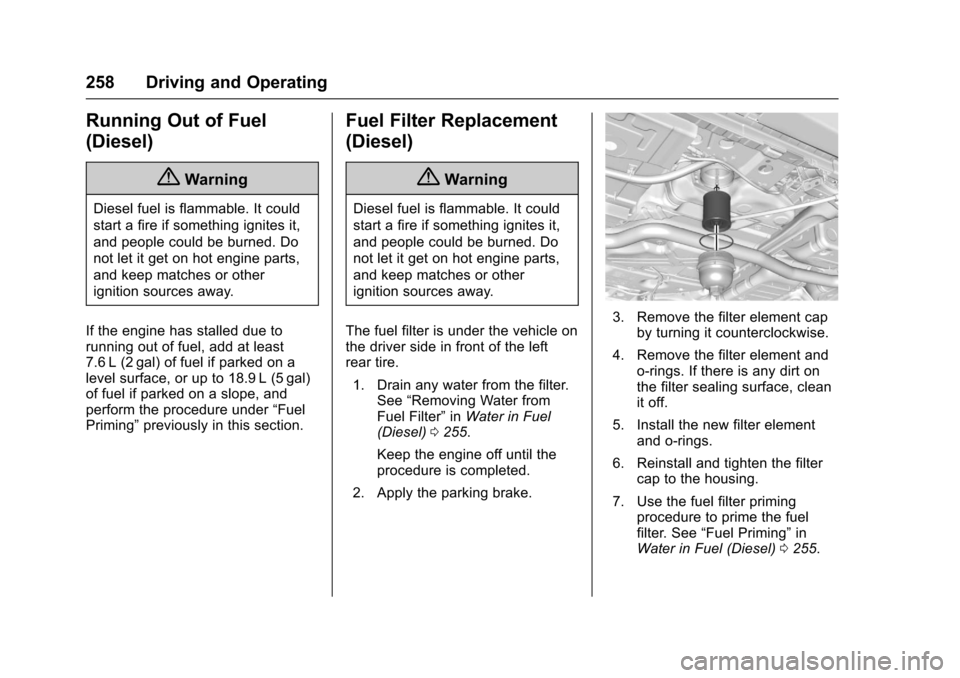
The fuel filter is under the vehicle on
the driver side in front of the left
rear tire. 1. Drain any water from the filter. See “Removing Water from
Fuel Filter” inWater in Fuel
(Diesel) 0255.
Keep the engine off until the
procedure is completed.
2. Apply the parking brake.
3. Remove the filter element cap by turning it counterclockwise.
4. Remove the filter element and o-rings. If there is any dirt on
the filter sealing surface, clean
it off.
5. Install the new filter element and o-rings.
6. Reinstall and tighten the filter cap to the housing.
7. Use the fuel filter priming procedure to prime the fuel
filter. See “Fuel Priming” in
Water in Fuel (Diesel) 0255.