2017 CHEVROLET CRUZE battery replacement
[x] Cancel search: battery replacementPage 34 of 405
Chevrolet Cruze Owner Manual (GMNA-Localizing-U.S./Canada/Mexico-
9803785) - 2017 - CRC - 4/13/16
Keys, Doors, and Windows 33
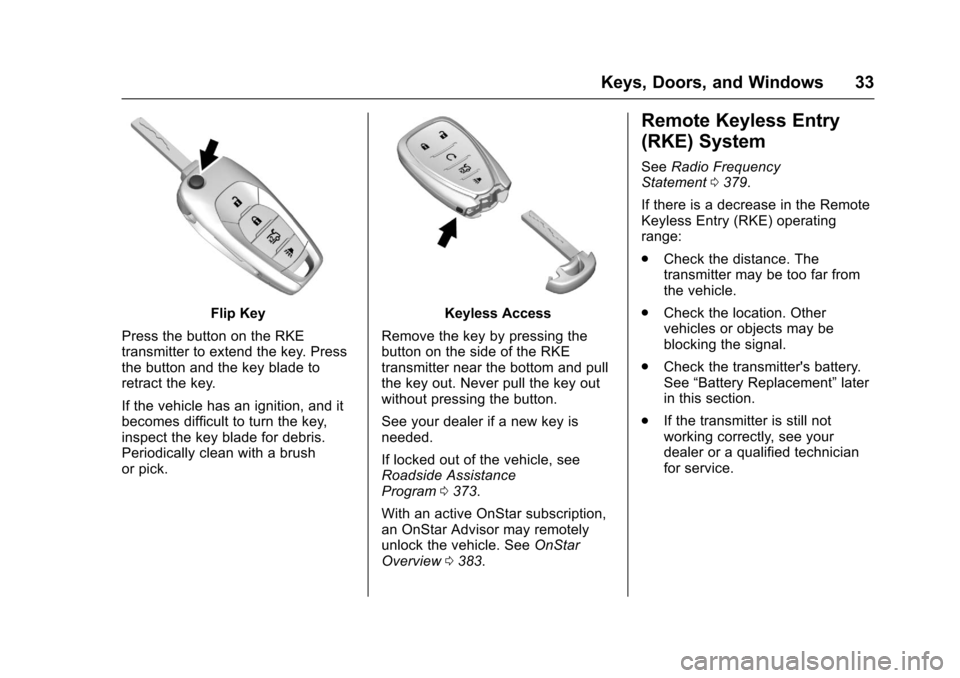
Flip Key
Press the button on the RKE
transmitter to extend the key. Press
the button and the key blade to
retract the key.
If the vehicle has an ignition, and it
becomes difficult to turn the key,
inspect the key blade for debris.
Periodically clean with a brush
or pick.Keyless Access
Remove the key by pressing the
button on the side of the RKE
transmitter near the bottom and pull
the key out. Never pull the key out
without pressing the button.
See your dealer if a new key is
needed.
If locked out of the vehicle, see
Roadside Assistance
Program 0373.
With an active OnStar subscription,
an OnStar Advisor may remotely
unlock the vehicle. See OnStar
Overview 0383.
Remote Keyless Entry
(RKE) System
See Radio Frequency
Statement 0379.
If there is a decrease in the Remote
Keyless Entry (RKE) operating
range:
. Check the distance. The
transmitter may be too far from
the vehicle.
. Check the location. Other
vehicles or objects may be
blocking the signal.
. Check the transmitter's battery.
See “Battery Replacement” later
in this section.
. If the transmitter is still not
working correctly, see your
dealer or a qualified technician
for service.
Page 36 of 405
Chevrolet Cruze Owner Manual (GMNA-Localizing-U.S./Canada/Mexico-
9803785) - 2017 - CRC - 4/13/16
Keys, Doors, and Windows 35
purchased and programmed through
your dealer. The vehicle can be
reprogrammed so that lost or stolen
keys no longer work. Any remaining
keys will need to be reprogrammed.
Each vehicle can have up to eight
keys matched to it.
Programming with Two
Recognized Keys (Key
Vehicles Only)
This procedure is for adding a
transmitter, not replacing a
transmitter. To program:1. Insert the original, already programmed key in the ignition
and turn the key to the ON/
RUN position.
2. Turn the key to LOCK/OFF, and remove the key.
3. Quickly, within five seconds, insert the second original
already programmed key in the
ignition and turn the key to the
ON/RUN position.
4. Turn the key to LOCK/OFF, and remove the key. 5. Insert the new key to be
programmed and turn it to the
ON/RUN position within
five seconds.
The security light will turn off
once the key has been
programmed.
6. Repeat Steps 1–5 if additional keys are to be programmed.
If a key is lost or damaged, see your
dealer to have a new key made.
Programming without Two
Recognized Keys (Key
Vehicles Only)
Program a new key to the vehicle
when a recognized key is not
available. Canadian regulations
require that owners see their dealer.
If two currently recognized keys are
not available, follow this procedure
to program the first key.
This procedure will take
approximately 30 minutes to
complete for the first key. The
vehicle must be off and all of the
keys you wish to program must be
with you. 1. Insert the new vehicle key into
the ignition.
2. Turn to ON/RUN. The security light will come on.
3. Wait 10 minutes until the security light turns off.
4. Turn the ignition to LOCK/OFF.
5. Repeat Steps 2–4 two more times. After the third time, turn
to ON/RUN; the key is learned
and all previously known keys
will no longer work with the
vehicle.
6. To learn a second key, turn to LOCK/OFF, insert the second
key to be learned, and rotate to
ON/RUN.
After two keys are learned,
remaining keys can be learned by
following the procedure in
“Programming with Two Recognized
Keys (Key Vehicles Only).”
Battery Replacement
Replace the battery if the REPLACE
BATTERY IN REMOTE KEY
message displays in the DIC. See
Key and Lock Messages 0143.
Page 40 of 405
Chevrolet Cruze Owner Manual (GMNA-Localizing-U.S./Canada/Mexico-
9803785) - 2017 - CRC - 4/13/16
Keys, Doors, and Windows 39
Keyless Trunk Opening
Press the touch pad on the rear of
the trunk above the license plate to
open the trunk when the RKE
transmitter is in range.
Keyed Access
To access a vehicle with a dead
transmitter battery, seeDoor
Locks 044.
Programming Transmitters to
the Vehicle
Only RKE transmitters programmed
to the vehicle will work. If a
transmitter is lost or stolen, a
replacement can be purchased and
programmed through your dealer.
The vehicle can be reprogrammed
so that lost or stolen transmitters no
longer work. Any remaining
transmitters will need to be
reprogrammed. Each vehicle can
have up to eight transmitters
matched to it. Programming with Recognized
Transmitters (Keyless Access
Vehicles Only)
A new transmitter can be
programmed to the vehicle when
there are two recognized
transmitters. To program, the vehicle
must be off and all of the
transmitters, both currently
recognized and new, must be
with you.
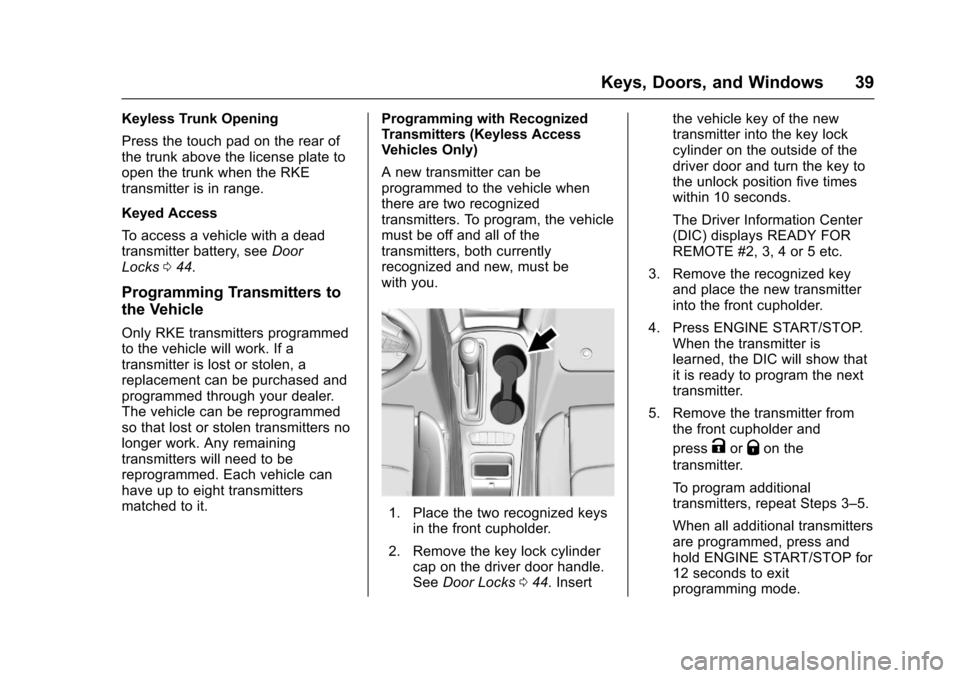
1. Place the two recognized keys
in the front cupholder.
2. Remove the key lock cylinder cap on the driver door handle.
See Door Locks 044. Insert the vehicle key of the new
transmitter into the key lock
cylinder on the outside of the
driver door and turn the key to
the unlock position five times
within 10 seconds.
The Driver Information Center
(DIC) displays READY FOR
REMOTE #2, 3, 4 or 5 etc.
3. Remove the recognized key and place the new transmitter
into the front cupholder.
4. Press ENGINE START/STOP. When the transmitter is
learned, the DIC will show that
it is ready to program the next
transmitter.
5. Remove the transmitter from the front cupholder and
press
KorQon the
transmitter.
To program additional
transmitters, repeat Steps 3–5.
When all additional transmitters
are programmed, press and
hold ENGINE START/STOP for
12 seconds to exit
programming mode.
Page 42 of 405
Chevrolet Cruze Owner Manual (GMNA-Localizing-U.S./Canada/Mexico-
9803785) - 2017 - CRC - 4/13/16
Keys, Doors, and Windows 41
When all additional transmitters
are programmed, press and
hold ENGINE START/STOP for
12 seconds to exit
programming mode.
7. Return the vehicle key back into the transmitter.
Starting the Vehicle with a Low
Transmitter Battery
If the transmitter battery is weak or if
there is interference with the signal
when tying to start the vehicle, the
DIC may display NO REMOTE
DETECTED or NO REMOTE KEY
WAS DETECTED PLACE KEY IN
TRANSMITTER POCKET THEN
START YOUR VEHICLE. The
REPLACE BATTERY IN REMOTE
KEY message may also be
displayed at this time.
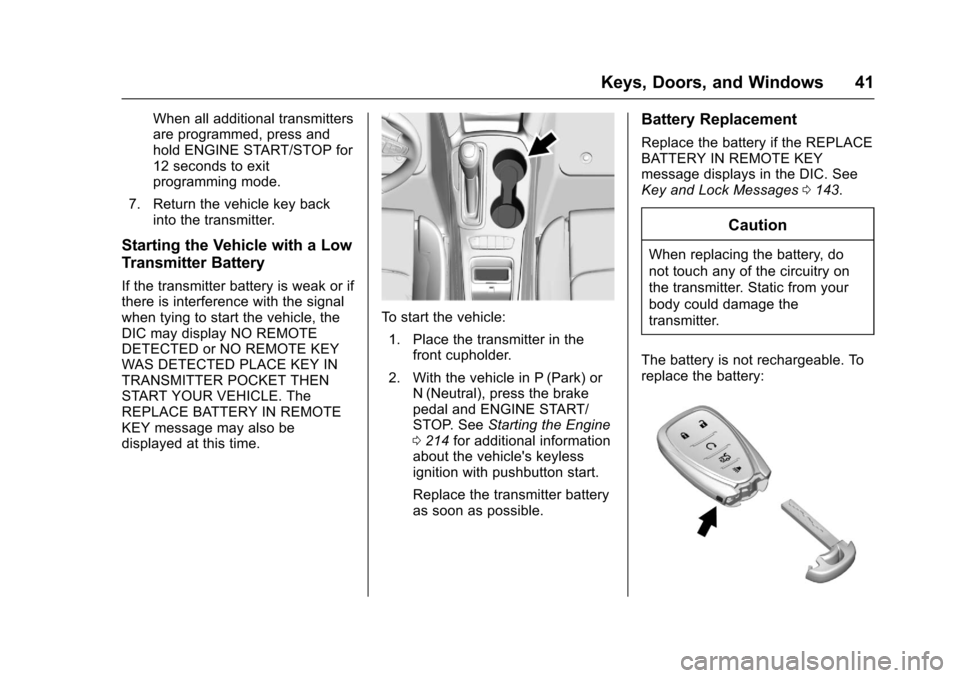
To start the vehicle:
1. Place the transmitter in the front cupholder.
2. With the vehicle in P (Park) or N (Neutral), press the brake
pedal and ENGINE START/
STOP. See Starting the Engine
0 214 for additional information
about the vehicle's keyless
ignition with pushbutton start.
Replace the transmitter battery
as soon as possible.
Battery Replacement
Replace the battery if the REPLACE
BATTERY IN REMOTE KEY
message displays in the DIC. See
Key and Lock Messages 0143.
Caution
When replacing the battery, do
not touch any of the circuitry on
the transmitter. Static from your
body could damage the
transmitter.
The battery is not rechargeable. To
replace the battery:
Page 145 of 405

Chevrolet Cruze Owner Manual (GMNA-Localizing-U.S./Canada/Mexico-
9803785) - 2017 - CRC - 4/13/16
144 Instruments and Controls
Remote Keyless Entry (RKE)
System Operation (Keyless
Access)036.
NO REMOTE DETECTED
PRESS BRAKE TO RESTART
or NO REMOTE DETECTED
PRESS CLUTCH TO RESTART
This message displays if the RKE
transmitter is no longer detected in
the vehicle. Press the brake pedal
or clutch and the engine start/stop
button to restart the vehicle.
REMOTE LEFT IN VEHICLE
This message displays when
leaving the vehicle with the RKE
transmitter still inside.
REPLACE BATTERY IN
REMOTE KEY
This message displays when the
battery in the RKE transmitter needs
to be replaced.
Lamp Messages
AUTOMATIC LIGHT
CONTROL ON
This message is displayed when the
automatic light control has been
turned on. See Automatic Headlamp
System 0160.
AUTOMATIC LIGHT
CONTROL OFF
This message is displayed when the
automatic light control has been
turned off. See Automatic Headlamp
System 0160.
XXX TURN INDICATOR
FAILURE
When one of the turn signals is out,
this message displays to show
which bulb needs to be replaced.
See Bulb Replacement 0289 and
Replacement Bulbs 0293 for more
information on turn signal bulb
replacement.
TURN SIGNAL ON
This message is displayed if the
turn signal has been left on. Turn off
the turn signal.
Object Detection System
Messages
FORWARD COLLISION
ALERT OFF
This message displays when the
Forward Collision Alert has been
turned off.
FRONT CAMERA BLOCKED
CLEAN WINDSHIELD
This message displays when the
camera is blocked. Cleaning the
outside of the windshield behind the
rearview mirror may correct the
issue. The Lane Keep Assist (LKA)
and the Lane Departure Warning
(LDW) system will not operate.
Forward Collision Alert (FCA) may
not work or may not work as well.
LANE CHANGE ALERT OFF
This message indicates that the
driver has turned the Side Blind
Zone Alert (SBZA) and Lane
Change Alert (LCA) systems off.
Page 264 of 405

Chevrolet Cruze Owner Manual (GMNA-Localizing-U.S./Canada/Mexico-
9803785) - 2017 - CRC - 4/13/16
Vehicle Care 263
Vehicle Care
General Information
General Information . . . . . . . . . . 264
California Proposition65 Warning . . . . . . . . . . . . . . . . . 264
California Perchlorate Materials Requirements . . . . . 264
Accessories and Modifications . . . . . . . . . . . . . . . . 265
Vehicle Checks
Doing Your OwnService Work . . . . . . . . . . . . . . . 265
Hood . . . . . . . . . . . . . . . . . . . . . . . . . 266
Engine Compartment Overview . . . . . . . . . . . . . . . . . . . . 267
Engine Oil . . . . . . . . . . . . . . . . . . . . 270
Engine Oil Life System . . . . . . . 273
Automatic Transmission Fluid . . . . . . . . . . . . . . . . . . . . . . . . 275
Manual Transmission Fluid . . . 275
Hydraulic Clutch . . . . . . . . . . . . . . 275
Engine Air Cleaner/Filter . . . . . . 276
Cooling System . . . . . . . . . . . . . . 277
Engine Coolant . . . . . . . . . . . . . . . 278
Engine Overheating . . . . . . . . . . 281
Washer Fluid . . . . . . . . . . . . . . . . . 282
Brakes . . . . . . . . . . . . . . . . . . . . . . . 283
Brake Fluid . . . . . . . . . . . . . . . . . . . 284 Battery - North America . . . . . . 285
Fuel Filter . . . . . . . . . . . . . . . . . . . . 286
Starter Switch Check . . . . . . . . . 286
Automatic Transmission Shift
Lock Control Function
Check . . . . . . . . . . . . . . . . . . . . . . . 287
Ignition Transmission Lock Check . . . . . . . . . . . . . . . . . . . . . . . 287
Park Brake and P (Park) Mechanism Check . . . . . . . . . . 287
Wiper Blade Replacement . . . . 288
Headlamp Aiming
Headlamp Aiming . . . . . . . . . . . . 289
Bulb Replacement
Bulb Replacement . . . . . . . . . . . . 289
Halogen Bulbs . . . . . . . . . . . . . . . . 289
High Intensity Discharge (HID) Lighting . . . . . . . . . . . . . . . . . . . . . 289
Headlamps and Front Turn Signal . . . . . . . . . . . . . . . . . . . . . . . 290
Taillamps and Back-Up Lamps . . . . . . . . . . . . . . . . . . . . . . 291
Replacement Bulbs . . . . . . . . . . . 293
Electrical System
Electrical System Overload . . . 293
Fuses and Circuit Breakers . . . 294
Engine Compartment Fuse Block . . . . . . . . . . . . . . . . . . . . . . . . 294 Instrument Panel Fuse
Block . . . . . . . . . . . . . . . . . . . . . . . . 298
Wheels and Tires
Tires . . . . . . . . . . . . . . . . . . . . . . . . . . 301
All-Season Tires . . . . . . . . . . . . . . 301
Winter Tires . . . . . . . . . . . . . . . . . . 302
Low-Profile Tires . . . . . . . . . . . . . 302
Tire Sidewall Labeling . . . . . . . . 303
Tire Designations . . . . . . . . . . . . . 305
Tire Terminology andDefinitions . . . . . . . . . . . . . . . . . . 305
Tire Pressure . . . . . . . . . . . . . . . . . 308
Tire Pressure for High-Speed Operation . . . . . . . . . . . . . . . . . . . 309
Tire Pressure Monitor System . . . . . . . . . . . . . . . . . . . . . . 310
Tire Pressure Monitor Operation . . . . . . . . . . . . . . . . . . . 311
Tire Inspection . . . . . . . . . . . . . . . . 314
Tire Rotation . . . . . . . . . . . . . . . . . 314
When It Is Time for New Tires . . . . . . . . . . . . . . . . . . . . . . . . 315
Buying New Tires . . . . . . . . . . . . . 316
Different Size Tires and Wheels . . . . . . . . . . . . . . . . . . . . . . 317
Uniform Tire Quality Grading . . . . . . . . . . . . . . . . . . . . . 318
Wheel Alignment and Tire Balance . . . . . . . . . . . . . . . . . . . . . 319
Wheel Replacement . . . . . . . . . . 319
Page 286 of 405
Chevrolet Cruze Owner Manual (GMNA-Localizing-U.S./Canada/Mexico-
9803785) - 2017 - CRC - 4/13/16
Vehicle Care 285
{Warning
If too much brake fluid is added, it
can spill on the engine and burn,
if the engine is hot enough. You
or others could be burned, and
the vehicle could be damaged.
Add brake fluid only when work is
done on the brake/clutch
hydraulic system.
When the brake/clutch fluid falls to a
low level, the brake warning light
comes on. See Brake System
Warning Light 0128.
Brake fluid absorbs water over time
which degrades the effectiveness of
the brake fluid. Replace brake fluid
at the specified intervals to prevent
increased stopping distance. See
Maintenance Schedule 0352.
What to Add
Use only GM approved DOT 3
brake fluid from a clean, sealed
container. See Recommended
Fluids and Lubricants 0361.
{Warning
The wrong or contaminated brake
fluid could result in damage to the
brake system. This could result in
the loss of braking leading to a
possible injury. Always use the
proper GM approved brake fluid.
Caution
If brake fluid is spilled on the
vehicle's painted surfaces, the
paint finish can be damaged.
Immediately wash off any painted
surface.
Battery - North America
The original equipment battery is
maintenance free. Do not remove
the cap and do not add fluid.
Refer to the replacement number on
the original battery label when a
new battery is needed. Some vehicles are equipped with an
Absorbant Glass Mat (AGM) 12-volt
battery. Installation of a standard
12-volt battery will result in reduced
battery life. When using a 12-volt
battery charger, some chargers
have an AGM battery setting on the
charger. If available, use the AGM
setting on the charger when
charging an AGM battery. Follow the
charger manufacture's instructions.
{Warning
WARNING:
Battery posts,
terminals, and related
accessories contain lead and lead
compounds, chemicals known to
the State of California to cause
cancer and birth defects or other
reproductive harm. Batteries also
contain other chemicals known to
the State of California to cause
cancer. WASH HANDS AFTER
HANDLING.
See California Proposition
65 Warning 0264.
Page 287 of 405
Chevrolet Cruze Owner Manual (GMNA-Localizing-U.S./Canada/Mexico-
9803785) - 2017 - CRC - 4/13/16
286 Vehicle Care
Vehicle Storage
{Warning
Batteries have acid that can burn
you and gas that can explode.
You can be badly hurt if you are
not careful. SeeJump Starting -
North America 0336 for tips on
working around a battery without
getting hurt.
Infrequent Usage: Remove the
black, negative (−) cable from the
battery to keep the battery from
running down.
Extended Storage: Remove the
black, negative (−) cable from the
battery or use a battery trickle
charger.
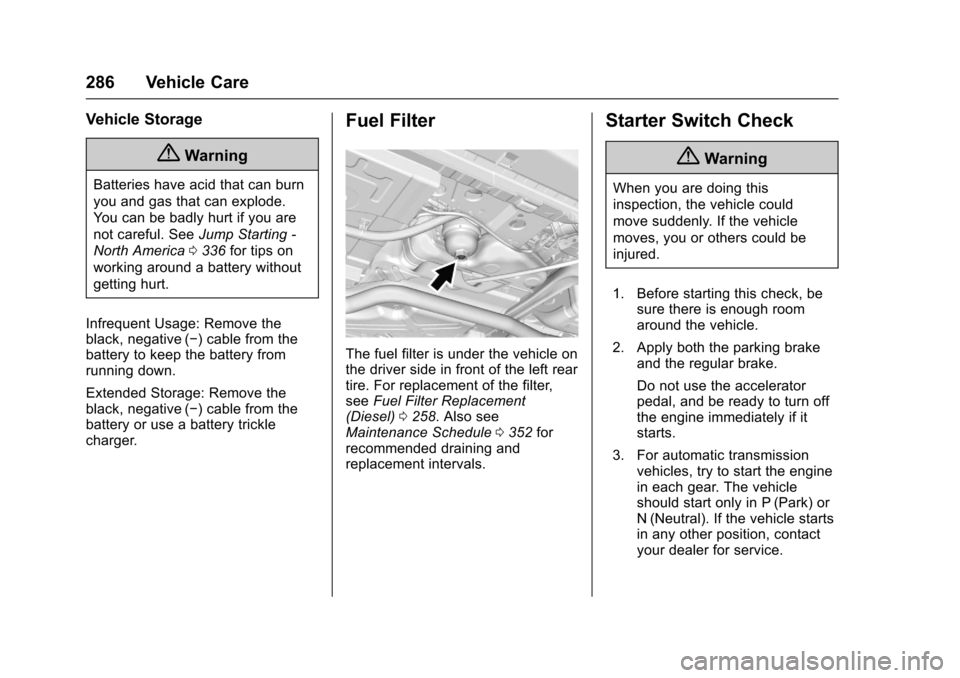
Fuel Filter
The fuel filter is under the vehicle on
the driver side in front of the left rear
tire. For replacement of the filter,
see Fuel Filter Replacement
(Diesel) 0258. Also see
Maintenance Schedule 0352 for
recommended draining and
replacement intervals.
Starter Switch Check
{Warning
When you are doing this
inspection, the vehicle could
move suddenly. If the vehicle
moves, you or others could be
injured.
1. Before starting this check, be sure there is enough room
around the vehicle.
2. Apply both the parking brake and the regular brake.
Do not use the accelerator
pedal, and be ready to turn off
the engine immediately if it
starts.
3. For automatic transmission vehicles, try to start the engine
in each gear. The vehicle
should start only in P (Park) or
N (Neutral). If the vehicle starts
in any other position, contact
your dealer for service.