2017 CHEVROLET CRUZE HATCHBACK service reset
[x] Cancel search: service resetPage 130 of 405
Chevrolet Cruze Owner Manual (GMNA-Localizing-U.S./Canada/Mexico-
9803785) - 2017 - CRC - 4/13/16
Instruments and Controls 129
{Warning
The brake system might not be
working properly if the brake
system warning light is on.
Driving with the brake system
warning light on can lead to a
crash. If the light is still on after
the vehicle has been pulled off
the road and carefully stopped,
have the vehicle towed for
service.
Antilock Brake System
(ABS) Warning Light
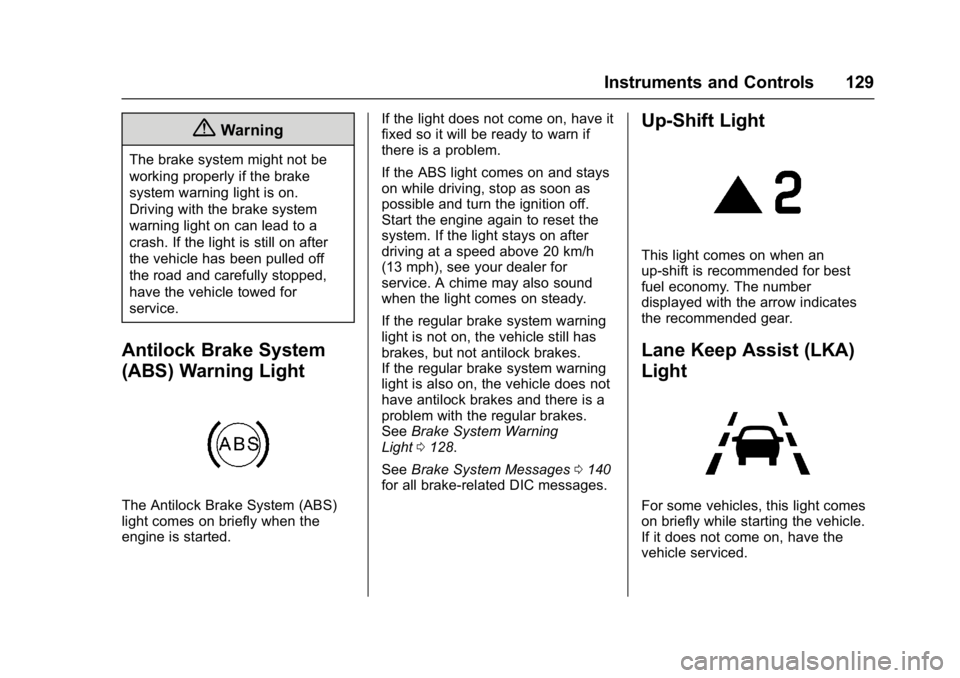
The Antilock Brake System (ABS)
light comes on briefly when the
engine is started.If the light does not come on, have it
fixed so it will be ready to warn if
there is a problem.
If the ABS light comes on and stays
on while driving, stop as soon as
possible and turn the ignition off.
Start the engine again to reset the
system. If the light stays on after
driving at a speed above 20 km/h
(13 mph), see your dealer for
service. A chime may also sound
when the light comes on steady.
If the regular brake system warning
light is not on, the vehicle still has
brakes, but not antilock brakes.
If the regular brake system warning
light is also on, the vehicle does not
have antilock brakes and there is a
problem with the regular brakes.
See
Brake System Warning
Light 0128.
See Brake System Messages 0140
for all brake‐related DIC messages.
Up-Shift Light
This light comes on when an
up-shift is recommended for best
fuel economy. The number
displayed with the arrow indicates
the recommended gear.
Lane Keep Assist (LKA)
Light
For some vehicles, this light comes
on briefly while starting the vehicle.
If it does not come on, have the
vehicle serviced.
Page 143 of 405

Chevrolet Cruze Owner Manual (GMNA-Localizing-U.S./Canada/Mexico-
9803785) - 2017 - CRC - 4/13/16
142 Instruments and Controls
Engine Oil Messages
CHANGE ENGINE OIL SOON
This message displays when the
engine oil needs to be changed.
When you change the engine oil, be
sure to reset the Oil Life System.
SeeEngine Oil Life System 0273
and Driver Information Center (DIC)
(Uplevel) 0137 orDriver Information
Center (DIC) (Base Level) 0134 for
information on how to reset the
system. See Engine Oil0270 and
Maintenance Schedule 0352 for
more information.
OIL PRESSURE LOW —STOP
ENGINE
This message displays if low oil
pressure levels occur. Stop the
vehicle as soon as safely possible
and do not operate it until the cause
of the low oil pressure has been
corrected. Check the oil as soon as
possible and have the vehicle
serviced by your dealer.
Engine Power Messages
ENGINE POWER IS REDUCED
This message displays when the
vehicle's engine power is reduced.
Reduced engine power can affect
the vehicle's ability to accelerate.
If this message is on, but there is no
reduction in performance, proceed
to your destination. The
performance may be reduced the
next time the vehicle is driven. The
vehicle may be driven at a reduced
speed while this message is on, but
maximum acceleration and speed
may be reduced. Anytime this
message stays on, or displays
repeatedly, the vehicle should be
taken to your dealer for service as
soon as possible.
Fuel System Messages
FUEL LEVEL LOW
This message displays when the
vehicle is low on fuel. Refuel as
soon as possible.
TIGHTEN GAS CAP (Gas
Engine Only)
This message displays when the
fuel cap is not on tight on vehicles
with gasoline engines. Tighten the
fuel cap.
WATER IN FUEL —CONTACT
SERVICE
This message displays when water
level in the diesel fuel filter exceeds
a specified level. Residual water in
the diesel fuel filter must be drained.
Water in Fuel (Diesel) 0255.
Diesel Exhaust Fluid
Messages
For more information on these
messages, see “Exhaust Fluid Low”
or “Exhaust Fluid Quality Poor” in
Diesel Exhaust Fluid 0223.
EXHAUST FLUID RANGE:
XXXX KM (MI)
When the exhaust fluid is getting
low, the range will be displayed in
either kilometers or miles. It is
normal for the EXHAUST FLUID
RANGE to vary based on vehicle
Page 172 of 405
Chevrolet Cruze Owner Manual (GMNA-Localizing-U.S./Canada/Mexico-
9803785) - 2017 - CRC - 4/13/16
Infotainment System 171
Selecting a Station
Seek Tuning
If the radio station is not known:
Press
gordto automatically
search for available radio stations.
Direct Tune
From the AM or FM menu:
1. Touch Tune.
2. Enter the station number.
3. Touch Go.
Favorites
1. Touch
SorTto scroll through
the favorite pages.
2. Touch the station to select it.
Update Station List
. From the AM or FM menu, touch
Menu, then touch Update Station
List. The broadcasting list
updating will begin.
. During the AM or FM
broadcasting list update, touch
Cancel to stop the updates. Station List
1. From the AM or FM menu, touch Menu.
2. Select Station List.
3. Touch
QorRto scroll through
the list. Touch the station to
select it.
Menu
Touch to choose between available
menus for the current source.
Storing a Station as a Favorite
Stations from all bands can be
stored in any order in the favorite
pages.
Up to 25 stations can be stored.
Storing Stations
To store the station to a position in
the list, touch the corresponding
button 1−5 until a beep is heard.
1. Select the desired station.
2. Touch
SorTto select the
desired page of saved
favorites. 3. Touch and hold any of the
preset buttons to save the
current radio station to that
button of the selected
favorites page.
To change a preset button, tune to
the new desired radio station and
touch and hold the preset button.
Satellite Radio (If
Equipped)
Vehicles with an SXM Satellite
Radio tuner and a valid SiriusXM®
Satellite Radio subscription can
receive SiriusXM programming.
SiriusXM Satellite Radio
Service
SiriusXM is a satellite radio service
based in the 48 contiguous United
States and 10 Canadian provinces.
SiriusXM Satellite Radio has a wide
variety of programming and
commercial-free music, coast to
coast, and in digital-quality sound.
During your trial or when you
subscribe, you will get unlimited
access to SiriusXM Radio Online for
when you are not in the vehicle.
Page 173 of 405
Chevrolet Cruze Owner Manual (GMNA-Localizing-U.S./Canada/Mexico-
9803785) - 2017 - CRC - 4/13/16
172 Infotainment System
A service fee is required to receive
the SiriusXM service. If SiriusXM
service needs to be reactivated, the
radio will display "No Subscription
Please Renew" on channel SXM1.
For more information, contact
SiriusXM at www.siriusxm.com or
1-866-635-2349 (U.S.), and
www.xmradio.ca or 1-877-209-0079
(Canada).
Listening to SiriusXM Radio
1. Press{.
2. Touch AUDIO.
3. Touch Source.
4. Touch SXM and the most recent listened to SiriusXM
channel will display.
Selecting a Category
From Menu, touch Categories, then
touch the desired category or from
Categories, touch
QorRto find the
desired channel. Touch the channel
to select it.
Selecting a Channel
Pressgordto seek the previous
or next channel.
Using the Preset Buttons
Up to five favorites pages can be
saved, and each page can store up
to five channels.
To change a preset button, tune to
the new desired channel and hold
the button.
Listening to Preset Channels
1. Touch
SorTrepeatedly to
select the desired
favorites page.
2. Touch the preset button to listen to the channel.
Using the SiriusXM Menu
Operation
1. Touch MENU on the SXM radio screen.
2. Touch the menu to select the desired item or to display the
detail menu item. 3. Touch
0to return to the
previous menu.
Channel List 1. Touch Channel List from the SXM menu. The channel list is
displayed.
2. Touch
QorRto find the
desired channel. Touch the
channel to select it.
Tone Settings 1. Touch Tone Settings. See “Tone Settings” under
Operation 0169.
2. Touch
0.
Auto Volume 1. Touch Auto Volume. See “Auto
Volume” under
Operation 0169.
2. Touch
0.
Page 231 of 405
Chevrolet Cruze Owner Manual (GMNA-Localizing-U.S./Canada/Mexico-
9803785) - 2017 - CRC - 4/13/16
230 Driving and Operating
D :This position is for normal
driving. It provides the best fuel
economy. If more power is needed
for passing, and the vehicle is:
. Going less than 56 km/h
(35 mph), push the accelerator
pedal about halfway down.
. Going about 56 km/h (35 mph) or
more, push the accelerator all
the way down.
Caution
If the vehicle does not shift gears,
the transmission could be
damaged. Have the vehicle
serviced right away.
L : Electronic Range Select (ERS)
or Manual Mode allows for the
selection of the range of gear
positions. See Manual Mode0230.
Operating Modes
The transmission may operate in a
lower gear than normal to improve
vehicle performance. The engine speed may be higher and there may
be an increase in noise during the
following conditions:
.
When climbing a grade.
. When driving downhill.
. When driving in hot
temperatures or at high altitude.
Manual Mode
Driver Shift Control (DSC)
Electronic Range Select (ERS) or
Manual Mode allows the range of
gear positions to be selected. Use
this mode when driving downhill or
to limit the top gear and vehicle
speed. The shift position indicator in
the Driver Information Center (DIC)
will display a number next to the L.
This indicates the highest available
gear under Manual Mode.
To use:
1. Move the shift lever to L (Low).
2. Press + (plus) or −(minus) on
the shift lever to increase or
decrease the available gear
range. When shifting to L (Low), the
transmission will shift to a preset
lower gear range. For this preset
range, the highest gear available is
displayed next to the L in the DIC.
See
Driver Information Center (DIC)
(Uplevel) 0137 orDriver Information
Center (DIC) (Base Level) 0134.
All gears below that number are
available to use.
While using ERS, cruise control can
be used.
The transmission will not allow
shifting to the next lower gear if the
vehicle speed or engine rpm is
too high.
If vehicle speed is not reduced
within the time allowed, the lower
gear range shift will not be
completed. Slow the vehicle, then
press −(minus) to the desired lower
gear range.
Page 275 of 405

Chevrolet Cruze Owner Manual (GMNA-Localizing-U.S./Canada/Mexico-
9803785) - 2017 - CRC - 4/13/16
274 Vehicle Care
When the system has calculated
that oil life has been diminished, it
indicates that an oil change is
necessary. A CHANGE ENGINE
OIL SOON message comes on. See
Engine Oil Messages0142.
Change the oil as soon as possible
within the next 1 000 km (600 mi).
It is possible that, if driving under
the best conditions, the oil life
system might indicate that an oil
change is not necessary for up to a
year. The engine oil and filter must
be changed at least once a year
and, at this time, the system must
be reset. Your dealer has trained
service people who will perform this
work and reset the system. It is also
important to check the oil regularly
over the course of an oil drain
interval and keep it at the proper
level.
If the system is ever reset
accidentally, the oil must be
changed at 5 000 km (3,000 mi)
since the last oil change.
Remember to reset the oil life
system whenever the oil is changed.How to Reset the Engine Oil
Life System
Reset the system whenever the
engine oil is changed so that the
system can calculate the next
engine oil change. To reset the
system:
Resetting the Oil Life System
(Base Level Cluster)
1. Display the REMAINING OIL LIFE on the DIC. See Driver
Information Center (DIC)
(Uplevel) 0137 orDriver
Information Center (DIC) (Base
Level) 0134.
2. Press and hold SET/CLR on the turn signal lever while the
Oil Life display is active. The
oil life will change to 100%.
Resetting the Oil Life System
(Uplevel Cluster) 1. Display the REMAINING OIL LIFE on the DIC. See Driver
Information Center (DIC)
(Uplevel) 0137 orDriver
Information Center (DIC) (Base
Level) 0134. 2. Press and hold
Von the DIC
while the Oil Life display is
active. The oil life will change
to 100%.
The oil life system can also be reset
as follows:
1. Turn the ignition on with the engine off. See Ignition
Positions (Keyless Access)
0 212 orIgnition Positions (Key
Access) 0210.
2. Fully press and release the accelerator pedal three times
within five seconds.
The system is reset when the
CHANGE ENGINE OIL SOON
message goes off.
If the CHANGE ENGINE OIL SOON
message comes back on when the
vehicle is started, the engine oil life
system has not been reset. Repeat
the procedure.
Page 290 of 405
Chevrolet Cruze Owner Manual (GMNA-Localizing-U.S./Canada/Mexico-
9803785) - 2017 - CRC - 4/13/16
Vehicle Care 289
Headlamp Aiming
Headlamp aim has been preset and
should need no further adjustment.
If the vehicle is damaged in a crash,
the headlamp aim may be affected.
If adjustment to the headlamps is
necessary, see your dealer.
Bulb Replacement
For the proper type of replacement
bulbs, seeReplacement
Bulbs 0293.
For any bulb-changing procedure
not listed in this section, contact
your dealer.
Halogen Bulbs
{Warning
Halogen bulbs have pressurized
gas inside and can burst if you
drop or scratch the bulb. You or
others could be injured. Be sure
to read and follow the instructions
on the bulb package.
High Intensity Discharge
(HID) Lighting
{Warning
The High Intensity Discharge
(HID) lighting system operates at
a very high voltage. If you try to
service any of the system
components, you could be
seriously injured. Have your
dealer or a qualified technician
service them.
After an HID headlamp bulb has
been replaced, the beam might be a
slightly different shade than it was
originally. This is normal.
Page 314 of 405

Chevrolet Cruze Owner Manual (GMNA-Localizing-U.S./Canada/Mexico-
9803785) - 2017 - CRC - 4/13/16
Vehicle Care 313
matched to the tire/wheel positions,
using a TPMS relearn tool, in the
following order: driver side front tire,
passenger side front tire, passenger
side rear tire, and driver side rear.
See your dealer for service or to
purchase a relearn tool. A TPMS
relearn tool can also be purchased.
See Tire Pressure Monitor Sensor
Activation Tool at
www.gmtoolsandequipment.com or
call 1-800-GM TOOLS
(1-800-468-6657).
There are two minutes to match the
first tire/wheel position, and
five minutes overall to match all four
tire/wheel positions. If it takes
longer, the matching process stops
and must be restarted.
The TPMS sensor matching
process is:1. Set the parking brake.
2. Place the vehicle power mode in ON/RUN/START. See
Ignition Positions (Keyless
Access) 0212 orIgnition
Positions (Key Access) 0210. 3. Uplevel DIC Only: Make sure
the Tire Pressure info page
option is turned on. The info
pages on the DIC can be
turned on and off through the
Settings menu. See Driver
Information Center (DIC)
(Uplevel) 0137 orDriver
Information Center (DIC) (Base
Level) 0134.
4. If the vehicle has an uplevel DIC, use the DIC controls on
the right side of the steering
wheel to scroll to the Tire
Pressure screen under the DIC
info page.
If the vehicle has a base level
DIC, press MENU to select the
Vehicle Information Menu in
the DIC. Use the thumbwheel
to scroll to the Tire Pressure
Menu item screen.
5. If the vehicle has an uplevel DIC, press and hold the
V
(Set/Reset) button in the center
of the DIC controls.
If the vehicle has a base level
DIC, press SET/CLR to begin
the sensor matching process. A message requesting
acceptance of the process may
display.
If the vehicle has a base level
DIC, press SET/CLR again to
confirm the selection.
The horn sounds twice to
signal the receiver is in relearn
mode and the TIRE
LEARNING ACTIVE message
displays on the DIC screen.
6. Start with the driver side front tire.
7. Place the relearn tool against the tire sidewall, near the valve
stem. Then press the button to
activate the TPMS sensor.
A horn chirp confirms that the
sensor identification code has
been matched to this tire and
wheel position.
8. Proceed to the passenger side front tire, and repeat the
procedure in Step 7.
9. Proceed to the passenger side rear tire, and repeat the
procedure in Step 7.