2017 CHEVROLET CRUZE HATCHBACK turn signal
[x] Cancel search: turn signalPage 264 of 405

Chevrolet Cruze Owner Manual (GMNA-Localizing-U.S./Canada/Mexico-
9803785) - 2017 - CRC - 4/13/16
Vehicle Care 263
Vehicle Care
General Information
General Information . . . . . . . . . . 264
California Proposition65 Warning . . . . . . . . . . . . . . . . . 264
California Perchlorate Materials Requirements . . . . . 264
Accessories and Modifications . . . . . . . . . . . . . . . . 265
Vehicle Checks
Doing Your OwnService Work . . . . . . . . . . . . . . . 265
Hood . . . . . . . . . . . . . . . . . . . . . . . . . 266
Engine Compartment Overview . . . . . . . . . . . . . . . . . . . . 267
Engine Oil . . . . . . . . . . . . . . . . . . . . 270
Engine Oil Life System . . . . . . . 273
Automatic Transmission Fluid . . . . . . . . . . . . . . . . . . . . . . . . 275
Manual Transmission Fluid . . . 275
Hydraulic Clutch . . . . . . . . . . . . . . 275
Engine Air Cleaner/Filter . . . . . . 276
Cooling System . . . . . . . . . . . . . . 277
Engine Coolant . . . . . . . . . . . . . . . 278
Engine Overheating . . . . . . . . . . 281
Washer Fluid . . . . . . . . . . . . . . . . . 282
Brakes . . . . . . . . . . . . . . . . . . . . . . . 283
Brake Fluid . . . . . . . . . . . . . . . . . . . 284 Battery - North America . . . . . . 285
Fuel Filter . . . . . . . . . . . . . . . . . . . . 286
Starter Switch Check . . . . . . . . . 286
Automatic Transmission Shift
Lock Control Function
Check . . . . . . . . . . . . . . . . . . . . . . . 287
Ignition Transmission Lock Check . . . . . . . . . . . . . . . . . . . . . . . 287
Park Brake and P (Park) Mechanism Check . . . . . . . . . . 287
Wiper Blade Replacement . . . . 288
Headlamp Aiming
Headlamp Aiming . . . . . . . . . . . . 289
Bulb Replacement
Bulb Replacement . . . . . . . . . . . . 289
Halogen Bulbs . . . . . . . . . . . . . . . . 289
High Intensity Discharge (HID) Lighting . . . . . . . . . . . . . . . . . . . . . 289
Headlamps and Front Turn Signal . . . . . . . . . . . . . . . . . . . . . . . 290
Taillamps and Back-Up Lamps . . . . . . . . . . . . . . . . . . . . . . 291
Replacement Bulbs . . . . . . . . . . . 293
Electrical System
Electrical System Overload . . . 293
Fuses and Circuit Breakers . . . 294
Engine Compartment Fuse Block . . . . . . . . . . . . . . . . . . . . . . . . 294 Instrument Panel Fuse
Block . . . . . . . . . . . . . . . . . . . . . . . . 298
Wheels and Tires
Tires . . . . . . . . . . . . . . . . . . . . . . . . . . 301
All-Season Tires . . . . . . . . . . . . . . 301
Winter Tires . . . . . . . . . . . . . . . . . . 302
Low-Profile Tires . . . . . . . . . . . . . 302
Tire Sidewall Labeling . . . . . . . . 303
Tire Designations . . . . . . . . . . . . . 305
Tire Terminology andDefinitions . . . . . . . . . . . . . . . . . . 305
Tire Pressure . . . . . . . . . . . . . . . . . 308
Tire Pressure for High-Speed Operation . . . . . . . . . . . . . . . . . . . 309
Tire Pressure Monitor System . . . . . . . . . . . . . . . . . . . . . . 310
Tire Pressure Monitor Operation . . . . . . . . . . . . . . . . . . . 311
Tire Inspection . . . . . . . . . . . . . . . . 314
Tire Rotation . . . . . . . . . . . . . . . . . 314
When It Is Time for New Tires . . . . . . . . . . . . . . . . . . . . . . . . 315
Buying New Tires . . . . . . . . . . . . . 316
Different Size Tires and Wheels . . . . . . . . . . . . . . . . . . . . . . 317
Uniform Tire Quality Grading . . . . . . . . . . . . . . . . . . . . . 318
Wheel Alignment and Tire Balance . . . . . . . . . . . . . . . . . . . . . 319
Wheel Replacement . . . . . . . . . . 319
Page 275 of 405

Chevrolet Cruze Owner Manual (GMNA-Localizing-U.S./Canada/Mexico-
9803785) - 2017 - CRC - 4/13/16
274 Vehicle Care
When the system has calculated
that oil life has been diminished, it
indicates that an oil change is
necessary. A CHANGE ENGINE
OIL SOON message comes on. See
Engine Oil Messages0142.
Change the oil as soon as possible
within the next 1 000 km (600 mi).
It is possible that, if driving under
the best conditions, the oil life
system might indicate that an oil
change is not necessary for up to a
year. The engine oil and filter must
be changed at least once a year
and, at this time, the system must
be reset. Your dealer has trained
service people who will perform this
work and reset the system. It is also
important to check the oil regularly
over the course of an oil drain
interval and keep it at the proper
level.
If the system is ever reset
accidentally, the oil must be
changed at 5 000 km (3,000 mi)
since the last oil change.
Remember to reset the oil life
system whenever the oil is changed.How to Reset the Engine Oil
Life System
Reset the system whenever the
engine oil is changed so that the
system can calculate the next
engine oil change. To reset the
system:
Resetting the Oil Life System
(Base Level Cluster)
1. Display the REMAINING OIL LIFE on the DIC. See Driver
Information Center (DIC)
(Uplevel) 0137 orDriver
Information Center (DIC) (Base
Level) 0134.
2. Press and hold SET/CLR on the turn signal lever while the
Oil Life display is active. The
oil life will change to 100%.
Resetting the Oil Life System
(Uplevel Cluster) 1. Display the REMAINING OIL LIFE on the DIC. See Driver
Information Center (DIC)
(Uplevel) 0137 orDriver
Information Center (DIC) (Base
Level) 0134. 2. Press and hold
Von the DIC
while the Oil Life display is
active. The oil life will change
to 100%.
The oil life system can also be reset
as follows:
1. Turn the ignition on with the engine off. See Ignition
Positions (Keyless Access)
0 212 orIgnition Positions (Key
Access) 0210.
2. Fully press and release the accelerator pedal three times
within five seconds.
The system is reset when the
CHANGE ENGINE OIL SOON
message goes off.
If the CHANGE ENGINE OIL SOON
message comes back on when the
vehicle is started, the engine oil life
system has not been reset. Repeat
the procedure.
Page 291 of 405
Chevrolet Cruze Owner Manual (GMNA-Localizing-U.S./Canada/Mexico-
9803785) - 2017 - CRC - 4/13/16
290 Vehicle Care
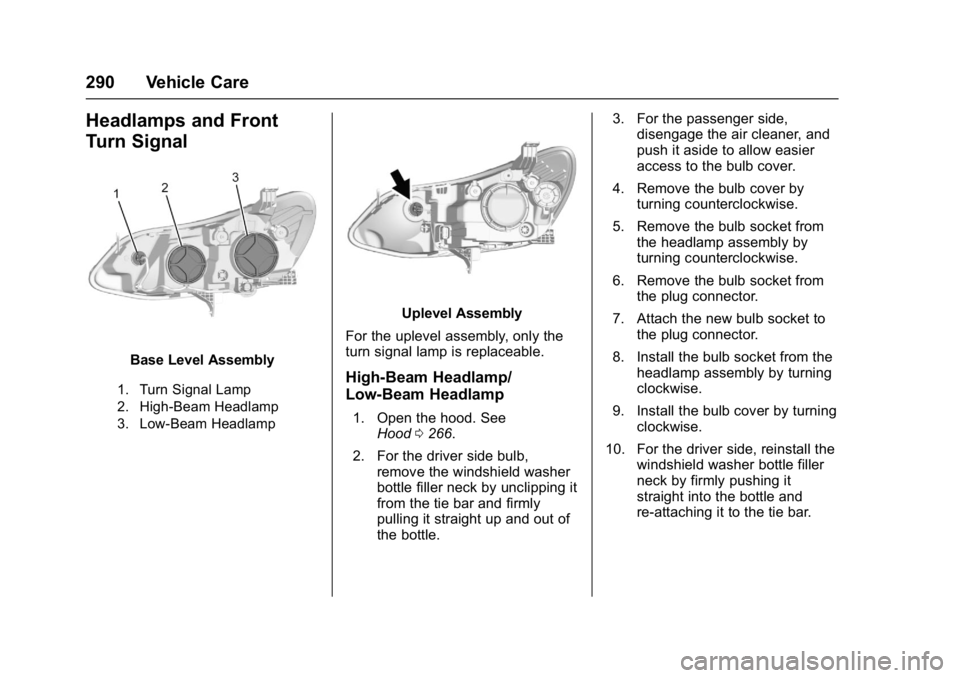
Headlamps and Front
Turn Signal
Base Level Assembly
1. Turn Signal Lamp
2. High-Beam Headlamp
3. Low-Beam Headlamp
Uplevel Assembly
For the uplevel assembly, only the
turn signal lamp is replaceable.
High-Beam Headlamp/
Low-Beam Headlamp
1. Open the hood. See Hood 0266.
2. For the driver side bulb, remove the windshield washer
bottle filler neck by unclipping it
from the tie bar and firmly
pulling it straight up and out of
the bottle. 3. For the passenger side,
disengage the air cleaner, and
push it aside to allow easier
access to the bulb cover.
4. Remove the bulb cover by turning counterclockwise.
5. Remove the bulb socket from the headlamp assembly by
turning counterclockwise.
6. Remove the bulb socket from the plug connector.
7. Attach the new bulb socket to the plug connector.
8. Install the bulb socket from the headlamp assembly by turning
clockwise.
9. Install the bulb cover by turning clockwise.
10. For the driver side, reinstall the windshield washer bottle filler
neck by firmly pushing it
straight into the bottle and
re-attaching it to the tie bar.
Page 292 of 405
Chevrolet Cruze Owner Manual (GMNA-Localizing-U.S./Canada/Mexico-
9803785) - 2017 - CRC - 4/13/16
Vehicle Care 291
Turn Signal Lamp
1. Open the hood. SeeHood 0266.
2. For the driver side bulb, remove the windshield washer
bottle filler neck by firmly
pulling it straight up and out of
the bottle.
3. Remove the bulb socket by turning counterclockwise.
4. Remove the bulb from the socket by pulling it straight out.
5. Install the new bulb by pushing it into the bulb socket.
6. Install the bulb socket to the headlamp assembly by turning
clockwise.
7. For the driver side, reinstall the windshield washer bottle filler
neck by firmly pushing it
straight into the bottle and
re-attaching it to the tie bar.
Taillamps and Back-Up
Lamps
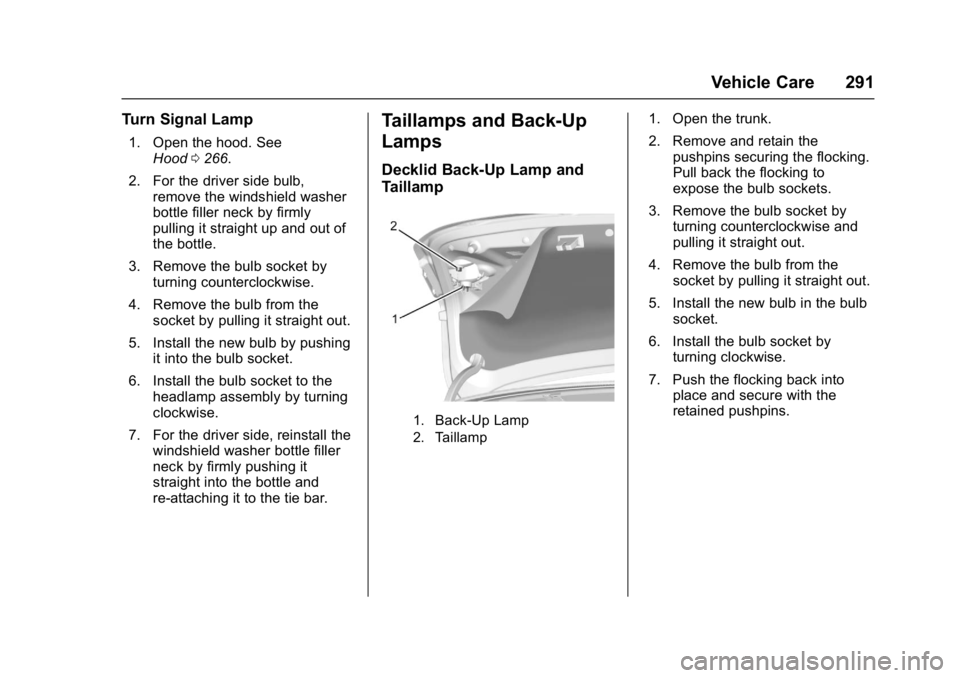
Decklid Back-Up Lamp and
Taillamp
1. Back-Up Lamp
2. Taillamp
1. Open the trunk.
2. Remove and retain the
pushpins securing the flocking.
Pull back the flocking to
expose the bulb sockets.
3. Remove the bulb socket by turning counterclockwise and
pulling it straight out.
4. Remove the bulb from the socket by pulling it straight out.
5. Install the new bulb in the bulb socket.
6. Install the bulb socket by turning clockwise.
7. Push the flocking back into place and secure with the
retained pushpins.
Page 294 of 405
Chevrolet Cruze Owner Manual (GMNA-Localizing-U.S./Canada/Mexico-
9803785) - 2017 - CRC - 4/13/16
Vehicle Care 293
Replacement Bulbs
Exterior LampBulb
Number
Uplevel Turn Signal 7444NA-T
Base Level Turn
Signal W5WLL
Base Level
High Beam 9005LL
Base Level
Low Beam H11LL
Decklid
Back-Up Lamp 921
Decklid Taillamp 194
Body-Side Tailamp 7443LL
For replacement bulbs not listed
here, contact your dealer.
Electrical System
Electrical System
Overload
The vehicle has fuses and circuit
breakers to protect against an
electrical system overload.
When the current electrical load is
too heavy, the circuit breaker opens
and closes, protecting the circuit
until the current load returns to
normal or the problem is fixed. This
greatly reduces the chance of circuit
overload and fire caused by
electrical problems.
Fuses and circuit breakers protect
power devices in the vehicle.
Replace a bad fuse with a new one
of the identical size and rating.
If there is a problem on the road and
a fuse needs to be replaced, the
same amperage fuse can be
borrowed. Choose some feature of
the vehicle that is not needed to use
and replace it as soon as possible.
Headlamp Wiring
An electrical overload may cause
the lamps to go on and off, or in
some cases to remain off. Have the
headlamp wiring checked right away
if the lamps go on and off or
remain off.
Windshield Wipers
Heavy snow or ice can overload the
wipers. If the wiper motor overheats,
the windshield wipers will stop until
the motor cools and the wiper
control is turned off.
Although the circuit is protected
from electrical overload, overload
due to heavy snow or ice may
cause wiper linkage damage.
Always clear ice and heavy snow
from the windshield before using the
windshield wipers.
If the overload is caused by an
electrical problem and not snow or
ice, be sure to get it fixed.
Page 314 of 405

Chevrolet Cruze Owner Manual (GMNA-Localizing-U.S./Canada/Mexico-
9803785) - 2017 - CRC - 4/13/16
Vehicle Care 313
matched to the tire/wheel positions,
using a TPMS relearn tool, in the
following order: driver side front tire,
passenger side front tire, passenger
side rear tire, and driver side rear.
See your dealer for service or to
purchase a relearn tool. A TPMS
relearn tool can also be purchased.
See Tire Pressure Monitor Sensor
Activation Tool at
www.gmtoolsandequipment.com or
call 1-800-GM TOOLS
(1-800-468-6657).
There are two minutes to match the
first tire/wheel position, and
five minutes overall to match all four
tire/wheel positions. If it takes
longer, the matching process stops
and must be restarted.
The TPMS sensor matching
process is:1. Set the parking brake.
2. Place the vehicle power mode in ON/RUN/START. See
Ignition Positions (Keyless
Access) 0212 orIgnition
Positions (Key Access) 0210. 3. Uplevel DIC Only: Make sure
the Tire Pressure info page
option is turned on. The info
pages on the DIC can be
turned on and off through the
Settings menu. See Driver
Information Center (DIC)
(Uplevel) 0137 orDriver
Information Center (DIC) (Base
Level) 0134.
4. If the vehicle has an uplevel DIC, use the DIC controls on
the right side of the steering
wheel to scroll to the Tire
Pressure screen under the DIC
info page.
If the vehicle has a base level
DIC, press MENU to select the
Vehicle Information Menu in
the DIC. Use the thumbwheel
to scroll to the Tire Pressure
Menu item screen.
5. If the vehicle has an uplevel DIC, press and hold the
V
(Set/Reset) button in the center
of the DIC controls.
If the vehicle has a base level
DIC, press SET/CLR to begin
the sensor matching process. A message requesting
acceptance of the process may
display.
If the vehicle has a base level
DIC, press SET/CLR again to
confirm the selection.
The horn sounds twice to
signal the receiver is in relearn
mode and the TIRE
LEARNING ACTIVE message
displays on the DIC screen.
6. Start with the driver side front tire.
7. Place the relearn tool against the tire sidewall, near the valve
stem. Then press the button to
activate the TPMS sensor.
A horn chirp confirms that the
sensor identification code has
been matched to this tire and
wheel position.
8. Proceed to the passenger side front tire, and repeat the
procedure in Step 7.
9. Proceed to the passenger side rear tire, and repeat the
procedure in Step 7.
Page 384 of 405
Chevrolet Cruze Owner Manual (GMNA-Localizing-U.S./Canada/Mexico-
9803785) - 2017 - CRC - 4/13/16
OnStar 383
OnStar
OnStar Overview
OnStar Overview . . . . . . . . . . . . . 383
OnStar Services
Emergency . . . . . . . . . . . . . . . . . . . 384
Security . . . . . . . . . . . . . . . . . . . . . . 384
Navigation . . . . . . . . . . . . . . . . . . . . 385
Connections . . . . . . . . . . . . . . . . . . 385
Diagnostics . . . . . . . . . . . . . . . . . . . 387
OnStar Additional Information
OnStar AdditionalInformation . . . . . . . . . . . . . . . . . . 388
OnStar Overview
=Voice Command Button
QBlue OnStar Button
>Red Emergency Button
This vehicle may be equipped with a
comprehensive, in-vehicle system
that can connect to an OnStar
Advisor for Emergency, Security,
Navigation, Connections, and
Diagnostics Services. OnStar
services may require a paid
subscription and data plan. OnStar
requires the vehicle battery and
electrical system, cellular service,
and GPS satellite signals to be
available and operating. OnStar acts
as a link to existing emergency
service providers. OnStar may
collect information about you and
your vehicle, including location
information. See OnStar User Terms, Privacy Statement, and
Software Terms for more details
including system limitations at
www.onstar.com (U.S.) or
www.onstar.ca (Canada).
The OnStar system status light is
next to the OnStar buttons. If the
status light is:
.
Solid Green: System is ready.
. Flashing Green: On a call.
. Red: Indicates a problem.
. Off: System is active. Press
Q
twice to speak with an OnStar
Advisor.
Press
Qor call 1-888-4ONSTAR
(1-888-466-7827) to speak to an
Advisor.
Press
=to:
. Make a call, end a call,
or answer an incoming call.
. Give OnStar Hands-Free Calling
voice commands.
. Give OnStar Turn-by-Turn
Navigation voice commands.
Page 387 of 405
Chevrolet Cruze Owner Manual (GMNA-Localizing-U.S./Canada/Mexico-
9803785) - 2017 - CRC - 4/13/16
386 OnStar
from each other and use a
combination of letters, numbers,
and symbols to increase the
security.
. Change the default name of the
SSID (Service Set Identifier).
This is your network’s name that
is visible to other wireless
devices. Choose a unique name
and avoid family names or
vehicle descriptions.
OnStar Wi-Fi
®Hotspot (If
Equipped)
The vehicle may have a built-in
Wi-Fi hotspot that provides access
to the Internet and web content at
4G LTE speed. Up to seven mobile
devices can be connected. A data
plan is required. Use the in-vehicle
controls only when it is safe to
do so.
1. To retrieve Wi-Fi hotspot information, press
=, wait for
the prompt, then say “Wi-Fi
settings.” On some vehicles,
touch Wi-Fi Settings on the
screen. 2. The Wi-Fi settings will display
the Wi-Fi hotspot name (SSID),
password, and on some
vehicles, the connection type
(no Internet connection, 3G,
4G, 4G LTE), and signal quality
(poor, good, excellent).
3. To change the SSID or password, press
Qor call
1-888-4ONSTAR to connect
with an Advisor.
After initial set-up, your vehicle’s
Wi-Fi hotspot will connect
automatically to your mobile
devices. Manage data usage by
turning Wi-Fi on or off on your
mobile device, using the
RemoteLink mobile app, or by
contacting an OnStar Advisor.
OnStar RemoteLink
®Mobile App
(If Equipped)
Download the OnStar RemoteLink
mobile app to select Apple
®iOS,
Android™, BlackBerry®,
or Windows®mobile devices.
OnStar Subscribers can access the
following services from a mobile
device: .
Remotely start/stop the vehicle,
if factory-equipped.
. Lock/unlock doors, if equipped
with automatic locks.
. Activate the horn and lamps.
. Check the vehicle’s fuel level, oil
life, or tire pressure,
if factory-equipped with the Tire
Pressure Monitor System.
. Send directions to the vehicle.
. Locate the vehicle on a map
(U.S. market only).
. Turn the vehicle's Wi-Fi hotspot
on/off, manage settings, and
monitor data consumption,
if equipped.
For OnStar RemoteLink information
and compatibility, see
www.onstar.com (U.S.) or
www.onstar.ca (Canada).
Remote Services
Contact an OnStar Advisor to
unlock the doors or sound the horn
and flash the lamps.