2017 CHEVROLET COLORADO engine
[x] Cancel search: enginePage 310 of 419

Chevrolet Colorado Owner Manual (GMNA-Localizing-U.S./Canada/Mexico-10122675) - 2017 - crc - 8/22/16
Vehicle Care 309
To r e p l a c e o n e o f t h e s e b u l b s :
1. Remove the two screws and liftoff the lamp assembly.
2. Turn the bulb socketcounterclockwise and pull itstraight out.
3. Pull the bulb straight out fromthe socket.
Replacement Bulbs
Exterior Lamp BulbNumber
Back-up Lamp 921 (W16W)
Back-up Lamp* 1156
Exterior Lamp BulbNumber
Cargo Lamp 921 (W16W)
CenterHigh-MountedStoplamp(CHMSL)
921LL
Front Turn SignalLamp andParking Lamp
7444NA-T
Sidemarker Lamp W5W LL
High-BeamHeadlamp9005 LL
Low-BeamHeadlampH11 LL
Stoplamp/Taillamp/Turn Signal Lamp7443 W21/5W LL-T
Stoplamp/TurnSignal Lamp/Ta i l l a m p *
11 5 7
*ChassisCabModels
For replacement bulbs not listedhere, contact your dealer.
Electrical System
Electrical System
Overload
The vehicle has fuses to protectagainst an electrical systemoverload. Fuses also protect powerdevices in the vehicle.
Replace a bad fuse with a new oneof the identical size and rating.
If there is a problem on the road andafuseneedstobereplaced,thereis a fuse puller in the EngineCompartment Fuse Block. Replacethe fuse as soon as possible withone of the same amperage rating.
Headlamp Wiring
An electrical overload may causethe lamps to go on and off, or insome cases to remain off. Have theheadlamp wiring checked right awayif the lamps go on and off orremain off.
Page 311 of 419

Chevrolet Colorado Owner Manual (GMNA-Localizing-U.S./Canada/Mexico-10122675) - 2017 - crc - 8/22/16
310 Vehicle Care
Windshield Wipers
If the wiper motor overheats due toheavy snow or ice, the windshieldwipers will stop until the motor coolsand will then restart.
Although the circuit is protectedfrom electrical overload, overloaddue to heavy snow or ice maycause wiper linkage damage.Always clear ice and heavy snowfrom the windshield before using thewindshield wipers.
If the overload is caused by anelectrical problem and not snow orice, be sure to get it fixed.
Fuses
The wiring circuits in the vehicle areprotected from short circuits byfuses. This greatly reduces thechance of fires caused by electricalproblems.
Look at the silver-colored bandinside the fuse. If the band is brokenor melted, replace the fuse. Be sureyou replace a bad fuse with a newone of the identical size and rating.
If a fuse goes out, replace the fuseas soon as you can.
Engine Compartment
Fuse Block
If the vehicle has a diesel engine,see the Duramax dieselsupplement.
The engine compartment fuse blockis in the engine compartment, onthe driver side of the vehicle.
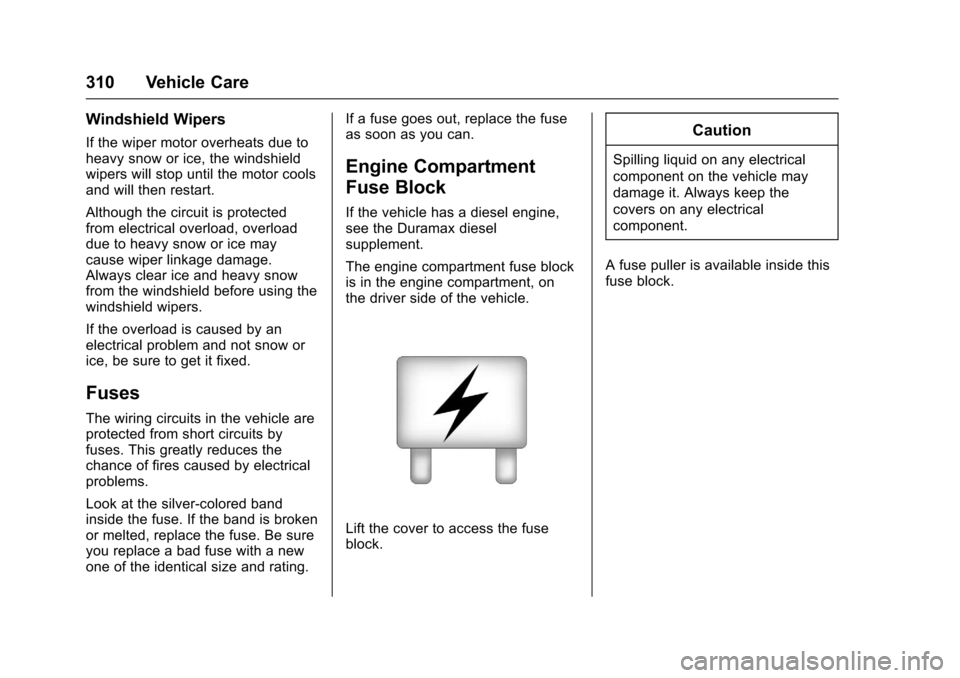
Lift the cover to access the fuseblock.
Caution
Spilling liquid on any electrical
component on the vehicle may
damage it. Always keep the
covers on any electrical
component.
Afusepullerisavailableinsidethisfuse block.
Page 313 of 419

Chevrolet Colorado Owner Manual (GMNA-Localizing-U.S./Canada/Mexico-10122675) - 2017 - crc - 8/22/16
312 Vehicle Care
The vehicle may not be equippedwith all of the fuses, relays, andfeatures shown.
Fuses Usage
F1 Traction controlmodule power
F2 Engine controlmodule power
F3 A/C clutch
F4–
F5 Engine controlmodule/Integratedchassis controlmodule/Fuel pumppower module
F6 Wipers
F7 Cargo lamp/Bedlighting (ifequipped)
F8 Fuel injectors-even
F9 Fuel injectors - odd
F10 Engine controlmodule 1
Fuses Usage
F11 Miscellaneous 1/Ignition
F12 Starter
F13 Traction controlmodule
F14–
F15–
F16–
F17 Front axle actuator
F18–
F19 Aeroshutters
F20–
F21 Front blower
F22 Antilock brakesystem valves
F23–
F24 Trailer
F25 Transfer caseelectronic control
F26 Antilock brakesystem pump
Fuses Usage
F27 Trailer brakecontrol module
F28 Rear windowdefogger
F29–
F30 Driver heated seat
F31–
F32 Passengerheated seat
F33 Body controlmodule 3
F34 Fuel system controlmodule
F35 Integrated chassiscontrol module (ifequipped)
F36 Centerhigh-mountedstoplamp
F37 Right high-beamheadlamp
F38 Left high-beamheadlamp
Page 314 of 419

Chevrolet Colorado Owner Manual (GMNA-Localizing-U.S./Canada/Mexico-10122675) - 2017 - crc - 8/22/16
Vehicle Care 313
FusesUsage
F39–
F40–
F41–
F42–
F43 Cooling fan
F44 Vacuum pump
F45–
F46 Engine controlmodule 2
F47 Miscellaneous 2/Ignition
F48 Fog lamps (ifequipped)
F49–
F50 Trailer parkinglamps
F51 Horn
F52–
F53–
F54–
F55–
FusesUsage
F56 Washer pump
F57–
F58–
F59 Trailer wiring
F60 Mirrors defogger
F61–
F62 Canister ventsolenoid
F63–
F64 Trailerreverse lamp
F65 Left trailerstoplamp/Turnsignal lamps
F66 Right trailerstoplamp/Turnsignal lamps
F67 Electric powersteering
F68–
F69 Battery regulatedvoltage control
F70–
FusesUsage
F71–
F72–
F73–
F74 Generator
F75–
RelaysUsage
K1 A/C clutch
K2 Starter
K3–
K4 Wipers speed
K5 Wipers control
K6 Cargo lamp/Bedlighting (ifequipped)
K7 Powertrain
K8–
K9–
K10–
K11 Centerhigh-mountedstoplamp
Page 321 of 419

Chevrolet Colorado Owner Manual (GMNA-Localizing-U.S./Canada/Mexico-10122675) - 2017 - crc - 8/22/16
320 Vehicle Care
emergency use when a regular
road tire has lost air and gone
flat. If the vehicle has a compact
spare tire, seeCompact Spare
Tire0346andIf a Tire Goes
Flat0336.
(3) Tire Identification Number
(TIN):The letters and numbers
following the DOT (Department
of Transportation) code are the
Tire Identification Number (TIN).
The TIN shows the
manufacturer and plant code,
tire size, and date the tire was
manufactured. The TIN is
molded onto both sides of the
tire, although only one side may
have the date of manufacture.
(4) Maximum Cold Inflation
Load Limit:Maximum load that
can be carried and the
maximum pressure needed to
support that load.
(5) Tire Inflation:The
temporary use tire or compact
spare tire should be inflated to
420 kPa (60 psi). For more
information on tire pressure and
inflation seeTire
Pressure0323.
(6) Tire Size:Acombinationof
letters and numbers define a
tire's width, height, aspect ratio,
construction type, and service
description. The letter T as the
first character in the tire size
means the tire is for temporary
use only.
(7) TPC Spec (Tire
Performance Criteria
Specification):Original
equipment tires designed to
GM's specific tire performance
criteria have a TPC specification
code molded onto the sidewall.
GM's TPC specifications meet or
exceed all federal safety
guidelines.
Tire Designations
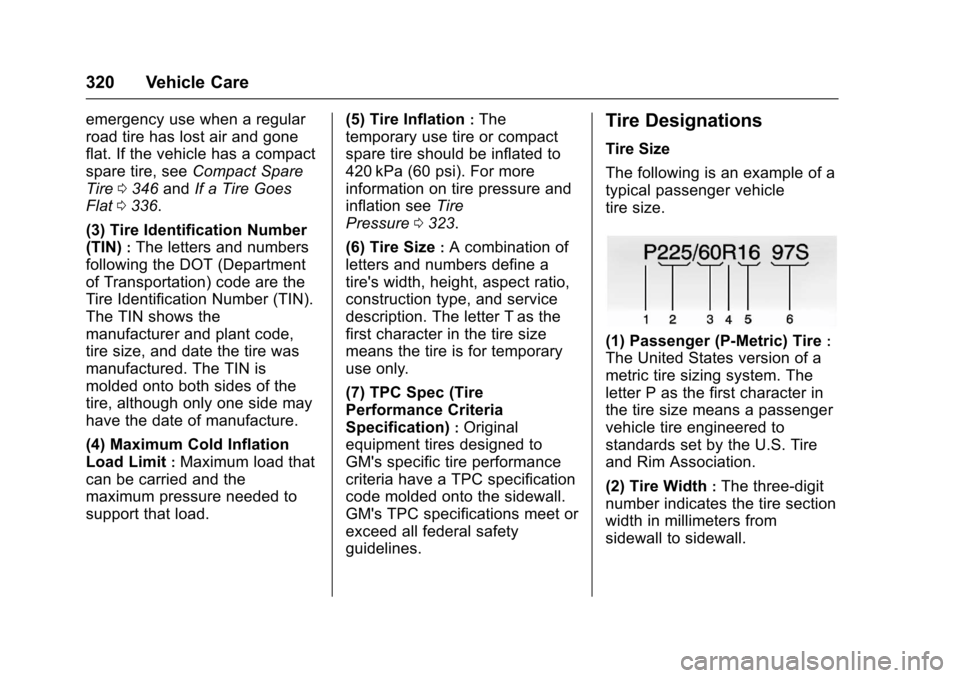
Tire Size
The following is an example of a
typical passenger vehicle
tire size.
(1) Passenger (P-Metric) Tire:
The United States version of a
metric tire sizing system. The
letter P as the first character in
the tire size means a passenger
vehicle tire engineered to
standards set by the U.S. Tire
and Rim Association.
(2) Tire Width:The three-digit
number indicates the tire section
width in millimeters from
sidewall to sidewall.
Page 329 of 419

Chevrolet Colorado Owner Manual (GMNA-Localizing-U.S./Canada/Mexico-10122675) - 2017 - crc - 8/22/16
328 Vehicle Care
passenger side front tire, passengerside rear tire, and driver side rear.See your dealer for service or topurchase a relearn tool. A TPMSrelearn tool can also be purchased.See Tire Pressure Monitor SensorActivation Tool atwww.gmtoolsandequipment.com orcall 1-800-GM TOOLS(1-800-468-6657).
There are two minutes to match thefirst tire/wheel position, andfive minutes overall to match all fourtire/wheel positions. If it takeslonger, the matching process stopsand must be restarted.
The TPMS sensor matchingprocess is:
1. Set the parking brake.
2. Turn the ignition to ON/RUNwith the engine off.
3. If the vehicle has an uplevelDIC, make sure the TirePressure info page option isturned on. The info pages onthe DIC can be turned on andoff through the Settings menu.
SeeDriver Information Center(DIC) (Base Level)0126orDriver Information Center (DIC)(Uplevel)0129.
4. If the vehicle has an uplevelDIC, use the DIC controls onthe right side of the steeringwheel to scroll to the TirePressure screen under the DICinfo page.
If the vehicle has a base levelDIC, use the MENU button toselect the Vehicle Informationmenu in the DIC. Use thethumbwheel to scroll to the TirePressure Menu item screen.
5. If the vehicle has an uplevel
DIC, press and holdVin the
center of the DIC controls.
If the vehicle has a base levelDIC, press SET/CLR on theturn signal lever to begin thesensor matching process.
Amessageaskingiftheprocess should begin shouldappear. Press SET/CLR againto confirm the selection.
The horn sounds twice tosignal the receiver is in relearnmode and the TIRELEARNING ACTIVE messagedisplays on the DIC screen.
6. Start with the driver sidefront tire.
7. Place the relearn tool againstthe tire sidewall, near the valvestem. Then press the button toactivate the TPMS sensor.Ahornchirpconfirmsthatthesensor identification code hasbeen matched to this tire andwheel position.
8. Proceed to the passenger sidefront tire, and repeat theprocedure in Step 7.
9. Proceed to the passenger siderear tire, and repeat theprocedure in Step 7.
10. Proceed to the driver side reartire, and repeat the procedurein Step 7. The horn sounds twotimes to indicate the sensoridentification code has beenmatched to the driver side reartire, and the TPMS sensor
Page 338 of 419

Chevrolet Colorado Owner Manual (GMNA-Localizing-U.S./Canada/Mexico-10122675) - 2017 - crc - 8/22/16
Vehicle Care 337
{Warning
Lifting a vehicle and getting under
it to do maintenance or repairs is
dangerous without the
appropriate safety equipment and
training. If a jack is provided with
the vehicle, it is designed only for
changing a flat tire. If it is used for
anything else, you or others could
be badly injured or killed if the
vehicle slips off the jack. If a jack
is provided with the vehicle, only
use it for changing a flat tire.
If a tire goes flat, avoid further tireand wheel damage by driving slowlyto a level place, well off the road,if possible. Turn on the hazardwarning flashers. SeeHazardWarning Flashers0149.
{Warning
Changing a tire can be
dangerous. The vehicle can slip
off the jack and roll over or fall
causing injury or death. Find a
level place to change the tire. To
help prevent the vehicle from
moving:
1. Set the parking brake firmly.
2. Put an automatictransmission in P (Park) or amanual transmission in1(First)orR(Reverse).
3. For four-wheel-drivevehicles, be sure thetransfer case is in a drivegear–not in N (Neutral).
4. Turn off the engine and donot restart while the vehicleis raised.
5. Do not allow passengers toremain in the vehicle.
(Continued)
Warning (Continued)
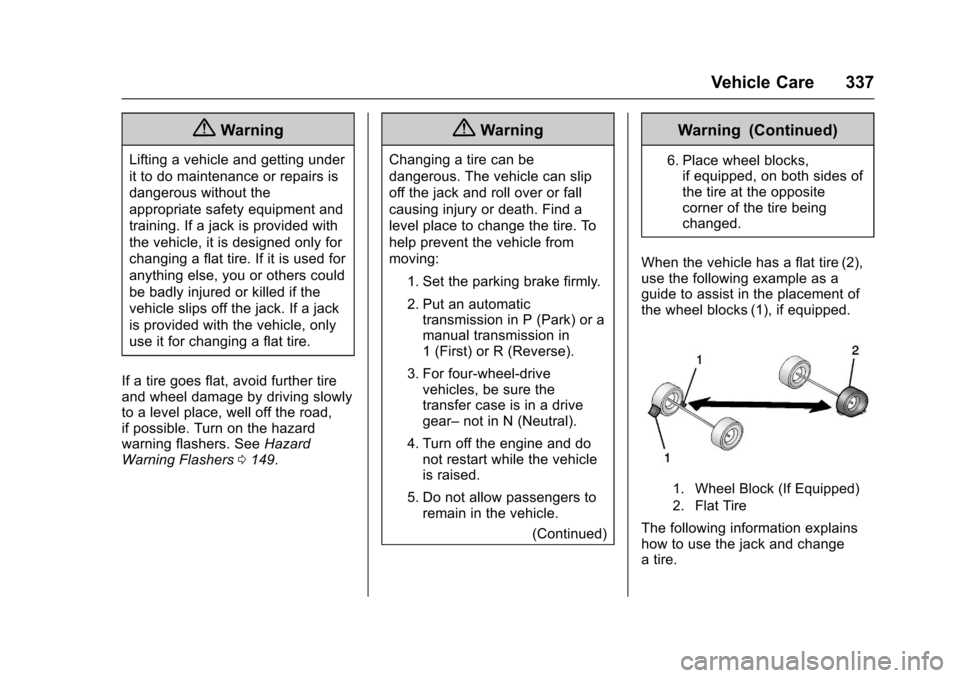
6. Place wheel blocks,if equipped, on both sides ofthe tire at the oppositecorner of the tire beingchanged.
When the vehicle has a flat tire (2),use the following example as aguide to assist in the placement ofthe wheel blocks (1), if equipped.
1. Wheel Block (If Equipped)
2. Flat Tire
The following information explainshow to use the jack and changeatire.
Page 350 of 419

Chevrolet Colorado Owner Manual (GMNA-Localizing-U.S./Canada/Mexico-10122675) - 2017 - crc - 8/22/16
Vehicle Care 349
Caution
Ignoring these steps could result
in costly damage to the vehicle
that would not be covered by the
vehicle warranty. Trying to start
the vehicle by pushing or pulling it
will not work, and it could damage
the vehicle.
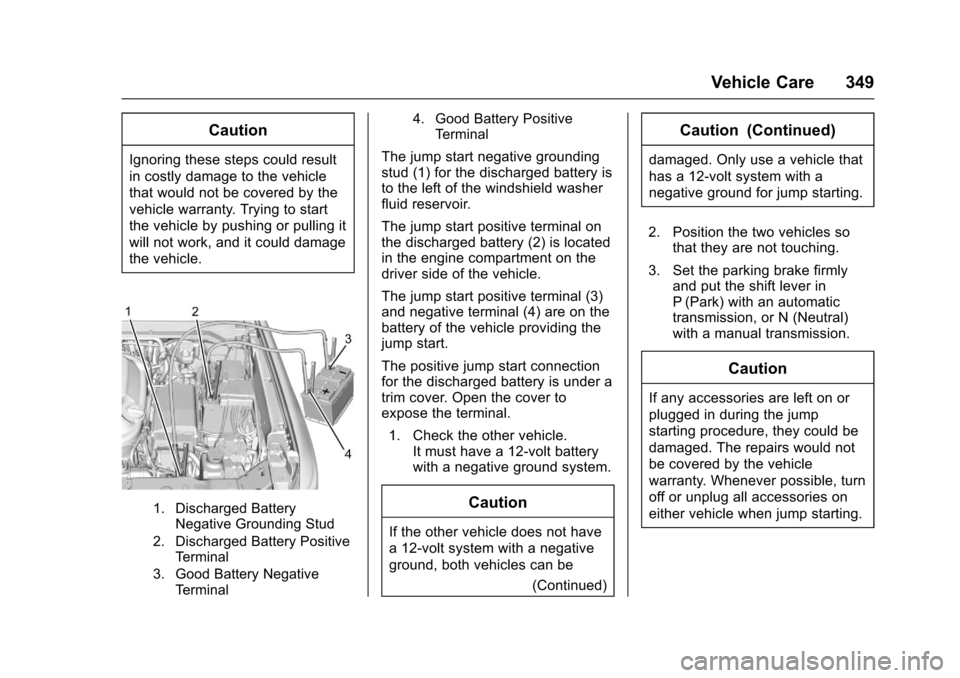
1. Discharged BatteryNegative Grounding Stud
2. Discharged Battery PositiveTe r m i n a l
3. Good Battery NegativeTe r m i n a l
4. Good Battery PositiveTe r m i n a l
The jump start negative groundingstud (1) for the discharged battery isto the left of the windshield washerfluid reservoir.
The jump start positive terminal onthe discharged battery (2) is locatedin the engine compartment on thedriver side of the vehicle.
The jump start positive terminal (3)and negative terminal (4) are on thebattery of the vehicle providing thejump start.
The positive jump start connectionfor the discharged battery is under atrim cover. Open the cover toexpose the terminal.
1. Check the other vehicle.It must have a 12-volt batterywith a negative ground system.
Caution
If the other vehicle does not have
a12-voltsystemwithanegative
ground, both vehicles can be
(Continued)
Caution (Continued)
damaged. Only use a vehicle that
has a 12-volt system with a
negative ground for jump starting.
2. Position the two vehicles sothat they are not touching.
3. Set the parking brake firmlyand put the shift lever inP(Park) with an automatictransmission, or N (Neutral)with a manual transmission.
Caution
If any accessories are left on or
plugged in during the jump
starting procedure, they could be
damaged. The repairs would not
be covered by the vehicle
warranty. Whenever possible, turn
off or unplug all accessories on
either vehicle when jump starting.