2017 CHEVROLET CITY EXPRESS warning
[x] Cancel search: warningPage 80 of 348
Chevrolet Express Owner Manual (GMNA-Localizing-U.S./Canada/Mexico-
9967827) - 2017 - crc - 9/26/16
Seats and Restraints 79
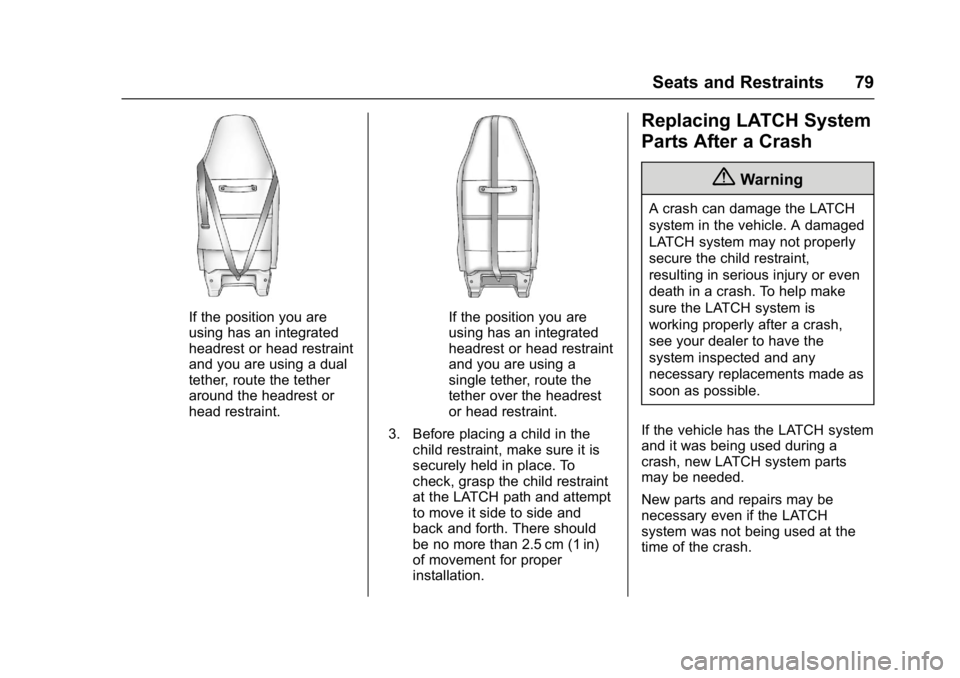
If the position you are
using has an integrated
headrest or head restraint
and you are using a dual
tether, route the tether
around the headrest or
head restraint.If the position you are
using has an integrated
headrest or head restraint
and you are using a
single tether, route the
tether over the headrest
or head restraint.
3. Before placing a child in the child restraint, make sure it is
securely held in place. To
check, grasp the child restraint
at the LATCH path and attempt
to move it side to side and
back and forth. There should
be no more than 2.5 cm (1 in)
of movement for proper
installation.
Replacing LATCH System
Parts After a Crash
{Warning
A crash can damage the LATCH
system in the vehicle. A damaged
LATCH system may not properly
secure the child restraint,
resulting in serious injury or even
death in a crash. To help make
sure the LATCH system is
working properly after a crash,
see your dealer to have the
system inspected and any
necessary replacements made as
soon as possible.
If the vehicle has the LATCH system
and it was being used during a
crash, new LATCH system parts
may be needed.
New parts and repairs may be
necessary even if the LATCH
system was not being used at the
time of the crash.
Page 83 of 348

Chevrolet Express Owner Manual (GMNA-Localizing-U.S./Canada/Mexico-
9967827) - 2017 - crc - 9/26/16
82 Seats and Restraints
Securing Child Restraints
(With the Safety Belt in
the Front Seat)
This vehicle has airbags. A rear
seat is a safer place to secure a
forward-facing child restraint. See
Where to Put the Restraint072.
There may be an airbag on-off
switch on the instrument panel that
you can use to turn off the front
outboard passenger frontal airbag.
See Airbag On-Off Switch 062 for
more information, including
important safety information.
Never put a rear-facing child seat in
the front. This is because the risk to
the rear-facing child is so great,
if the airbag deploys.
{Warning
A child in a rear-facing child
restraint can be seriously injured
or killed if the front outboard
passenger airbag inflates. This is
because the back of the
(Continued)
Warning (Continued)
rear-facing child restraint would
be very close to the inflating
airbag. A child in a forward-facing
child restraint can be seriously
injured or killed if the front
outboard passenger airbag
inflates and the passenger seat is
in a forward position.
Even if the airbag switch has
turned off the front outboard
passenger frontal airbag, no
system is fail-safe. No one can
guarantee that an airbag will not
deploy under some unusual
circumstance, even though it is
turned off.
Secure rear-facing child restraints
in a rear seat, even if the airbag
is off. If you secure a
forward-facing child restraint in
the front outboard passenger
seat, always move the seat as far
back as it will go. It is better to
secure the child restraint in a
rear seat.
{Warning
If the airbag readiness light ever
comes on and stays on, it means
that something may be wrong
with the airbag system. For
example, the front outboard
passenger frontal airbag could
inflate even though the airbag
on-off switch is turned off.
To help avoid injury to yourself or
others, have the vehicle serviced
right away. SeeAirbag Readiness
Light 099 for more information,
including important safety
information.
If the vehicle does not have a rear
seat that will accommodate a
rear-facing child restraint, a
rear-facing child restraint should not
be installed in the vehicle, even if
the airbag is off.
If the child restraint uses a top
tether, see Lower Anchors and
Tethers for Children (LATCH
System) 073 for top tether anchor
locations.
Page 86 of 348
Chevrolet Express Owner Manual (GMNA-Localizing-U.S./Canada/Mexico-
9967827) - 2017 - crc - 9/26/16
Storage 85
Storage
Storage Compartments
Storage Compartments . . . . . . . . 85
Front Storage . . . . . . . . . . . . . . . . . . 85
Additional Storage Features
Cargo Tie-Downs . . . . . . . . . . . . . . 85
Storage
Compartments
{Warning
Do not store heavy or sharp
objects in storage compartments.
In a crash, these objects may
cause the cover to open and
could result in injury.
Front Storage
This vehicle may have a front
storage compartment. It is located at
the center of the instrument panel
extension, by the floor. To open the
compartment, pull up on the latch.
The compartment will open
automatically.
Storage compartments may also be
included on the inside of each
front door.
Additional Storage
Features
Cargo Tie-Downs
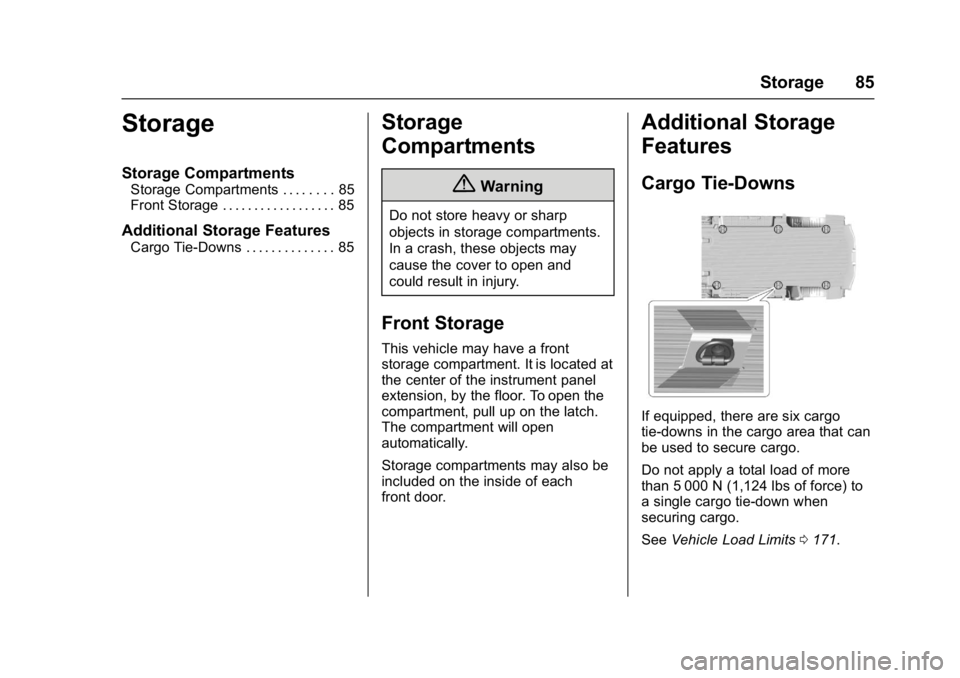
If equipped, there are six cargo
tie-downs in the cargo area that can
be used to secure cargo.
Do not apply a total load of more
than 5 000 N (1,124 lbs of force) to
a single cargo tie-down when
securing cargo.
SeeVehicle Load Limits 0171.
Page 87 of 348
Chevrolet Express Owner Manual (GMNA-Localizing-U.S./Canada/Mexico-
9967827) - 2017 - crc - 9/26/16
86 Storage
{Warning
The child restraint top tether strap
may be damaged by contact with
items in the cargo area. Your child
could be seriously injured or killed
in a collision if the top tether strap
is damaged. Properly secure all
cargo.
{Warning
Properly secure all cargo with
ropes or straps to help prevent it
from sliding or shifting. Do not
place cargo higher than the
seatbacks. In a sudden stop or
collision, unsecured cargo could
cause personal injury. Use
suitable ropes or straps to secure
cargo.
{Warning
Never allow anyone to ride in the
cargo area. It is extremely
dangerous to ride in the cargo
area of a vehicle. In a collision,
people riding in these areas are
more likely to be seriously injured
or killed.
Do not allow people to ride in any
area of the vehicle that is not
equipped with seats and safety
belts. Be sure everyone in the
vehicle is in a seat and using a
safety belt properly.
Page 88 of 348

Chevrolet Express Owner Manual (GMNA-Localizing-U.S./Canada/Mexico-
9967827) - 2017 - crc - 9/26/16
Instruments and Controls 87
Instruments and
Controls
Controls
Steering Wheel Adjustment . . . . 88
Steering Wheel Controls . . . . . . . 88
Horn . . . . . . . . . . . . . . . . . . . . . . . . . . . 89
Windshield Wiper/Washer . . . . . . 89
Compass . . . . . . . . . . . . . . . . . . . . . . 90
Clock . . . . . . . . . . . . . . . . . . . . . . . . . . 92
Power Outlets . . . . . . . . . . . . . . . . . 92
Cigarette Lighter . . . . . . . . . . . . . . . 94
Ashtrays . . . . . . . . . . . . . . . . . . . . . . . 94
Warning Lights, Gauges, and
Indicators
Warning Lights, Gauges, andIndicators . . . . . . . . . . . . . . . . . . . . 94
Instrument Cluster . . . . . . . . . . . . . 95
Speedometer . . . . . . . . . . . . . . . . . . 96
Odometer . . . . . . . . . . . . . . . . . . . . . . 96
Trip Odometer . . . . . . . . . . . . . . . . . 96
Fuel Gauge . . . . . . . . . . . . . . . . . . . . 96
Engine Oil Pressure Gauge . . . . 97
Engine Coolant Temperature Gauge . . . . . . . . . . . . . . . . . . . . . . . . 98
Voltmeter Gauge . . . . . . . . . . . . . . . 99
Safety Belt Reminders . . . . . . . . . 99
Airbag Readiness Light . . . . . . . . 99 Airbag On-Off Light . . . . . . . . . . . 100
Charging System Light . . . . . . . 101
Malfunction Indicator Lamp
(Check Engine Light) . . . . . . . . 102
Brake System Warning
Light . . . . . . . . . . . . . . . . . . . . . . . . 104
Antilock Brake System (ABS) Warning Light . . . . . . . . . . . . . . . 104
Tow/Haul Mode Light . . . . . . . . . 105
StabiliTrak OFF Light . . . . . . . . . 105
Traction Control System (TCS)/ StabiliTrak Light . . . . . . . . . . . . . 105
Tire Pressure Light . . . . . . . . . . . 106
Engine Oil Pressure Light . . . . 106
Low Fuel Warning Light . . . . . . 107
Security Light . . . . . . . . . . . . . . . . . 107
High-Beam On Light . . . . . . . . . . 107
Cruise Control Light . . . . . . . . . . 107Information Displays
Driver Information Center (DIC) . . . . . . . . . . . . . . . . 108
Vehicle Messages
Vehicle Messages . . . . . . . . . . . . 112
Battery Voltage and ChargingMessages . . . . . . . . . . . . . . . . . . . 112
Brake System Messages . . . . . 112
Compass Messages . . . . . . . . . . 113
Door Ajar Messages . . . . . . . . . . 113 Engine Cooling System
Messages . . . . . . . . . . . . . . . . . . . 113
Engine Oil Messages . . . . . . . . . 114
Engine Power Messages . . . . . 114
Fuel System Messages . . . . . . . 115
Key and Lock Messages . . . . . . 115
Lamp Messages . . . . . . . . . . . . . . 115
Object Detection System Messages . . . . . . . . . . . . . . . . . . . 115
Ride Control System Messages . . . . . . . . . . . . . . . . . . . 116
Airbag System Messages . . . . . 117
Security Messages . . . . . . . . . . . 117
Service Vehicle Messages . . . . 117
Tire Messages . . . . . . . . . . . . . . . . 118
Transmission Messages . . . . . . 118
Vehicle Reminder Messages . . . . . . . . . . . . . . . . . . . 119
Vehicle Personalization
Vehicle Personalization . . . . . . . 119
Page 91 of 348
Chevrolet Express Owner Manual (GMNA-Localizing-U.S./Canada/Mexico-
9967827) - 2017 - crc - 9/26/16
90 Instruments and Controls
6:Use to adjust the delay time
between wipes. Turn the band up
for more frequent wipes or down for
less frequent wipes.
d: Slow wipes.
a:Fast wipes.
9: Use to turn the wipers off.
When driving during the day and the
wipers are activated, the head
lamps automatically turn on after
completing eight wipe cycles.
Clear ice and snow from the wiper
blades before using them. If frozen
to the windshield, carefully loosen or
thaw them. Damaged blades should
be replaced.
Windshield Washer
The windshield wiper paddle is on
top of the turn signal lever.
L: Push the paddle to spray
washer fluid on the windshield. The
wipers will clear the window and
then either stop or return to the
preset speed.
{Warning
In freezing weather, do not use
the washer until the windshield is
warmed. Otherwise the washer
fluid can form ice on the
windshield, blocking your vision.
Compass
This vehicle may have a compass in
the Driver Information Center (DIC).
Compass Zone
Your dealer will set the correct zone
for your location.
Under certain circumstances, such
as during a long distance
cross-country trip or moving to a
new state or province, it will be
necessary to compensate for
compass variance by resetting the
zone through the DIC if the zone is
not set correctly.
Compass variance is the difference
between the earth's magnetic north
and true geographic north. If the
compass is not set to the zone
where you live, the compass may give false readings. The compass
must be set to the variance zone in
which the vehicle is traveling.
To adjust for compass variance, use
the following procedure:
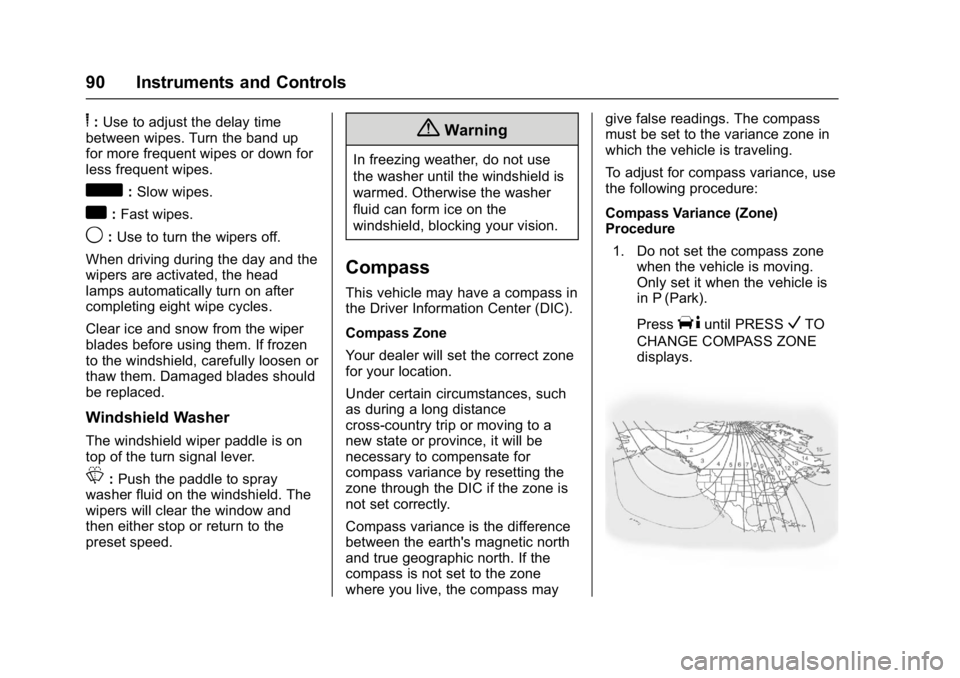
Compass Variance (Zone)
Procedure
1. Do not set the compass zone when the vehicle is moving.
Only set it when the vehicle is
in P (Park).
Press
Tuntil PRESSVTO
CHANGE COMPASS ZONE
displays.
Page 94 of 348
Chevrolet Express Owner Manual (GMNA-Localizing-U.S./Canada/Mexico-
9967827) - 2017 - crc - 9/26/16
Instruments and Controls 93
The vehicle may have two
accessory power outlets on the
instrument panel.
Remove the cover to access and
replace when not in use.
Certain power accessory plugs may
not be compatible to the accessory
power outlet and could overload
vehicle or adapter fuses. If a
problem is experienced, see your
dealer.
{Warning
Power is always supplied to the
outlets. Do not leave electrical
equipment plugged in when the
vehicle is not in use because the
vehicle could catch fire and cause
injury or death.
Caution
Leaving electrical equipment
plugged in for an extended period
of time while the vehicle is off will(Continued)
Caution (Continued)
drain the battery. Always unplug
electrical equipment when not in
use and do not plug in equipment
that exceeds the maximum
20 amp rating.
When adding electrical equipment,
be sure to follow the proper
installation instructions included with
the equipment. See Add-On
Electrical Equipment 0212.
Caution
Hanging heavy equipment from
the power outlet can cause
damage not covered by the
vehicle warranty. The power
outlets are designed for
accessory power plugs only, such
as mobile phone charge cords.
Power Outlet 110/120 Volt
Alternating Current
This power outlet can be used to
plug in electrical equipment that
uses a maximum limit of 150 watts.
The 110/120 volt power outlet is on
the instrument panel.
An indicator light on the outlet turns
on to show it is in use. The light
comes on when the ignition is in
ON/RUN, equipment requiring less
than 150 watts is plugged into the
outlet, and no system fault is
detected.
The indicator light does not come on
when the ignition is in LOCK/OFF or
if the equipment is not fully seated
into the outlet.
If equipment is connected using
more than 150 watts or a system
fault is detected, a protection circuit
shuts off the power supply and the
indicator light turns off. To reset the
circuit, unplug the item and plug it
back in or turn the Retained
Accessory Power (RAP) off and
then back on. See Retained
Accessory Power (RAP) 0179.
Page 95 of 348

Chevrolet Express Owner Manual (GMNA-Localizing-U.S./Canada/Mexico-
9967827) - 2017 - crc - 9/26/16
94 Instruments and Controls
The power outlet is not designed for
the following, and may not work
properly if they are plugged in:
.Equipment with high initial peak
wattage, such as
compressor-driven refrigerators
and electric power tools.
. Other equipment requiring an
extremely stable power supply,
such as
microcomputer-controlled
electric blankets and touch
sensor lamps.
. Medical equipment.
Cigarette Lighter
If equipped with a cigarette lighter,
to heat push it in all the way and let
go. When it is ready for use, it will
pop back out by itself.
Do not use the lighter to plug in
accessory devices. Use the power
outlets provided.
Caution
Holding a cigarette lighter in while
it is heating does not let the
lighter back away from the
heating element when it is hot.
Damage from overheating can
occur to the lighter or heating
element, or a fuse could be
blown. Do not hold a cigarette
lighter in while it is heating.
Ashtrays
If equipped with a removable
ashtray, it can be placed into the
front floor console cupholder. Open
the cover to use.
Caution
If papers, pins, or other
flammable items are put in the
ashtray, hot cigarettes or other
smoking materials could ignite
them and possibly damage the
vehicle. Never put flammable
items in the ashtray.
Warning Lights,
Gauges, and
Indicators
Warning lights and gauges can
signal that something is wrong
before it becomes serious enough
to cause an expensive repair or
replacement. Paying attention to the
warning lights and gauges could
prevent injury.
Some warning lights come on briefly
when the engine is started to
indicate they are working. When
one of the warning lights comes on
and stays on while driving, or when
one of the gauges shows there may
be a problem, check the section that
explains what to do. Waiting to do
repairs can be costly and even
dangerous.