2017 CHEVROLET CITY EXPRESS ECU
[x] Cancel search: ECUPage 204 of 348
Chevrolet Express Owner Manual (GMNA-Localizing-U.S./Canada/Mexico-
9967827) - 2017 - crc - 9/26/16
Driving and Operating 203
.The trailer must be equipped
with brakes adequate for the
intended use. A loaded trailer
weighing more than 680 kg
(1,500 lb) must be equipped with
its own brake system, with
brakes working on all axles.
Trailer braking equipment
conforming to Canadian
Standards Association (CSA)
requirement CAN3-D313, or its
equivalent, is recommended.
. Do not tow a trailer during the
first 800 km (500 mi) to prevent
damage to the engine, axle,
or other parts.
. Then during the first 800 km
(500 mi) of trailer towing, do not
drive over 80 km/h (50 mph) and
do not make starts at full throttle.
. Vehicles can tow in D (Drive).
The Tow/Haul Mode may be
used if the transmission shifts
too often. See Tow/Haul Mode
0 187.
. Turn off Park Assist when
towing.{Warning
When towing a trailer, exhaust
gases may collect at the rear of
the vehicle and enter if the
liftgate, trunk/hatch, or rear-most
window is open.
When towing a trailer:
. Do not drive with the
liftgate, trunk/hatch,
or rear-most window open.
. Fully open the air outlets on
or under the instrument
panel.
. Also adjust the climate
control system to a setting
that brings in only outside
air. See “Climate Control
Systems” in the Index.
For more information about
carbon monoxide, see Engine
Exhaust 0182.
Towing a trailer requires a certain
amount of experience. The
combination you are driving is
longer and not as responsive as the vehicle itself. Get acquainted with
the handling and braking of the rig
before setting out for the open road.
The structure, tires, and brakes of
the trailer must be rated to carry the
load. Inadequate trailer equipment
can cause the combination to
operate in an unexpected or unsafe
manner.
Before starting, check all trailer hitch
parts and attachments, safety
chains, electrical connectors, lamps,
tires, and mirrors. Get familiar with
the handling and braking of the rig.
If the trailer has electric brakes, start
the combination moving and then
apply the trailer brake controller by
hand to be sure the brakes work.
During the trip, check occasionally
to be sure that the load is secure
and the lamps and any trailer
brakes still work.
Following Distance
Stay at least twice as far behind the
vehicle ahead as you would when
driving the vehicle without a trailer.
This can help to avoid heavy
braking and sudden turns.
Page 231 of 348
Chevrolet Express Owner Manual (GMNA-Localizing-U.S./Canada/Mexico-
9967827) - 2017 - crc - 9/26/16
230 Vehicle Care
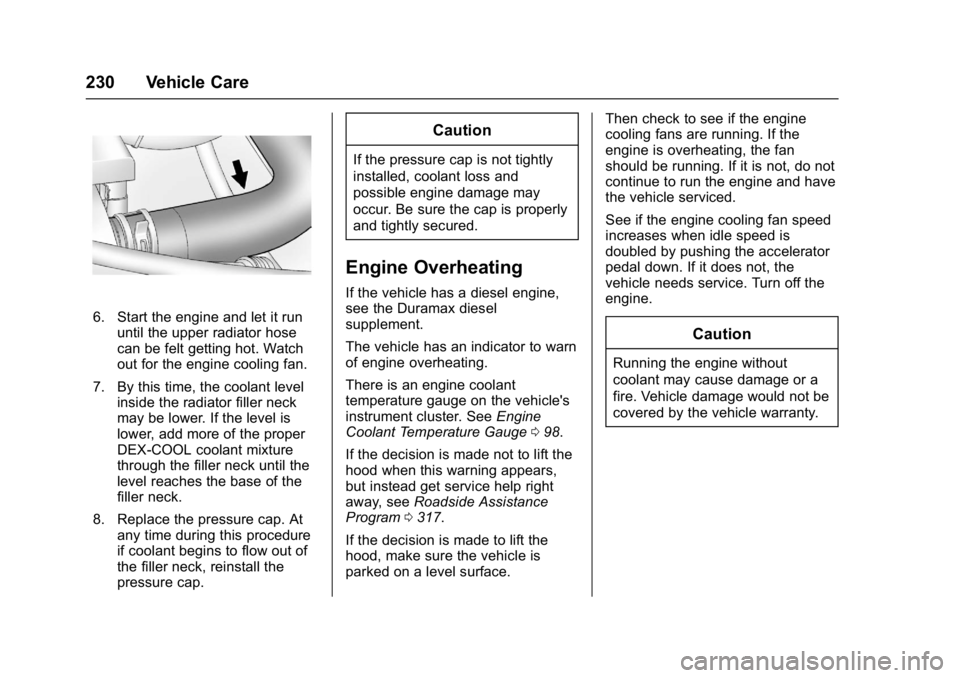
6. Start the engine and let it rununtil the upper radiator hose
can be felt getting hot. Watch
out for the engine cooling fan.
7. By this time, the coolant level inside the radiator filler neck
may be lower. If the level is
lower, add more of the proper
DEX-COOL coolant mixture
through the filler neck until the
level reaches the base of the
filler neck.
8. Replace the pressure cap. At any time during this procedure
if coolant begins to flow out of
the filler neck, reinstall the
pressure cap.
Caution
If the pressure cap is not tightly
installed, coolant loss and
possible engine damage may
occur. Be sure the cap is properly
and tightly secured.
Engine Overheating
If the vehicle has a diesel engine,
see the Duramax diesel
supplement.
The vehicle has an indicator to warn
of engine overheating.
There is an engine coolant
temperature gauge on the vehicle's
instrument cluster. See Engine
Coolant Temperature Gauge 098.
If the decision is made not to lift the
hood when this warning appears,
but instead get service help right
away, see Roadside Assistance
Program 0317.
If the decision is made to lift the
hood, make sure the vehicle is
parked on a level surface. Then check to see if the engine
cooling fans are running. If the
engine is overheating, the fan
should be running. If it is not, do not
continue to run the engine and have
the vehicle serviced.
See if the engine cooling fan speed
increases when idle speed is
doubled by pushing the accelerator
pedal down. If it does not, the
vehicle needs service. Turn off the
engine.
Caution
Running the engine without
coolant may cause damage or a
fire. Vehicle damage would not be
covered by the vehicle warranty.
Page 241 of 348
Chevrolet Express Owner Manual (GMNA-Localizing-U.S./Canada/Mexico-
9967827) - 2017 - crc - 9/26/16
240 Vehicle Care
Caution (Continued)
the vehicle warranty. Do not allow
the wiper arm to touch the
windshield.
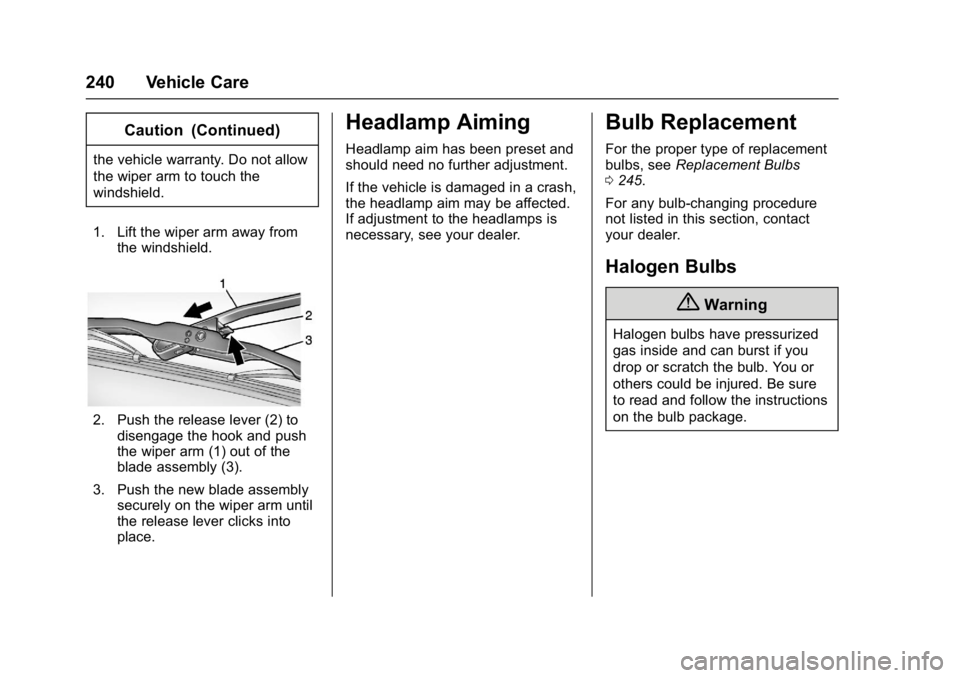
1. Lift the wiper arm away from the windshield.
2. Push the release lever (2) to
disengage the hook and push
the wiper arm (1) out of the
blade assembly (3).
3. Push the new blade assembly securely on the wiper arm until
the release lever clicks into
place.
Headlamp Aiming
Headlamp aim has been preset and
should need no further adjustment.
If the vehicle is damaged in a crash,
the headlamp aim may be affected.
If adjustment to the headlamps is
necessary, see your dealer.
Bulb Replacement
For the proper type of replacement
bulbs, see Replacement Bulbs
0 245.
For any bulb-changing procedure
not listed in this section, contact
your dealer.
Halogen Bulbs
{Warning
Halogen bulbs have pressurized
gas inside and can burst if you
drop or scratch the bulb. You or
others could be injured. Be sure
to read and follow the instructions
on the bulb package.
Page 246 of 348
Chevrolet Express Owner Manual (GMNA-Localizing-U.S./Canada/Mexico-
9967827) - 2017 - crc - 9/26/16
Vehicle Care 245
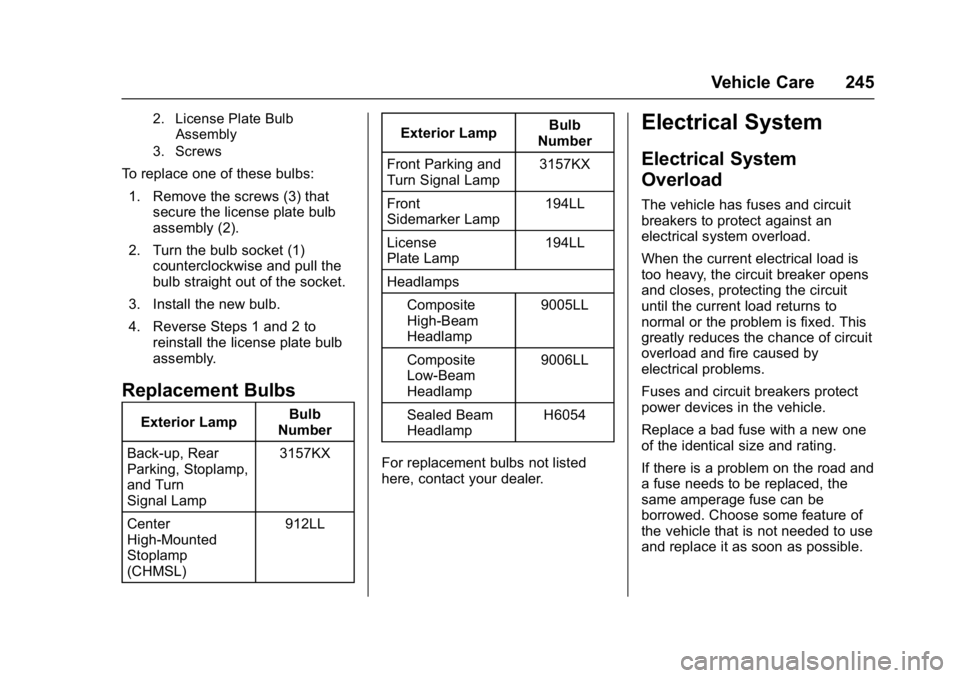
2. License Plate BulbAssembly
3. Screws
To replace one of these bulbs:
1. Remove the screws (3) that secure the license plate bulb
assembly (2).
2. Turn the bulb socket (1) counterclockwise and pull the
bulb straight out of the socket.
3. Install the new bulb.
4. Reverse Steps 1 and 2 to reinstall the license plate bulb
assembly.
Replacement Bulbs
Exterior Lamp Bulb
Number
Back-up, Rear
Parking, Stoplamp,
and Turn
Signal Lamp 3157KX
Center
High-Mounted
Stoplamp
(CHMSL) 912LLExterior Lamp
Bulb
Number
Front Parking and
Turn Signal Lamp 3157KX
Front
Sidemarker Lamp 194LL
License
Plate Lamp 194LL
Headlamps Composite
High-Beam
Headlamp 9005LL
Composite
Low-Beam
Headlamp 9006LL
Sealed Beam
Headlamp H6054
For replacement bulbs not listed
here, contact your dealer.
Electrical System
Electrical System
Overload
The vehicle has fuses and circuit
breakers to protect against an
electrical system overload.
When the current electrical load is
too heavy, the circuit breaker opens
and closes, protecting the circuit
until the current load returns to
normal or the problem is fixed. This
greatly reduces the chance of circuit
overload and fire caused by
electrical problems.
Fuses and circuit breakers protect
power devices in the vehicle.
Replace a bad fuse with a new one
of the identical size and rating.
If there is a problem on the road and
a fuse needs to be replaced, the
same amperage fuse can be
borrowed. Choose some feature of
the vehicle that is not needed to use
and replace it as soon as possible.
Page 274 of 348
Chevrolet Express Owner Manual (GMNA-Localizing-U.S./Canada/Mexico-
9967827) - 2017 - crc - 9/26/16
Vehicle Care 273
Caution (Continued)
chains on the tires of the front
axle. Tighten them as tightly as
possible with the ends securely
fastened. Drive slowly and follow
the chain manufacturer's
instructions. If the chains contact
the vehicle, stop and retighten
them. If the contact continues,
slow down until it stops. Driving
too fast or spinning the wheels
with chains on will damage the
vehicle.
For Cutaway models with LT245/
75R16, LT225/75R16 or LT215/
85R16 size single or dual rear tires,
use Low Profile Z-Chain or SAE
Class S cables.
For Cargo or Passenger models
with P245/70R17, LT225/75R16 or
LT245/75R16 size tires, use Low
Profile Z-Chain cables. SAE Class S
chains are not recommended. If the vehicle has dual rear tires, do
not use individual tire chains. Use
tire chains that fit across both dual
tires.
If a Tire Goes Flat
It is unusual for a tire to blow out
while driving, especially if the tires
are maintained properly. See
Tires
0 252. If air goes out of a tire, it is
much more likely to leak out slowly.
But if there ever is a blowout, here
are a few tips about what to expect
and what to do:
If a front tire fails, the flat tire
creates a drag that pulls the vehicle
toward that side. Take your foot off
the accelerator pedal and grip the
steering wheel firmly. Steer to
maintain lane position, and then
gently brake to a stop, well off the
road, if possible.
A rear blowout, particularly on a
curve, acts much like a skid and
may require the same correction as
used in a skid. Stop pressing the
accelerator pedal and steer to
straighten the vehicle. It may be very bumpy and noisy. Gently brake
to a stop, well off the road,
if possible.
{Warning
Driving on a flat tire will cause
permanent damage to the tire.
Re-inflating a tire after it has been
driven on while severely
underinflated or flat may cause a
blowout and a serious crash.
Never attempt to re-inflate a tire
that has been driven on while
severely underinflated or flat.
Have your dealer or an authorized
tire service center repair or
replace the flat tire as soon as
possible.
Page 276 of 348
Chevrolet Express Owner Manual (GMNA-Localizing-U.S./Canada/Mexico-
9967827) - 2017 - crc - 9/26/16
Vehicle Care 275
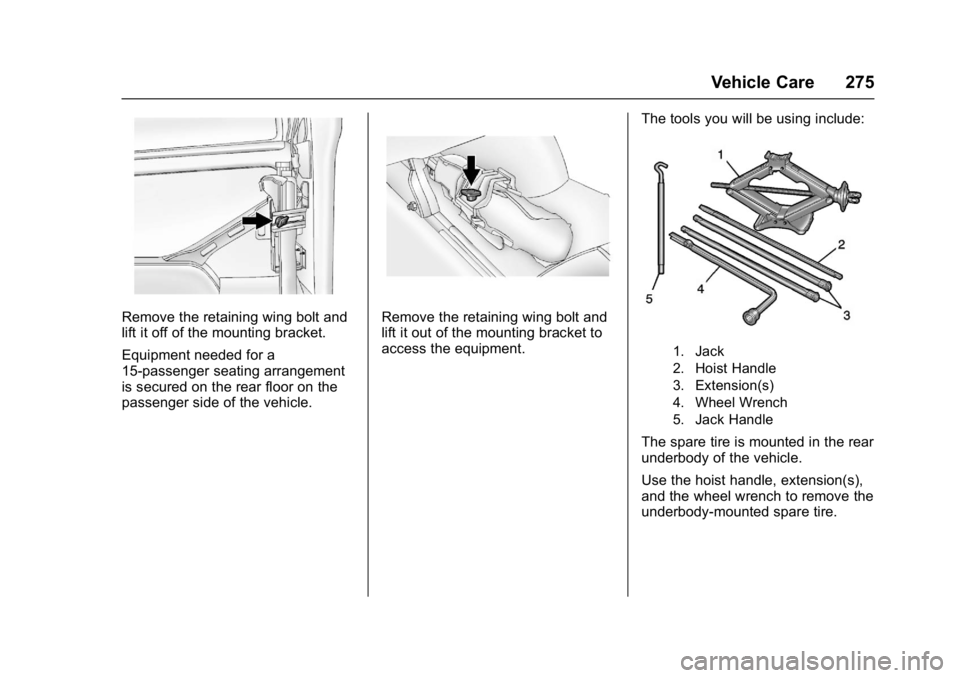
Remove the retaining wing bolt and
lift it off of the mounting bracket.
Equipment needed for a
15-passenger seating arrangement
is secured on the rear floor on the
passenger side of the vehicle.Remove the retaining wing bolt and
lift it out of the mounting bracket to
access the equipment.The tools you will be using include:
1. Jack
2. Hoist Handle
3. Extension(s)
4. Wheel Wrench
5. Jack Handle
The spare tire is mounted in the rear
underbody of the vehicle.
Use the hoist handle, extension(s),
and the wheel wrench to remove the
underbody-mounted spare tire.
Page 282 of 348
Chevrolet Express Owner Manual (GMNA-Localizing-U.S./Canada/Mexico-
9967827) - 2017 - crc - 9/26/16
Vehicle Care 281
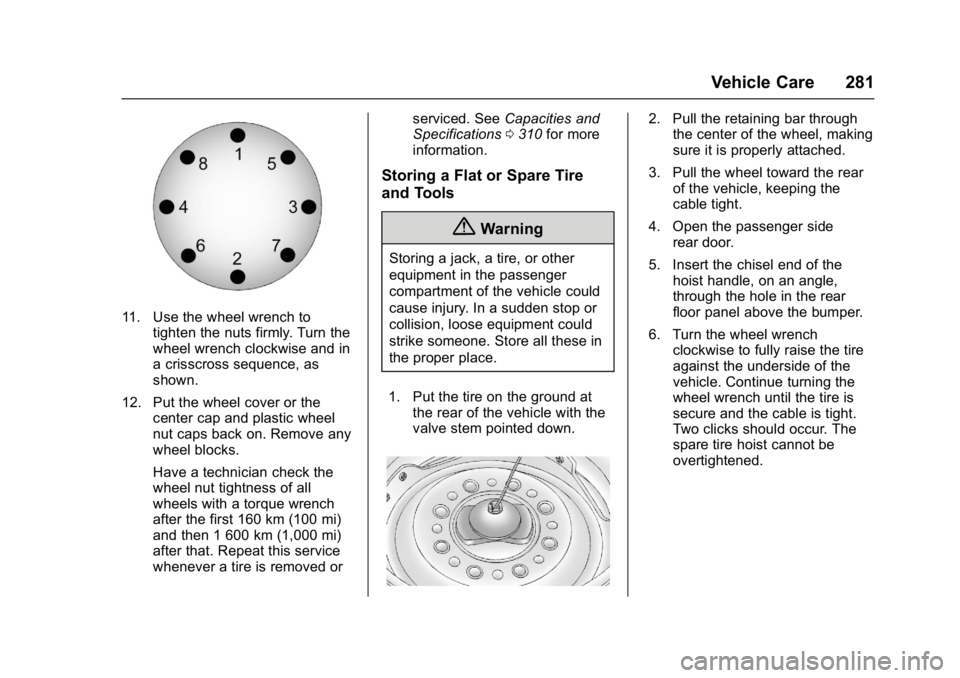
11. Use the wheel wrench totighten the nuts firmly. Turn the
wheel wrench clockwise and in
a crisscross sequence, as
shown.
12. Put the wheel cover or the center cap and plastic wheel
nut caps back on. Remove any
wheel blocks.
Have a technician check the
wheel nut tightness of all
wheels with a torque wrench
after the first 160 km (100 mi)
and then 1 600 km (1,000 mi)
after that. Repeat this service
whenever a tire is removed or serviced. See
Capacities and
Specifications 0310 for more
information.
Storing a Flat or Spare Tire
and Tools
{Warning
Storing a jack, a tire, or other
equipment in the passenger
compartment of the vehicle could
cause injury. In a sudden stop or
collision, loose equipment could
strike someone. Store all these in
the proper place.
1. Put the tire on the ground at the rear of the vehicle with the
valve stem pointed down.
2. Pull the retaining bar throughthe center of the wheel, making
sure it is properly attached.
3. Pull the wheel toward the rear of the vehicle, keeping the
cable tight.
4. Open the passenger side rear door.
5. Insert the chisel end of the hoist handle, on an angle,
through the hole in the rear
floor panel above the bumper.
6. Turn the wheel wrench clockwise to fully raise the tire
against the underside of the
vehicle. Continue turning the
wheel wrench until the tire is
secure and the cable is tight.
Two clicks should occur. The
spare tire hoist cannot be
overtightened.
Page 283 of 348
Chevrolet Express Owner Manual (GMNA-Localizing-U.S./Canada/Mexico-
9967827) - 2017 - crc - 9/26/16
282 Vehicle Care
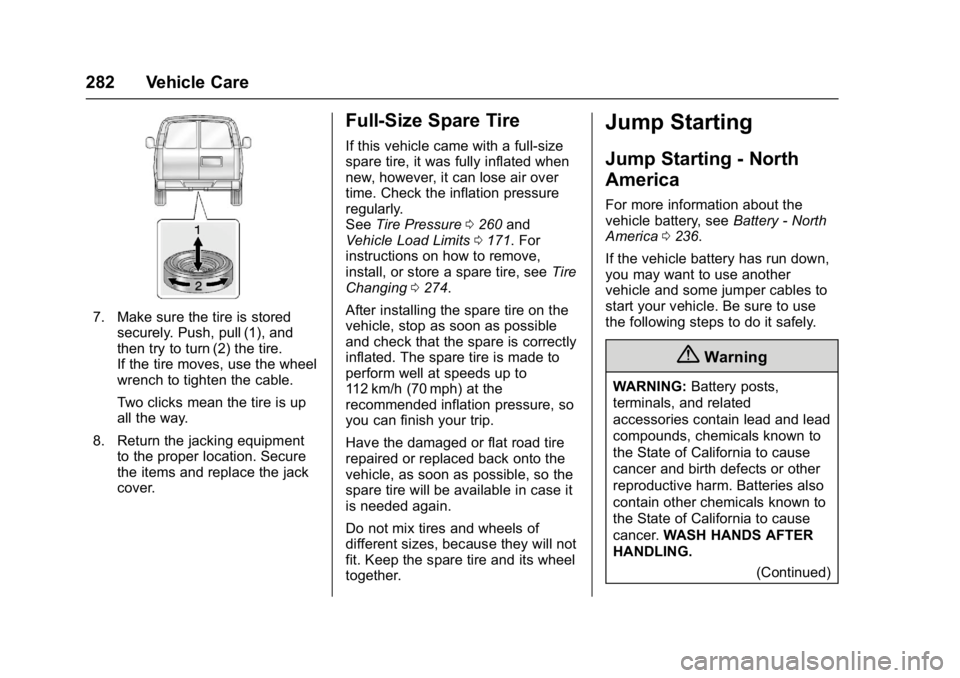
7. Make sure the tire is storedsecurely. Push, pull (1), and
then try to turn (2) the tire.
If the tire moves, use the wheel
wrench to tighten the cable.
Two clicks mean the tire is up
all the way.
8. Return the jacking equipment to the proper location. Secure
the items and replace the jack
cover.
Full-Size Spare Tire
If this vehicle came with a full-size
spare tire, it was fully inflated when
new, however, it can lose air over
time. Check the inflation pressure
regularly.
See Tire Pressure 0260 and
Vehicle Load Limits 0171. For
instructions on how to remove,
install, or store a spare tire, see Tire
Changing 0274.
After installing the spare tire on the
vehicle, stop as soon as possible
and check that the spare is correctly
inflated. The spare tire is made to
perform well at speeds up to
112 km/h (70 mph) at the
recommended inflation pressure, so
you can finish your trip.
Have the damaged or flat road tire
repaired or replaced back onto the
vehicle, as soon as possible, so the
spare tire will be available in case it
is needed again.
Do not mix tires and wheels of
different sizes, because they will not
fit. Keep the spare tire and its wheel
together.
Jump Starting
Jump Starting - North
America
For more information about the
vehicle battery, see Battery - North
America 0236.
If the vehicle battery has run down,
you may want to use another
vehicle and some jumper cables to
start your vehicle. Be sure to use
the following steps to do it safely.
{Warning
WARNING: Battery posts,
terminals, and related
accessories contain lead and lead
compounds, chemicals known to
the State of California to cause
cancer and birth defects or other
reproductive harm. Batteries also
contain other chemicals known to
the State of California to cause
cancer. WASH HANDS AFTER
HANDLING.
(Continued)