2017 CHEVROLET CITY EXPRESS spare wheel
[x] Cancel search: spare wheelPage 277 of 348
Chevrolet Express Owner Manual (GMNA-Localizing-U.S./Canada/Mexico-
9967827) - 2017 - crc - 9/26/16
276 Vehicle Care
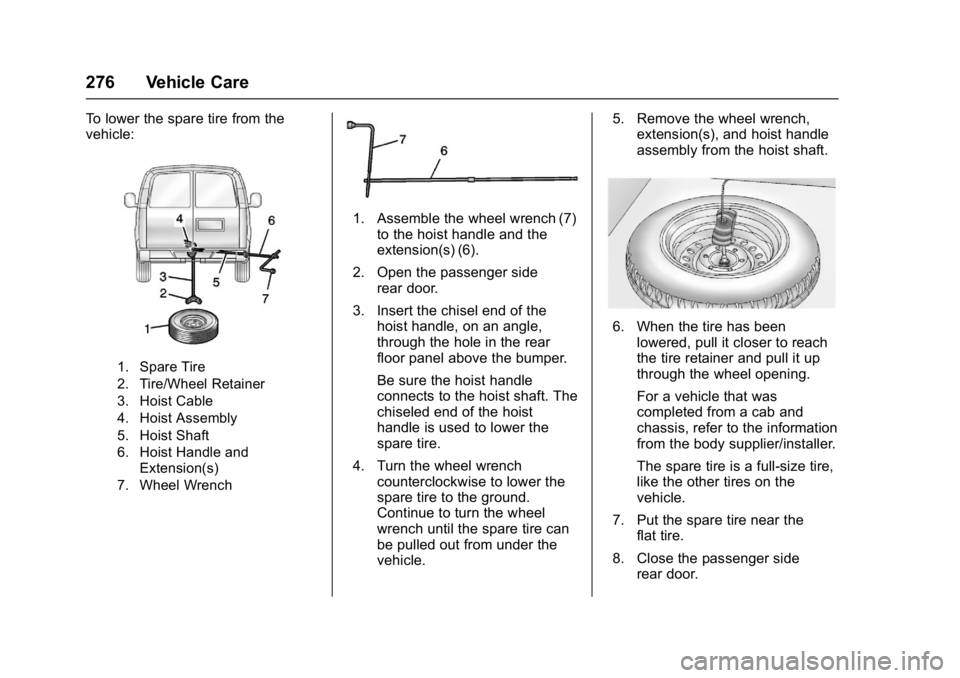
To lower the spare tire from the
vehicle:
1. Spare Tire
2. Tire/Wheel Retainer
3. Hoist Cable
4. Hoist Assembly
5. Hoist Shaft
6. Hoist Handle andExtension(s)
7. Wheel Wrench
1. Assemble the wheel wrench (7) to the hoist handle and the
extension(s) (6).
2. Open the passenger side rear door.
3. Insert the chisel end of the hoist handle, on an angle,
through the hole in the rear
floor panel above the bumper.
Be sure the hoist handle
connects to the hoist shaft. The
chiseled end of the hoist
handle is used to lower the
spare tire.
4. Turn the wheel wrench counterclockwise to lower the
spare tire to the ground.
Continue to turn the wheel
wrench until the spare tire can
be pulled out from under the
vehicle. 5. Remove the wheel wrench,
extension(s), and hoist handle
assembly from the hoist shaft.
6. When the tire has been
lowered, pull it closer to reach
the tire retainer and pull it up
through the wheel opening.
For a vehicle that was
completed from a cab and
chassis, refer to the information
from the body supplier/installer.
The spare tire is a full-size tire,
like the other tires on the
vehicle.
7. Put the spare tire near the flat tire.
8. Close the passenger side rear door.
Page 278 of 348
Chevrolet Express Owner Manual (GMNA-Localizing-U.S./Canada/Mexico-
9967827) - 2017 - crc - 9/26/16
Vehicle Care 277
Removing the Flat Tire and
Installing the Spare Tire
If the vehicle has plastic wheel nut
caps, loosen them by turning the
wheel wrench counterclockwise.
The wheel nut caps are designed to
remain with the center cap. Remove
the center cap.
If the wheel has a smooth center
piece, place the chisel end of the
wheel wrench in the slot on the
wheel and gently pry it out.
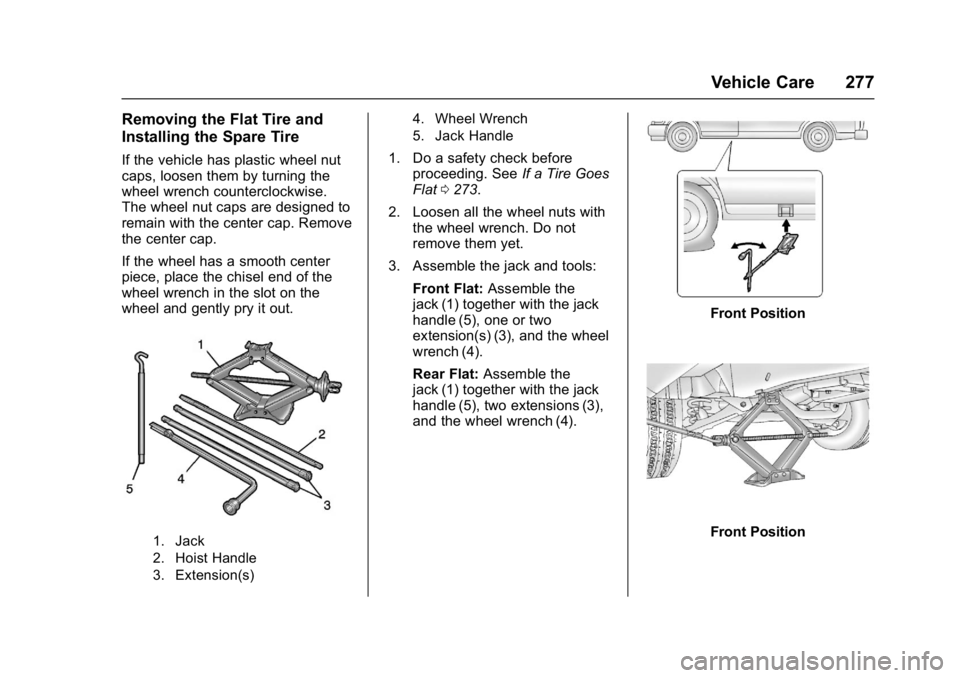
1. Jack
2. Hoist Handle
3. Extension(s)4. Wheel Wrench
5. Jack Handle
1. Do a safety check before
proceeding. See If a Tire Goes
Flat 0273.
2. Loosen all the wheel nuts with the wheel wrench. Do not
remove them yet.
3. Assemble the jack and tools: Front Flat: Assemble the
jack (1) together with the jack
handle (5), one or two
extension(s) (3), and the wheel
wrench (4).
Rear Flat: Assemble the
jack (1) together with the jack
handle (5), two extensions (3),
and the wheel wrench (4).
Front Position
Front Position
Page 279 of 348
Chevrolet Express Owner Manual (GMNA-Localizing-U.S./Canada/Mexico-
9967827) - 2017 - crc - 9/26/16
278 Vehicle Care
Rear Position
Rear Alternative Position (DieselVehicles)
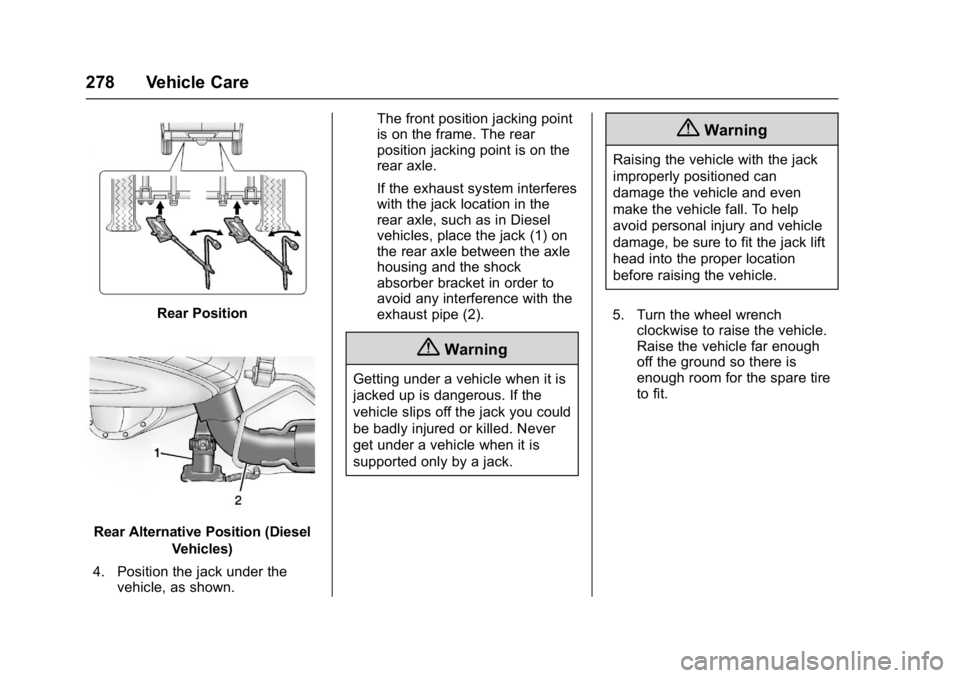
4. Position the jack under the vehicle, as shown. The front position jacking point
is on the frame. The rear
position jacking point is on the
rear axle.
If the exhaust system interferes
with the jack location in the
rear axle, such as in Diesel
vehicles, place the jack (1) on
the rear axle between the axle
housing and the shock
absorber bracket in order to
avoid any interference with the
exhaust pipe (2).
{Warning
Getting under a vehicle when it is
jacked up is dangerous. If the
vehicle slips off the jack you could
be badly injured or killed. Never
get under a vehicle when it is
supported only by a jack.
{Warning
Raising the vehicle with the jack
improperly positioned can
damage the vehicle and even
make the vehicle fall. To help
avoid personal injury and vehicle
damage, be sure to fit the jack lift
head into the proper location
before raising the vehicle.
5. Turn the wheel wrench clockwise to raise the vehicle.
Raise the vehicle far enough
off the ground so there is
enough room for the spare tire
to fit.
Page 280 of 348
Chevrolet Express Owner Manual (GMNA-Localizing-U.S./Canada/Mexico-
9967827) - 2017 - crc - 9/26/16
Vehicle Care 279
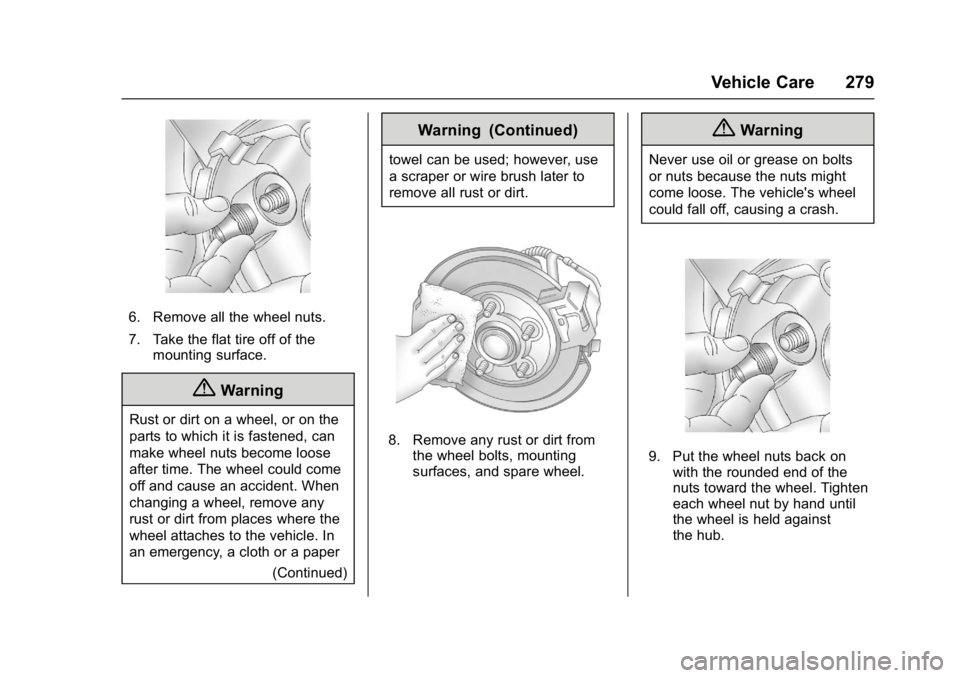
6. Remove all the wheel nuts.
7. Take the flat tire off of themounting surface.
{Warning
Rust or dirt on a wheel, or on the
parts to which it is fastened, can
make wheel nuts become loose
after time. The wheel could come
off and cause an accident. When
changing a wheel, remove any
rust or dirt from places where the
wheel attaches to the vehicle. In
an emergency, a cloth or a paper
(Continued)
Warning (Continued)
towel can be used; however, use
a scraper or wire brush later to
remove all rust or dirt.
8. Remove any rust or dirt fromthe wheel bolts, mounting
surfaces, and spare wheel.
{Warning
Never use oil or grease on bolts
or nuts because the nuts might
come loose. The vehicle's wheel
could fall off, causing a crash.
9. Put the wheel nuts back onwith the rounded end of the
nuts toward the wheel. Tighten
each wheel nut by hand until
the wheel is held against
the hub.
Page 282 of 348
Chevrolet Express Owner Manual (GMNA-Localizing-U.S./Canada/Mexico-
9967827) - 2017 - crc - 9/26/16
Vehicle Care 281
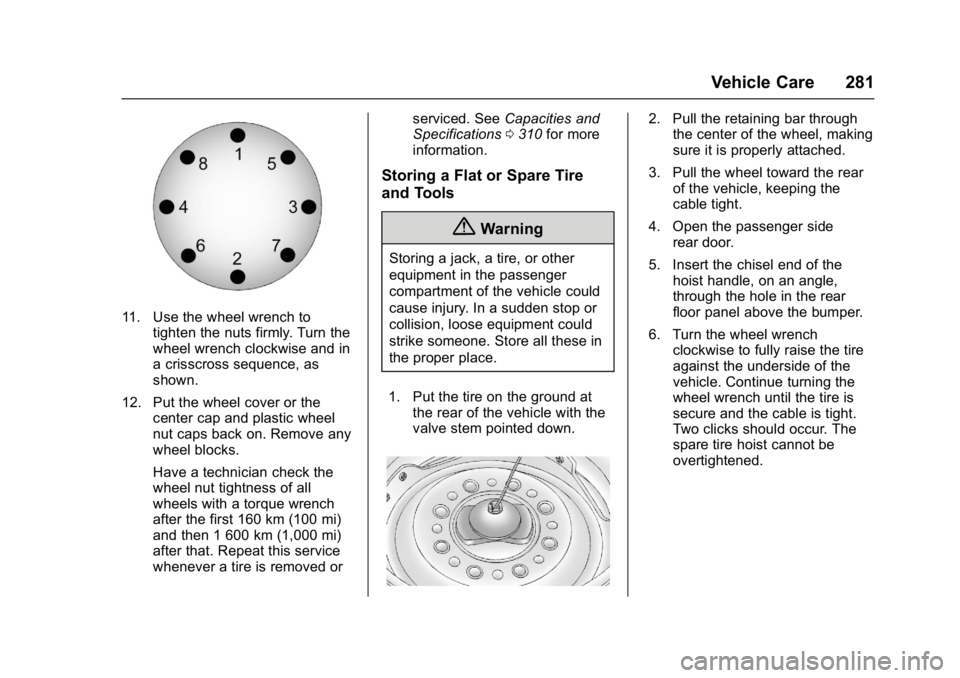
11. Use the wheel wrench totighten the nuts firmly. Turn the
wheel wrench clockwise and in
a crisscross sequence, as
shown.
12. Put the wheel cover or the center cap and plastic wheel
nut caps back on. Remove any
wheel blocks.
Have a technician check the
wheel nut tightness of all
wheels with a torque wrench
after the first 160 km (100 mi)
and then 1 600 km (1,000 mi)
after that. Repeat this service
whenever a tire is removed or serviced. See
Capacities and
Specifications 0310 for more
information.
Storing a Flat or Spare Tire
and Tools
{Warning
Storing a jack, a tire, or other
equipment in the passenger
compartment of the vehicle could
cause injury. In a sudden stop or
collision, loose equipment could
strike someone. Store all these in
the proper place.
1. Put the tire on the ground at the rear of the vehicle with the
valve stem pointed down.
2. Pull the retaining bar throughthe center of the wheel, making
sure it is properly attached.
3. Pull the wheel toward the rear of the vehicle, keeping the
cable tight.
4. Open the passenger side rear door.
5. Insert the chisel end of the hoist handle, on an angle,
through the hole in the rear
floor panel above the bumper.
6. Turn the wheel wrench clockwise to fully raise the tire
against the underside of the
vehicle. Continue turning the
wheel wrench until the tire is
secure and the cable is tight.
Two clicks should occur. The
spare tire hoist cannot be
overtightened.
Page 283 of 348
Chevrolet Express Owner Manual (GMNA-Localizing-U.S./Canada/Mexico-
9967827) - 2017 - crc - 9/26/16
282 Vehicle Care
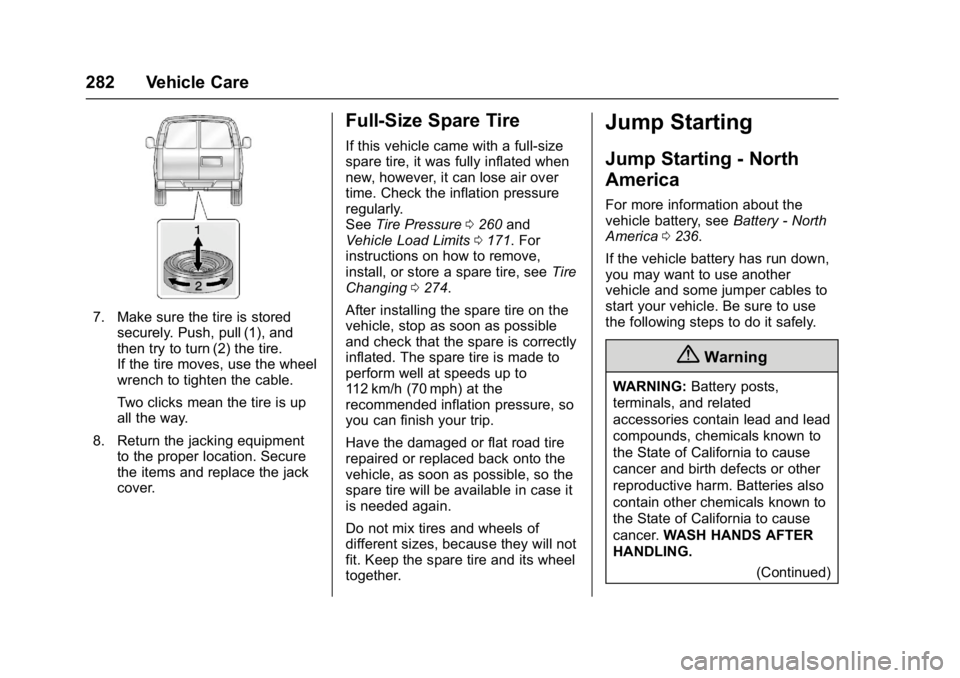
7. Make sure the tire is storedsecurely. Push, pull (1), and
then try to turn (2) the tire.
If the tire moves, use the wheel
wrench to tighten the cable.
Two clicks mean the tire is up
all the way.
8. Return the jacking equipment to the proper location. Secure
the items and replace the jack
cover.
Full-Size Spare Tire
If this vehicle came with a full-size
spare tire, it was fully inflated when
new, however, it can lose air over
time. Check the inflation pressure
regularly.
See Tire Pressure 0260 and
Vehicle Load Limits 0171. For
instructions on how to remove,
install, or store a spare tire, see Tire
Changing 0274.
After installing the spare tire on the
vehicle, stop as soon as possible
and check that the spare is correctly
inflated. The spare tire is made to
perform well at speeds up to
112 km/h (70 mph) at the
recommended inflation pressure, so
you can finish your trip.
Have the damaged or flat road tire
repaired or replaced back onto the
vehicle, as soon as possible, so the
spare tire will be available in case it
is needed again.
Do not mix tires and wheels of
different sizes, because they will not
fit. Keep the spare tire and its wheel
together.
Jump Starting
Jump Starting - North
America
For more information about the
vehicle battery, see Battery - North
America 0236.
If the vehicle battery has run down,
you may want to use another
vehicle and some jumper cables to
start your vehicle. Be sure to use
the following steps to do it safely.
{Warning
WARNING: Battery posts,
terminals, and related
accessories contain lead and lead
compounds, chemicals known to
the State of California to cause
cancer and birth defects or other
reproductive harm. Batteries also
contain other chemicals known to
the State of California to cause
cancer. WASH HANDS AFTER
HANDLING.
(Continued)
Page 346 of 348

Chevrolet Express Owner Manual (GMNA-Localizing-U.S./Canada/Mexico-
9967827) - 2017 - crc - 9/26/16
Index 345
Security (cont'd)OnStar®. . . . . . . . . . . . . . . . . . . . . . 328
Vehicle . . . . . . . . . . . . . . . . . . . . . . . . . 33
Service . . . . . . . . . . . . . . . . . . . . . . . . . 163
Accessories andModifications . . . . . . . . . . . . . . . . 216
Climate Control System . . . . . . . 158
Doing Your Own Work . . . . . . . . 216
Engine Soon Light . . . . . . . . . . . . 102
Maintenance Records . . . . . . . . 308
Maintenance, General Information . . . . . . . . . . . . . . . . . . 297
Parts Identification Label . . . . . 309
Publications Ordering Information . . . . . . . . . . . . . . . . . . 322
Scheduling Appointments . . . . . 319
Vehicle Messages . . . . . . . . . . . . .117
Services
Special Application . . . . . . . . . . . 303
Servicing the Airbag . . . . . . . . . . . . . 65
Shift Lock Control Function Check, Automatic
Transmission . . . . . . . . . . . . . . . . . . 238
Shifting Into Park . . . . . . . . . . . . . . . . . . . . . . 180
Out of Park . . . . . . . . . . . . . . . . . . . 181
Side Door . . . . . . . . . . . . . . . . . . . . . . . 31 Sidemarker
Bulb Replacement . . . . . . . . . . . . 242
Signals, Turn and Lane-Change . . . . . . . . . . . . . . . . . 128
Sliding Door . . . . . . . . . . . . . . . . . . . . . 32
Special Application Services . . . . 303
Specifications and Capacities . . . . . . . . . . . . . . . . . . . . . 310
Speedometer . . . . . . . . . . . . . . . . . . . . 96
StabiliTrak OFF Light . . . . . . . . . . . . . . . . . . . . . 105
Start Vehicle, Remote . . . . . . . . . . . 27
Starter Switch Check . . . . . . . . . . . 238
Starting the Engine . . . . . . . . . . . . . 177
Steering . . . . . . . . . . . . . . . . . . . . . . . . 166 Fluid, Power . . . . . . . . . . . . . . . . . . 232
Wheel Adjustment . . . . . . . . . . . . . . 88
Wheel Controls . . . . . . . . . . . . . . . . . 88
Storage Areas Front . . . . . . . . . . . . . . . . . . . . . . . . . . . 85
Storage Compartments . . . . . . . . . . 85
Stuck Vehicle . . . . . . . . . . . . . . . . . . . 171
Sun Visors . . . . . . . . . . . . . . . . . . . . . . . 39
Swing-out Windows . . . . . . . . . . . . . . 37
Switches
Airbag On-Off . . . . . . . . . . . . . . . . . . . 62
Symbols . . . . . . . . . . . . . . . . . . . . . . . . . . 3 System
Infotainment . . . . . . . . . . . . . 132, 326
Noise Control . . . . . . . . . . . . . . . . . 237
T
Taillamps . . . . . . . . . . . . . . . . . . . . . . . 243
Text Telephone (TTY) Users . . . . 316
Theft-Deterrent Systems . . . . . . . . . 33
Immobilizer . . . . . . . . . . . . . . . . . . . . . 33
Time . . . . . . . . . . . . . . . . . . . . . . . . . . . . . 92
Tires . . . . . . . . . . . . . . . . . . . . . . . . . . . . 252 All-Season . . . . . . . . . . . . . . . . . . . . 253
All-Terrain . . . . . . . . . . . . . . . . . . . . 253
Buying New Tires . . . . . . . . . . . . . 268
Chains . . . . . . . . . . . . . . . . . . . . . . . . 272
Changing . . . . . . . . . . . . . . . . . . . . . 274
Designations . . . . . . . . . . . . . . . . . 256
Different Size . . . . . . . . . . . . . . . . . 269
Dual Rotation . . . . . . . . . . . . . . . . . 266
Full-Size Spare . . . . . . . . . . . . . . . 282
If a Tire Goes Flat . . . . . . . . . . . . 273
Inspection . . . . . . . . . . . . . . . . . . . . 265
Messages . . . . . . . . . . . . . . . . . . . . .118
Pressure . . . . . . . . . . . . . . . . . . . . . . 260
Pressure Light . . . . . . . . . . . . . . . . 106
Pressure Monitor Operation . . 262
Pressure Monitor System . . . . . 261
Rotation . . . . . . . . . . . . . . . . . . . . . . 265
Sidewall Labeling . . . . . . . . . . . . . 254