2017 CHEVROLET CITY EXPRESS change wheel
[x] Cancel search: change wheelPage 172 of 348
Chevrolet Express Owner Manual (GMNA-Localizing-U.S./Canada/Mexico-
9967827) - 2017 - crc - 9/26/16
Driving and Operating 171
If the Vehicle Is Stuck
Slowly and cautiously spin the
wheels to free the vehicle when
stuck in sand, mud, ice, or snow.
If stuck too severely for the traction
system to free the vehicle, turn the
traction system off and use the
rocking method. SeeTraction
Control/Electronic Stability Control
0 190.
{Warning
If the vehicle's tires spin at high
speed, they can explode, and you
or others could be injured. The
vehicle can overheat, causing an
engine compartment fire or other
damage. Spin the wheels as little
as possible and avoid going
above 56 km/h (35 mph).
Rocking the Vehicle to Get
it Out
Turn the steering wheel left and
right to clear the area around the
front wheels. Turn off any traction
system. Shift back and forth between R (Reverse) and a low
forward gear, spinning the wheels
as little as possible. To prevent
transmission wear, wait until the
wheels stop spinning before shifting
gears. Release the accelerator
pedal while shifting, and press
lightly on the accelerator pedal
when the transmission is in gear.
Slowly spinning the wheels in the
forward and reverse directions
causes a rocking motion that could
free the vehicle. If that does not get
the vehicle out after a few tries, it
might need to be towed out. If the
vehicle does need to be towed out,
see
Towing the Vehicle 0286.
Vehicle Load Limits
It is very important to know how
much weight the vehicle can
carry. This weight is called the
vehicle capacity weight and
includes the weight of all
occupants, cargo, and all
nonfactory-installed options.
Two labels on the vehicle may
show how much weight it was designed to carry, the Tire and
Loading Information label and
the Certification/Tire label.
{Warning
Do not load the vehicle any
heavier than the Gross
Vehicle Weight Rating
(GVWR), or either the
maximum front or rear Gross
Axle Weight Rating (GAWR).
This can cause systems to
break and change the way the
vehicle handles. This could
cause loss of control and a
crash. Overloading can also
reduce stopping distance,
damage the tires, and shorten
the life of the vehicle.
Page 178 of 348
Chevrolet Express Owner Manual (GMNA-Localizing-U.S./Canada/Mexico-
9967827) - 2017 - crc - 9/26/16
Driving and Operating 177
A warning tone will sound when the
driver door is opened, the ignition is
in ACC/ACCESSORY or LOCK/OFF
and the key is in the ignition.
Starting the Engine
If the vehicle has a diesel engine,
see the Duramax diesel
supplement.
To place the transmission in the
proper gear:
Move the shift lever to P (Park) or
N (Neutral). The engine will not start
in any other position. To restart the
engine when the vehicle is already
moving, use N (Neutral) only.
Caution
If you add electrical parts or
accessories, you could change
the way the engine operates. Any
resulting damage would not be
covered by the vehicle warranty.
SeeAdd-On Electrical Equipment
0 212.
Caution
Do not try to shift to P (Park) if the
vehicle is moving. If you do, you
could damage the transmission.
Shift to P (Park) only when the
vehicle is stopped.
Caution
If the steering wheel is turned
until it reaches the end of its
travel, and is held in that position
while starting the vehicle, damage
may occur to the hydraulic power
steering system and there may be
loss of power steering assist.
Starting Procedure 1. With your foot off the accelerator pedal, turn the
ignition key to START. When
the engine starts, let go of the
key. The idle speed will go
down as your engine gets
warm. Do not race the engine
immediately after starting it. Operate the engine and
transmission gently to allow the
oil to warm up and lubricate all
moving parts.
When the Low Fuel warning
lamp is on and the FUEL
LEVEL LOW message is
displayed in the Driver
Information Center (DIC), the
Computer-Controlled Cranking
System is disabled to prevent
possible vehicle component
damage. When this happens,
hold the ignition switch in the
START position to continue
engine cranking.
Caution
Cranking the engine for long
periods of time, by returning the
ignition to the START position
immediately after cranking has
ended, can overheat and damage
the cranking motor, and drain the
battery. Wait at least 15 seconds
between each try, to let the
cranking motor cool down.
Page 188 of 348
Chevrolet Express Owner Manual (GMNA-Localizing-U.S./Canada/Mexico-
9967827) - 2017 - crc - 9/26/16
Driving and Operating 187
2. Press the +/−buttons on the
shift lever, to select the desired
range of gears for current
driving conditions.
When M (Manual Mode) is selected
a number displays in the DIC next to
the M indicating the current gear.
This number is the highest gear that
can be used. However, the vehicle
can automatically shift to lower
gears as it adjusts to driving
conditions. This means that all
gears below that number are
available. When 5 (Fifth) is selected,
1 (First) through 5 (Fifth) gears are
automatically shifted by the vehicle,
but 6 (Sixth) cannot be used until
the +/− button on the steering
column lever is used to change to
the gear.
Grade Braking is not available when
Range Selection Mode is active.
See Tow/Haul Mode 0187.
While using Range Selection Mode,
cruise control and the Tow/Haul
Mode can be used.Caution
Spinning the tires or holding the
vehicle in one place on a hill
using only the accelerator pedal
may damage the transmission.
The repair will not be covered by
the vehicle warranty. If the vehicle
is stuck, do not spin the tires.
When stopping on a hill, use the
brakes to hold the vehicle in
place.
Low Traction Mode
Low Traction Mode can assist in
vehicle acceleration when road
conditions are slippery. While the
vehicle is at a stop, select the
second gear range using Range
Selection Mode. This will limit
torque to the wheels after it detects
wheel slip, preventing the tires from
spinning.
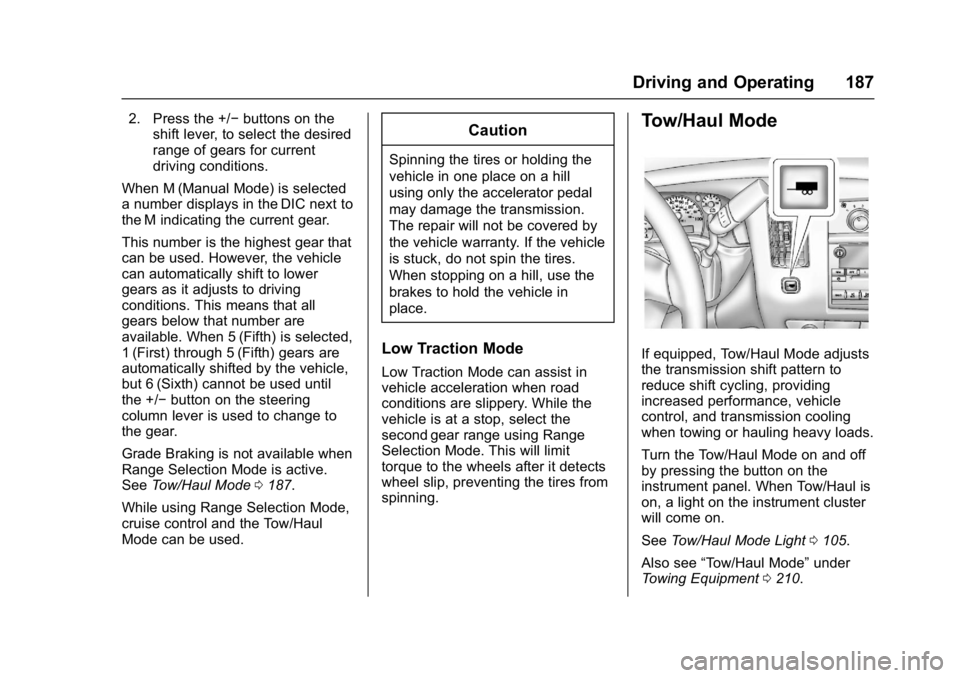
Tow/Haul Mode
If equipped, Tow/Haul Mode adjusts
the transmission shift pattern to
reduce shift cycling, providing
increased performance, vehicle
control, and transmission cooling
when towing or hauling heavy loads.
Turn the Tow/Haul Mode on and off
by pressing the button on the
instrument panel. When Tow/Haul is
on, a light on the instrument cluster
will come on.
See Tow/Haul Mode Light 0105.
Also see “Tow/Haul Mode” under
Towing Equipment 0210.
Page 189 of 348
Chevrolet Express Owner Manual (GMNA-Localizing-U.S./Canada/Mexico-
9967827) - 2017 - crc - 9/26/16
188 Driving and Operating
Tow/Haul Mode Grade Braking
Tow/Haul Mode Grade Braking is
only enabled while the Tow/Haul
Mode is selected and the vehicle is
not in the Range Selection Mode.
See“Tow/Haul Mode” listed
previously and Manual Mode0186.
Tow/Haul Mode Grade Braking
assists in maintaining desired
vehicle speeds when driving on
downhill grades by using the engine
and transmission to slow the
vehicle.
To disable or enable Tow/Haul Mode
Grade Braking within the current
ignition key cycle, press and hold
the Tow/Haul button for
three seconds. A DIC message will
be displayed. See Transmission
Messages 0118.
See Towing Equipment 0210.
For other forms of grade braking,
see Automatic Transmission 0183
and Cruise Control 0192.
Brakes
Antilock Brake
System (ABS)
This vehicle has an Antilock Brake
System (ABS), an advanced
electronic braking system that helps
prevent a braking skid.
When the vehicle begins to drive
away, ABS checks itself.
A momentary motor or clicking noise
may be heard while this test is going
on, and it may even be noticed that
the brake pedal moves a little. This
is normal.
If there is a problem with ABS, this
warning light stays on. See Antilock
Brake System (ABS) Warning Light
0 104. If driving safely on a wet road and it
becomes necessary to slam on the
brakes and continue braking to
avoid a sudden obstacle, a
computer senses the wheels are
slowing down. If one of the wheels
is about to stop rolling, the computer
will separately work the brakes at
each wheel.
ABS can change the brake pressure
to each wheel, as required, faster
than any driver could. This can help
you steer around the obstacle while
braking hard.
As the brakes are applied, the
computer keeps receiving updates
on wheel speed and controls
braking pressure accordingly.
Remember: ABS does not change
the time needed to get a foot up to
the brake pedal or always decrease
stopping distance. If you get too
close to the vehicle in front of you,
there will not be enough time to
apply the brakes if that vehicle
suddenly slows or stops. Always
leave enough room up ahead to
stop, even with ABS.
Page 193 of 348
Chevrolet Express Owner Manual (GMNA-Localizing-U.S./Canada/Mexico-
9967827) - 2017 - crc - 9/26/16
192 Driving and Operating
Cruise Control
{Warning
Cruise control can be dangerous
where you cannot drive safely at
a steady speed. Do not use
cruise control on winding roads or
in heavy traffic.
Cruise control can be dangerous
on slippery roads. On such roads,
fast changes in tire traction can
cause excessive wheel slip, and
you could lose control. Do not use
cruise control on slippery roads.
If equipped with cruise control, a
speed of about 40 km/h (25 mph) or
more can be maintained without
keeping your foot on the
accelerator. Cruise control does not
work at speeds below about 40 km/h
(25 mph).
If the vehicle has StabiliTrak and the
system begins to limit wheel spin,
cruise control will automatically
disengage. See Traction Control/
Electronic Stability Control 0190. When road conditions allow cruise
control to be safely used again,
cruise control can be turned
back on.
If the brakes are applied, cruise
control disengages.
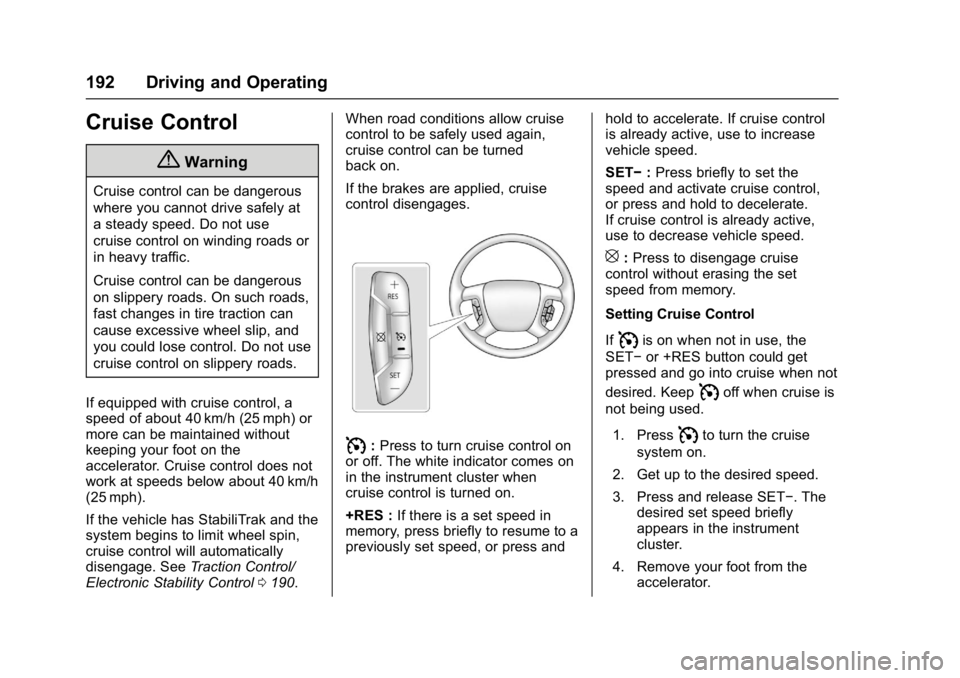
I:
Press to turn cruise control on
or off. The white indicator comes on
in the instrument cluster when
cruise control is turned on.
+RES : If there is a set speed in
memory, press briefly to resume to a
previously set speed, or press and hold to accelerate. If cruise control
is already active, use to increase
vehicle speed.
SET−
:Press briefly to set the
speed and activate cruise control,
or press and hold to decelerate.
If cruise control is already active,
use to decrease vehicle speed.
[: Press to disengage cruise
control without erasing the set
speed from memory.
Setting Cruise Control
If
Iis on when not in use, the
SET− or +RES button could get
pressed and go into cruise when not
desired. Keep
Ioff when cruise is
not being used.
1. Press
Ito turn the cruise
system on.
2. Get up to the desired speed.
3. Press and release SET−. The desired set speed briefly
appears in the instrument
cluster.
4. Remove your foot from the accelerator.
Page 235 of 348
Chevrolet Express Owner Manual (GMNA-Localizing-U.S./Canada/Mexico-
9967827) - 2017 - crc - 9/26/16
234 Vehicle Care
Brakes
Disc brake pads have built-in wear
indicators that make a high-pitched
warning sound when the brake pads
are worn and new pads are needed.
The sound can come and go or can
be heard all the time when the
vehicle is moving, except when
applying the brake pedal firmly.
{Warning
The brake wear warning sound
means that soon the brakes will
not work well. That could lead to
a crash. When the brake wear
warning sound is heard, have the
vehicle serviced.
Caution
Continuing to drive with worn-out
brake pads could result in costly
brake repair.Some driving conditions or climates
can cause a brake squeal when the
brakes are first applied or lightly
applied. This does not mean
something is wrong with the brakes.
Properly torqued wheel nuts are
necessary to help prevent brake
pulsation. When tires are rotated,
inspect brake pads for wear and
evenly tighten wheel nuts in the
proper sequence to torque
specifications. See
Capacities and
Specifications 0310.
Brake pads should be replaced as
complete sets.
Brake Pedal Travel
See your dealer if the brake pedal
does not return to normal height,
or if there is a rapid increase in
pedal travel. This could be a sign
that brake service may be required.
Replacing Brake System Parts
Always replace brake system parts
with new, approved replacement
parts. If this is not done, the brakes
may not work properly. The braking
performance expected can change
in many other ways if the wrong replacement brake parts are
installed or if parts are improperly
installed.
Brake Fluid
The brake master cylinder reservoir
is filled with DOT 3 brake fluid. See
Engine Compartment Overview
0
218 for the location of the
reservoir.
There are only two reasons why the
brake fluid level in the reservoir may
go down:
. Normal brake lining wear. When
new linings are installed, the
fluid level goes back up.
. A fluid leak in the brake
hydraulic system. Have the
brake hydraulic system fixed.
With a leak, the brakes will not
work well.
Page 254 of 348
Chevrolet Express Owner Manual (GMNA-Localizing-U.S./Canada/Mexico-
9967827) - 2017 - crc - 9/26/16
Vehicle Care 253
All-Season Tires
This vehicle may come with
all-season tires. These tires are
designed to provide good overall
performance on most road surfaces
and weather conditions. Original
equipment tires designed to GM's
specific tire performance criteria
have a TPC specification code
molded onto the sidewall. Original
equipment all-season tires can be
identified by the last two characters
of this TPC code, which will
be“MS.”
Consider installing winter tires on
the vehicle if frequent driving on
snow or ice-covered roads is
expected. All-season tires provide
adequate performance for most
winter driving conditions, but they
may not offer the same level of
traction or performance as winter
tires on snow or ice-covered roads.
See Winter Tires 0253.
Winter Tires
This vehicle was not originally
equipped with winter tires. Winter
tires are designed for increased
traction on snow and ice-covered
roads. Consider installing winter
tires on the vehicle if frequent
driving on ice or snow covered
roads is expected. See your dealer
for details regarding winter tire
availability and proper tire selection.
Also, see Buying New Tires 0268.
With winter tires, there may be
decreased dry road traction,
increased road noise, and shorter
tread life. After changing to winter
tires, be alert for changes in vehicle
handling and braking.
If using winter tires:
. Use tires of the same brand and
tread type on all four wheel
positions.
. Use only radial ply tires of the
same size, load range, and
speed rating as the original
equipment tires. Winter tires with the same speed
rating as the original equipment tires
may not be available for H, V, W, Y,
and ZR speed rated tires. If winter
tires with a lower speed rating are
chosen, never exceed the tire's
maximum speed capability.
All-Terrain Tires
This vehicle may have All-Terrain
Tires. These tires provide good
performance on most road surfaces,
weather conditions, and for off-road
driving.
The tread pattern on these tires may
wear more quickly than other tires.
Consider rotating the tires more
frequently than at 12 000 km
(7,500 mi) intervals if irregular wear
is noted when the tires are
inspected. See
Tire Inspection
0 265.
Page 267 of 348

Chevrolet Express Owner Manual (GMNA-Localizing-U.S./Canada/Mexico-
9967827) - 2017 - crc - 9/26/16
266 Vehicle Care
Use this rotation pattern when
rotating the tires.
If the vehicle has a compact
spare tire, do not include it in the
tire rotation.
Adjust the front and rear tires to
the recommended inflation
pressure on the Tire and
Loading Information label after
the tires have been rotated.
SeeTire Pressure 0260 and
Vehicle Load Limits 0171.
Reset the Tire Pressure Monitor
System. See Tire Pressure
Monitor Operation 0262. Check that all wheel nuts are
properly tightened. See
“Wheel
Nut Torque” underCapacities
and Specifications 0310.
{Warning
Rust or dirt on a wheel, or on the
parts to which it is fastened, can
make wheel nuts become loose
after time. The wheel could come
off and cause an accident. When
changing a wheel, remove any
rust or dirt from places where the
wheel attaches to the vehicle. In
an emergency, a cloth or a paper
towel can be used; however, use
a scraper or wire brush later to
remove all rust or dirt.
Lightly coat the center of the
wheel hub with wheel bearing
grease after a wheel change or
tire rotation to prevent corrosion
or rust build-up. Do not get
grease on the flat wheel
mounting surface or on the
wheel nuts or bolts.
Dual Tire Rotation
When the vehicle is new,
or whenever a wheel, wheel bolt,
or wheel nut is replaced, check the
wheel nut torque after
160, 1 600, and 10 000 km (100,
1,000, and 6,000 mi) of driving. For
proper wheel nut tightening
information, see “Removing the Flat
Tire and Installing the Spare Tire”
under Tire Changing 0274. Also
see “Wheel Nut Torque” under
Capacities and Specifications 0310.
The outer tire on a dual wheel setup
generally wears faster than the
inner tire. Tires last longer and wear
more evenly if they are rotated.
See Tire Inspection 0265 andTire
Rotation 0265. Also see
Maintenance Schedule 0298.
{Warning
If the vehicle is operated with a
tire that is underinflated, the tire
can overheat. An overheated tire
can lose air suddenly or catch
(Continued)