2017 CADILLAC XT5 Cargo cover
[x] Cancel search: Cargo coverPage 22 of 339

Cadillac XT5 Owner Manual (GMNA-Localizing-MidEast-10260744) - 2017 -
crc - 1/14/16
22 In Brief
The vehicle has two accessory
power outlets, one on the lower
center floor console and in the rear
cargo area.
Lift the cover to access the
accessory power outlet.
SeePower Outlets 0114.
Sunroof
If equipped, the ignition must be in
ON/RUN or ACC/ACCESSORY,
or in Retained Accessory
Power (RAP) to operate the sunroof.
See Ignition Positions 0191 and
Retained Accessory Power
(RAP) 0195.
1. Sunroof Switch
2. Sunshade Switch
Sunroof Switch : Press the rear of
the switch (1) to express-open the
sunroof. Press the switch (1) again
to stop at the desired position. The
sunshade partially opens
automatically. Press the front of the
switch (1) to express-close the
sunroof.
Sunshade Switch : Press the rear
of the switch (2) to express-open
the sunshade. Press the front of the
switch (2) to express-close the
sunshade. Press the switch again to
stop at the desired position. The sunroof cannot be opened or
closed if the vehicle has an
electrical failure.
The sunroof/sunshade is equipped
with an automatic reversal system.
See
Sunroof 050.
Page 101 of 339

Cadillac XT5 Owner Manual (GMNA-Localizing-MidEast-10260744) - 2017 -
crc - 1/14/16
Storage 101
Storage
Storage Compartments
Storage Compartments . . . . . . . 101
Glove Box . . . . . . . . . . . . . . . . . . . . 101
Cupholders . . . . . . . . . . . . . . . . . . . 101
Armrest Storage . . . . . . . . . . . . . . 101
Rear Storage . . . . . . . . . . . . . . . . . 102
Center Console Storage . . . . . . 102
Additional Storage Features
Cargo Cover . . . . . . . . . . . . . . . . . . 102
Cargo Tie-Downs . . . . . . . . . . . . . 104
Cargo ManagementSystem . . . . . . . . . . . . . . . . . . . . . . 104
Convenience Net . . . . . . . . . . . . . 105
Safety Kit . . . . . . . . . . . . . . . . . . . . . 105
Roof Rack System
Roof Rack System . . . . . . . . . . . 106
Storage
Compartments
{Warning
Do not store heavy or sharp
objects in storage compartments.
In a crash, these objects may
cause the cover to open and
could result in injury.
Glove Box
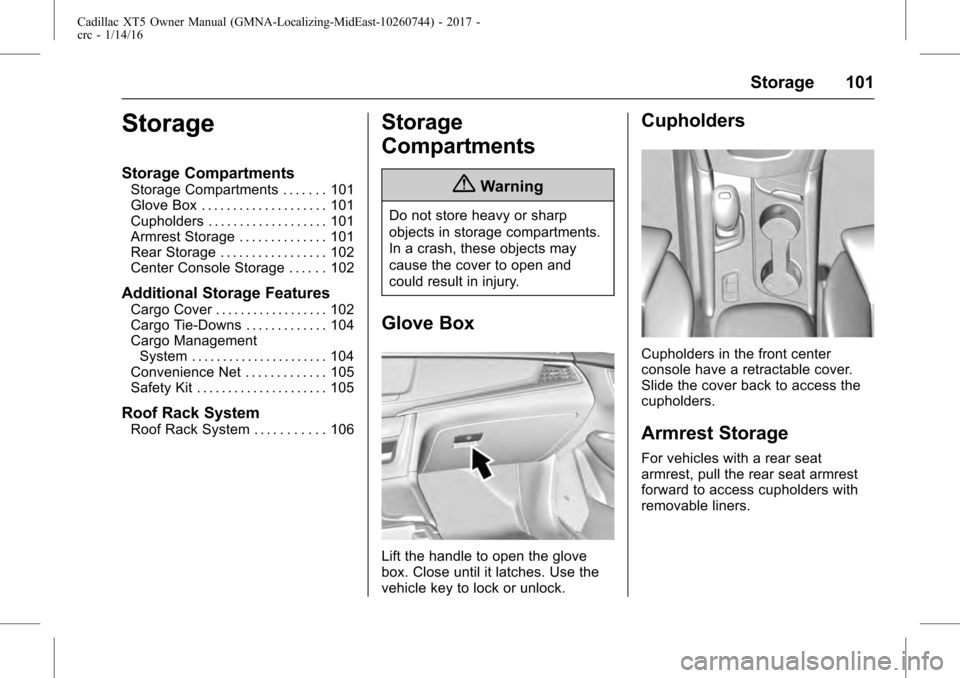
Lift the handle to open the glove
box. Close until it latches. Use the
vehicle key to lock or unlock.
Cupholders
Cupholders in the front center
console have a retractable cover.
Slide the cover back to access the
cupholders.
Armrest Storage
For vehicles with a rear seat
armrest, pull the rear seat armrest
forward to access cupholders with
removable liners.
Page 102 of 339

Cadillac XT5 Owner Manual (GMNA-Localizing-MidEast-10260744) - 2017 -
crc - 1/14/16
102 Storage
Rear Storage
There is storage in the floor of the
rear cargo area. Lift the handle to
access.
Center Console Storage
Press the button to access the
storage area in front of the armrest
cover.
Press the button on the driver side
of the cover to access the storage
area under the armrest. There are
two USB ports and an auxiliary jack
inside.
If equipped, there is an auxiliary
jack outlet and two charge only USB
ports on the rear of the center
console.
Additional Storage
Features
Cargo Cover
{Warning
An unsecured cargo cover could
strike people in a sudden stop or
turn, or in a crash. Store the
cargo cover securely or remove it
from the vehicle.
{Warning
Do not place objects on the cargo
cover. Sudden stops or turns can
cause objects to be thrown in the
vehicle. You or others could be
injured.
Page 103 of 339

Cadillac XT5 Owner Manual (GMNA-Localizing-MidEast-10260744) - 2017 -
crc - 1/14/16
Storage 103
If equipped, the cargo cover can be
used to cover items in the
cargo area.
Install the Cargo Cover1. Hold the cartridge so that the retracted cargo cover faces the
rear of the vehicle.2. Align the cartridge over theslots on the trim panels of the
vehicle.
3. Place one end of the cartridge into the slot and then compress
to fit the other end into the
remaining slot.
4. Unroll the cargo cover toward the rear of the vehicle. The
cargo cover can be half open
or fully open.5. Insert the cargo cover pins intothe channels on both sides.
Remove the Cargo Cover
Remove the cargo cover pins from
the channels and let the cover
retract. Compress the ends of the
cartridge to remove it from the slots.
Page 114 of 339

Cadillac XT5 Owner Manual (GMNA-Localizing-MidEast-10260744) - 2017 -
crc - 1/14/16
114 Instruments and Controls
2. Touch Clock Display, thenselect Off or On.
3. Touch
[Back to go back to the
previous menu.
Power Outlets
The accessory power outlet can be
used to plug in electrical equipment,
such as a cell phone or MP3 player.
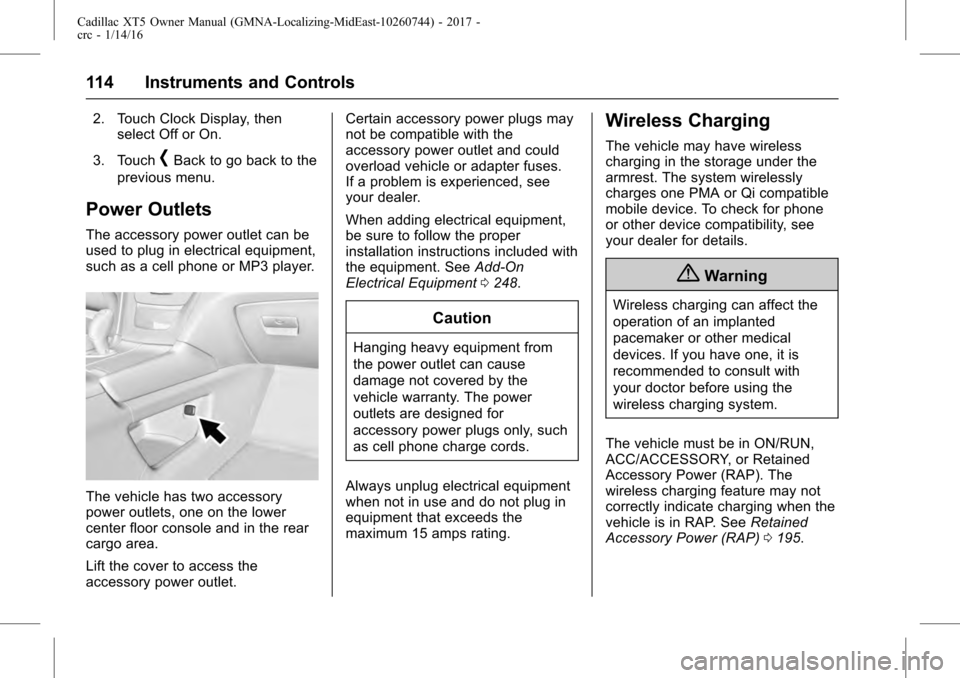
The vehicle has two accessory
power outlets, one on the lower
center floor console and in the rear
cargo area.
Lift the cover to access the
accessory power outlet. Certain accessory power plugs may
not be compatible with the
accessory power outlet and could
overload vehicle or adapter fuses.
If a problem is experienced, see
your dealer.
When adding electrical equipment,
be sure to follow the proper
installation instructions included with
the equipment. See
Add-On
Electrical Equipment 0248.
Caution
Hanging heavy equipment from
the power outlet can cause
damage not covered by the
vehicle warranty. The power
outlets are designed for
accessory power plugs only, such
as cell phone charge cords.
Always unplug electrical equipment
when not in use and do not plug in
equipment that exceeds the
maximum 15 amps rating.
Wireless Charging
The vehicle may have wireless
charging in the storage under the
armrest. The system wirelessly
charges one PMA or Qi compatible
mobile device. To check for phone
or other device compatibility, see
your dealer for details.
{Warning
Wireless charging can affect the
operation of an implanted
pacemaker or other medical
devices. If you have one, it is
recommended to consult with
your doctor before using the
wireless charging system.
The vehicle must be in ON/RUN,
ACC/ACCESSORY, or Retained
Accessory Power (RAP). The
wireless charging feature may not
correctly indicate charging when the
vehicle is in RAP. See Retained
Accessory Power (RAP) 0195.
Page 190 of 339

Cadillac XT5 Owner Manual (GMNA-Localizing-MidEast-10260744) - 2017 -
crc - 1/14/16
190 Driving and Operating
Example 3
1.Vehicle Capacity Weight
for Example 3 = 453 kg
(1,000 lbs).
2.Subtract Occupant
Weight @ 91 kg
(200 lbs) × 5 = 453 kg
(1,000 lbs).
3.Available Cargo Weight
= 0 kg (0 lbs).
Refer to the vehicle's tire and
loading information label for
specific information about the
vehicle's capacity weight and
seating positions. The combined weight of the driver, passengers,
and cargo should never exceed
the vehicle's capacity weight.
Certification/Tire Label
Label Example
A vehicle-specific Certification/
Tire label is attached to the
center pillar (B-pillar).
The label may show the size of
the vehicle's original tires and
the inflation pressures needed to
obtain the gross weight capacity
of the vehicle. The label shows
the gross weight capacity of the
vehicle. This is called the GrossVehicle Weight Rating (GVWR).
The GVWR includes the weight
of the vehicle, all occupants,
fuel, and cargo.
The Certification/Tire label may
also show the maximum weights
for the front and rear axles,
called the Gross Axle Weight
Rating (GAWR). To find out the
actual loads on the front and
rear axles, weigh the vehicle at
a weigh station. Your dealer can
help with this. Be sure to spread
the load equally on both sides of
the centerline.
CautionOverloading the vehicle may
cause damage. Repairs would not
be covered by the vehicle
warranty. Do not overload the
vehicle.
Page 299 of 339

Cadillac XT5 Owner Manual (GMNA-Localizing-MidEast-10260744) - 2017 -
crc - 1/14/16
Vehicle Care 299
Warning (Continued)
collision, loose equipment could
strike someone. Store all these in
the proper place.
To store the flat or spare tire and
tools: 1. Open the liftgate. See Liftgate 036.
2. Put back all tools as they were stored in the rear storage
compartment and put the
compartment cover back on.
3. Install the cargo cover.
4. Place the tire, lying flat, in the rear storage compartment.
5. Place the loop end of the strapthrough the cargo tie-down.
Place the hook end of the strap
through the loop and pull it until
the strap is fastened securely
to the tie-down.6. Route the strap hook throughthe wheel, as shown.
7. Attach the strap to the other cargo tie-down in the rear of
the vehicle.
8. Tighten the strap and secure it using the buckle.
The compact spare is for temporary
use only. Replace the compact
spare tire with a full-size tire as
soon as you can.
Page 313 of 339

Cadillac XT5 Owner Manual (GMNA-Localizing-MidEast-10260744) - 2017 -
crc - 1/14/16
Vehicle Care 313
Caution
Use of air fresheners may cause
permanent damage to plastics
and painted surfaces. If an air
freshener comes in contact with
any plastic or painted surface in
the vehicle, blot immediately and
clean with a soft cloth dampened
with a mild soap solution.
Damage caused by air fresheners
would not be covered by the
vehicle warranty.
Cargo Cover and
Convenience Net
Wash with warm water and mild
detergent. Do not use chlorine
bleach. Rinse with cold water, and
then dry completely.
Care of Safety Belts
Keep belts clean and dry.
{Warning
Do not bleach or dye safety belt
webbing. It may severely weaken
the webbing. In a crash, they
might not be able to provide
adequate protection. Clean and
rinse safety belt webbing only
with mild soap and lukewarm
water. Allow the webbing to dry.
Floor Mats
{Warning
If a floor mat is the wrong size or
is not properly installed, it can
interfere with the pedals.
Interference with the pedals can
cause unintended acceleration
and/or increased stopping
distance which can cause a crash
and injury. Make sure the floor
mat does not interfere with the
pedals.
Use the following guidelines for
proper floor mat usage. .
The original equipment floor
mats were designed for your
vehicle. If the floor mats need
replacing, it is recommended
that certified floor mats be
purchased. Non-certified floor
mats may not fit properly and
may interfere with the pedals.
Always check that the floor mats
do not interfere with the pedals.
. Do not use a floor mat if the
vehicle is not equipped with a
floor mat retainer on the driver
side floor.
. Use the floor mat with the
correct side up. Do not turn
it over.
. Do not place anything on top of
the driver side floor mat.
. Use only a single floor mat on
the driver side.
. Do not place one floor mat on
top of another.