Page 1 of 20
1
Review this Quick Reference Guide for an overview of some important features in your Buick Envision. More detailed information can be found in your Owner Manual. Some optional equipment described in this guide may not be included in your vehicle. For easy reference, keep this guide with your Owner Manual in your glove box.
www.buick.com
2017 Envision
Getting to Know Your
Page 2 of 20
2
Power Liftgate Control
Power Mirror/ Window Controls
Instrument Panel
Driver Information Center Controls/ Audio Steering Wheel Controls
Engine Start/Stop Button
Cruise Control/Forward Collision AlertF/Heated Steering WheelF/Voice Recognition Buttons
Tilt/Telescoping Steering Wheel Lever
Head-Up Display ControlsF
Symbols
Check Engine
Engine Oil Pressure
Lane Keep Assist
Airbag Readiness
Cruise Control Set
Service Electric Parking Brake
Traction Control/StabiliTrak Active
Charging System
Security
Engine Coolant Temperature
Brake System Warning
BRAKE Electric Parking Brake
Power Door Lock Buttons
Turn Signal Lever/ IntelliBeam ButtonF
Driver Information Center
Hazard Warning Flashers ButtonWindshield Wipers Lever
Memory Seat ButtonsF
Exterior/ Interior Lamp Controls
Page 3 of 20
3
Refer to your Owner Manual to learn about the information being relayed by the lights, gauges and indicators on the instrument cluster.
See In Brief in your Owner Manual.
Infotainment System Touch Screen
Infotainment System Controls
Parking Assist Button
Lane Keep Assist ButtonF
Electric Parking Brake SwitchDriver’s Heated/VentedF Seat Buttons
Traction Control and StabiliTrak ButtonPassenger’s Heated/VentedF Seat Buttons
Automatic Parking Assist ButtonF
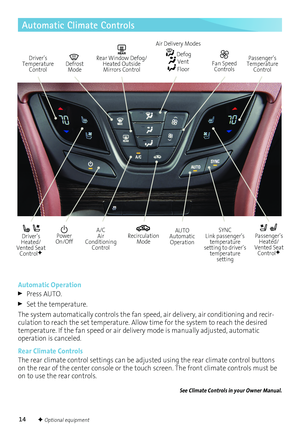
Climate Controls
F Optional equipment
Adaptive Forward Lighting
Lights On Reminder
Antilock Brake System Warning
Low Tire Pressure
Door Ajar
Vehicle Ahead
StabiliTrak Off
Driver Safety Belt Reminder
2 Passenger Safety Belt Reminder
Uplevel DIC displayF shown
Page 4 of 20
 Transmitter
Keyless Access System
Unlock
Press to unlock the driver’s door. Press again to unlock all doors.
Power Liftgate
Press twice to open or close the liftgate")
4
Remote Keyless Entry (RKE) Transmitter
Keyless Access System
Unlock
Press to unlock the driver’s door. Press again to unlock all doors.
Power Liftgate
Press twice to open or close the liftgate. Press once to stop power liftgate operation.
Lock
Press to lock all doors.
Vehicle Locator/Panic Alarm
Press and release to locate your vehicle. The exterior lamps will flash and the horn will sound.
Press and hold to activate the alarm. Press it again to cancel the alarm.
Note: To change the remote lock, unlock, and remote start settings, go to Remote Lock, Unlock, Start in the Vehicle Settings menu.
Remote Vehicle Start
Press and release the Lock button and then immediately press and hold the button until the turn signal lamps flash to start the engine from outside the vehicle. After entering the vehicle, turn on the ignition.
• During a remote start, the engine will run for 10 minutes. Repeat these steps to run the engine for an additional 10 minutes. A remote start can be extend-ed once.
• Press and hold the button until the parking lamps turn off to cancel a remote start.
Remote Start and Heated Seats: Select the remote start heated seat option in the Vehicle Settings to have the heated seats turn on during a remote start. The heated seat button indicators do not illuminate and the temperature of the unoccupied seat may be reduced during a remote start.
See Keys, Doors and Windows in your Owner Manual.
The Keyless Access System enables operation of the doors, igni-tion and liftgate without removing the Remote Keyless Entry transmitter from your pocket or purse. The transmitter must be within 3 feet of the door being unlocked or the liftgate.
Keyless Unlocking
With the transmitter within range:
Press the lock button on the driver’s door handle to unlock the driver’s door; press it again within 5 seconds to unlock all doors.
Press the lock button on a passenger door handle to unlock all doors.
Press the touchpad on the liftgate handle to open the liftgate.
Keyless Locking
With the ignition off, the transmitter removed from the vehicle, and all doors closed:
Press the lock button on any door handle to lock all doors immediately.
If Passive Locking is turned on, all doors will lock automatically after a short delay.
Note: To change the keyless locking and unlocking settings, go to Remote Lock, Unlock, Start in the Vehicle Settings menu.
See Keys, Doors and Windows in your Owner Manual.
Page 5 of 20

5
Pushbutton Start
Auto Engine Stop/StartF
Start
With the vehicle in Park or Neutral, press the brake pedal and then press the ENGINE START/STOP button to start the engine. The green indicator on the button will illuminate.
Note: The Remote Keyless Entry transmitter must be in the vehicle to turn on the ignition. If the transmitter battery is weak, place the transmitter in the front cupholder to enable the engine to start. Replace the transmitter battery as soon as possible.
Stop/Off
Shift to Park and press the ENGINE START/STOP button to turn off the engine.
Power will be available for 10 minutes to operate the audio system until the driver’s door is opened and to operate the windows and moonroofF until any door is opened.
Accessory Mode
With the engine off and the brake pedal NOT depressed, press the ENGINE START/STOP button to place the ignition system in the accessory mode. The amber indicator on the button will illuminate.
See Driving and Operating in your Owner Manual.
A fuel-saving stop/start system has been integrated with the engine. While driving, when the brake pedal is applied and the vehicle is at a complete stop, the automatic engine stop/start system may turn off the engine, depending on operating conditions. When the engine is off, the tachometer gauge will read AUTO STOP. Upon releasing the brake pedal or applying the accelerator pedal, the engine will restart. After parking the vehicle and turning off the engine, the tachometer gauge will read OFF.
The engine may remain running or restart if:
• A minimum vehicle speed is not reached.
• The engine or transmission is not at the required operating temperature.
• The outside temperature is not in the required operating range.
• The shift lever is in any gear other than Drive (D).
• The battery charge is low.
• The current settings for the climate control or defog system have not been reached.
• The Auto Stop time is greater than 2 minutes.
See Driving and Operating in your Owner Manual.
F Optional equipment
Page 6 of 20

6
Front Seats
Memory SeatsF
Set Memory Seat Positions
With the ignition On or in Accessory mode:
1. Adjust the seat and power outside mirrors to the desired positions.
2. Press and release the SET button on the driver’s door. A beep will sound.
3. Immediately press and hold button 1 until two beeps sound.
Repeat these steps using button 2 for a second driver.
To store a seat position for more clearance when exiting the vehicle, repeat these steps using the Exit button instead of button 1 or 2.
Recall Memory Seat Positions
Press and hold button 1, 2 or Exit until the seat and mirrors reach the set position.
The memory/exit positions can be programmed to be recalled automatically.
To set the Auto Memory Recall or Easy Exit options, go to the Settings > Vehicle > Comfort and Convenience menu.
See Seats and Restraints in your Owner Manual.
Power Seat Adjustments
A. Seat Adjustment
Move the horizontal control to move the seat forward or rearward and to tilt, raise or lower the seat.
B. Seatback Recline Adjustment
Move the vertical control to recline or raise the seatback.
C. Lumbar Support Adjustment
Press the rear control to adjust the amount of lumbar support.
Steering Wheel Adjustment
With the vehicle parked, push down the lever under the steering column to adjust the steering wheel. The steering wheel can then be moved up or down and in or out. Pull up the lever to lock the steering wheel in place.
See Instruments and Controls in your Owner Manual.
Ac
B
F Optional equipment
Page 7 of 20
 under the seat cushion and slide the seat.
Reclining the Seatback
To recline the seat cushion, pull the lever (B) on th")
7
Rear Seat Adjustment
To slide the seat forward or rearward, lift the bar (A) under the seat cushion and slide the seat.
Reclining the Seatback
To recline the seat cushion, pull the lever (B) on the side of the seatback and move the seatback to the desired position. Release the lever.
Folding the Seatback
1. Press the button on the side of the head restraint. It will fold automatically.
2. Pull the lever (B) on the side of the seat cushion and fold the seatback forward or pull the release lever located on the side of the cargo area.
To raise the seatback, pull the lever on the side of the seat cushion and push the seatback rearward until it locks in the upright position. Adjust the seatback.
See Seats and Restraints in your Owner Manual.
Rear Seats
Power Liftgate
Open/Close the Power Liftgate
Press the Power Liftgate button on the Remote Keyless Entry transmitter twice.
Press the Power Liftgate knob on the driver’s door.
Press the touchpad on the liftgate handle to open the liftgate.
Press the button next to the liftgate pull to close the liftgate.
Hands-Free Operation
To open or close the liftgate hands-free, kick your foot under the rear bumper in the area directly below the left edge of the license plate. To function, the Remote Keyless Entry trans-mitter must be within 3 feet of the liftgate.
Programming the Liftgate Height
1. Turn the Power Liftgate knob to the 3/4 position.
2. Open the liftgate.
3. Adjust the liftgate manually to the desired height.
4. To save the setting, press and hold the button next to the liftgate pull for 3 seconds. The turn signals will flash when the setting is saved.
See Keys, Doors and Windows in your Owner Manual.
A
B
Page 8 of 20
 on the instrument cluster displays a variety of vehicle system information and warning messages.
DIC Controls
Use the controls on the ri")
8
Driver Information Center
The Driver Information Center (DIC) on the instrument cluster displays a variety of vehicle system information and warning messages.
DIC Controls
Use the controls on the right side of the steering wheel to view and move through the DIC menus.
Press the or button to move between the display zones. Press the left to go back to the previous menu.
Press the or button to scroll through the menus.
Press the button to open a menu or select a setting. Press and hold to reset a value.
Menus
• Info – display trip odometers and fuel information
• Audio – browse music and change the audio source
• Phone – view the active call and scroll through contacts
• NavigationF – view the active route and change prompts
• Settings – change display information
Info Pages Menu
1. Use the controls to display Settings and then press .
2. Scroll to Info Pages. Press the to enter the menu.
3. Scroll through the list of items.
4. Press the button to select or
deselect an item to display.
See Instruments and Controls in your Owner Manual.
F Optional equipment
Uplevel DIC displayF shown
Uplevel DIC displayF shown