Page 49 of 366

Buick Enclave Owner Manual (GMNA-Localizing-U.S./Canada/Mexico-
9955666) - 2017 - crc - 8/4/16
48 Seats and Restraints
position is reached. Try to move the
head restraint after the button is
released to make sure that it is
locked in place.
The front seat outboard head
restraints are not removable.
Rear Seats
The vehicle's second row seats
have head restraints in the outboard
seating positions that cannot be
adjusted.
The vehicle's third row seats have
headrests in the outboard seating
positions that cannot be adjusted.
The second row head restraints and
third row headrests are not
removable.
Front Seats
Power Seat Adjustment
{Warning
You can lose control of the
vehicle if you try to adjust a driver
seat while the vehicle is moving.
Adjust the driver seat only when
the vehicle is not moving.
1. Seat Adjustment Control
2. Reclining Seatback Control
3. Lumbar Adjustment Control
To adjust the seat:
.Move the seat forward or
rearward by sliding the
control (1) forward or rearward.
. Raise or lower the front part of
the seat cushion by moving the
front of the control (1) up
or down.
. Raise or lower the entire seat by
moving the rear of the control (1)
up or down.
. Adjust the seatback by tilting the
top of the control (2) forward or
rearward.
See Reclining Seatbacks 049.
. Increase or decrease lumbar
support by pressing the front or
rear of the control (3).
See Lumbar Adjustment 049.
Page 91 of 366

Buick Enclave Owner Manual (GMNA-Localizing-U.S./Canada/Mexico-
9955666) - 2017 - crc - 8/4/16
90 Seats and Restraints
the rearward position, whenever
possible, to minimize contact with
the front center airbag.
If you need to secure more than one
child restraint in the rear seat, see
Where to Put the Restraint084.
This system is designed to make
installation of child restraints easier.
When using lower anchors, do not
use the vehicle's safety belts.
Instead, use the vehicle's anchors
and child restraint attachments to
secure the restraints. Some
restraints also use another vehicle
anchor to secure a top tether. 1. Attach and tighten the lower attachments to the lower
anchors. If the child restraint
does not have lower
attachments or the desired
seating position does not have
lower anchors, secure the child
restraint with the top tether and
the safety belts. Refer to your
child restraint manufacturer
instructions and the
instructions in this manual. 1.1. Find the lower anchors
for the desired seating
position.
1.2. To access the lower anchors in the second
row, it may help to recline
the seatback.
Third row seatbacks must
be upright before placing
the child restraint on
the seat.
1.3. Put the child restraint on the seat.
1.4. Attach and tighten the lower attachments on the
child restraint to the lower
anchors.
If necessary, adjust the
angle of the second row
seatback to achieve a
tight installation. Make
sure the second row
bench seatbacks are
aligned at the same
angle.
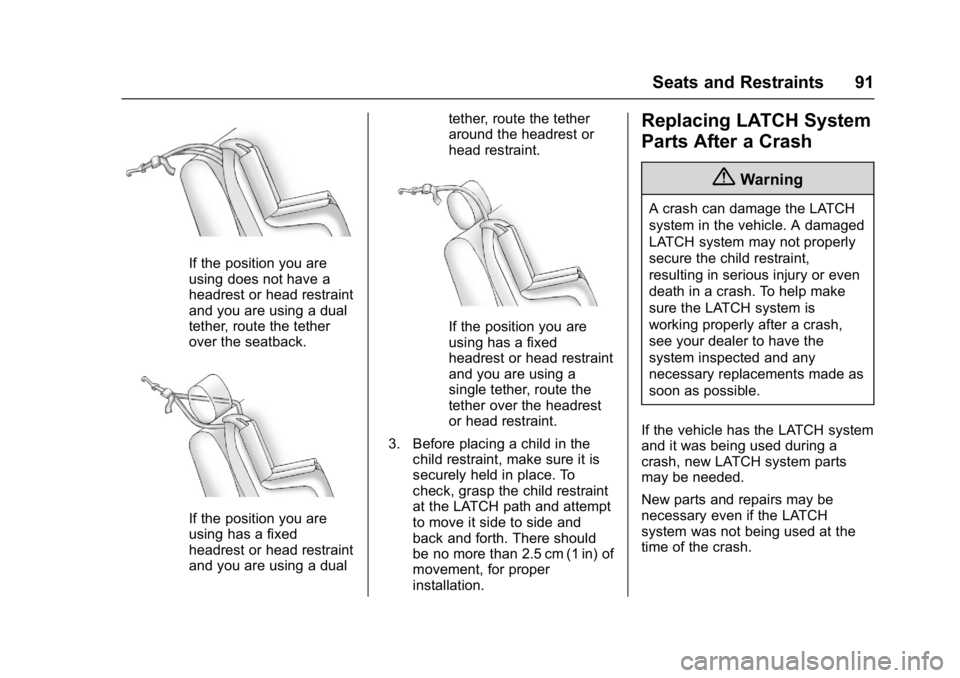
2. If the child restraint manufacturer recommends that
the top tether be attached, attach and tighten the top
tether to the top tether anchor,
if the vehicle has one. Refer to
the child restraint instructions
and the following steps:
2.1. Find the top tether
anchor.
2.2. Route, attach, and tighten the top tether according
to your child restraint
instructions and the
following instructions:
If the position you are
using does not have a
headrest or head restraint
and you are using a
single tether, route the
tether over the seatback.
Page 92 of 366

Buick Enclave Owner Manual (GMNA-Localizing-U.S./Canada/Mexico-
9955666) - 2017 - crc - 8/4/16
Seats and Restraints 91
If the position you are
using does not have a
headrest or head restraint
and you are using a dual
tether, route the tether
over the seatback.
If the position you are
using has a fixed
headrest or head restraint
and you are using a dualtether, route the tether
around the headrest or
head restraint.
If the position you are
using has a fixed
headrest or head restraint
and you are using a
single tether, route the
tether over the headrest
or head restraint.
3. Before placing a child in the child restraint, make sure it is
securely held in place. To
check, grasp the child restraint
at the LATCH path and attempt
to move it side to side and
back and forth. There should
be no more than 2.5 cm (1 in) of
movement, for proper
installation.
Replacing LATCH System
Parts After a Crash
{Warning
A crash can damage the LATCH
system in the vehicle. A damaged
LATCH system may not properly
secure the child restraint,
resulting in serious injury or even
death in a crash. To help make
sure the LATCH system is
working properly after a crash,
see your dealer to have the
system inspected and any
necessary replacements made as
soon as possible.
If the vehicle has the LATCH system
and it was being used during a
crash, new LATCH system parts
may be needed.
New parts and repairs may be
necessary even if the LATCH
system was not being used at the
time of the crash.