2017 BUICK CASCADA instrument panel
[x] Cancel search: instrument panelPage 2 of 20

2
Cruise Control/Forward Collision AlertF Buttons
Exterior/Interior Lamp Controls
Instrument Panel
Voice Recognition/Audio Steering Wheel Controls
Tilt/Telescoping Steering Wheel Lever
Symbols
Check Engine
Engine Oil Pressure
Lane Departure Warning
Airbag Readiness
Cruise Control Set
Service Electric Parking Brake
Traction Control/StabiliTrak Active
Charging System
Security
Safety Belt Reminder
Brake System Warning
Electric Parking Brake
Adaptive Forward Lighting
Power Mirror Controls
Driver Information CenterWindshield Wipers Lever
Turn Signal Lever/Driver Information Center Controls
Page 4 of 20

4
Remote Keyless Entry Transmitter
Door Locks/Trunk Release
F Optional equipment
Remote Vehicle Start
Press and release the Lock button and then press and hold the button until the turn signal lamps flash to start the engine from outside the vehicle.
After entering the vehicle, turn on the ignition. During a remote start, the engine will run for 10 minutes
Repeat these steps for an addition-al 10 minutes. A remote start can be extended once.
Press and hold the button until the parking lamps turn off to
cancel a remote start.
Note: To change the remote lock, unlock, and remote start settings, go to Remote Lock, Unlock, Start in the Vehicle Settings menu.
See Keys, Doors and Windows in your Owner Manual.
Door Locks
To lock or unlock the doors, trunk and fuel door, press the power door Lock/ Unlock button located on the center of the instrument panel.
Note: To change the door lock and unlock settings, go to Power Door Locks in the Vehicle Settings menu.
To open a locked door from inside, pull the inside door handle to unlock the door; pull the door handle again to open the door.
Trunk Release
To open the trunk, press the lower half of the Buick emblem (A) on the trunk.
See Keys, Doors and Windows in your Owner Manual.
Unlock
Press to unlock the driver’s door and fuel door. Press again to unlock all doors.
Press and hold to lower all windows.
Press and hold the buttonF to lower the convertible top.
Lock
Press to lock all doors.
Trunk
Press and hold to unlatch the trunk.
Vehicle Locator/Panic Alarm
Press and release to locate your vehicle. The exterior lamps will flash and the horn will sound.
Press and hold to activate the alarm.
A
Page 14 of 20

14
Lighting
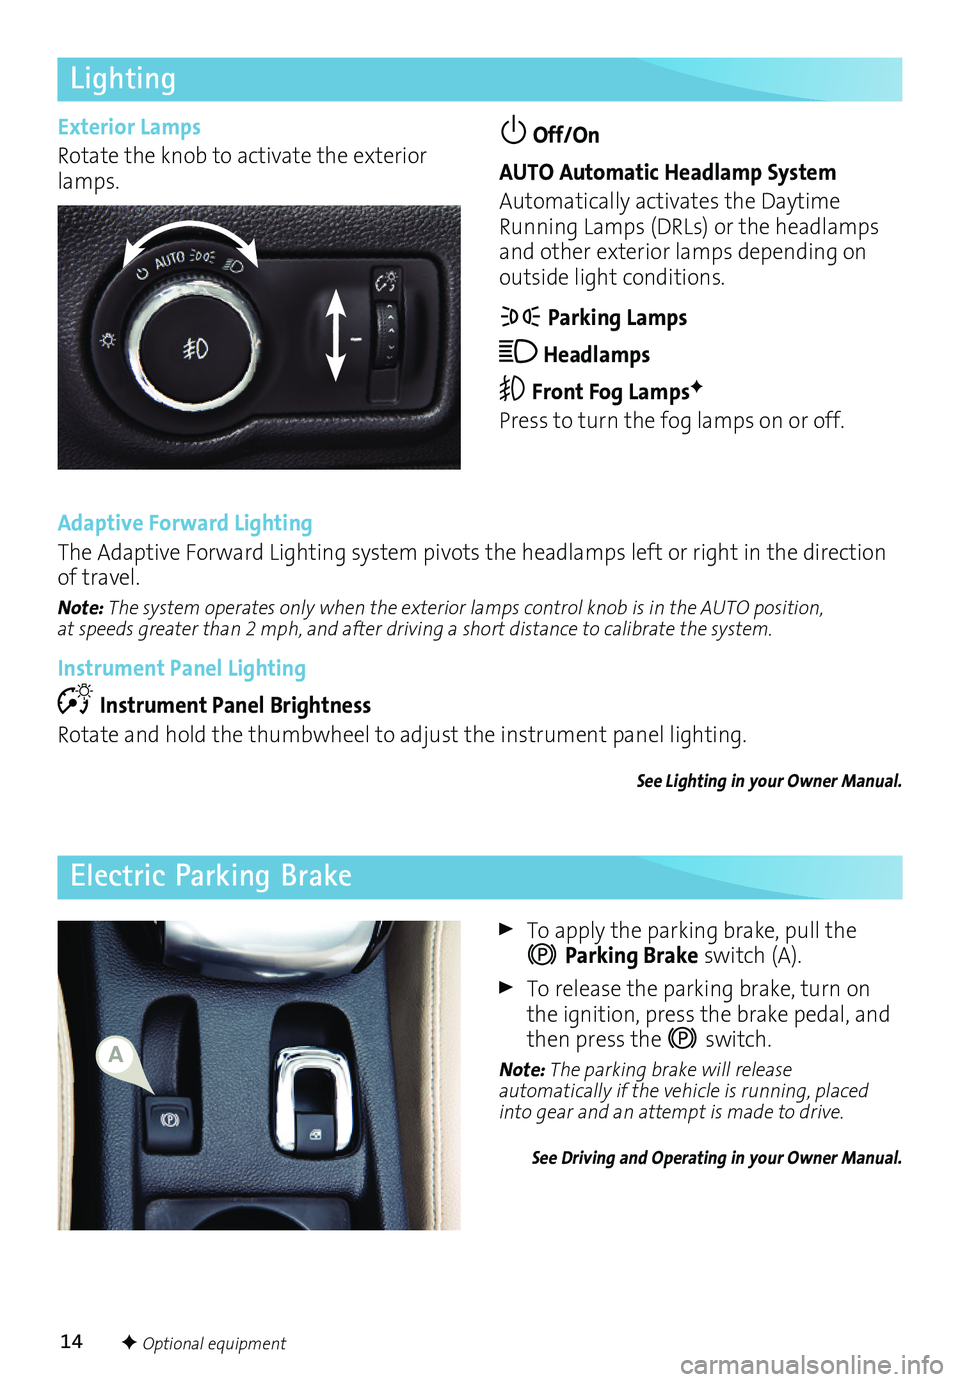
Off/On
AUTO Automatic Headlamp System
Automatically activates the Daytime Running Lamps (DRLs) or the headlamps and other exterior lamps depending on outside light conditions.
Parking Lamps
Headlamps
Front Fog LampsF
Press to turn the fog lamps on or off.
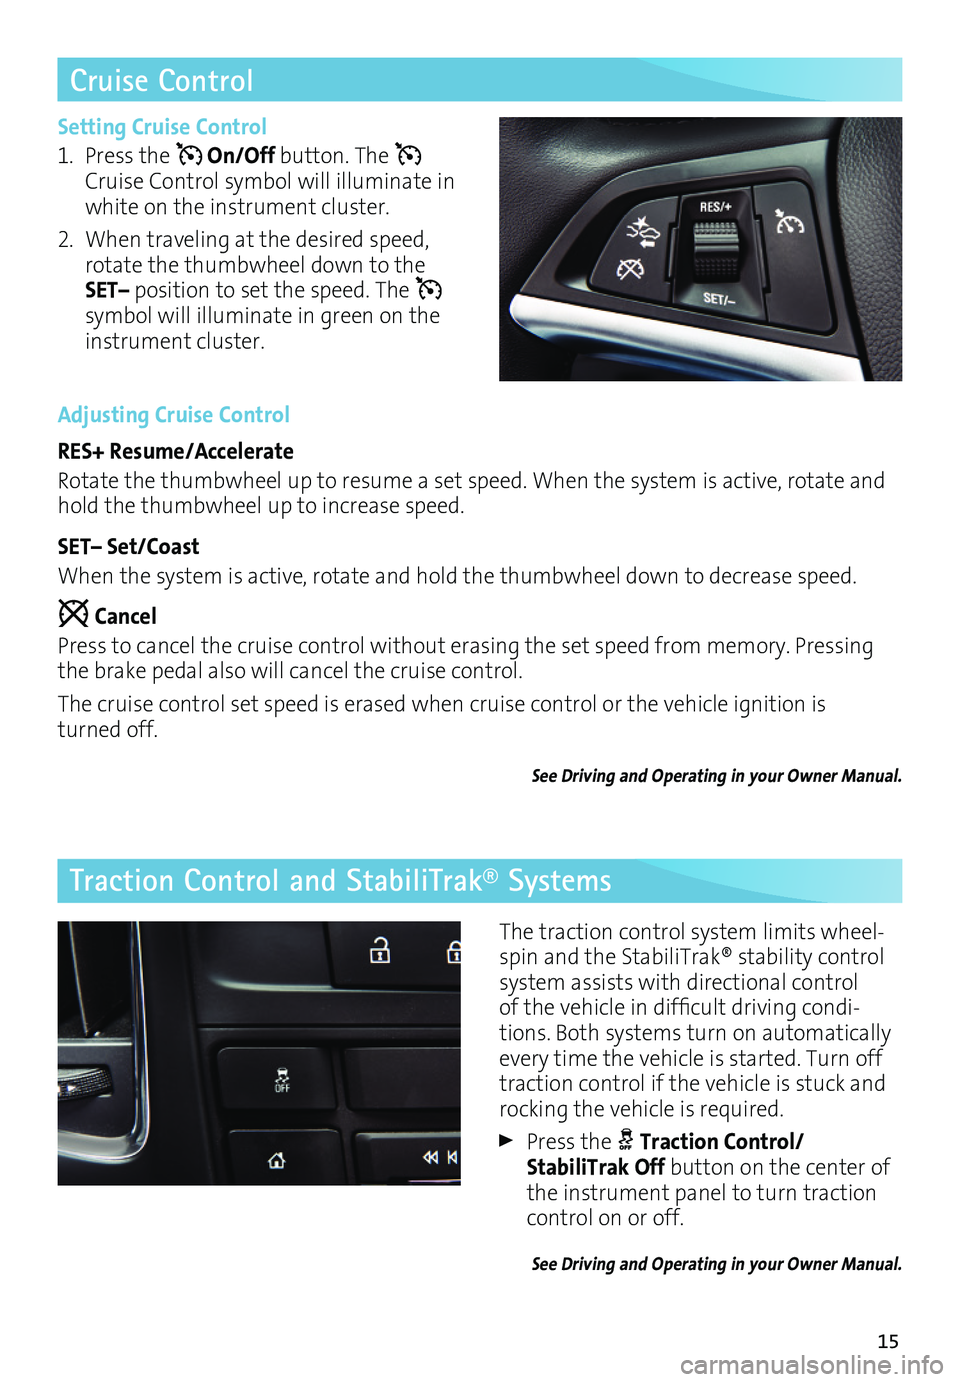
To apply the parking brake, pull the
Parking Brake switch (A).
To release the parking brake, turn on the ignition, press the brake pedal, and then press the switch.
Note: The parking brake will release automatically if the vehicle is running, placed into gear and an attempt is made to drive.
See Driving and Operating in your Owner Manual.
Electric Parking Brake
F Optional equipment
Exterior Lamps
Rotate the knob to activate the exterior lamps.
Adaptive Forward Lighting
The Adaptive Forward Lighting system pivots the headlamps left or right in the direction of travel.
Note: The system operates only when the exterior lamps control knob is in the AUTO position, at speeds greater than 2 mph, and after driving a short distance to calibrate the system.
Instrument Panel Lighting
Instrument Panel Brightness
Rotate and hold the thumbwheel to adjust the instrument panel lighting.
See Lighting in your Owner Manual.
A
Page 15 of 20

15
Cruise Control
Traction Control and StabiliTrak® Systems
Setting Cruise Control
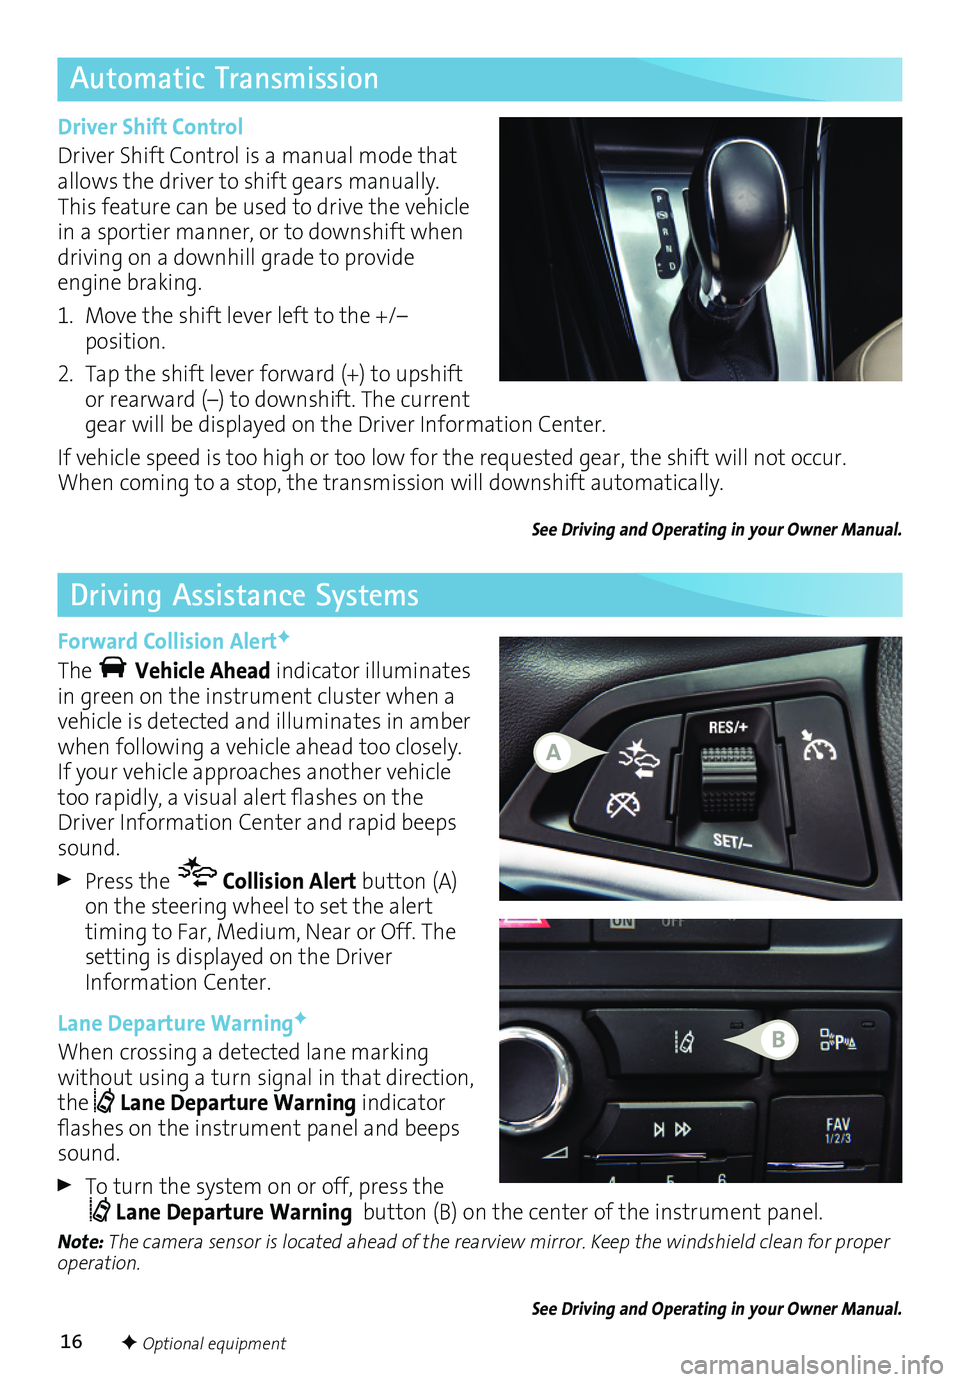
1. Press the On/Off button. The Cruise Control symbol will illuminate in white on the instrument cluster.
2. When traveling at the desired speed, rotate the thumbwheel down to the SET– position to set the speed. The symbol will illuminate in green on the instrument cluster.
Adjusting Cruise Control
RES+ Resume/Accelerate
Rotate the thumbwheel up to resume a set speed. When the system is active, rotate and hold the thumbwheel up to increase speed.
SET– Set/Coast
When the system is active, rotate and hold the thumbwheel down to decrease speed.
Cancel
Press to cancel the cruise control without erasing the set speed from memory. Pressing the brake pedal also will cancel the cruise control.
The cruise control set speed is erased when cruise control or the vehicle ignition is turned off.
See Driving and Operating in your Owner Manual.
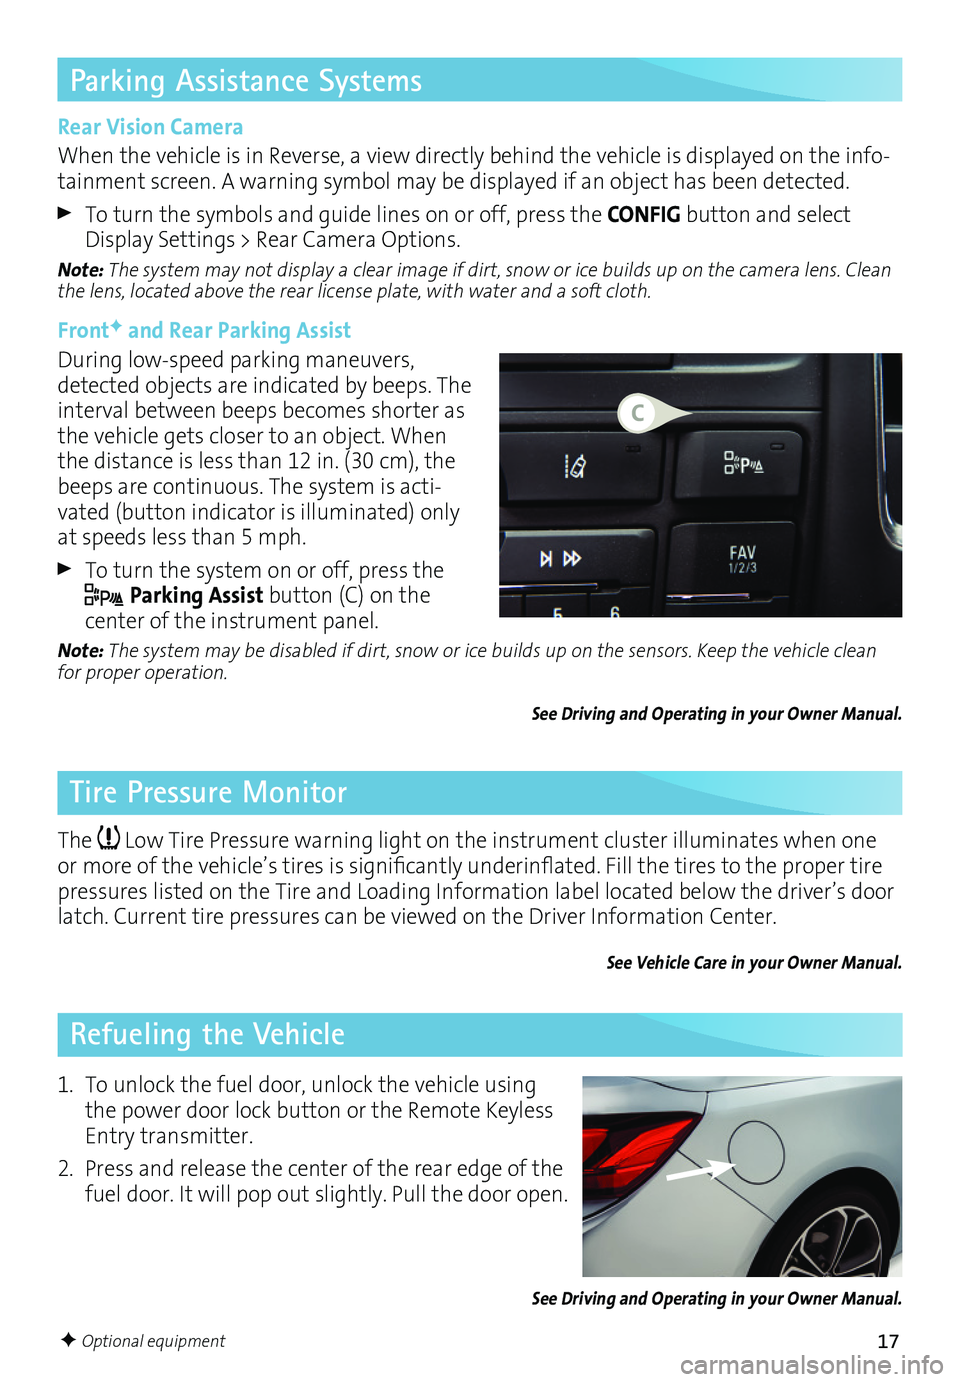
The traction control system limits wheel-spin and the StabiliTrak® stability control system assists with directional control of the vehicle in difficult driving condi-tions. Both systems turn on automatically every time the vehicle is started. Turn off traction control if the vehicle is stuck and
rocking the vehicle is required.
Press the Traction Control/StabiliTrak Off button on the center of the instrument panel to turn traction control on or off.
See Driving and Operating in your Owner Manual.
Page 16 of 20

16
Automatic Transmission
Driving Assistance Systems
Driver Shift Control
Driver Shift Control is a manual mode that allows the driver to shift gears manually. This feature can be used to drive the vehicle in a sportier manner, or to downshift when driving on a downhill grade to provide engine braking.
1. Move the shift lever left to the +/– position.
2. Tap the shift lever forward (+) to upshift or rearward (–) to downshift. The current gear will be displayed on the Driver Information Center.
If vehicle speed is too high or too low for the requested gear, the shift will not occur. When coming to a stop, the transmission will downshift automatically.
See Driving and Operating in your Owner Manual.
Forward Collision AlertF
The Vehicle Ahead indicator illuminates in green on the instrument cluster when a vehicle is detected and illuminates in amber when following a vehicle ahead too closely. If your vehicle approaches another vehicle too rapidly, a visual alert flashes on the Driver Information Center and rapid beeps sound.
Press the Collision Alert button (A) on the steering wheel to set the alert timing to Far, Medium, Near or Off. The setting is displayed on the Driver Information Center.
Lane Departure WarningF
When crossing a detected lane marking without using a turn signal in that direction, the Lane Departure Warning indicator flashes on the instrument panel and beeps sound.
To turn the system on or off, press the Lane Departure Warning button (B) on the center of the instrument panel.
Note: The camera sensor is located ahead of the rearview mirror. Keep the windshield clean for proper operation.
See Driving and Operating in your Owner Manual.
F Optional equipment
A
B
Page 17 of 20

17
Parking Assistance Systems
Tire Pressure Monitor
Refueling the Vehicle
Rear Vision Camera
When the vehicle is in Reverse, a view directly behind the vehicle is displayed on the info-tainment screen. A warning symbol may be displayed if an object has been detected.
To turn the symbols and guide lines on or off, press the CONFIG button and select Display Settings > Rear Camera Options.
Note: The system may not display a clear image if dirt, snow or ice builds up on the camera lens. Clean the lens, located above the rear license plate, with water and a soft cloth.
FrontF and Rear Parking Assist
During low-speed parking maneuvers, detected objects are indicated by beeps. The interval between beeps becomes shorter as the vehicle gets closer to an object. When the distance is less than 12 in. (30 cm), the beeps are continuous. The system is acti-vated (button indicator is illuminated) only at speeds less than 5 mph.
To turn the system on or off, press the
Parking Assist button (C) on the
center of the instrument panel.
Note: The system may be disabled if dirt, snow or ice builds up on the sensors. Keep the vehicle clean for proper operation.
See Driving and Operating in your Owner Manual.
The Low Tire Pressure warning light on the instrument cluster illuminates when one or more of the vehicle’s tires is significantly underinflated. Fill the tires to the proper tire pressures listed on the Tire and Loading Information label located below the driver’s door latch. Current tire pressures can be viewed on the Driver Information Center.
See Vehicle Care in your Owner Manual.
1. To unlock the fuel door, unlock the vehicle using the power door lock button or the Remote Keyless Entry transmitter.
2. Press and release the center of the rear edge of the fuel door. It will pop out slightly. Pull the door open.
See Driving and Operating in your Owner Manual.
F Optional equipment
C