2017 BMW X3 belt
[x] Cancel search: beltPage 105 of 265

SafetyVehicle features and options
This chapter describes all standard, country-
specific and optional features offered with the
series. It also describes features that are not
necessarily available in your car, e. g., due tothe selected options or country versions. This
also applies to safety-related functions and
systems. The respectively applicable country
provisions must be observed when using the
respective features and systems.
Airbags
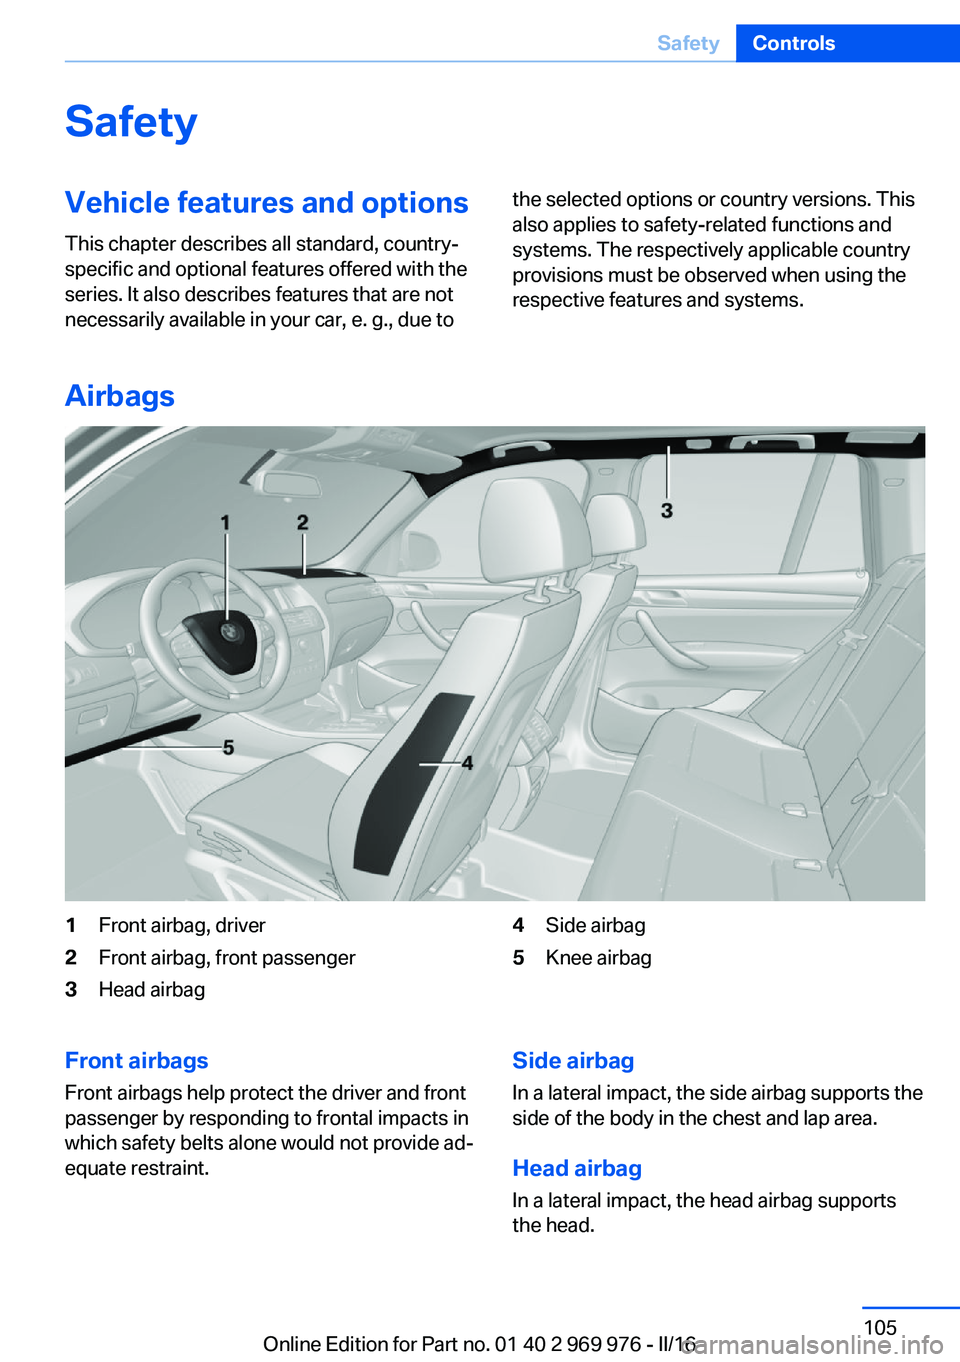
1Front airbag, driver2Front airbag, front passenger3Head airbag4Side airbag5Knee airbagFront airbags
Front airbags help protect the driver and front
passenger by responding to frontal impacts in
which safety belts alone would not provide ad‐
equate restraint.Side airbag
In a lateral impact, the side airbag supports the
side of the body in the chest and lap area.
Head airbag In a lateral impact, the head airbag supports
the head.Seite 105SafetyControls105
Online Edition for Part no. 01 40 2 969 976 - II/16
Page 107 of 265

Correct functionWhen the ignition is switched on, the
warning lamp in the instrument cluster lights up briefly and thereby indicates
the operational readiness of the entire airbag
system and the belt tensioner.
Airbag system malfunctioning▷Warning lamp does not come on when the
ignition is turned on.▷The warning lamp lights up continuously.
Automatic deactivation of the front-
seat passenger airbags
The concept The system reads if the front passenger seat is
occupied by measuring the human body's re‐
sistance.
Front, knee and side airbag on the front pas‐
senger's side are either activated or deacti‐
vated.
Information Before transporting a child on the front pas‐
senger seat, refer to the safety notes and in‐
structions for children on the front passenger
seat, see Children.
WARNING
To ensure the front-seat passenger air‐
bag function, it must be detected, whether a
person occupies the front passenger seat. The
entire seat cushion area must be used for this
purpose. There is a risk of injury or danger to
life. Make sure that the front passenger keeps
his or her feet in the floor area.◀
Malfunction of the automatic
deactivation system
When transporting older children and adults,
the front-seat passenger airbags may be deac‐
tivated in certain sitting positions. In this case,
the indicator lamp for the front-seat passenger
airbags lights up.
In this case, change the sitting position so that
the front-seat passenger airbags are activated
and the indicator lamp goes out.
If it is not possible to activate the airbags, have
the person sit in the rear.
To enable correct recognition of the occupied
seat cushion.▷Do not attach covers, cushions, ball mats
or other items to the front passenger seat
unless they are specifically determined to
be safe for use on the front passenger
seat.▷Do not place any electronic devices on the
passenger seat if a child restraint system is
to be installed on it.▷Do not place objects under the seat that
could press against the seat from below.▷No moisture in or on the seat.
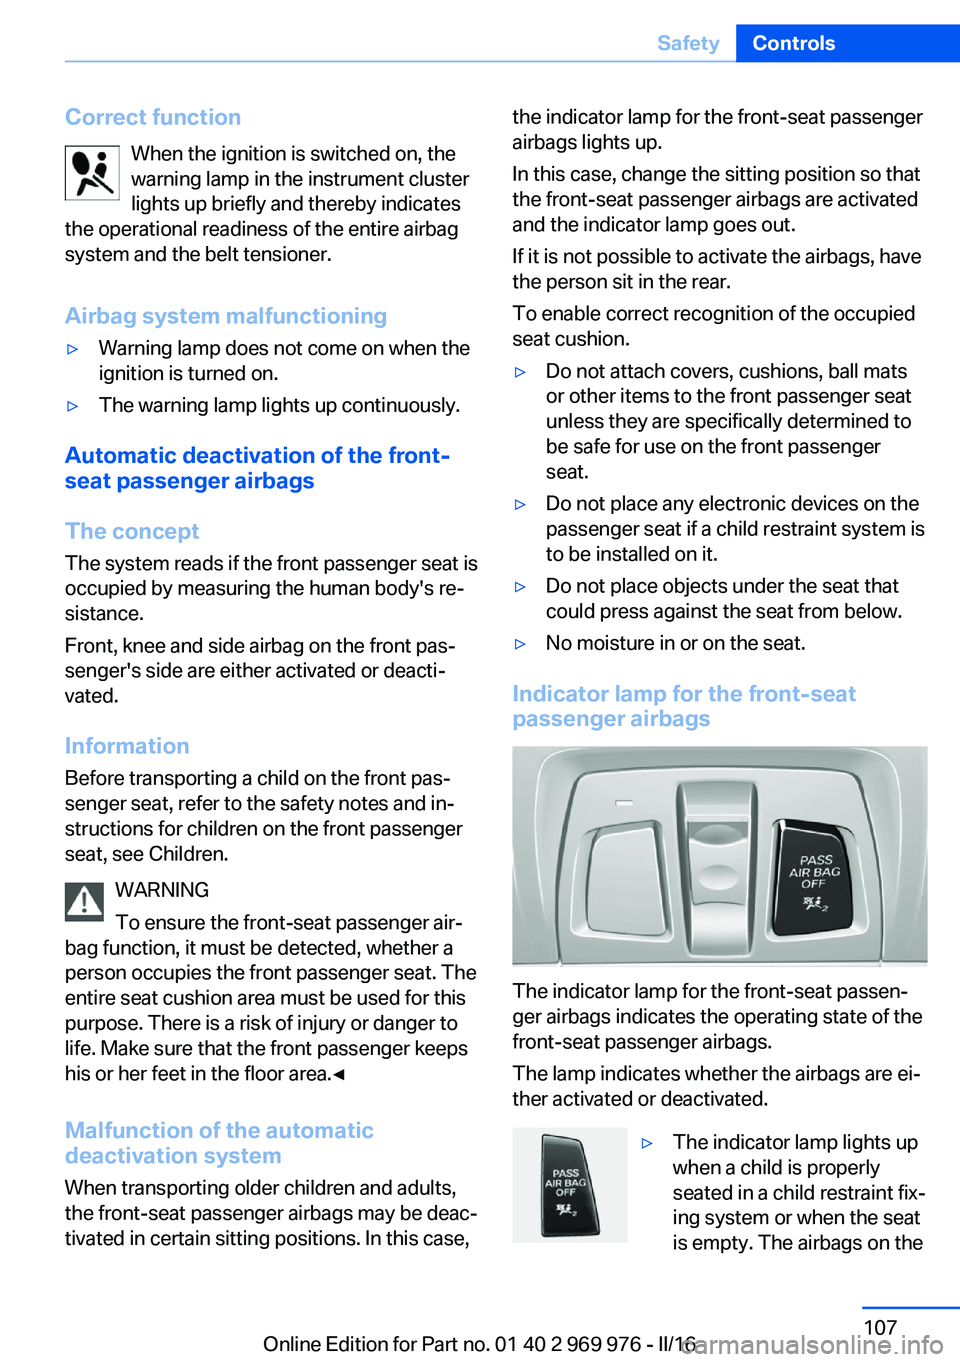
Indicator lamp for the front-seat
passenger airbags
The indicator lamp for the front-seat passen‐
ger airbags indicates the operating state of the
front-seat passenger airbags.
The lamp indicates whether the airbags are ei‐
ther activated or deactivated.
▷The indicator lamp lights up
when a child is properly
seated in a child restraint fix‐
ing system or when the seat
is empty. The airbags on theSeite 107SafetyControls107
Online Edition for Part no. 01 40 2 969 976 - II/16
Page 138 of 265

Switching offTo switch off the system while standing, step
on brake pedal at the same time.
Press button on the steering wheel.▷If active: press twice.▷If interrupted: press once.
The displays go out. The stored desired speed
is deleted.
Interrupting manually Press button on the steering wheel.
If interrupting the system while stationary,
press on the brake pedal at the same time.
Automatic interruption
The system is automatically interrupted in the
following situations:
▷When the driver applies the brakes.▷When selector lever position D is disen‐
gaged.▷When DTC is activated or DSC is deacti‐
vated.▷When DSC is actively controlling stability.▷When SPORT+ is activated with Driving
Dynamics Control.▷If the safety belt and the driver's door are
opened while the vehicle is standing still.▷If the system has not detected objects for
an extended period, for example, on a road
with very little traffic without curb or
shoulder markings.▷If the detection range of the radar is dis‐
rupted, for example, by dirt or heavy fog.▷After a longer stationary period when the
vehicle has been braked to a stop by the
system.Setting the speed
Maintaining/storing the speed
Press the rocker switch while the system is in‐
terrupted.
When the system is switched on, the current
speed is maintained and stored as the desired
speed.
The stored speed is displayed in the speedom‐
eter and briefly in the instrument cluster, refer
to page 139.
DSC will be switched on if needed.
The speed can also be stored bypressing a button.
Press button.
Changing the speed
Press the rocker switch up or down repeatedly
until the desired speed is set.
If active, the displayed speed is stored and the
vehicle reaches the stored speed when the
road is clear.
Seite 138ControlsDriving comfort138
Online Edition for Part no. 01 40 2 969 976 - II/16
Page 174 of 265

If equipped with through-loading system: the
rear seat backrest is divided in the ratio 40–20–
40. The sides and the middle section can be
folded down separately.
Information WARNING
Danger of jamming with folding down the
backrests. There is a risk of injuries or a risk of
property damage. Make sure that the area of
movement of the rear backrest and the of the
head restraint is clear prior to folding down.◀
WARNING
The stability of the child restraint system
is limited or compromised with incorrect seat
adjustment or improper installation of the child
seat. There is a risk of injury or danger to life.
Make sure that the child restraint system fits
securely against the backrest. If possible, ad‐
just the backrest tilt for all affected backrests
and correctly adjust the seats. Make sure that
seats and backrests are securely engaged. If
possible, adjust the height of the head re‐
straints or remove them.◀
WARNING
With an unlocked backrest, an unsecured
load can be thrown into the vehicle's interior,
e.g., in case of an accident, braking or evasive
maneuver. There is a a risk of injury. Make sure
that the backrest engages into the locking af‐
ter folding it back.◀
WARNING
With a rear backrest that is not locked,
the protective function of the middle safety
belt is not guaranteed. There is a risk of inju‐
ries or danger to life. If you are using the mid‐
dle safety belt, lock the wider rear backrest.◀
Folding down the sidesThe right side can be folded down separately.
The left side can be folded down in combina‐
tion with the middle section.
Reach into the recess and pull forward.
Folding down the middle section
Reach into the recess and pull forward.
Cargo area partition net
Information WARNING
If the cargo net snaps back, it can cause
injuries or damage. There is a risk of injuries or
a risk of property damage. Do not let the cargo
area partition net snap back into place.◀
With a normal cargo area
1.Fold open the rear covers on the roofliner.2.Pull the cargo area partition net out of the
case by the strap.3.Insert the bars into the brackets on both
sides in the roofliner toward the front, ar‐Seite 174ControlsInterior equipment174
Online Edition for Part no. 01 40 2 969 976 - II/16
Page 187 of 265

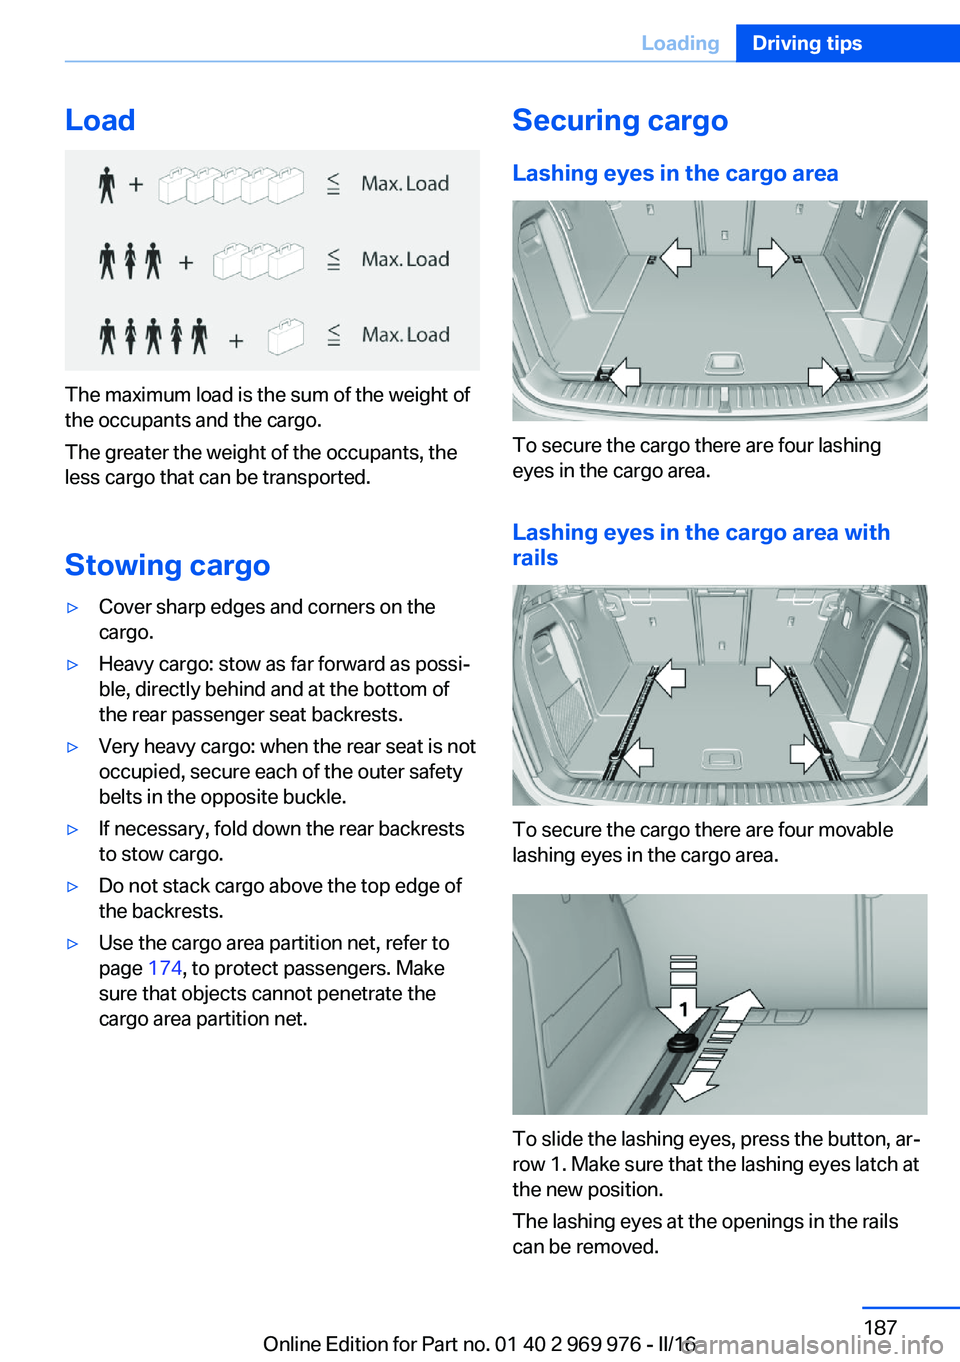
Load
The maximum load is the sum of the weight of
the occupants and the cargo.
The greater the weight of the occupants, the
less cargo that can be transported.
Stowing cargo
▷Cover sharp edges and corners on the
cargo.▷Heavy cargo: stow as far forward as possi‐
ble, directly behind and at the bottom of
the rear passenger seat backrests.▷Very heavy cargo: when the rear seat is not
occupied, secure each of the outer safety
belts in the opposite buckle.▷If necessary, fold down the rear backrests
to stow cargo.▷Do not stack cargo above the top edge of
the backrests.▷Use the cargo area partition net, refer to
page 174, to protect passengers. Make
sure that objects cannot penetrate the
cargo area partition net.Securing cargo
Lashing eyes in the cargo area
To secure the cargo there are four lashing
eyes in the cargo area.
Lashing eyes in the cargo area with
rails
To secure the cargo there are four movable
lashing eyes in the cargo area.
To slide the lashing eyes, press the button, ar‐
row 1. Make sure that the lashing eyes latch at
the new position.
The lashing eyes at the openings in the rails
can be removed.
Seite 187LoadingDriving tips187
Online Edition for Part no. 01 40 2 969 976 - II/16
Page 246 of 265

Safety belts
Dirty belt straps impede the reeling action and
thus have a negative impact on safety.
WARNING
Chemical cleansers can destroy the
safety belt webbing. Missing protective effect
of the safety belts. There is a risk of injury or
danger to life. Use only a mild soapy solution
for cleaning the safety belts.◀
Use only a mild soapy solution, with the safety
belts clipped into their buckles.
Do not allow the switchs to retract the safety
belts until they are dry.
Carpets and floor mats WARNING
Objects in the driver's floor area can limit
the pedal distance or block a depressed pedal.
There is risk of an accident. Stow objects in
the vehicle such that they are secured and
cannot enter into the driver's floor area. Use
floor mats that are suitable for the vehicle and
can be safely attached to the floor. Do not use
loose floor mats and do not layer several floor
mats. Make sure that there is sufficient clear‐
ance for the pedals. Ensure that the floor mats
are securely fastened again after they were re‐
moved, e.g., for cleaning.◀
Floor mats can be removed from the car's inte‐
rior for cleaning.
If the floor carpets are very dirty, clean with a
microfiber cloth and water or a textile cleaner.
To prevent matting of the carpet, rub back and
forth in the direction of travel only.
Sensor/camera lenses
To clean sensors and camera lenses, use a
cloth moistened with a small amount of glass
detergent.Displays/Screens/protective glass of
the Head-up Display
ATTENTION
Chemical cleansers, moisture or fluids of
any kind can damage the surface of displays
and screens. There is a risk of damage to prop‐
erty. Clean with a clean, antistatic microfiber
cloth.◀
ATTENTION
The surface of displays can be damaged
with improper cleaning. There is a risk of dam‐
age to property. Avoid pressure that is too high
and do not use any scratching materials.◀
Clean with a clean, antistatic microfiber cloth.
Head-up Display:
Clean the protective glass of the Head-up Dis‐
play using a microfiber cloth and commercially
available dish-washing soap.
Long-term vehicle storage
When the vehicle is shut down for longer than
three months, special measures must be
taken. Further information is available from a
dealer’s service center or another qualified
service center or repair shop.Seite 246MobilityCare246
Online Edition for Part no. 01 40 2 969 976 - II/16
Page 254 of 265

Everything from A to Z
IndexA ABS, Antilock Brake Sys‐ tem 129
ACC, Active Cruise Control with Stop&Go function 136
Acceleration Assistant, refer to Launch Control 82
Accessories and parts 8
Activated-charcoal filter 164
Active Blind Spot Detec‐ tion 126
Active Cruise Control with Stop&Go function,
ACC 136
Adaptive brake lights, see Brake force display 128
Adaptive Light Control 102
Additional information, iDrive 23
Additives, oil 222
Adjustments, seats/head re‐ straints 53
After washing vehicle 244
Airbags 105
Airbags, indicator/warning light 106
Air circulation, see Recircu‐ lated-air mode 160, 163
Air, dehumidifying, see Cool‐ ing function 160, 163
Air distribution, man‐ ual 161 , 164
Air flow, automatic climate control 161, 164
Air pressure, tires 205
Air vents, see Ventilation 165
Alarm system 47
Alarm, unintentional 48
All around the center con‐ sole 16 All around the roofliner 17
All around the steering wheel 14
All-season tires, see Winter tires 211
All-wheel-drive 131
Alternating-code hand-held transmitter 168
Alternative oil types 222
Ambient light 104
Antifreeze, washer fluid 78
Antilock Brake System, ABS 129
Anti-slip control, see DSC 129
App, BMW Driver’s Guide 6
Approved axle load 251
Armrest, see Center arm‐ rest 177
Arrival time 95
Ash tray 169
Assistance, Roadside Assis‐ tance 238
Assistance when driving off 135
Assist system, see Intelligent Safety 114
AUTO H button 73
AUTO H button, see Auto‐ matic Hold 73
AUTO intensity 163
Automatic car wash 243
Automatic climate con‐ trol 159
Automatic cruise control with Stop&Go function 136
Automatic Curb Monitor 61
Automatic deactivation, Front-seat passenger air‐
bags 107 Automatic headlamp con‐
trol 101
Automatic Hold 73
Automatic locking 46
Automatic recirculated-air control 163
Automatic tailgate 41
Automatic transmission, see Steptronic transmission 79
AUTO program, automatic cli‐ mate control 163
AUTO program, climate con‐ trol 160
AUTO program, intensity 163
Auto Start/Stop function 70
AUX-IN port, general informa‐ tion 171
Average fuel consumption 94
Average speed 94
Axle loads, weights 251
B Backrest curvature, see Lum‐ bar support 55
Backrest, width 56
Bad road trips 182
Band-aids, see First-aid kit 238
Battery replacement, vehicle battery 235
Battery replacement, vehicle remote control 35
Battery, vehicle 235
Being towed, see Tow-start‐ ing and towing 240
Belts, safety belts 56
Beverage holder, cup holder 177
Biodiesel 201
Blinds, sun protection 50 Seite 254ReferenceEverything from A to Z254
Online Edition for Part no. 01 40 2 969 976 - II/16
Page 261 of 265

Roller sunblinds 50
RON recommended fuel grade 201
Roofliner 17
Roof load capacity 251
Roof-mounted luggage rack 188
RSC Run Flat System Com‐ ponent, see Run-flat
tires 212
Rubber components, care 245
Run-flat tires 212
S Safe braking 184
Safety belt reminder for driv‐ er's seat and front passen‐
ger seat 58
Safety belts 56
Safety belts, care 246
Safety switch, windows 50
Safety systems, airbags 105
Saving fuel 189
Screen, see Control Dis‐ play 18
Screwdriver, see Onboard ve‐ hicle tool kit 228
Sealant 212
Seat and mirror memory 60
Seat belts, see Safety belts 56
Seat heating, front 56
Seat heating, rear 56
Seating position for chil‐ dren 64
Seats 53
Securing cargo 187
Selection list in instrument cluster 93
Selector lever, Steptronic transmission 80
Sensors, care 246
Service and warranty 8 Service requirements, Condi‐
tion Based Service
CBS 226
Service requirements, dis‐ play 91
Service, Roadside Assis‐ tance 238
Services, ConnectedDrive
Servotronic 133
SET button, see Active Cruise Control, ACC 136
SET button, see Cruise con‐ trol 142
Settings, locking/unlock‐ ing 46
Settings on Control Dis‐ play 96
Settings, storing for seat, mir‐ ror 60
Shift paddles on the steering wheel 81
Side airbags 105
Side View 152
Signaling, horn 14
Signals when unlocking 46
Sitting safely 53
Size 250
Ski and snowboard bag 175
Slide/tilt glass roof 50
Snow chains 215
Socket 170
Socket, OBD Onboard Diag‐ nostics 227
Soot particulate filter 183
SOS button 237
Spare fuse 236
Speed, average 94
Speed limit detection 92
Speed limit detection, com‐ puter 95
Speed limits, display 92
Speed warning 96
Split screen 24
SPORT+ - program, Dynamic Driving Control 133 Sport displays, torque dis‐
play, performance dis‐
play 95
SPORT program, Dynamic Driving Control 134
Sport program, transmis‐ sion 80
Sport steering, variable 132
Stability control systems 129
Standard equipment 7
Start/stop, automatic func‐ tion 70
Start/Stop button 68
Start function during malfunc‐ tion 35
Starting the engine 69
Status control display, tires 109
Status of Owner's Manual 7
Steering assistance 133
Steering wheel, adjusting 62
Steering wheel heating 63
Steptronic Sport transmis‐ sion, see Steptronic trans‐
mission 79
Steptronic transmission 79
Stopping the engine 69
Storage compartments 176
Storage compartments, loca‐ tions 176
Storage, tires 212
Storing the vehicle 246
Suitable engine oil types 222
Summer tires, tread 210
Sun visor 169
Supplementary text mes‐ sages 88
Surround View 147
Switch for Dynamic Driv‐ ing 133
Switch-on times, parked-car ventilation 166
Switch, see Cockpit 14
Symbols 6
Symbols in the status field 23 Seite 261Everything from A to ZReference261
Online Edition for Part no. 01 40 2 969 976 - II/16