2017 BMW 6 SERIES GRAN COUPE tires
[x] Cancel search: tiresPage 214 of 261

4.Insert the sealant container on the com‐
pressor housing in an upright position.5.Screw the filling hose of the sealant con‐
tainer onto the tire valve of the nonworking
wheel.6.With the compressor switched off, insert
the plug into the power socket inside the
vehicle.7.With the ignition turned on or the engine
running, switch on the compressor.
ATTENTION
The compressor can overheat during ex‐
tended operation. There is a risk of damage to
property. Do not run the compressor for more
than 10 min.◀
Let the compressor run for approx. 3 to 8 mi‐
nutes to fill the tire with sealant and achieve a
tire inflation pressure of approx. 2.5 bar.
While the tire is being filled with sealant, the
tire inflation pressure may sporadically reach
approx. 5 bar. Do not switch off the compres‐
sor at this point.
If a tire inflation pressure of 2 bar is not
reached:
1.Switch off the compressor.2.Unscrew the filling hose from the wheel.3.Drive 33 ft/10 m forward and back to dis‐
tribute the sealant in the tire.4.Inflate the tire again using the compressor.
If a tire inflation pressure of 2 bar cannot be
reached, contact your dealer’s service cen‐
ter or another qualified service center or
repair shop.
Stowing the Mobility System
1.Unscrew the filling hose of the sealant con‐
tainer from the wheel.2.Unscrew the connection hose of the com‐
pressor from the sealant container.3.Connect the filling hose of the sealant con‐
tainer previously connected to the tireSeite 214MobilityWheels and tires214
Online Edition for Part no. 01 40 2 969 305 - II/16
Page 215 of 261

valve with the available connector on the
sealant container.
This prevents leftover sealant from escap‐
ing from the container.4.Wrap the empty sealant container in suita‐
ble material to avoid dirtying the cargo
area.5.Stow the Mobility System back in the vehi‐
cle.
Distributing the sealant
Immediately drive approx. 5 miles/10 km to en‐
sure that the sealant is evenly distributed in the
tire.
Do not exceed a speed of 50 mph/80 km/h.
If possible, do not drive at speeds less than
12 mph/20 km/h.
To correct the tire inflation pressure
1.Stop at a suitable location.2.Screw the connection hose of the com‐
pressor directly onto the tire valve stem.3.Insert the connector into the power socket
inside the vehicle.4.Correct the tire inflation pressure to
2.5 bar.▷Increase pressure: with the ignition
turned on or the engine running, switch
on the compressor.▷To reduce the pressure: press the but‐
ton on the compressor.
Continuing the trip
Do not exceed the maximum permissible
speed of 50 mph/80 km/h.
Reinitialize the Flat Tire Monitor.
Reinitialize the Tire Pressure Monitor.
Replace the nonworking tire and the sealant
container of the Mobility System as soon as
possible.
Snow chains
Fine-link snow chains The manufacturer of your vehicle recommends
use of fine-link snow chains. Certain types of
fine-link snow chains have been tested by the
manufacturer of the vehicle and recommended
as road-safe and suitable.
Information regarding suitable snow chains is
available from a dealer’s service center or an‐
other qualified service center or repair shop.
Use WARNING
With the mounting of snow chains on un‐
suitable tires, the snow chains can come into
contact with vehicle parts. There is a risk of ac‐
cidents or a risk of property damage. Only
mount snow chains on tires that are desig‐
nated by their manufacturer as suitable for the
use of snow chains.◀
Use only in pairs on the rear wheels, equipped
with the tires of the following size:▷225/55 R 17.▷245/45 R 18.
Follow the snow chain manufacturer's instruc‐
tions.
Make sure that the snow chains are always
sufficiently tight. Re-tighten as needed ac‐
cording to the snow chain manufacturer's in‐
structions.
Do not initialize the Flat Tire Monitor after
mounting snow chains, as doing so may result
in incorrect readings.
Do not initialize the Tire Pressure Monitor after
mounting snow chains, as doing so may result
in incorrect readings.
When driving with snow chains, briefly activate
Dynamic Traction Control if needed.
Seite 215Wheels and tiresMobility215
Online Edition for Part no. 01 40 2 969 305 - II/16
Page 216 of 261

Maximum speed with snow chainsDo not exceed a speed of 30 mph/50 km/h
when using snow chains.
Snow chain detection
The concept
When using snow chains, settings should be
made via the iDrive for the snow chains being
applied.
The snow chain detection system supports
you by automatically showing the detected
state on the Control Display.
When snow chains are in use, the rear axle
steering of the Integral Active Steering is deac‐
tivated automatically.
At speeds above the maximum permitted
speed with snow chains of 30 mph/50 km/h,
the rear axle steering is activated again auto‐
matically.
Activating the status1."Settings"2."Tire chains"3."Tire chains installed"
Automatic detection If functioning properly:
▷Snow chains are mounted. Settings are not
activated
.
After you drive a short distance, a Check
Control message is shown and the state is
activated automatically.
Confirm the automatic activation.
▷Snow chains are not mounted. Settings are
activated
.
At speeds above 30 mph/50 km/h, a Check
Control message is displayed. Deactivate
the status manually.
If not functioning properly:
▷Snow chains are mounted. Settings are not
activated
.
A Check Control message is not displayed.
The automatic detection system is mal‐
functioning. Activate the status manually.
Activating/deactivating rear axle
steering
If the status indicating that snow chains are in
use is activated, the rear axle steering is deac‐
tivated automatically.
At speeds above 30 mph/50 km/h, the rear axle
steering is activated again, even though snow
chains are in use.
Seite 216MobilityWheels and tires216
Online Edition for Part no. 01 40 2 969 305 - II/16
Page 231 of 261

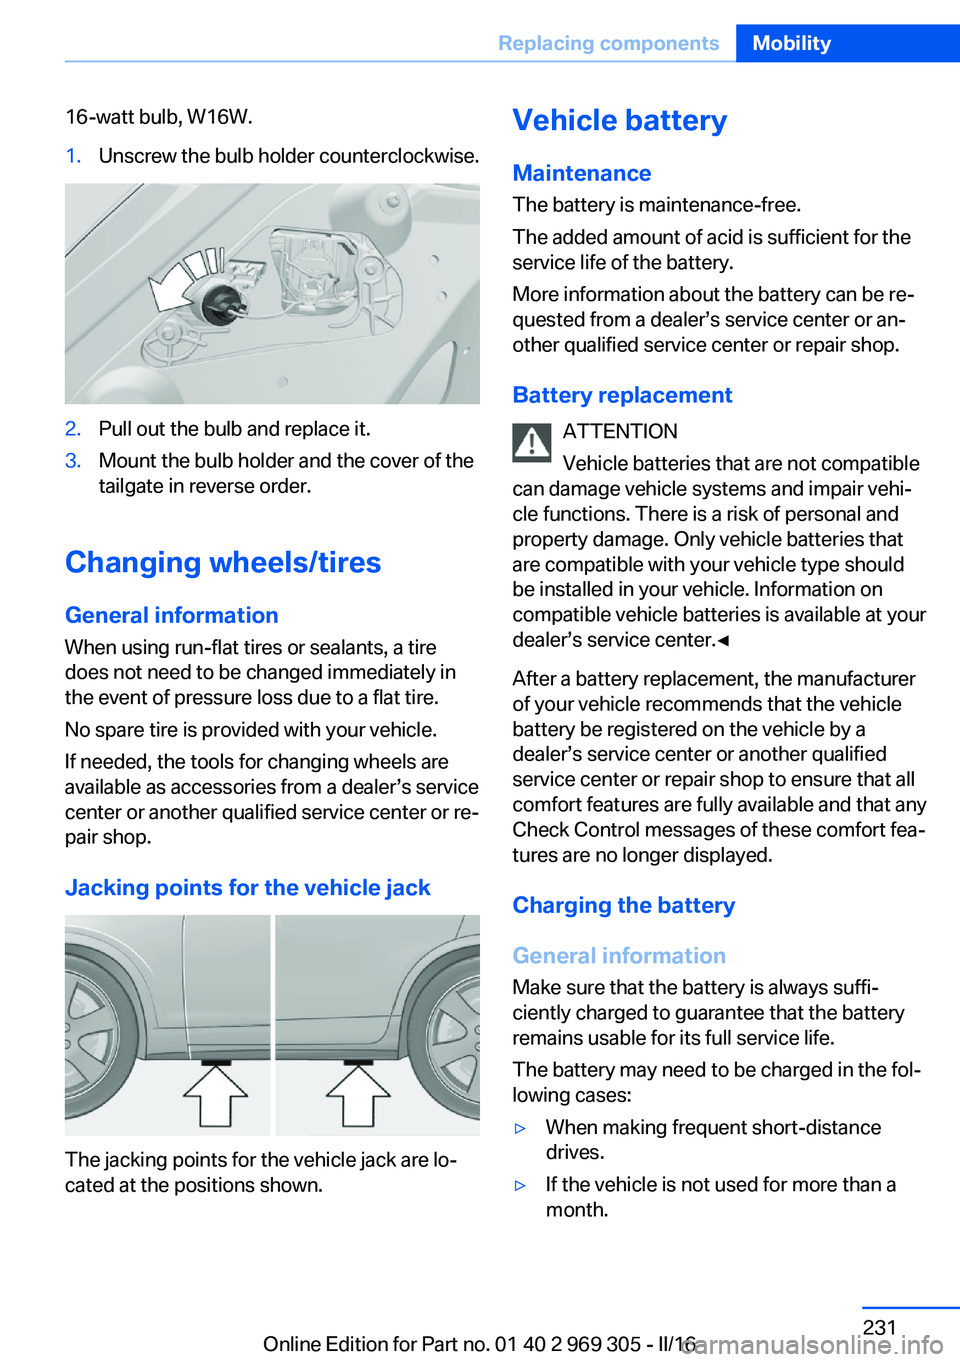
16-watt bulb, W16W.1.Unscrew the bulb holder counterclockwise.2.Pull out the bulb and replace it.3.Mount the bulb holder and the cover of the
tailgate in reverse order.
Changing wheels/tires
General information
When using run-flat tires or sealants, a tire
does not need to be changed immediately in
the event of pressure loss due to a flat tire.
No spare tire is provided with your vehicle.
If needed, the tools for changing wheels are
available as accessories from a dealer’s service
center or another qualified service center or re‐
pair shop.
Jacking points for the vehicle jack
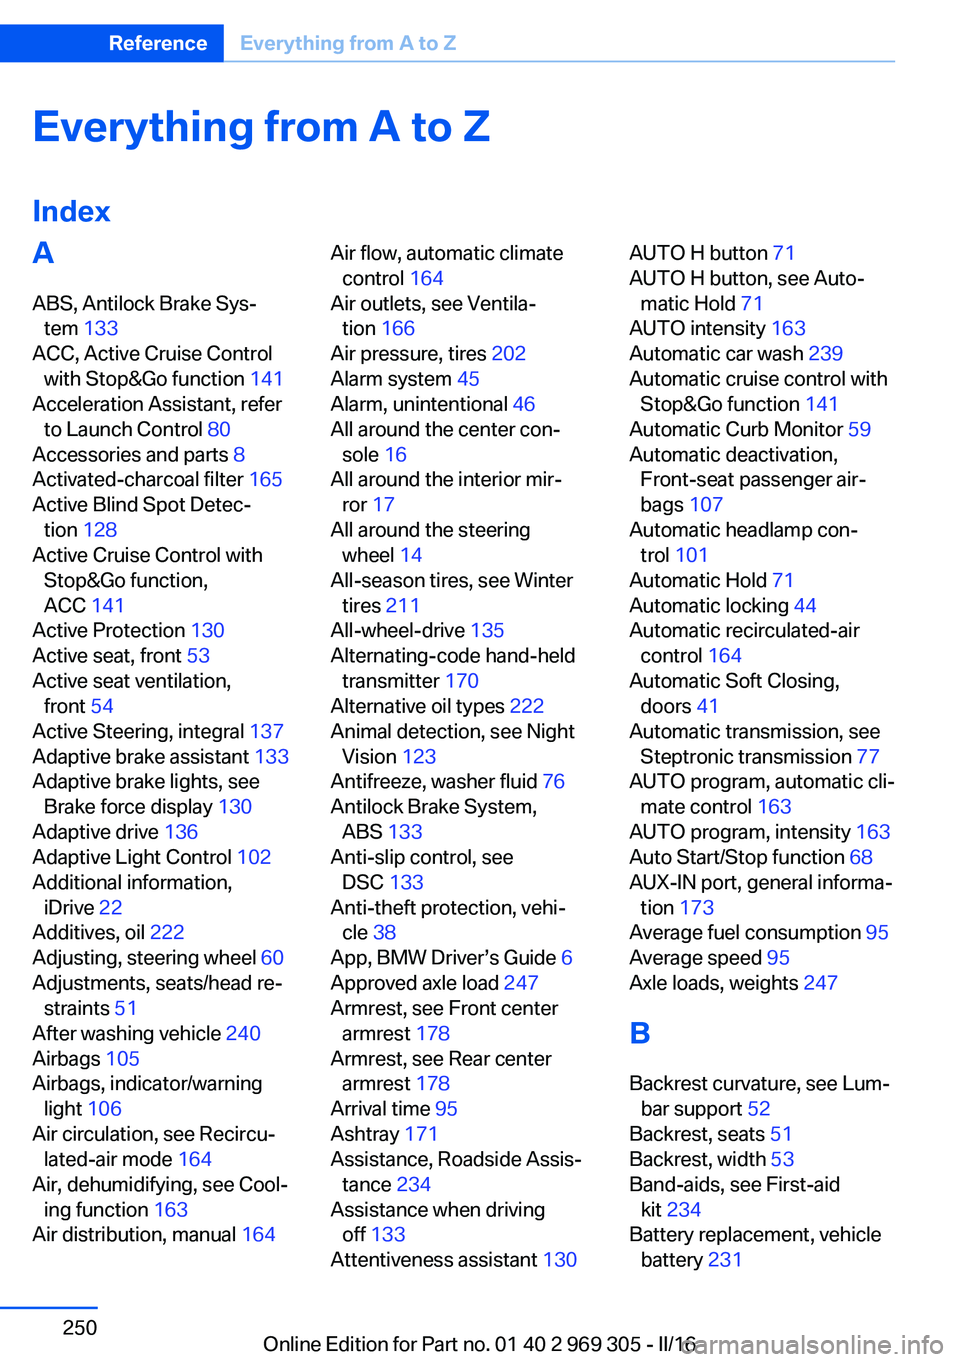
The jacking points for the vehicle jack are lo‐
cated at the positions shown.
Vehicle battery
Maintenance
The battery is maintenance-free.
The added amount of acid is sufficient for the
service life of the battery.
More information about the battery can be re‐
quested from a dealer’s service center or an‐ other qualified service center or repair shop.
Battery replacement ATTENTION
Vehicle batteries that are not compatible
can damage vehicle systems and impair vehi‐
cle functions. There is a risk of personal and
property damage. Only vehicle batteries that
are compatible with your vehicle type should
be installed in your vehicle. Information on
compatible vehicle batteries is available at your
dealer’s service center.◀
After a battery replacement, the manufacturer
of your vehicle recommends that the vehicle
battery be registered on the vehicle by a
dealer’s service center or another qualified
service center or repair shop to ensure that all
comfort features are fully available and that any
Check Control messages of these comfort fea‐
tures are no longer displayed.
Charging the battery
General information
Make sure that the battery is always suffi‐
ciently charged to guarantee that the battery
remains usable for its full service life.
The battery may need to be charged in the fol‐
lowing cases:▷When making frequent short-distance
drives.▷If the vehicle is not used for more than a
month.Seite 231Replacing componentsMobility231
Online Edition for Part no. 01 40 2 969 305 - II/16
Page 239 of 261

CareVehicle features and optionsThis chapter describes all standard, country-
specific and optional features offered with the
series. It also describes features that are not
necessarily available in your car, e. g., due to
the selected options or country versions. This
also applies to safety-related functions and
systems. The respectively applicable country
provisions must be observed when using the
respective features and systems.
Car washes General information
Regularly remove foreign objects such as
leaves in the area below the windshield when
the hood is raised.
Wash your vehicle frequently, particularly in
winter. Intense soiling and road salt can dam‐
age the vehicle.
Steam blaster and high-pressure
washer
Information ATTENTION
When cleaning with high-pressure wash‐
ers, components can be damaged due to the
pressure or temperatures being too high.
There is a risk of damage to property. Maintain
sufficient distance and do not spray too long
continuously. Follow the operating instructions
for the high-pressure washer.◀
Distances and temperature▷Maximum temperature: 140 ℉/60 ℃.▷Minimum distance from sensors, cameras,
seals: 12 inches/30 cm.▷Minimum distance from glass sunroof:
31.5 in/80 cm.
Automatic car washes
Information CAUTION
Water can penetrate in the windshield
area due to high-pressure washers. There is a
risk of property damage. Avoid high-pressure
washers.◀
ATTENTION
Improper use of automatic vehicle
washes can cause damage to the vehicle.
There is a risk of damage to property. Informa‐
tion the following instructions:
▷Give preference to cloth vehicle washes or
those that use soft brushes in order to
avoid paint damage.▷Avoid vehicle washes with guide rails
higher than 4 in/10 cm to avoid damage to
the chassis.▷Observe the tire width of the guide rail to
avoid damage to tires and rims.▷Fold in exterior mirrors to avoid damage to
the exterior mirrors.▷Deactivate rain sensor, if necessary, to
avoid damage to the wiper system.◀
In some cases, an unintentional alarm can be
triggered by the interior motion sensor of the
alarm system. Follow the instructions on
avoiding an unintentional alarm, refer to
page 46.
Seite 239CareMobility239
Online Edition for Part no. 01 40 2 969 305 - II/16
Page 246 of 261

Technical dataVehicle features and options
This chapter describes all standard, country-
specific and optional features offered with the
series. It also describes features that are not
necessarily available in your car, e. g., due tothe selected options or country versions. This
also applies to safety-related functions and
systems. The respectively applicable country
provisions must be observed when using the
respective features and systems.
Information
The technical data and specifications in this
Owner's Manual are used as guidance values.
The vehicle-specific data can deviate from this,
for example, due to the selected special equip‐
ment, country version or country-specific
measurement method. Detailed values can be
found in the approval documents, on labels onthe vehicle or can be obtained from a dealer’s
service center or another qualified service cen‐
ter or repair shop.
The information in the vehicle documents al‐
ways has priority over the information in this
Owner's Manual.
Dimensions
The dimensions can vary depending on the
model version, equipment or country-specific
measurement method.
The specified heights do not take into account
attached parts, for example, a roof antenna,roof racks or spoiler. The heights can deviate,
for example, due to the selected special equip‐
ment, tires, load and chassis version. BMW 6 Series Gran CoupeWidth with mirrorsinches/mm82.3/2,090 Width without mirrorsinches/mm74.6/1,894Heightinches/mm54.8/1,392Lengthinches/mm197.2/5,009Wheelbaseinches/mm116.9/2,968Smallest turning radius diam.ft/m39.3/12.0Seite 246ReferenceTechnical data246
Online Edition for Part no. 01 40 2 969 305 - II/16
Page 250 of 261

Everything from A to Z
IndexA ABS, Antilock Brake Sys‐ tem 133
ACC, Active Cruise Control with Stop&Go function 141
Acceleration Assistant, refer to Launch Control 80
Accessories and parts 8
Activated-charcoal filter 165
Active Blind Spot Detec‐ tion 128
Active Cruise Control with Stop&Go function,
ACC 141
Active Protection 130
Active seat, front 53
Active seat ventilation, front 54
Active Steering, integral 137
Adaptive brake assistant 133
Adaptive brake lights, see Brake force display 130
Adaptive drive 136
Adaptive Light Control 102
Additional information, iDrive 22
Additives, oil 222
Adjusting, steering wheel 60
Adjustments, seats/head re‐ straints 51
After washing vehicle 240
Airbags 105
Airbags, indicator/warning light 106
Air circulation, see Recircu‐ lated-air mode 164
Air, dehumidifying, see Cool‐ ing function 163
Air distribution, manual 164 Air flow, automatic climate
control 164
Air outlets, see Ventila‐ tion 166
Air pressure, tires 202
Alarm system 45
Alarm, unintentional 46
All around the center con‐ sole 16
All around the interior mir‐ ror 17
All around the steering wheel 14
All-season tires, see Winter tires 211
All-wheel-drive 135
Alternating-code hand-held transmitter 170
Alternative oil types 222
Animal detection, see Night Vision 123
Antifreeze, washer fluid 76
Antilock Brake System, ABS 133
Anti-slip control, see DSC 133
Anti-theft protection, vehi‐ cle 38
App, BMW Driver’s Guide 6
Approved axle load 247
Armrest, see Front center armrest 178
Armrest, see Rear center armrest 178
Arrival time 95
Ashtray 171
Assistance, Roadside Assis‐ tance 234
Assistance when driving off 133
Attentiveness assistant 130 AUTO H button 71
AUTO H button, see Auto‐ matic Hold 71
AUTO intensity 163
Automatic car wash 239
Automatic cruise control with Stop&Go function 141
Automatic Curb Monitor 59
Automatic deactivation, Front-seat passenger air‐
bags 107
Automatic headlamp con‐ trol 101
Automatic Hold 71
Automatic locking 44
Automatic recirculated-air control 164
Automatic Soft Closing, doors 41
Automatic transmission, see Steptronic transmission 77
AUTO program, automatic cli‐ mate control 163
AUTO program, intensity 163
Auto Start/Stop function 68
AUX-IN port, general informa‐ tion 173
Average fuel consumption 95
Average speed 95
Axle loads, weights 247
B Backrest curvature, see Lum‐ bar support 52
Backrest, seats 51
Backrest, width 53
Band-aids, see First-aid kit 234
Battery replacement, vehicle battery 231 Seite 250ReferenceEverything from A to Z250
Online Edition for Part no. 01 40 2 969 305 - II/16
Page 251 of 261

Battery replacement, vehicleremote control 35
Battery, vehicle 231
Being towed, see Tow-start‐ ing and towing 236
Belts, safety belts 55
Beverage holder, cup holder 179
Blinds, sun protection 48
BMW Assist, see Owner's Manual for Navigation, En‐
tertainment and Communi‐
cation
BMW Driver’s Guide app 6
BMW Homepage 6
BMW Internet page 6
BMW maintenance sys‐ tem 226
Bonus range, ECO PRO 192
Bottle holder, see Cup holder 179
Brake assistant 133
Brake assistant, adaptive 133
Brake discs, break-in 184
Brake force display 130
Brake lights, adaptive 130
Brake lights, brake force dis‐ play 130
Brake lights, bulb replace‐ ment 230
Brake pads, break-in 184
Braking, information 186
Breakdown assis‐ tance 233, 234
Break-in 184
Brightness of Control Dis‐ play 97
Bulb replacement, front 228
Bulb replacement, rear 230
Button, RES 144
Button, Start/Stop 66
Bypassing, see Jump-start‐ ing 235 C
California Proposition 65 Warning 8
Calling up mirror adjust‐ ment 44
Calling up seat adjust‐ ment 44
Calling up steering wheel ad‐ justment 44
Camera lenses, care 242
Camera, rearview cam‐ era 153
Camera, Side View 155
Camera, Top View 157
Can holder, see Cup holder 179
Car battery 231
Care, displays 242
Care, vehicle 240
Cargo 188
Cargo area, enlarging 174
Cargo area, storage compart‐ ments 179
Cargo straps, securing cargo 189
Car key, see Remote con‐ trol 34
Carpet, care 242
Car wash 239
Catalytic converter, see Hot exhaust system 185
CBS Condition Based Serv‐ ice 226
CD/Multimedia, see Owner's Manual for Navigation, En‐
tertainment and Communi‐
cation
Center console 16
Central locking system 40
Central screen, see Control Display 18
Changes, technical, see Own Safety 7
Changing parts 228
Changing wheels 231 Changing wheels/tires 210
Chassis number, see Vehicle identification number 10
Check Control 85
Checking the engine oil level electronically 220
Checking the oil level elec‐ tronically 220
Children, seating position 62
Children, transporting safely 62
Child restraint fixing system LATCH 64
Child restraint system 62
Child restraint systems, mounting 63
Child safety locks 65
Child seat, mounting 63
Child seats 62
Chrome parts, care 241
Cigarette lighter 171
Cleaning displays 242
Climate control 162
Climate control laminated tinted safety glass 185
Climate control wind‐ shield 185
Clock 90
Closing/opening via door lock 39
Closing/opening with remote control 38
Clothes hooks 179
Coasting 194
Coasting with engine decou‐ pled, coasting 194
Coasting with idling en‐ gine 194
Combination switch, see Turn signals 73
Combination switch, see Wiper system 73
COMFORT+ program, Driving Dynamics Control 139
Comfort Access 42 Seite 251Everything from A to ZReference251
Online Edition for Part no. 01 40 2 969 305 - II/16