2017 BMW 6 SERIES GRAN COUPE manual transmission
[x] Cancel search: manual transmissionPage 69 of 261
▷Vehicle battery is heavily discharged.▷At higher elevations.▷The engine compartment lid is unlocked.▷HDC Hill Descent Control is activated.▷The parking assistant is activated.▷Stop-and-go traffic.▷Selector lever in selector lever position N,
M/S or R.▷Use of fuel with high ethanol content.
Starting the engine
The engine starts automatically under the fol‐
lowing conditions:
▷Steptronic transmission: by releasing the
brake pedal.
When Automatic Hold is activated: press
the accelerator pedal.
After the engine starts, accelerate as usual.
Safety mode
After the engine switches off automatically, it
will not start again automatically if any one of
the following conditions are met:
▷The driver's safety belt is unbuckled and
the driver's door is open.▷The hood was unlocked.
Some indicator lights light up for a varied
length of time.
The engine can only be started via the Start/
Stop button.
Functional limitations
Even if driving off was not intended, the deacti‐
vated engine starts up automatically in the fol‐
lowing situations:
▷Excessive warming of the car's interior
when the cooling function is switched on.▷The steering wheel is turned.▷Fogging of the windows when the auto‐
matic climate control is switched on.▷Vehicle battery is heavily discharged.▷Excessive cooling of the car's interior when
the heating is switched on.
Activating/deactivating the system
manually
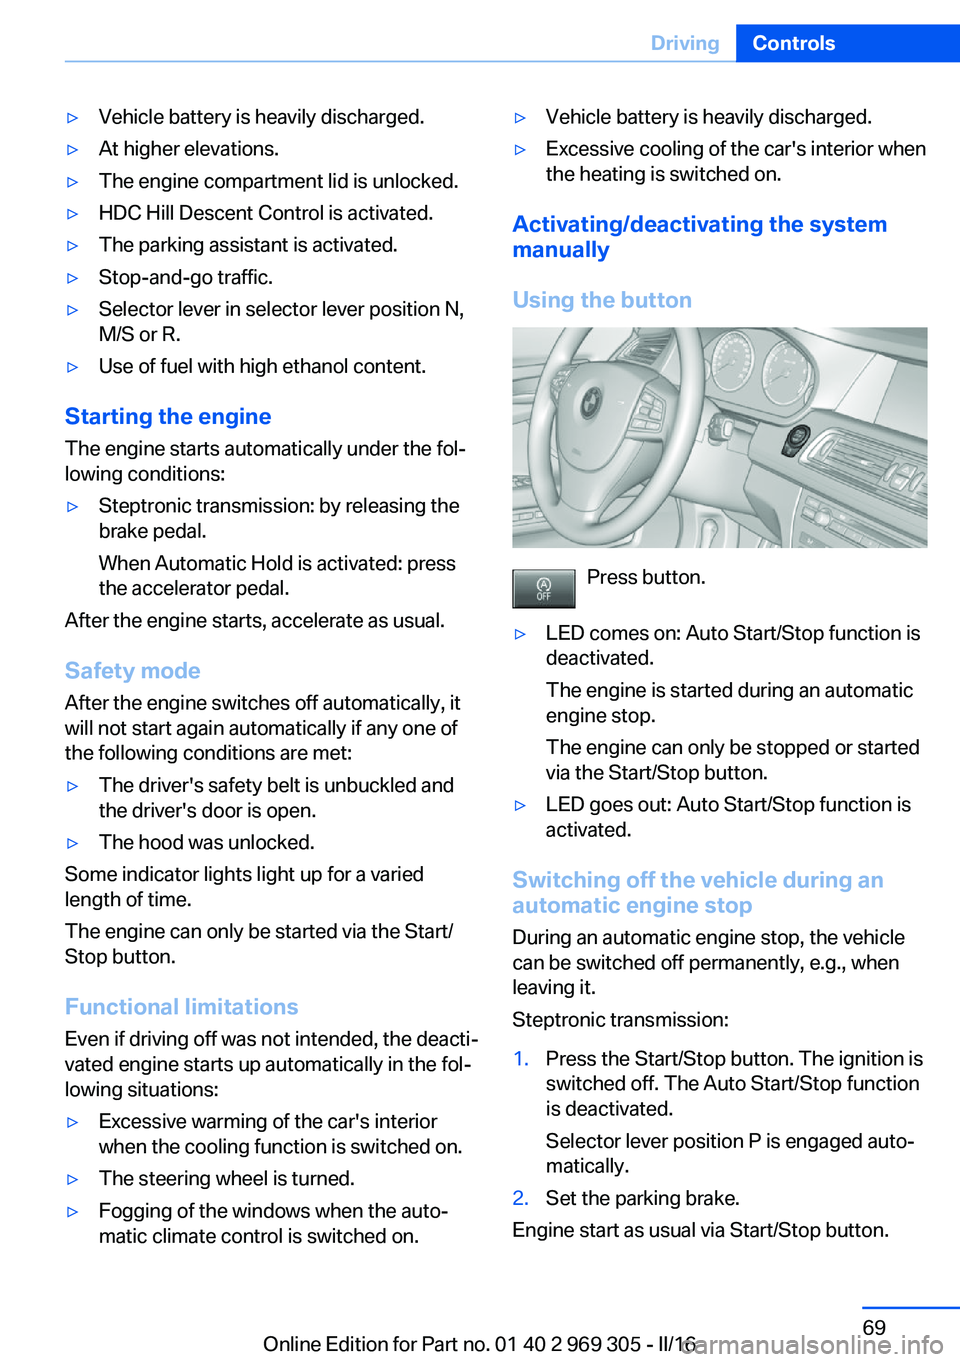
Using the button
Press button.
▷LED comes on: Auto Start/Stop function is
deactivated.
The engine is started during an automatic
engine stop.
The engine can only be stopped or started
via the Start/Stop button.▷LED goes out: Auto Start/Stop function is
activated.
Switching off the vehicle during an
automatic engine stop
During an automatic engine stop, the vehicle
can be switched off permanently, e.g., when
leaving it.
Steptronic transmission:
1.Press the Start/Stop button. The ignition is
switched off. The Auto Start/Stop function
is deactivated.
Selector lever position P is engaged auto‐
matically.2.Set the parking brake.
Engine start as usual via Start/Stop button.
Seite 69DrivingControls69
Online Edition for Part no. 01 40 2 969 305 - II/16
Page 78 of 261
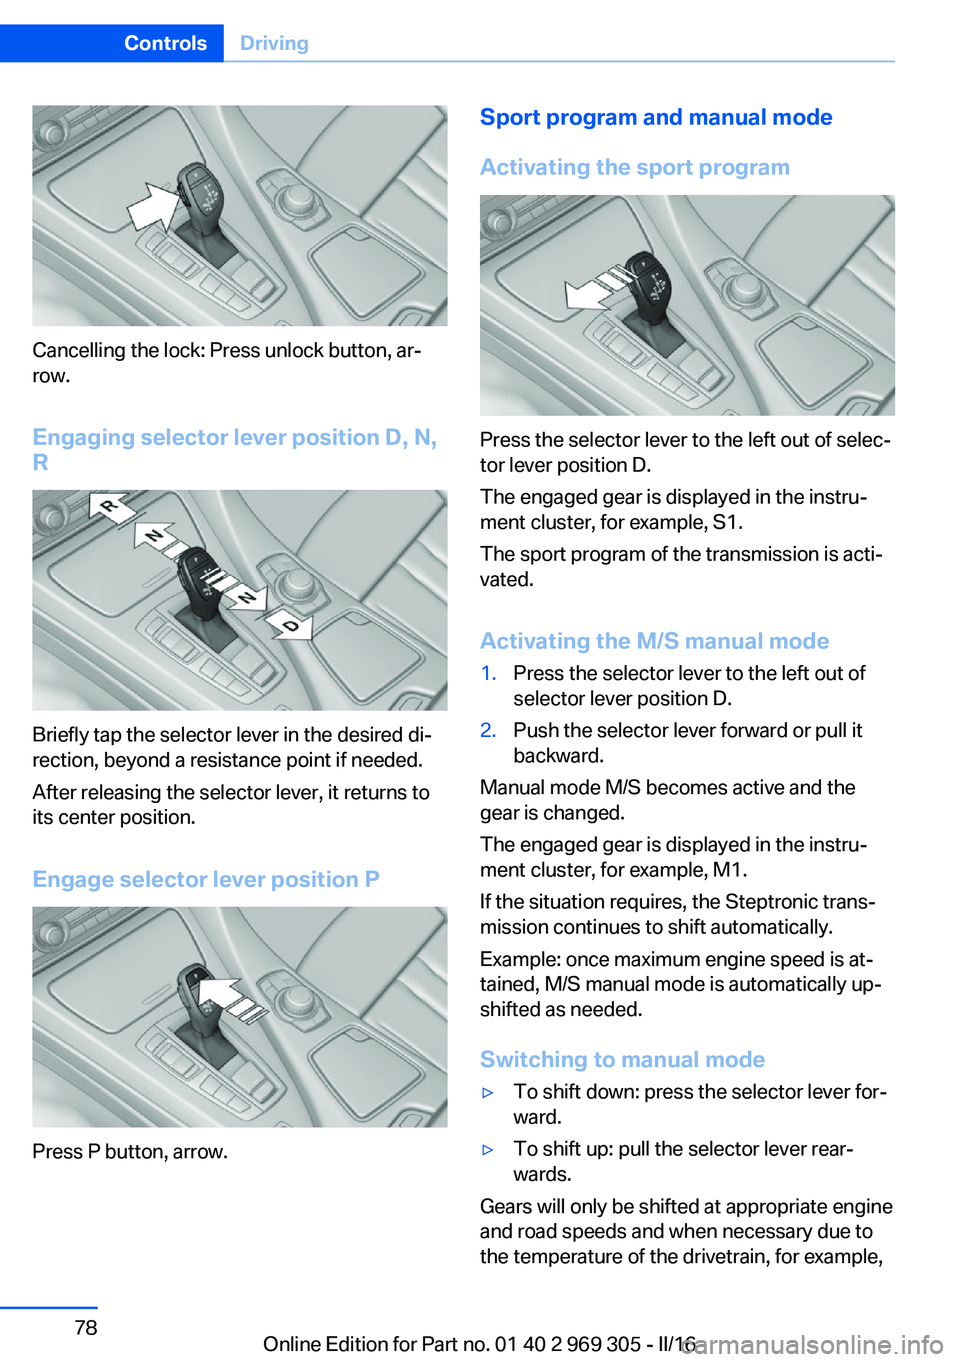
Cancelling the lock: Press unlock button, ar‐
row.
Engaging selector lever position D, N,
R
Briefly tap the selector lever in the desired di‐
rection, beyond a resistance point if needed.
After releasing the selector lever, it returns to
its center position.
Engage selector lever position P
Press P button, arrow.
Sport program and manual mode
Activating the sport program
Press the selector lever to the left out of selec‐
tor lever position D.
The engaged gear is displayed in the instru‐
ment cluster, for example, S1.
The sport program of the transmission is acti‐
vated.
Activating the M/S manual mode
1.Press the selector lever to the left out of
selector lever position D.2.Push the selector lever forward or pull it
backward.
Manual mode M/S becomes active and the
gear is changed.
The engaged gear is displayed in the instru‐
ment cluster, for example, M1.
If the situation requires, the Steptronic trans‐
mission continues to shift automatically.
Example: once maximum engine speed is at‐
tained, M/S manual mode is automatically up‐
shifted as needed.
Switching to manual mode
▷To shift down: press the selector lever for‐
ward.▷To shift up: pull the selector lever rear‐
wards.
Gears will only be shifted at appropriate engine
and road speeds and when necessary due to
the temperature of the drivetrain, for example,
Seite 78ControlsDriving78
Online Edition for Part no. 01 40 2 969 305 - II/16
Page 79 of 261
downshifting is not possible if the engine
speed is too high.
The selected gear is briefly displayed in the in‐
strument cluster, followed by the currently se‐
lected gear.
Steptronic Sport transmission: avoid automatic upshifting in M/S manual
mode
The Steptronic Sport transmission does not
automatically upshift in M/S manual mode
once the maximum speed is reached, if one of
the following conditions is met:▷DSC deactivated.▷TRACTION activated.▷SPORT+ activated.
In addition, there is no downshifting for kick‐
down.
Ending the sport program/manual
mode
Push the selector lever to the right.
D is displayed in the instrument cluster.
Shift paddles
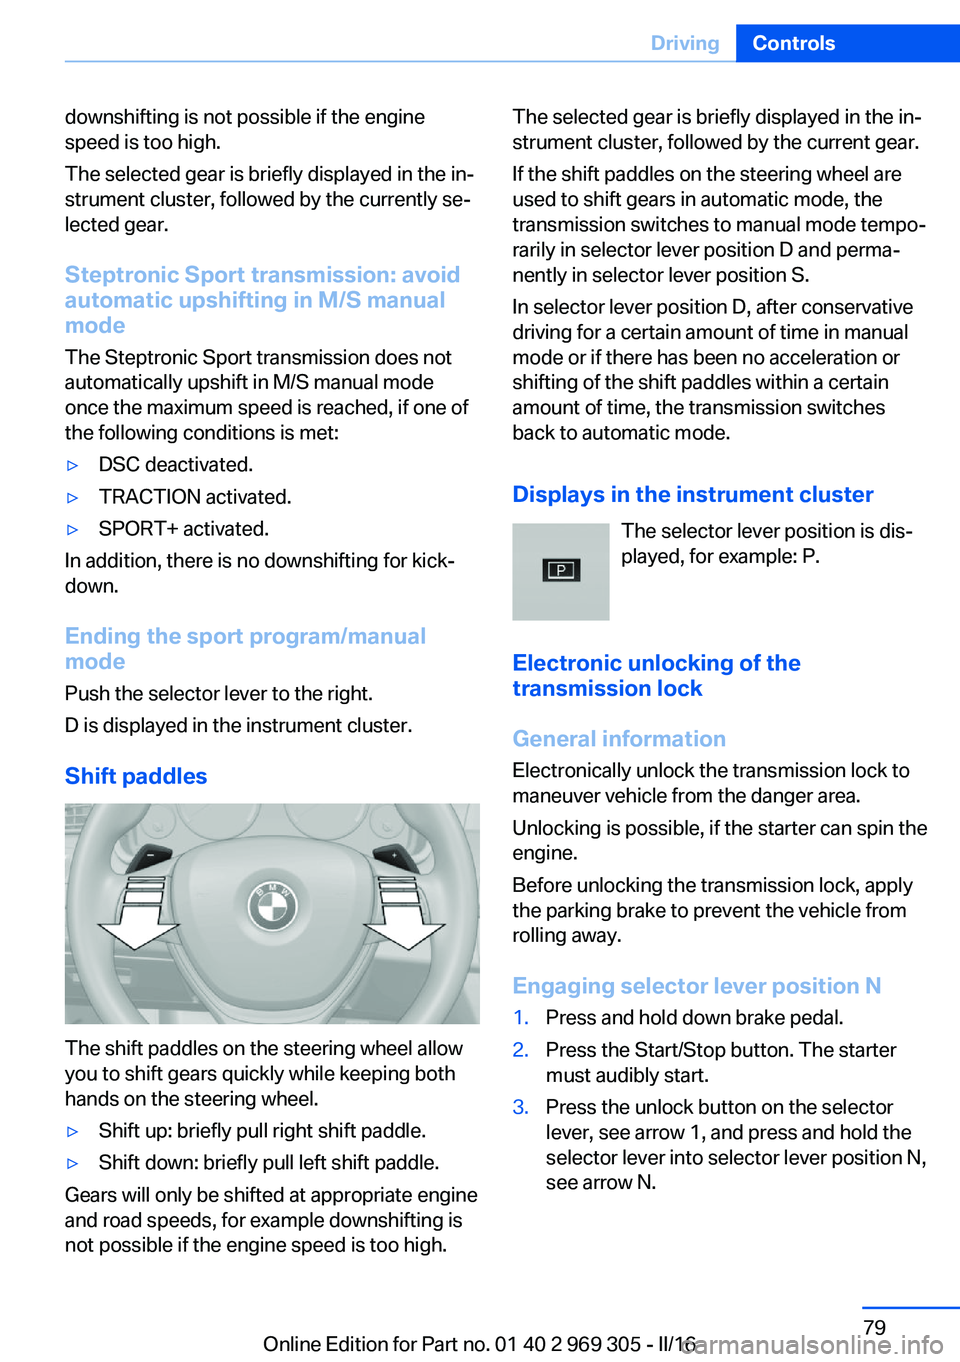
The shift paddles on the steering wheel allow
you to shift gears quickly while keeping both
hands on the steering wheel.
▷Shift up: briefly pull right shift paddle.▷Shift down: briefly pull left shift paddle.
Gears will only be shifted at appropriate engine
and road speeds, for example downshifting is
not possible if the engine speed is too high.
The selected gear is briefly displayed in the in‐
strument cluster, followed by the current gear.
If the shift paddles on the steering wheel are
used to shift gears in automatic mode, the
transmission switches to manual mode tempo‐
rarily in selector lever position D and perma‐
nently in selector lever position S.
In selector lever position D, after conservative
driving for a certain amount of time in manual
mode or if there has been no acceleration or
shifting of the shift paddles within a certain
amount of time, the transmission switches
back to automatic mode.
Displays in the instrument cluster The selector lever position is dis‐played, for example: P.
Electronic unlocking of the
transmission lock
General information
Electronically unlock the transmission lock to
maneuver vehicle from the danger area.
Unlocking is possible, if the starter can spin the
engine.
Before unlocking the transmission lock, apply
the parking brake to prevent the vehicle from
rolling away.
Engaging selector lever position N1.Press and hold down brake pedal.2.Press the Start/Stop button. The starter
must audibly start.3.Press the unlock button on the selector
lever, see arrow 1, and press and hold the
selector lever into selector lever position N,
see arrow N.Seite 79DrivingControls79
Online Edition for Part no. 01 40 2 969 305 - II/16
Page 84 of 261
sentation of the efficiency display and various
ECO PRO tips.
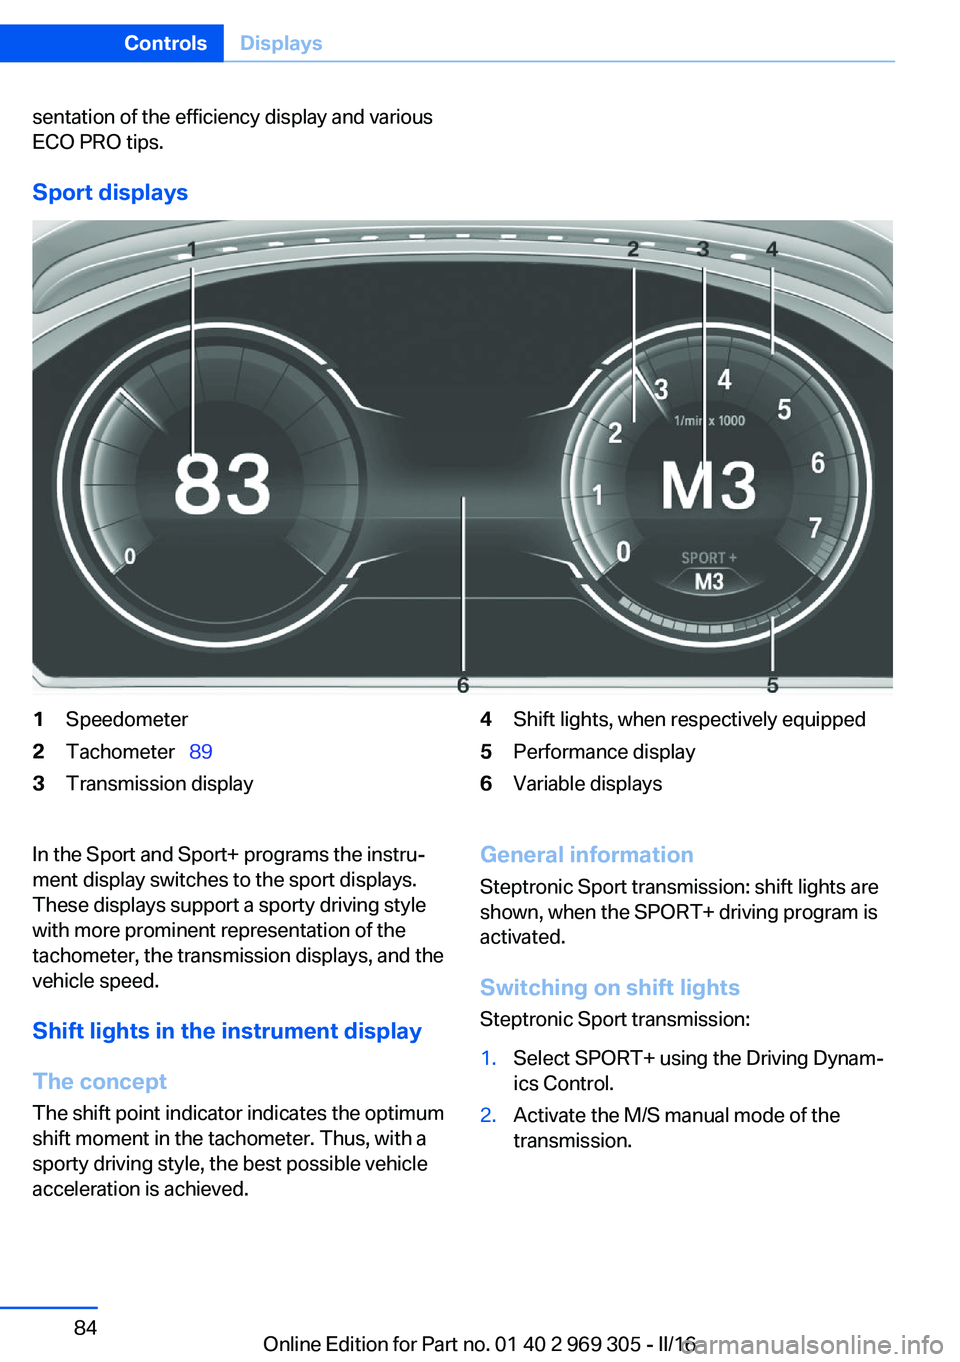
Sport displays
1Speedometer2Tachometer 893Transmission display4Shift lights, when respectively equipped5Performance display6Variable displaysIn the Sport and Sport+ programs the instru‐
ment display switches to the sport displays.
These displays support a sporty driving style
with more prominent representation of the
tachometer, the transmission displays, and the
vehicle speed.
Shift lights in the instrument display
The concept The shift point indicator indicates the optimum
shift moment in the tachometer. Thus, with a
sporty driving style, the best possible vehicle
acceleration is achieved.General information
Steptronic Sport transmission: shift lights are
shown, when the SPORT+ driving program is
activated.
Switching on shift lights Steptronic Sport transmission:1.Select SPORT+ using the Driving Dynam‐
ics Control.2.Activate the M/S manual mode of the
transmission.Seite 84ControlsDisplays84
Online Edition for Part no. 01 40 2 969 305 - II/16
Page 92 of 261

Gear shift indicatorThe conceptThe system recommends the most fuel effi‐
cient gear for the current driving situation.
General information
Depending on the vehicle's features and coun‐
try version of the vehicle, the gear shift indica‐
tor is active in the manual mode of the Step‐
tronic transmission.
Suggestions to shift gear up or down are dis‐
played in the instrument cluster.
On vehicles without a gear shift indicator, the
engaged gear is displayed.
DisplayingExampleDescriptionFuel efficient gear is set.Shift into fuel efficient gear.
Speed limit detection
The concept
Speed limit detection
Speed limit detection shows the current maxi‐
mum permitted speed in the instrument clus‐
ter. The camera in the area of the interior mir‐
ror detects traffic signs at the edge of the road
as well as variable overhead sign posts. Traffic
signs with extra symbols for wet road condi‐
tions, etc. are also detected and compared
with the vehicle's onboard data, such as for the
rain sensor, and will be displayed depending
on the situation. The system takes into ac‐
count the information stored in the navigation
system and also displays speed limits present
on routes without signs.
Information WARNING
The system does not release from the
personal responsibility to correctly assess visi‐
bility and traffic situation. There is risk of an ac‐
cident. Adjust the driving style to the traffic
conditions. Watch traffic closely and actively
intervene in the respective situations.◀
Overview
Camera
The camera is installed near the interior mirror.
Keep the windshield in the area behind the in‐
terior mirror clean and clear.
Switching on/off On the Control Display:
1."Settings"2."Instrument cluster"3."Speed limit information"
If speed limit detection is switched on, it can
be displayed on the CID (central information
display) in the instrument cluster via the on‐
board computer.
Display
The following is displayed in the instrument
cluster:
Seite 92ControlsDisplays92
Online Edition for Part no. 01 40 2 969 305 - II/16
Page 151 of 261

With front PDC: switching on/off
manually
Press park assistance button.▷On: the LED lights up.▷Off: the LED goes out.
Display
Signal tones When approaching an object, an intermittent
sound indicates the position of the object. E.g.
if an object is detected to the left rear of the
vehicle, a signal tone sounds from the left rear
speaker.
The shorter the distance to the object, the shorter the intervals.
If the distance to a detected object is less than
approx. 10 inches/25 cm, a continuous tone is
sounded.
With front PDC: if objects are located both in
front of and behind the vehicle, an alternating
continuous signal is sounded.
An interval tone is interrupted with the appro‐
priate equipment after about 3 seconds:
▷If the vehicle stops in front of an object that
is detected by only one of the corner sen‐
sors.▷If moving parallel to a wall.
The signal tone is switched off, when selector
lever position P is engaged on vehicles with
Steptronic transmission.
Volume
The ratio of the PDC signal tone volume to the
entertainment volume can be adjusted.
1."Multimedia", "Radio" or "Settings"2."Tone"3."Volume settings"4."PDC"5.Turn the Controller until the desired set‐
ting is selected.6.Press the Controller.
Settings are stored for the profile currently
used.
Visual warning
The approach of the vehicle to an object can
be shown on the Control Display. Objects that
are farther away are already displayed on the
Control Display before a signal sounds.
A display appears as soon as Park Distance
Control (PDC) is activated.
The range of the sensors is represented in the
colors green, yellow and red.
When the image of the rearview camera is dis‐
played, the switch can be made to PDC:
"Rear view camera"
System limits
Information WARNING
The system can react incorrectly or not
at all due to the system limits. There is risk of
accidents or risk of property damage. Observe
the information regarding the system limits
and actively intervene, if needed.◀
Limits of ultrasonic measurement Ultrasonic measuring might not function under
the following circumstances:
▷For small children and animals.▷For persons with certain clothing, for ex‐
ample coats.▷With external interference of the ultra‐
sound, for example from passing vehicles
or loud machines.▷When sensors are dirty, iced over, dam‐
aged or out of position.Seite 151Driving comfortControls151
Online Edition for Part no. 01 40 2 969 305 - II/16
Page 173 of 261
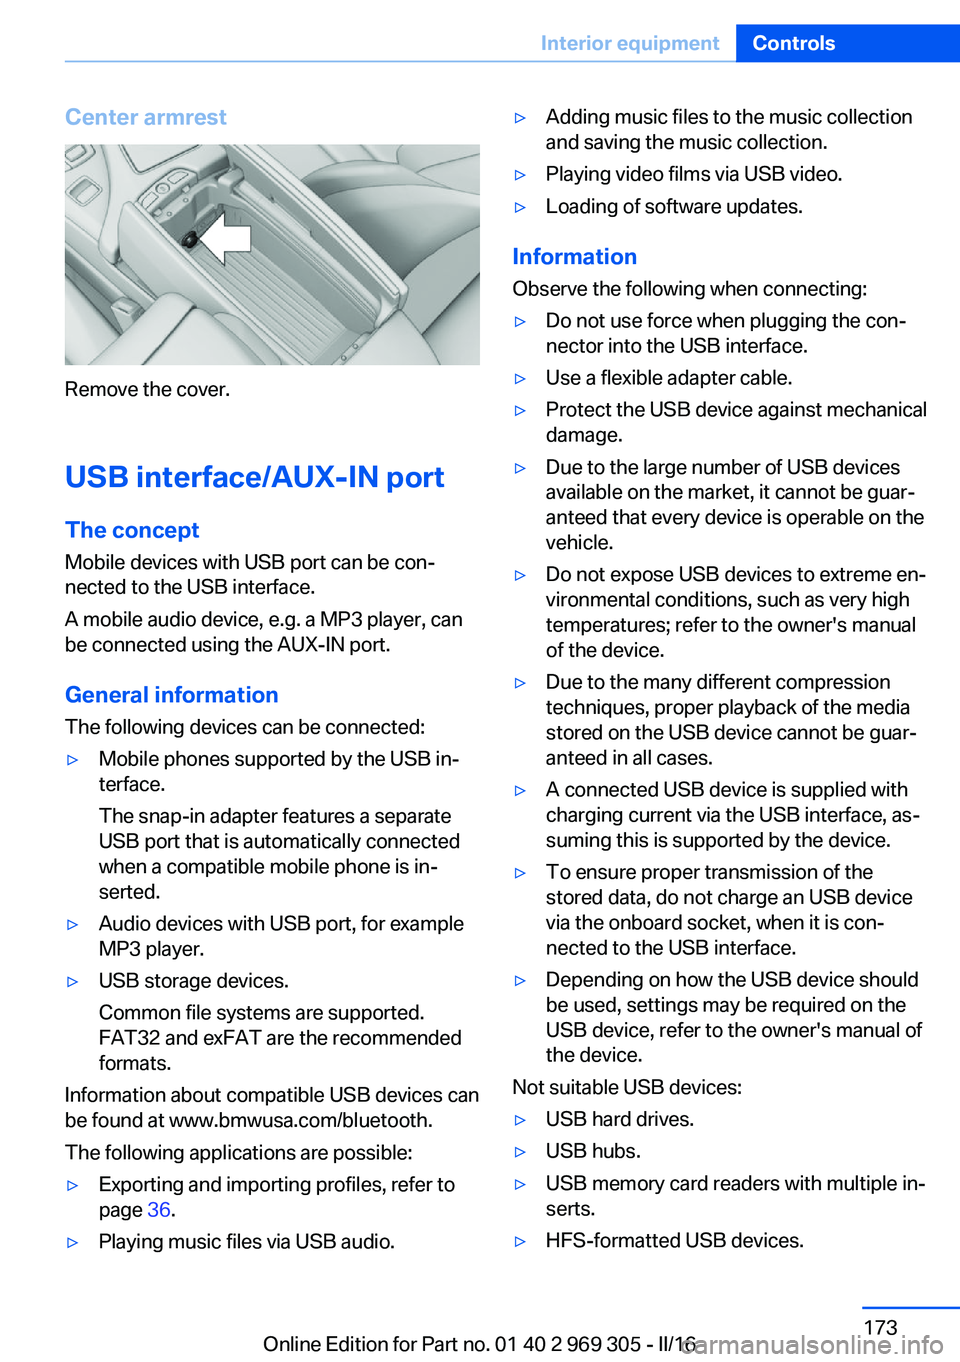
Center armrest
Remove the cover.
USB interface/AUX-IN port The concept
Mobile devices with USB port can be con‐
nected to the USB interface.
A mobile audio device, e.g. a MP3 player, can
be connected using the AUX-IN port.
General information
The following devices can be connected:
▷Mobile phones supported by the USB in‐
terface.
The snap-in adapter features a separate
USB port that is automatically connected
when a compatible mobile phone is in‐
serted.▷Audio devices with USB port, for example
MP3 player.▷USB storage devices.
Common file systems are supported.
FAT32 and exFAT are the recommended
formats.
Information about compatible USB devices can
be found at www.bmwusa.com/bluetooth.
The following applications are possible:
▷Exporting and importing profiles, refer to
page 36.▷Playing music files via USB audio.▷Adding music files to the music collection
and saving the music collection.▷Playing video films via USB video.▷Loading of software updates.
Information
Observe the following when connecting:
▷Do not use force when plugging the con‐
nector into the USB interface.▷Use a flexible adapter cable.▷Protect the USB device against mechanical
damage.▷Due to the large number of USB devices
available on the market, it cannot be guar‐
anteed that every device is operable on the
vehicle.▷Do not expose USB devices to extreme en‐
vironmental conditions, such as very high
temperatures; refer to the owner's manual
of the device.▷Due to the many different compression
techniques, proper playback of the media
stored on the USB device cannot be guar‐
anteed in all cases.▷A connected USB device is supplied with
charging current via the USB interface, as‐
suming this is supported by the device.▷To ensure proper transmission of the
stored data, do not charge an USB device
via the onboard socket, when it is con‐
nected to the USB interface.▷Depending on how the USB device should
be used, settings may be required on the
USB device, refer to the owner's manual of
the device.
Not suitable USB devices:
▷USB hard drives.▷USB hubs.▷USB memory card readers with multiple in‐
serts.▷HFS-formatted USB devices.Seite 173Interior equipmentControls173
Online Edition for Part no. 01 40 2 969 305 - II/16
Page 250 of 261
Everything from A to Z
IndexA ABS, Antilock Brake Sys‐ tem 133
ACC, Active Cruise Control with Stop&Go function 141
Acceleration Assistant, refer to Launch Control 80
Accessories and parts 8
Activated-charcoal filter 165
Active Blind Spot Detec‐ tion 128
Active Cruise Control with Stop&Go function,
ACC 141
Active Protection 130
Active seat, front 53
Active seat ventilation, front 54
Active Steering, integral 137
Adaptive brake assistant 133
Adaptive brake lights, see Brake force display 130
Adaptive drive 136
Adaptive Light Control 102
Additional information, iDrive 22
Additives, oil 222
Adjusting, steering wheel 60
Adjustments, seats/head re‐ straints 51
After washing vehicle 240
Airbags 105
Airbags, indicator/warning light 106
Air circulation, see Recircu‐ lated-air mode 164
Air, dehumidifying, see Cool‐ ing function 163
Air distribution, manual 164 Air flow, automatic climate
control 164
Air outlets, see Ventila‐ tion 166
Air pressure, tires 202
Alarm system 45
Alarm, unintentional 46
All around the center con‐ sole 16
All around the interior mir‐ ror 17
All around the steering wheel 14
All-season tires, see Winter tires 211
All-wheel-drive 135
Alternating-code hand-held transmitter 170
Alternative oil types 222
Animal detection, see Night Vision 123
Antifreeze, washer fluid 76
Antilock Brake System, ABS 133
Anti-slip control, see DSC 133
Anti-theft protection, vehi‐ cle 38
App, BMW Driver’s Guide 6
Approved axle load 247
Armrest, see Front center armrest 178
Armrest, see Rear center armrest 178
Arrival time 95
Ashtray 171
Assistance, Roadside Assis‐ tance 234
Assistance when driving off 133
Attentiveness assistant 130 AUTO H button 71
AUTO H button, see Auto‐ matic Hold 71
AUTO intensity 163
Automatic car wash 239
Automatic cruise control with Stop&Go function 141
Automatic Curb Monitor 59
Automatic deactivation, Front-seat passenger air‐
bags 107
Automatic headlamp con‐ trol 101
Automatic Hold 71
Automatic locking 44
Automatic recirculated-air control 164
Automatic Soft Closing, doors 41
Automatic transmission, see Steptronic transmission 77
AUTO program, automatic cli‐ mate control 163
AUTO program, intensity 163
Auto Start/Stop function 68
AUX-IN port, general informa‐ tion 173
Average fuel consumption 95
Average speed 95
Axle loads, weights 247
B Backrest curvature, see Lum‐ bar support 52
Backrest, seats 51
Backrest, width 53
Band-aids, see First-aid kit 234
Battery replacement, vehicle battery 231 Seite 250ReferenceEverything from A to Z250
Online Edition for Part no. 01 40 2 969 305 - II/16