2017 BMW 6 SERIES GRAN COUPE high beam
[x] Cancel search: high beamPage 15 of 261

Front fog lights 103Lights off
Daytime running lights 102Parking lights 100Low beams 100Automatic headlamp con‐
trol 101
High-beam Assistant 103Instrument lighting 1047Steering column stalk, leftTurn signal 73High beams, head‐
light flasher 73High-beam Assistant 103Roadside parking lights 100Onboard computer 948Shift paddles 799Steering wheel buttons, leftActive Cruise Control on/off, in‐
terrupting 141Cruise control on/off, interrupt‐
ing 147Cruise control: store speedCruise control: resume speedActive Cruise Control: reduce dis‐
tanceActive Cruise Control: increase
distanceCruise control rocker switch10Instrument cluster 8111Steering wheel buttons, rightEntertainment sourceVolumeVoice activation 26Telephone, see Owner's Manual
for Navigation, Entertainment and
CommunicationThumbwheel for selection lists 9312Steering column stalk, rightWiper 73Rain sensor 74Clean the windshields and head‐
lamps 7513Start/stop the engine and switch
the ignition on/off 6714Auto Start/Stop function 6815Horn, total area16Steering wheel heating 6017Adjust the steering wheel 6018Unlocking the hoodSeite 15CockpitAt a glance15
Online Edition for Part no. 01 40 2 969 305 - II/16
Page 67 of 261

The radio-ready state remains active if, for ex‐
ample, the ignition is automatically switched
off for the following reasons:▷Opening or closing the driver's door.▷Unfastening of the driver's safety belt.▷When automatically switching from low
beams to parking lights.
If the engine is switched off and the ignition is
switched on, the system automatically
switches to the radio-ready state if the lights
are turned off or, if correspondingly equipped,
the daytime running lights are activated.
Starting the engine
Information DANGER
If the exhaust pipe is blocked or ventila‐
tion is insufficient, harmful exhaust gases can
enter into the vehicle. The exhaust gases con‐
tain carbon monoxide, an odorless and color‐
less but highly toxic gas. In enclosed areas, ex‐
haust gases can also accumulate outside of
the vehicle. There is danger to life. Keep the
exhaust pipe free and ensure sufficient ventila‐
tion.◀
WARNING
An unsecured vehicle can begin to move
and possibly roll away. There is risk of an acci‐
dent. Before exiting, secure the vehicle against
rolling.
In order to ensure that the vehicle is secured
against rolling away, observe the following:
▷Set the parking brake.▷On uphill grades or on a downhill slope,
turn the front wheels in the direction of the
curb.▷On uphill grades or on a downhill slope,
also secure the vehicle, e.g., with a wheel
chock.◀ATTENTION
In the case of repeated starting attempts
or repeated starting in quick succession, the
fuel is not burned or is inadequately burned.
The catalytic converter can overheat. There is
a risk of damage to property. Avoid repeated
starting in quick succession.◀
Steptronic transmission
Starting the engine1.Depress the brake pedal.2.Press the Start/Stop button.
The ignition is activated automatically for a
certain time and is stopped as soon as the en‐
gine starts.
Engine stop
Information WARNING
Unattended children or animals can
cause the vehicle to move and endanger them‐
selves and traffic, e.g., due to the following ac‐
tions:
▷Pressing the Start/Stop button.▷Releasing the parking brake.▷Opening and closing the doors or win‐
dows.▷Engaging selector lever position N.▷Using vehicle equipment.
There is risk of accidents or injuries. Do not
leave children or animals unattended in the ve‐
hicle. Take the remote control with you when
exiting and lock the vehicle.◀
WARNING
An unsecured vehicle can begin to move
and possibly roll away. There is risk of an acci‐
dent. Before exiting, secure the vehicle against
rolling.
Seite 67DrivingControls67
Online Edition for Part no. 01 40 2 969 305 - II/16
Page 73 of 261

Turn signal, high beams,
headlight flasher
Turn signal
Turn signal in exterior mirror
When driving and during operation of the turn
signals or hazard warning system, do not fold
in the exterior mirrors, so that the signal lights on the exterior mirror are easy to see.
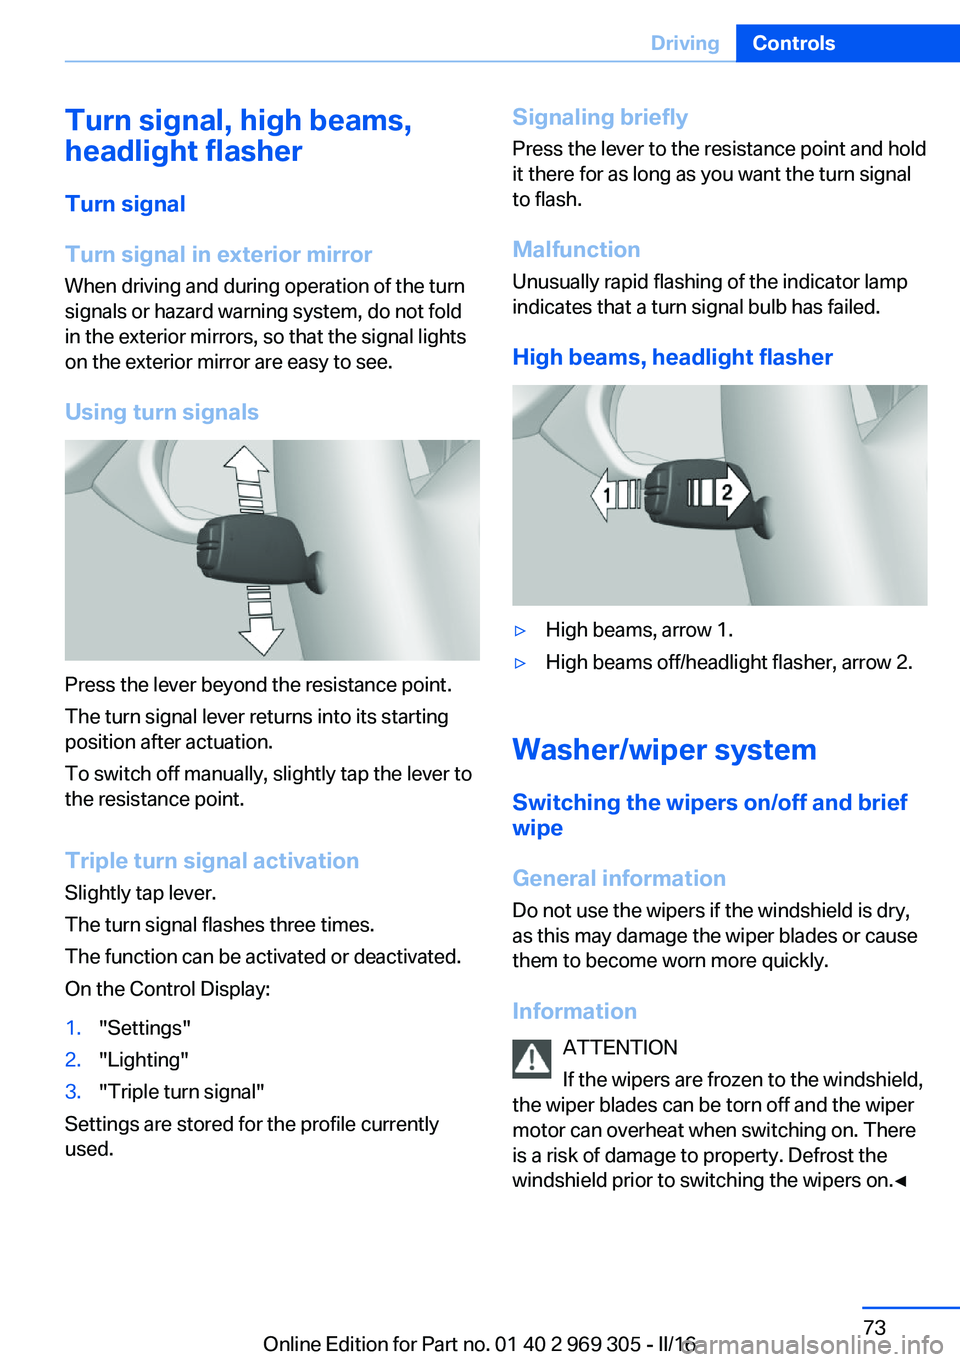
Using turn signals
Press the lever beyond the resistance point.
The turn signal lever returns into its starting
position after actuation.
To switch off manually, slightly tap the lever to
the resistance point.
Triple turn signal activation
Slightly tap lever.
The turn signal flashes three times.
The function can be activated or deactivated.
On the Control Display:
1."Settings"2."Lighting"3."Triple turn signal"
Settings are stored for the profile currently
used.
Signaling briefly
Press the lever to the resistance point and hold
it there for as long as you want the turn signal
to flash.
Malfunction Unusually rapid flashing of the indicator lamp
indicates that a turn signal bulb has failed.
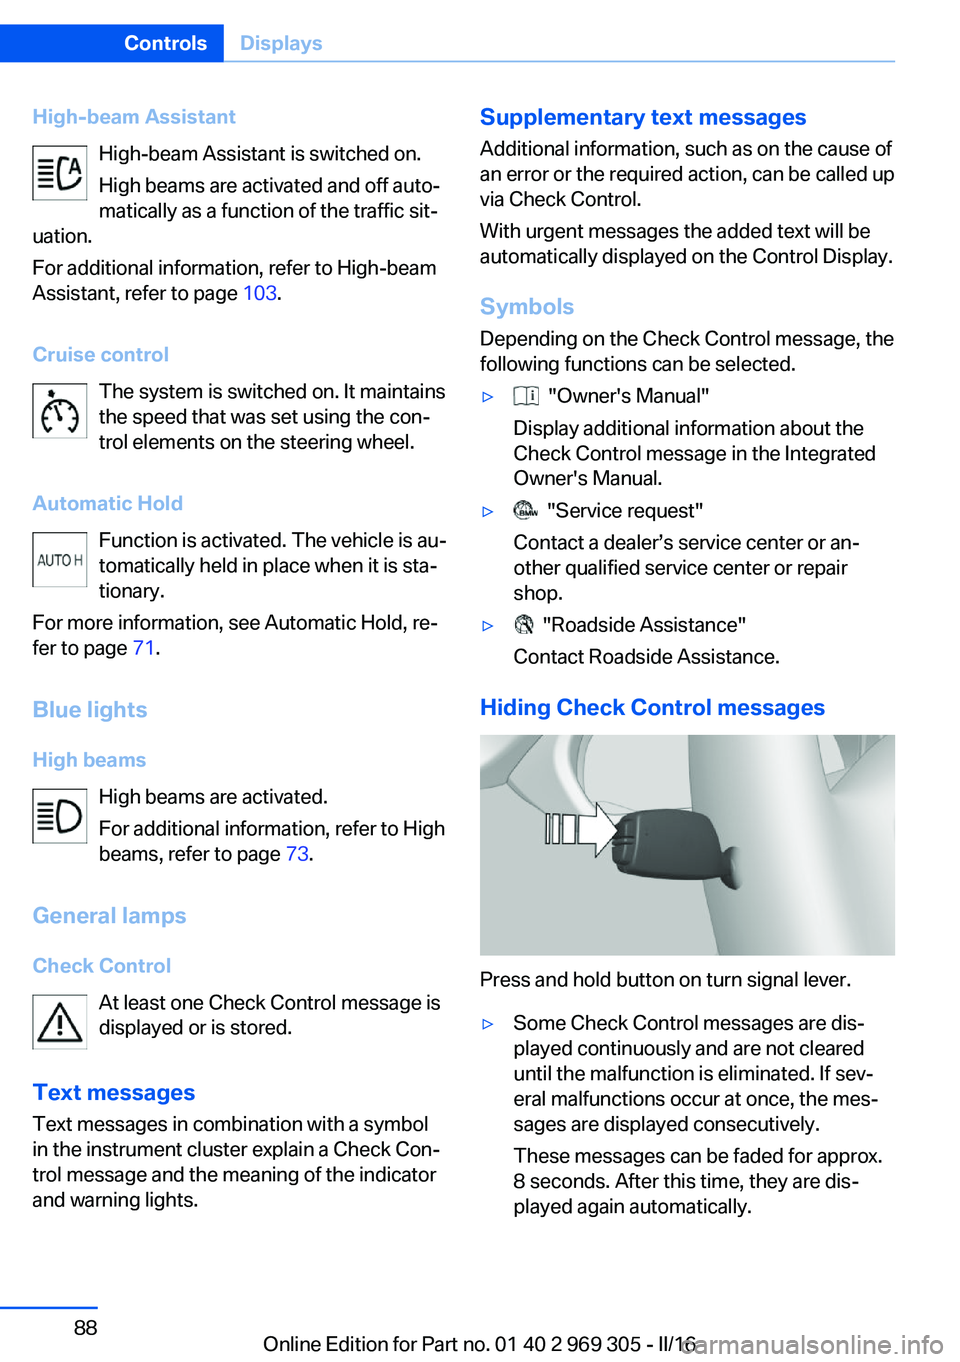
High beams, headlight flasher▷High beams, arrow 1.▷High beams off/headlight flasher, arrow 2.
Washer/wiper system Switching the wipers on/off and brief
wipe
General information
Do not use the wipers if the windshield is dry,
as this may damage the wiper blades or cause them to become worn more quickly.
Information ATTENTION
If the wipers are frozen to the windshield,
the wiper blades can be torn off and the wiper
motor can overheat when switching on. There
is a risk of damage to property. Defrost the
windshield prior to switching the wipers on.◀
Seite 73DrivingControls73
Online Edition for Part no. 01 40 2 969 305 - II/16
Page 88 of 261

High-beam AssistantHigh-beam Assistant is switched on.
High beams are activated and off auto‐
matically as a function of the traffic sit‐
uation.
For additional information, refer to High-beam
Assistant, refer to page 103.
Cruise control The system is switched on. It maintains
the speed that was set using the con‐
trol elements on the steering wheel.
Automatic Hold Function is activated. The vehicle is au‐
tomatically held in place when it is sta‐
tionary.
For more information, see Automatic Hold, re‐
fer to page 71.
Blue lights
High beams High beams are activated.
For additional information, refer to High
beams, refer to page 73.
General lamps
Check Control At least one Check Control message is
displayed or is stored.
Text messages Text messages in combination with a symbol
in the instrument cluster explain a Check Con‐
trol message and the meaning of the indicator
and warning lights.Supplementary text messages
Additional information, such as on the cause of
an error or the required action, can be called up
via Check Control.
With urgent messages the added text will be
automatically displayed on the Control Display.
Symbols
Depending on the Check Control message, the
following functions can be selected.▷ "Owner's Manual"
Display additional information about the
Check Control message in the Integrated
Owner's Manual.▷ "Service request"
Contact a dealer’s service center or an‐
other qualified service center or repair
shop.▷ "Roadside Assistance"
Contact Roadside Assistance.
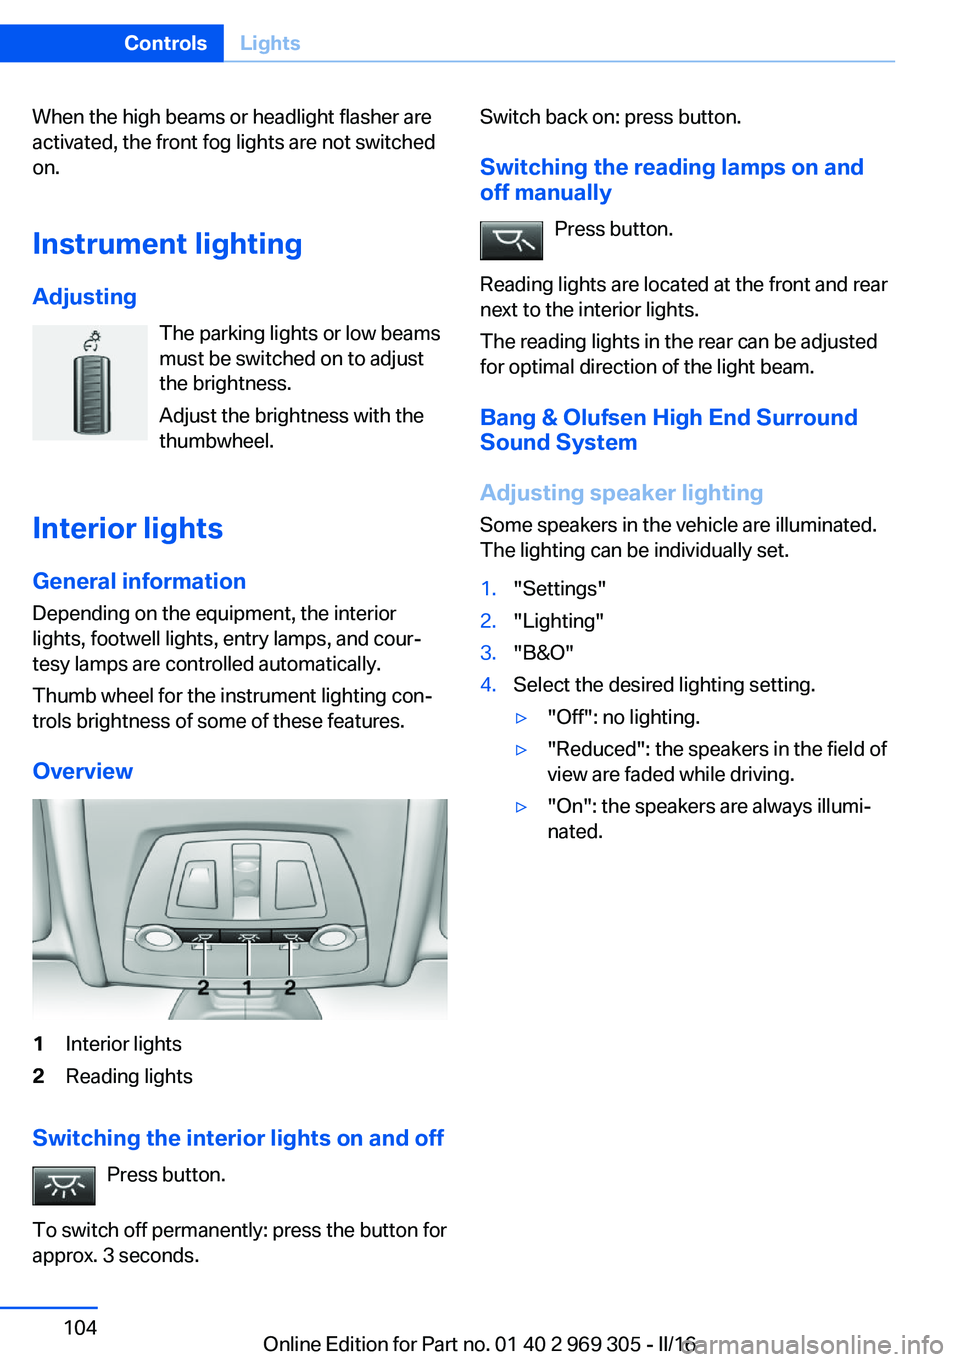
Hiding Check Control messages
Press and hold button on turn signal lever.
▷Some Check Control messages are dis‐
played continuously and are not cleared
until the malfunction is eliminated. If sev‐
eral malfunctions occur at once, the mes‐
sages are displayed consecutively.
These messages can be faded for approx.
8 seconds. After this time, they are dis‐
played again automatically.Seite 88ControlsDisplays88
Online Edition for Part no. 01 40 2 969 305 - II/16
Page 103 of 261

High-beam AssistantThe concept
The high-beam Assistant detects other traffic
participants early on and automatically
switches the high beams on or off depending
on the traffic situation. The assistant ensures
that the high beams are switched on, when‐
ever the traffic situation allows. In the low
speed range, the high beams are not switched
on by the system.
General information
The system responds to light from oncoming
traffic and traffic driving ahead of you, and to
adequate illumination, for example, in towns
and cities.
The driver can intervene at any time and switch
the high beams on and off as usual.
Activating1.Depending on the equipment, turn the light
switch into position
or .
2.Press button on the turn signal lever, ar‐
row.
The indicator lamp in the instrument
cluster is illuminated, when the low
beams are switched on.
The high beams are switched on and off auto‐
matically.
The blue indicator lamp in the instru‐
ment cluster lights up when the system
switches on the high beams.
Deactivating
The High-beam Assistant is deactivated when
manually switching the high beams on and off,
refer to page 73. To reactivate the High-beam
Assistant, press the button on the turn signal
lever.
System limits
The High-beam Assistant cannot serve as a
substitute for the driver's personal judgment of
when to use the high beams. Therefore, man‐
ually switch off the high beams in situations
where required to avoid a safety risk.
The system is not fully functional in the follow‐
ing situations, and driver intervention may be
necessary:▷In very unfavorable weather conditions,
such as fog or heavy precipitation.▷When detecting poorly-lit road users such
as pedestrians, cyclists, horseback riders
and wagons; when driving close to train or
ship traffic; and at animal crossings.▷In tight curves, on hilltops or in depres‐
sions, in cross traffic or half-obscured on‐
coming traffic on highways.▷In poorly-lit towns and cities and in the
presence of highly reflective signs.▷When the windshield behind the interior
mirror is fogged over, dirty or covered with
stickers, etc.
Fog lights
Front fog lights
The parking lights or low beams must be
switched on.
Press button. The green indicator
lamp lights up.
If the automatic headlamp control, refer to
page 101, is activated, the low beams will
come on automatically when you switch on the
front fog lights.
Seite 103LightsControls103
Online Edition for Part no. 01 40 2 969 305 - II/16
Page 104 of 261

When the high beams or headlight flasher are
activated, the front fog lights are not switched
on.
Instrument lighting Adjusting The parking lights or low beams
must be switched on to adjust
the brightness.
Adjust the brightness with the
thumbwheel.
Interior lights
General information Depending on the equipment, the interior
lights, footwell lights, entry lamps, and cour‐
tesy lamps are controlled automatically.
Thumb wheel for the instrument lighting con‐
trols brightness of some of these features.
Overview1Interior lights2Reading lights
Switching the interior lights on and off Press button.
To switch off permanently: press the button for
approx. 3 seconds.
Switch back on: press button.
Switching the reading lamps on and
off manually
Press button.
Reading lights are located at the front and rear
next to the interior lights.
The reading lights in the rear can be adjusted
for optimal direction of the light beam.
Bang & Olufsen High End Surround
Sound System
Adjusting speaker lighting Some speakers in the vehicle are illuminated.
The lighting can be individually set.1."Settings"2."Lighting"3."B&O"4.Select the desired lighting setting.▷"Off": no lighting.▷"Reduced": the speakers in the field of
view are faded while driving.▷"On": the speakers are always illumi‐
nated.Seite 104ControlsLights104
Online Edition for Part no. 01 40 2 969 305 - II/16
Page 229 of 261

service center or repair shop if you are unfami‐
liar with it or if it has not been described here.
A spare lamp box is available from a dealer’s
service center or another qualified service cen‐
ter or repair shop.
WARNING
Bulbs can get hot during operation. Con‐
tact with the bulbs can cause burns. There is a
risk of injuries. Only change bulbs after they
have cooled off.◀
WARNING
Work on switched-on lighting systems
can cause short circuits. There is a risk of inju‐
ries or a risk of property damage. When work‐
ing on the lighting system, switch off the lamps
in question. If necessary, heed the bulb manu‐
facturer's instructions.◀
CAUTION
Dirty bulbs have a reduced service life.
There is a risk of property damage. Do not hold
new bulbs with your bare hands. Use a clean
cloth or something similar, or hold the bulb by
its base.◀
Light-emitting diodes (LEDs)
Some items of equipment use light-emitting
diodes installed behind a cover as a light
source.
These light-emitting diodes, which are related
to conventional lasers, are officially designated as Class 1 light-emitting diodes.
WARNING
Too intensive brightness can irritate or
damage the retina of the eye. There is a a risk
of injury. Do not look directly into the head‐
lights or other light sources. Do not remove the LED covers.◀
Headlight glass
Condensation can form on the inside of the ex‐
ternal lights in cool or humid weather. Whendriving with the lights switched on, the con‐
densation evaporates after a short time. The
headlight glass does not need to be changed.
If despite driving with the lights switched on,
increasing humidity forms, e. g. water droplets
in the lamp, the manufacturer of your vehicle
recommends having it checked by a dealer’s
service center or another qualified service cen‐
ter or repair shop.
Headlight setting
The headlight adjustments can be affected by
changing lights and bulbs. After the headlight
adjustment was changed, have it checked and,
if necessary, corrected by a dealer’s service
center or another qualified service center or re‐ pair shop.
Front lights, bulb replacement
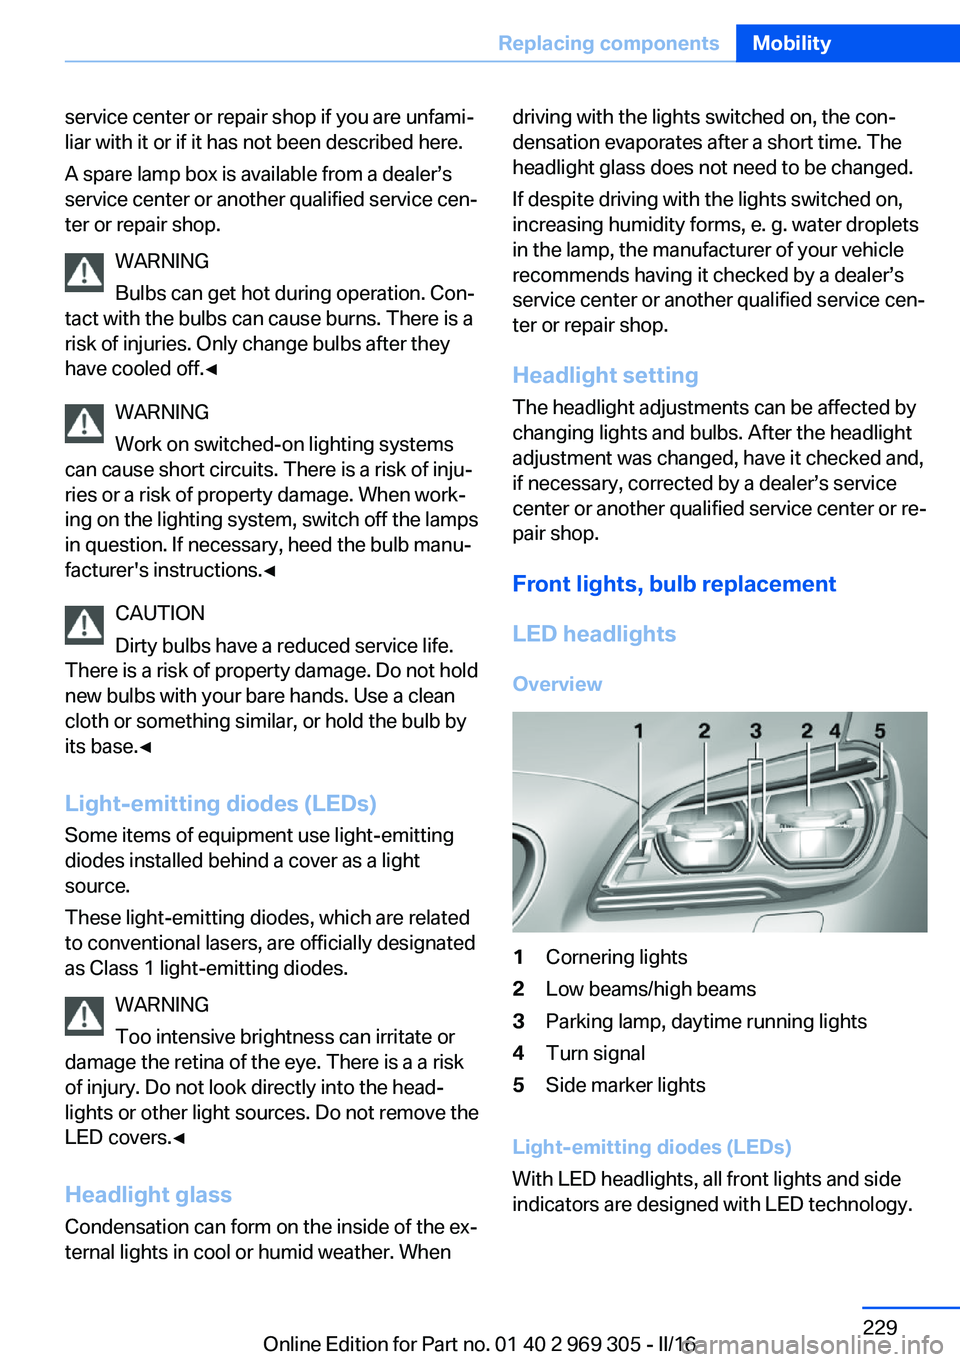
LED headlights Overview1Cornering lights2Low beams/high beams3Parking lamp, daytime running lights4Turn signal5Side marker lights
Light-emitting diodes (LEDs)
With LED headlights, all front lights and side
indicators are designed with LED technology.
Seite 229Replacing componentsMobility229
Online Edition for Part no. 01 40 2 969 305 - II/16
Page 254 of 261

H
Handbrake, see Parking brake 70
Hand-held transmitter, alter‐ nating code 170
Hazard warning flashers 233
HDC Hill Descent Con‐ trol 135
Head airbags 105
Headlamp control, auto‐ matic 101
Headlight courtesy delay fea‐ ture 101
Headlight courtesy delay fea‐ ture via remote control 39
Headlight flasher 73
Headlight glass 229
Headlights 228
Headlights, care 240
Head restraints 51
Head restraints, front 56
Head-up Display 98
Head-up Display, care 242
Heavy cargo, stowing 189
Height, seats 51
Height, vehicle 246
High-beam Assistant 103
High beams 73
High beams/low beams, see High-beam Assistant 103
Hill Descent Control HDC 135
Hills 186
Hill start assistant, see Drive- off assistant 133
Holder for beverages 179
Homepage 6
Hood 217
Horn 14
Hotel function, tailgate 42
Hot exhaust system 185
HUD Head-up Display 98
Hydroplaning 185 I
Ice warning, see External temperature warning 89
Icy roads, see External tem‐ perature warning 89
Identification marks, tires 208
Identification number, see Ve‐ hicle identification num‐
ber 10
iDrive 18
Ignition key, see Remote con‐ trol 34
Ignition off 66
Ignition on 66
Indication of a flat tire 109 , 112
Indicator and alarm lamps, see Check Control 85
Indicator lamp, see Check Control 85
Individual air distribution 164
Individual settings, see Per‐ sonal Profile 36
Inflation pressure, tires 202
Inflation pressure warning FTM, tires 112
Info display, see On-Board computer 94
Information 6
Initialization, Integral Active Steering 137
Initialize, Tire Pressure Moni‐ tor TPM 109
Initializing, Flat Tire Monitor FTM 112
Instrument cluster 81
Instrument cluster, electronic displays 81
Instrument display, multifunc‐ tional 82
Instrument lighting 104
Integral Active Steering 137
Integrated key 34
Integrated Owner's Manual in the vehicle 29 Intelligent emergency
call 233
Intelligent Safety 114
Intensity, AUTO pro‐ gram 163
Interior equipment 169
Interior lights 104
Interior lights during unlock‐ ing 38
Interior lights with the vehicle locked 38
Interior mirror, automatic dim‐ ming feature 60
Interior motion sensor 46
Internet page 6
Interval display, service re‐ quirements 91
Interval mode 74
J
Jacking points for the vehicle jack 231
Joystick, Steptronic transmis‐ sion 77
Jump-starting 235
K
Key/remote control 34
Keyless Go, see Comfort Ac‐ cess 42
Key Memory, see Personal Profile 36
Kickdown, Steptronic trans‐ mission 77
Knee airbag 106
L Label on recommended tires 211
Lamp in the exterior mirror, see Active Blind Spot De‐
tection 128
Lamp replacement, front 228 Seite 254ReferenceEverything from A to Z254
Online Edition for Part no. 01 40 2 969 305 - II/16