2017 Alfa Romeo Giulia seats
[x] Cancel search: seatsPage 128 of 268
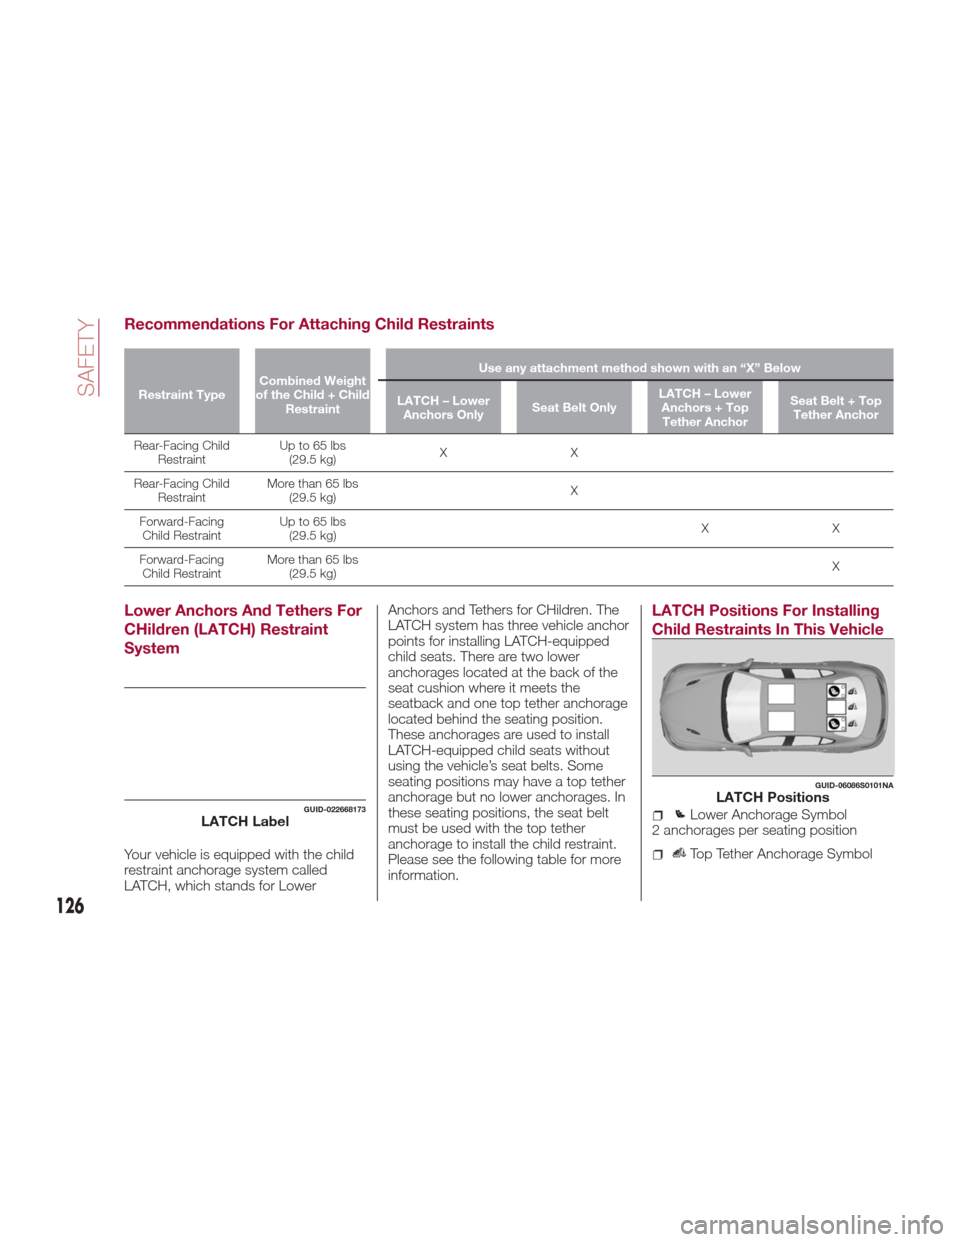
Recommendations For Attaching Child Restraints
Restraint TypeCombined Weight
of the Child + Child Restraint Use any attachment method shown with an “X” Below
LATCH – Lower Anchors Only Seat Belt OnlyLATCH – Lower
Anchors + TopTether Anchor Seat Belt + Top
Tether Anchor
Rear-Facing Child Restraint Up
to 65 lbs
(29.5 kg) XX
Rear-Facing Child Restraint More than 65 lbs
(29.5 kg) X
Forward-Facing Child Restraint Up to 65 lbs
(29.5 kg) XX
Forward-Facing Child Restraint More than 65 lbs
(29.5 kg) X
Lower Anchors And Tethers For
CHildren (LATCH) Restraint
System
Your vehicle is equipped with the child
restraint anchorage system called
LATCH, which stands for LowerAnchors and Tethers for CHildren. The
LATCH system has three vehicle anchor
points for installing LATCH-equipped
child seats. There are two lower
anchorages located at the back of the
seat cushion where it meets the
seatback and one top tether anchorage
located behind the seating position.
These anchorages are used to install
LATCH-equipped child seats without
using the vehicle’s seat belts. Some
seating positions may have a top tether
anchorage but no lower anchorages. In
these seating positions, the seat belt
must be used with the top tether
anchorage to install the child restraint.
Please see the following table for more
information.
LATCH Positions For Installing
Child Restraints In This Vehicle
GUID-022668173LATCH Label
GUID-06086S0101NALATCH Positions
Lower Anchorage Symbol
2 anchorages per seating position
Top Tether Anchorage Symbol
126
SAFETY
Page 131 of 268
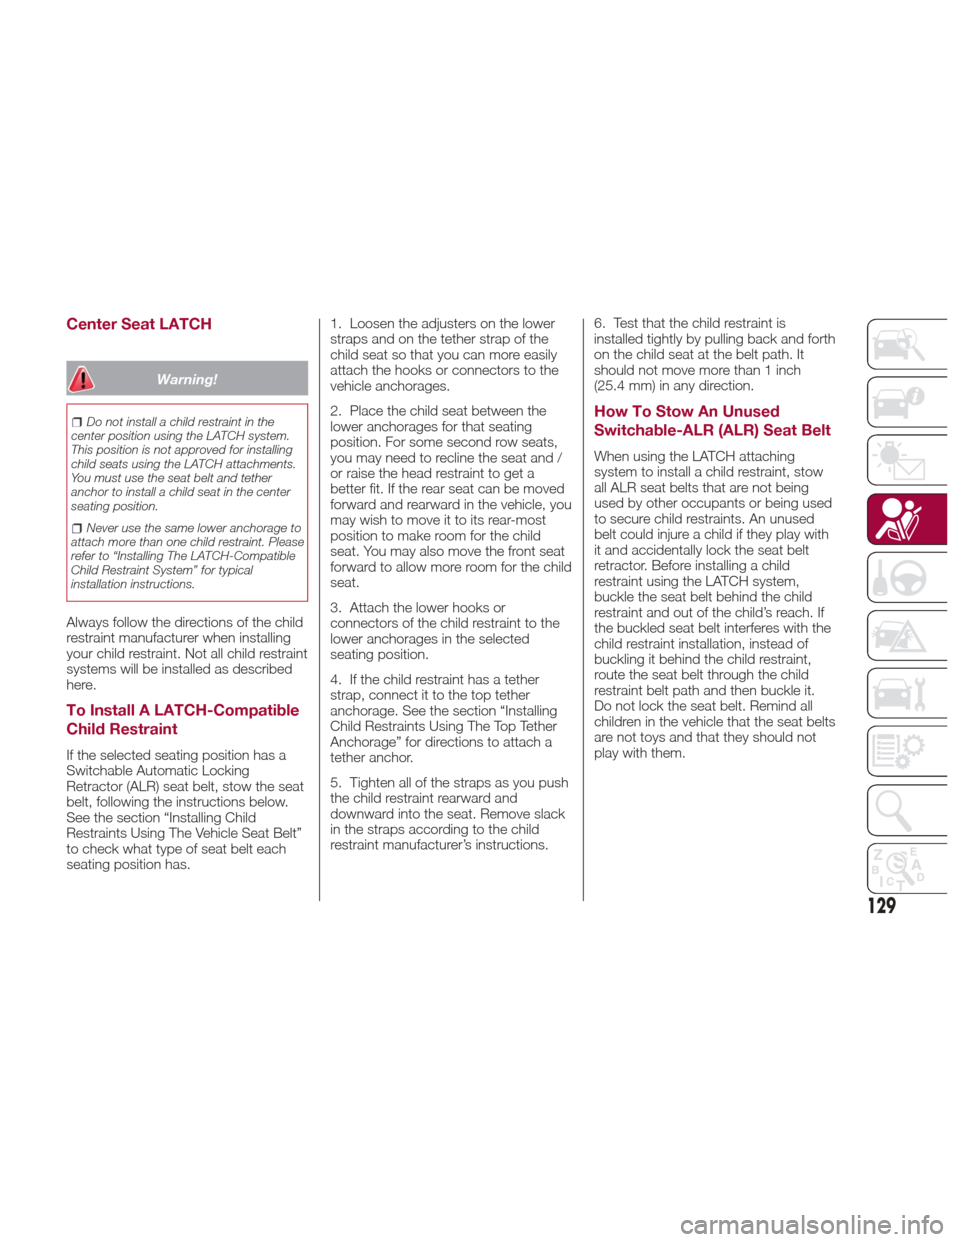
Center Seat LATCH
Warning!
Do not install a child restraint in the
center position using the LATCH system.
This position is not approved for installing
child seats using the LATCH attachments.
You must use the seat belt and tether
anchor to install a child seat in the center
seating position.
Never use the same lower anchorage to
attach more than one child restraint. Please
refer to “Installing The LATCH-Compatible
Child Restraint System” for typical
installation instructions.
Always follow the directions of the child
restraint manufacturer when installing
your child restraint. Not all child restraint
systems will be installed as described
here.
To Install A LATCH-Compatible
Child Restraint
If the selected seating position has a
Switchable Automatic Locking
Retractor (ALR) seat belt, stow the seat
belt, following the instructions below.
See the section “Installing Child
Restraints Using The Vehicle Seat Belt”
to check what type of seat belt each
seating position has. 1. Loosen the adjusters on the lower
straps and on the tether strap of the
child seat so that you can more easily
attach the hooks or connectors to the
vehicle anchorages.
2. Place the child seat between the
lower anchorages for that seating
position. For some second row seats,
you may need to recline the seat and /
or raise the head restraint to get a
better fit. If the rear seat can be moved
forward and rearward in the vehicle, you
may wish to move it to its rear-most
position to make room for the child
seat. You may also move the front seat
forward to allow more room for the child
seat.
3. Attach the lower hooks or
connectors of the child restraint to the
lower anchorages in the selected
seating position.
4. If the child restraint has a tether
strap, connect it to the top tether
anchorage. See the section “Installing
Child Restraints Using The Top Tether
Anchorage” for directions to attach a
tether anchor.
5. Tighten all of the straps as you push
the child restraint rearward and
downward into the seat. Remove slack
in the straps according to the child
restraint manufacturer’s instructions.
6. Test that the child restraint is
installed tightly by pulling back and forth
on the child seat at the belt path. It
should not move more than 1 inch
(25.4 mm) in any direction.
How To Stow An Unused
Switchable-ALR (ALR) Seat Belt
When using the LATCH attaching
system to install a child restraint, stow
all ALR seat belts that are not being
used by other occupants or being used
to secure child restraints. An unused
belt could injure a child if they play with
it and accidentally lock the seat belt
retractor. Before installing a child
restraint using the LATCH system,
buckle the seat belt behind the child
restraint and out of the child’s reach. If
the buckled seat belt interferes with the
child restraint installation, instead of
buckling it behind the child restraint,
route the seat belt through the child
restraint belt path and then buckle it.
Do not lock the seat belt. Remind all
children in the vehicle that the seat belts
are not toys and that they should not
play with them.
129
Page 132 of 268
Warning!
Improper installation of a child restraint
to the LATCH anchorages can lead to
failure of the restraint. The child could be
badly injured or killed. Follow the child
restraint manufacturer’s directions exactly
when installing an infant or child restraint.
Child restraint anchorages are designed
to withstand only those loads imposed by
correctly-fitted child restraints. Under no
circumstances are they to be used for adult
seat belts, harnesses, or for attaching other
items or equipment to the vehicle.
Installing Child Restraints Using
The Vehicle Seat Belt
Child restraint systems are designed to
be secured in vehicle seats by lap belts
or the lap belt portion of a lap/shoulder
belt.
Warning!
Improper installation or failure to properly
secure a child restraint can lead to failure of
the restraint. The child could be badly
injured or killed.
Follow the child restraint manufacturer’s
directions exactly when installing an infant
or child restraint.
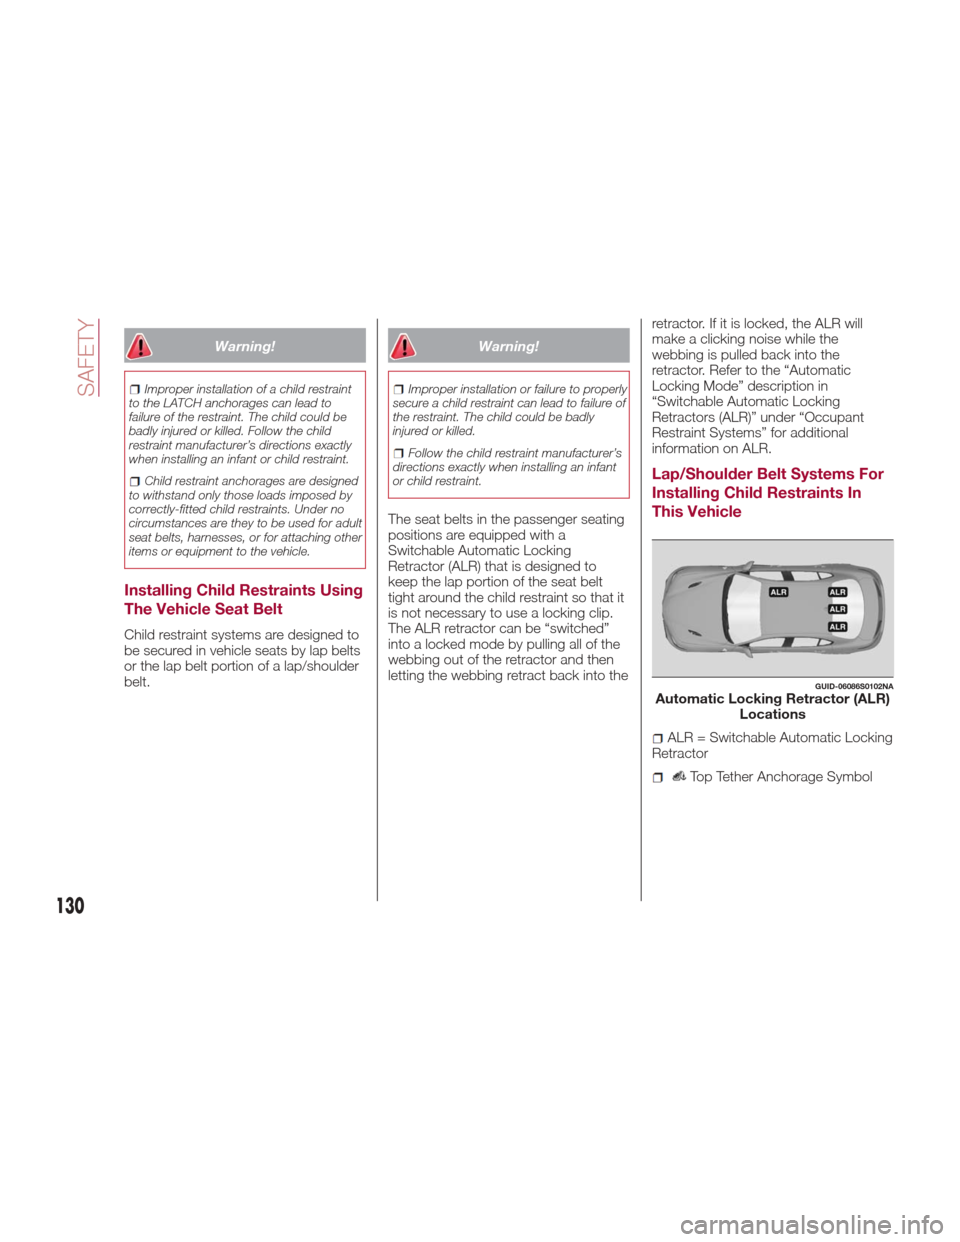
The seat belts in the passenger seating
positions are equipped with a
Switchable Automatic Locking
Retractor (ALR) that is designed to
keep the lap portion of the seat belt
tight around the child restraint so that it
is not necessary to use a locking clip.
The ALR retractor can be “switched”
into a locked mode by pulling all of the
webbing out of the retractor and then
letting the webbing retract back into the retractor. If it is locked, the ALR will
make a clicking noise while the
webbing is pulled back into the
retractor. Refer to the “Automatic
Locking Mode” description in
“Switchable Automatic Locking
Retractors (ALR)” under “Occupant
Restraint Systems” for additional
information on ALR.
Lap/Shoulder Belt Systems For
Installing Child Restraints In
This Vehicle
GUID-06086S0102NAAutomatic Locking Retractor (ALR)
Locations
ALR = Switchable Automatic Locking
Retractor
Top Tether Anchorage Symbol
130
SAFETY
Page 133 of 268
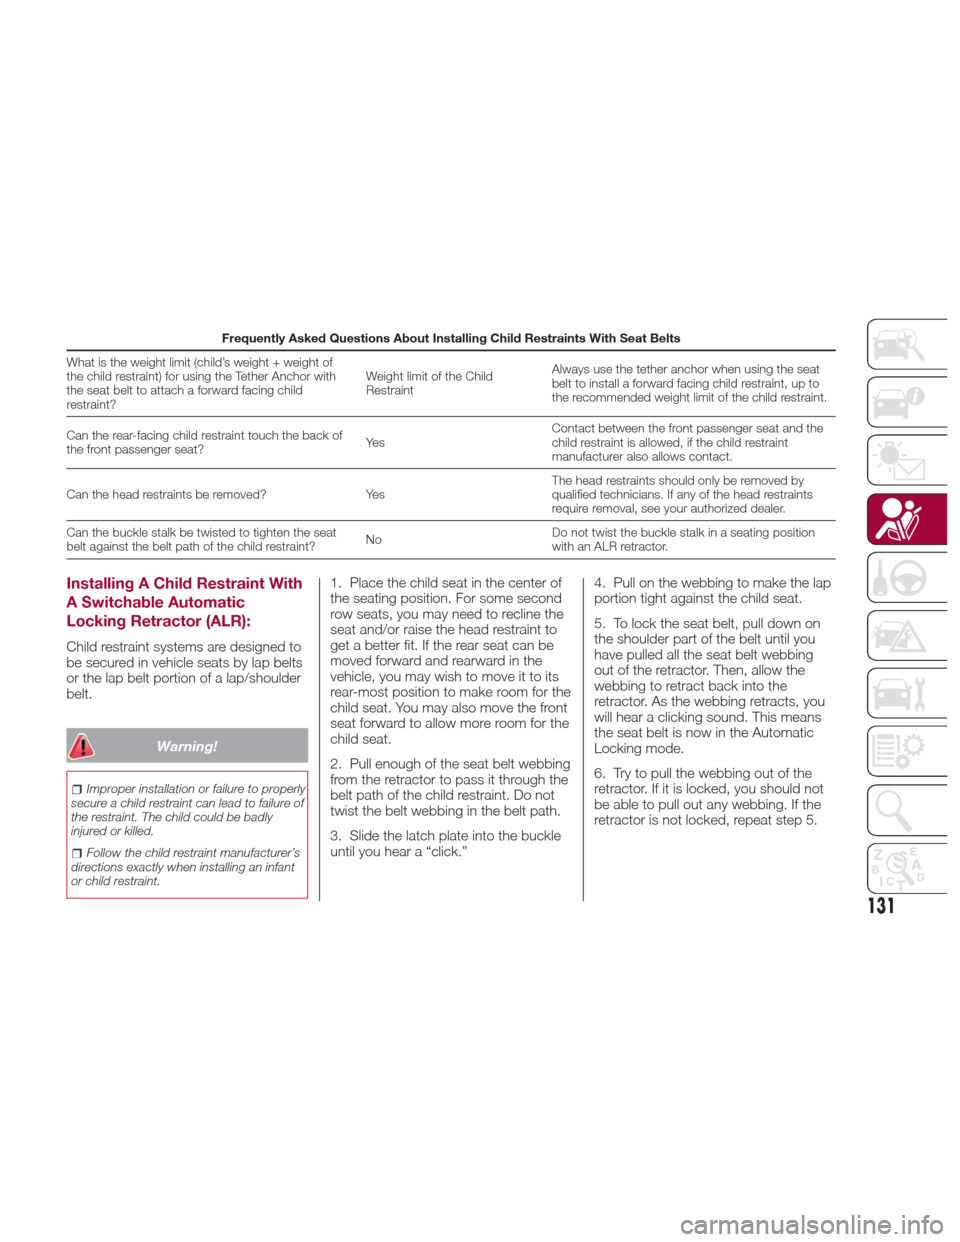
Frequently Asked Questions About Installing Child Restraints With Seat Belts
What is the weight limit (child’s weight + weight of
the child restraint) for using the Tether Anchor with
theseatbelttoattachaforwardfacingchild
restraint? Weight limit of the Child
Restraint
Always use the tether anchor when using the seat
belt to install a forward facing child restraint, up to
the recommended weight limit of the child restraint.
Can the rear-facing child restraint touch the back of
the front passenger seat? Ye sContact between the front passenger seat and the
child restraint is allowed, if the child restraint
manufacturer also allows contact.
Can the head restraints be removed? YesThe head restraints should only be removed by
qualified technicians. If any of the head restraints
require removal, see your authorized dealer.
Can the buckle stalk be twisted to tighten the seat
belt against the belt path of the child restraint? NoDo not twist the buckle stalk in a seating position
with an ALR retractor.
Installing A Child Restraint With
A Switchable Automatic
Locking Retractor (ALR):
Child restraint systems are designed to
be secured in vehicle seats by lap belts
or the lap belt portion of a lap/shoulder
belt.
Warning!
Improper installation or failure to properly
secure a child restraint can lead to failure of
the restraint. The child could be badly
injured or killed.
Follow the child restraint manufacturer’s
directions exactly when installing an infant
or child restraint.
1. Place the child seat in the center of
the seating position. For some second
row seats, you may need to recline the
seat and/or raise the head restraint to
get a better fit. If the rear seat can be
moved forward and rearward in the
vehicle, you may wish to move it to its
rear-most position to make room for the
child seat. You may also move the front
seat forward to allow more room for the
child seat.
2. Pull enough of the seat belt webbing
from the retractor to pass it through the
belt path of the child restraint. Do not
twist the belt webbing in the belt path.
3. Slide the latch plate into the buckle
until you hear a “click.” 4. Pull on the webbing to make the lap
portion tight against the child seat.
5. To lock the seat belt, pull down on
the shoulder part of the belt until you
have pulled all the seat belt webbing
out of the retractor. Then, allow the
webbing to retract back into the
retractor. As the webbing retracts, you
will hear a clicking sound. This means
the seat belt is now in the Automatic
Locking mode.
6. Try to pull the webbing out of the
retractor. If it is locked, you should not
be able to pull out any webbing. If the
retractor is not locked, repeat step 5.
131
Page 137 of 268
STARTING THE
ENGINE
Starting The Engine
Before starting the engine, be sure to
adjust the seat, the interior rear view
mirrors, and the door mirrors, and
fasten the seat belt correctly.
Never press the accelerator pedal
before starting the engine.
If necessary, messages indicating the
starting procedure can be shown in the
display.
Warning!
When leaving the vehicle, always remove
the key fob from the vehicle and lock your
vehicle.
Never leave children alone in a vehicle,
or with access to an unlocked vehicle.
Allowing children to be in a vehicle
unattended is dangerous for a number of
reasons. A child or others could be
seriously or fatally injured. Children should
be warned not to touch the parking brake,
brake pedal or the transmission gear
selector.
Do not leave the key fob in or near the
vehicle, or in a location accessible to
children. A child could operate power
windows, other controls, or move the
vehicle.
Do not leave children or animals inside
parked vehicles in hot weather. Interior heat
build-up may cause serious injury or death.
Starting Procedure
Proceed as follows:
1. Apply the electric park brake and set
the gear selector to PARK (P) or
NEUTRAL (N).
2. Fully depress the brake pedal
without touching the accelerator.
3. Briefly push the ignition button.
4. If the engine doesn't start within a
few seconds, you need to repeat the
procedure.
If the problem persists, contact an
authorized dealer.
Warning!
Never pour fuel or other flammable liquid
into the throttle body air inlet opening in an
attempt to start the vehicle. This could
result in flash fire causing serious personal
injury.
Do not attempt to push or tow your
vehicle to get it started. Vehicles equipped
with an automatic transmission cannot be
started this way. Unburned fuel could enter
the catalytic converter and once the engine
has started, ignite and damage the
converter and vehicle.
If the vehicle has a discharged battery,
booster cables may be used to obtain a
start from a booster battery or the battery
in another vehicle. This type of start can be
dangerous if done improperly. Refer to
“Emergency Starting” in “In Case Of
Emergency” for further information.
Caution!
To prevent damage to the starter, do not
continuously crank the engine for more
than 25 seconds at a time. Wait
60 seconds before trying again.
Remote Starting System
— If Equipped
This system uses the key fob to start
the engine conveniently from outside
the vehicle while still maintaining
security. The system has a range of at
least 300 feet (91 meters).
The remote starting system also
activates the climate control (if
equipped), the heated seats (if
equipped), and the heated steering
wheel (if equipped), depending on
temperatures outside and inside of the
car.
Note:
The vehicle must be equipped with
an automatic transmission in order to
include remote start.
Obstructions between the vehicle
and key fob may reduce this range.
135
Page 239 of 268
INTERIORS
Periodically check the cleanliness of the
interior, beneath the mats, which could
cause oxidation of the sheet metal.
Seats And Fabric Parts
Remove dust with a soft brush or a
vacuum cleaner. It is advised to use a
moist brush on velvet upholstery. Rub
the seats with a sponge moistened with
a solution of water and neutral
detergent.
Leather Seats — If
Equipped
Remove the dry dirt with a chamois or
slightly damp cloth, without exerting too
much pressure.
Remove any liquid or grease stains
using an absorbent dry cloth, without
rubbing. Then clean with a soft cloth or
buckskin cloth dampened with water
and mild soap. If the stain persists, use
specific products and observe the
instructions carefully.
Note:Never use alcohol. Make sure
that the cleaning products used contain
no alcohol or alcohol derivatives, even
in small quantities.
Plastic And Coated
Parts
Clean interior plastic parts with a damp
cloth (if possible made from microfiber),
and a solution of water and neutral,
non-abrasive detergent.
To clean oily or persistent stains, use
specific products free from solvents and
designed to maintain the original
appearance and color of the
components.
Remove any dust using a microfiber
cloth, if necessary moistened with
water. The use of paper tissues is not
recommended as these may leave
residues.
Genuine Leather Parts —
If Equipped
Use only water and mild soap to clean
these parts. Never use alcohol or
alcohol-based products.
Before using a specific product for
cleaning interiors, make sure that it
does not contain alcohol and/or alcohol
based substances.
Carbon Fiber Parts
To eliminate small scratches and marks
on the carbon, contact your authorized
dealer. An improperly performed
operation may irreparably damage the
carbon.
237
Page 249 of 268
LUGGAGE
COMPARTMENT VOLUME
Capacity (V.D.A. standards)
Rear seats not folded
Vehicle unladen: 16.96 cubic feet
247
Page 262 of 268

INDEX
Accessories purchased by theowner ....................3
Active aerodynamics ...........60
Active safety systems ...........96
Active Torque Vectoring (ATV) System ..................99
Adaptive Cruise Control ........156
Adaptive Cruise Control (ACC) (Cruise Control) ............156
Additional Heaters .............48
Additives, Fuel ..............250
AirBag.................. .116
Air Bag Components .....115,120
Air Bag Operation ..........117
Air Bag Warning Light .......115
Driver Knee Air Bag .........118
Enhanced Accident Response . .203
Event Data Recorder (EDR) . . . .203
FrontAirBag ............ .116
If A Deployment Occurs ......120
Knee Impact Bolsters .......117
Maintaining Your Air Bag
System ............... .122
Redundant Air Bag Warning
Light ................. .116
Side Air Bags .............118
Transporting Pets ..........133
Air Bag Light ...............115
Air Bag Maintenance ..........122Air Pressure, Tires
............230
Alarm (Security Alarm) ..........19
Alfa Active Suspension (AAS) .....149
Alfa DNA system .............146
Anti-Lock Braking (ABS) System ....96
Automatic Dimming Mirror ........33
Automatic Headlights ...........34
Automatic Temperature Control (ATC) ...................43
Automatic transmission.........140
Auxiliary Driving Systems ........99
B-Pillar Location.............223
Battery .................. .212
Battery recharging ............212
Blind Spot Monitoring ..........99
Bodywork (cleaning and maintenance) .............235
Brakes .................. .243
brake fluid level ............211
Brightness, Interior Lights ........39
Camera, Rear..............170
Cargo Tie-Downs .............54
Certification Label ............173
Changing A Flat Tire ...........220
Checking levels ..............209
Child Restraint ..............123
Child Restraints Booster Seats ............125
Child Restraints ...........123 Child Seat Installation
........131
How To Stow An Unused ALR
Seat Belt ............... .129
Infants And Child Restraints . . . .124
LATCH Positions ..........126
Lower Anchors And Tethers For
Children ............... .126
Older Children And Child
Restraints ...............124
Seating Positions ..........126
Using The Top Tether
Anchorage ..............132
Clean Air Gasoline ............249
Cleaning Wheels ............... .227
Climate Control ............42,45
Close The Hood ..............52
Compact Spare Tire ...........226
Contract, Service ............257
Courtesy mirror light (bulb replacement) ..............184
Cruise Control (Speed Control) . . . .156
Cupholder ..................59
Cupholders .................59
Customer Assistance ..........256
Daytime Running Lights .........35
Daytime Running Lights (DRL) .....35
Dimensions ............... .246
Direction indicators (changing a bulb) .................. .183
INDEX