2017 Acura TLX display
[x] Cancel search: displayPage 35 of 75

| 6362 |
Learn about Acura’s advanced connectivity services.
AcuraLink Messages
Receive messages on vehicle features, safety and emissions recall campaigns,
maintenance reminders, and diagnostic information. Some message features
require a phone connection. Visit www.acura.com/handsfreelink (U.S.) or www.
handsfreelink.ca (Canada) to check phone compatibility.
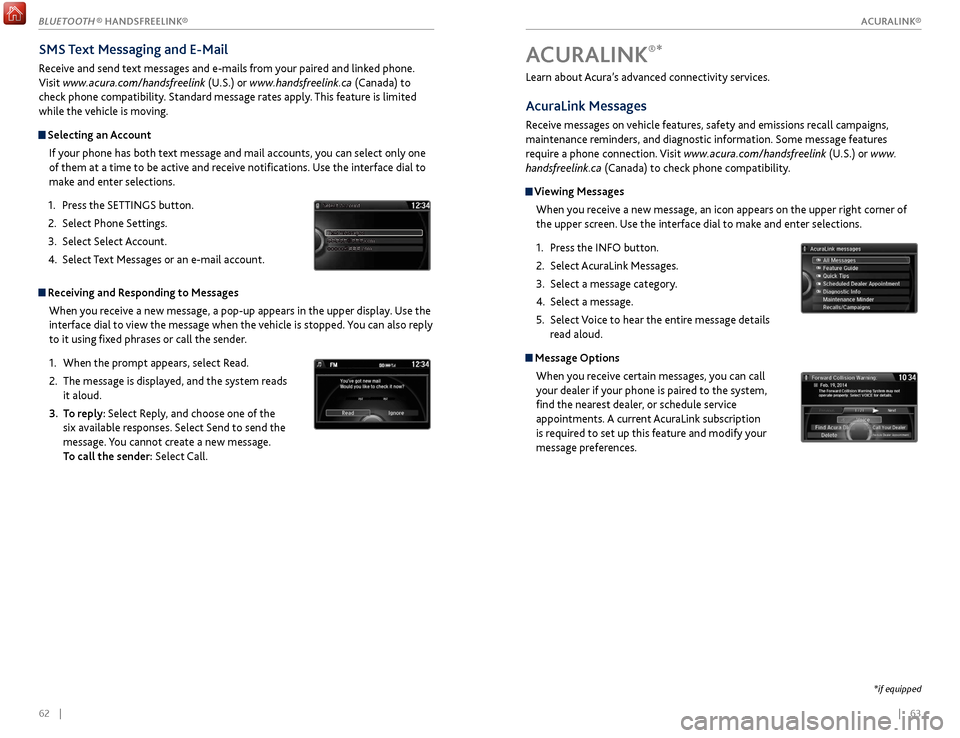
Viewing Messages
When you receive a new message, an icon appears on the upper right corner of
the upper screen. Use the interface dial to make and enter selections.
1.
Pr
ess the INFO button.
2.
Select A
curaLink Messages.
3.
Select a message category
.
4.
Select a message.
5.
Select
Voice to hear the entire message details
read aloud.
Message Options
When you receive certain messages, you can call
your dealer if your phone is paired to the system,
find the nearest dealer, or schedule service
appointments. A current AcuraLink subscription
is required to set up this feature and modify your
message preferences.
ACURALINK®*
*if equipped
SMS Text Messaging and E-Mail
Receive and send text messages and e-mails from your paired and linked phone.
Visit www.acura.com/handsfreelink (U.S.) or www.handsfreelink.ca (Canada) to
check phone compatibility. Standard message rates apply. This feature is limited
while the vehicle is moving.
Selecting an Account
If your phone has both text message and mail accounts, you can select only one
of them at a time to be active and receive notifications. Use the interface dial to
make and enter selections.
1.
Pr
ess the SETTINGS button.
2.
Select
Phone Settings.
3.
Select
Select Account.
4.
Select
Text Messages or an e-mail account.
Receiving and Responding to MessagesWhen you receive a new message, a pop-up appears in the upper display. Use the
interface dial to view the message when the vehicle is stopped. You can also reply
to it using fixed phrases or call the sender.
1.
When
the prompt appears, select Read.
2.
The message is
displayed, and the system reads
it aloud.
3.
T
o reply: Select Reply, and choose one of the
six available responses. Select Send to send the
message. You cannot create a new message.
To call the sender: Select Call.
xyz xyz
ACURALINK®
BLUETOOTH ® HANDSFREELINK®
ACURALINK®
Page 37 of 75

66 || 67
NAVIGATION
NAVIGATION
System Guidance Volume
Adjust the navigation system guidance volume. This does not affect audio or
Bluetooth® HandsFreeLink® volume, which is controlled by the volume knob. Use
the interface dial to make and enter selections.
1.
F
rom the map screen, press the interface dial to
display the map menu.
2.
Select
Guidance Volume.
3.
A
djust the volume to your preferred level.
4.
Pr
ess BACK to exit the menu.
Voice PromptTurn the voice prompt feature on or off. Use the interface dial to make and enter
selections.
1.
Pr
ess SETTINGS.
2.
Select S
ystem Settings.
3.
Select V
oice Prompt.
4.
Select Off
or On.
On: Provides voice prompts.
Off: Voice prompts are disabled.
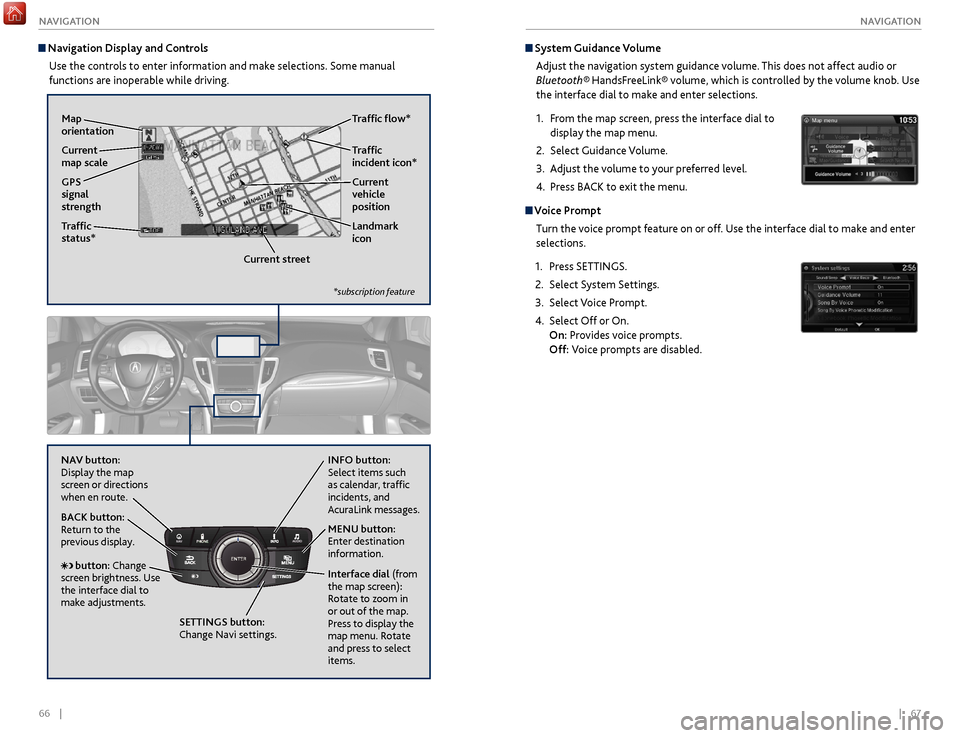
Navigation Display and Controls
Use the controls to enter information and make selections. Some manual
functions are inoperable while driving.
NAVAUDIOAUDIONAV
NAV button:
Display the map
screen or directions
when en route. INFO
button:
Select items such
as calendar, traffic
incidents, and
AcuraLink messages.
BACK button:
Return to the
previous display.
SETTINGS button:
Change Navi settings. MENU button:
Enter destination
information.
button: Change
screen brightness. Use
the interface dial to
make adjustments. Interface dial
(from
the map screen):
Rotate to zoom in
or out of the map.
Press to display the
map menu. Rotate
and press to select
items.
GPS
signal
strength Traffic
incident icon*
Traffic
status* Traffic flow*
Current
map scale Current
vehicle
position
Map
orientation
Current streetLandmark
icon
*subscription feature
Page 38 of 75

68 || 69
NAVIGATION
NAVIGATION
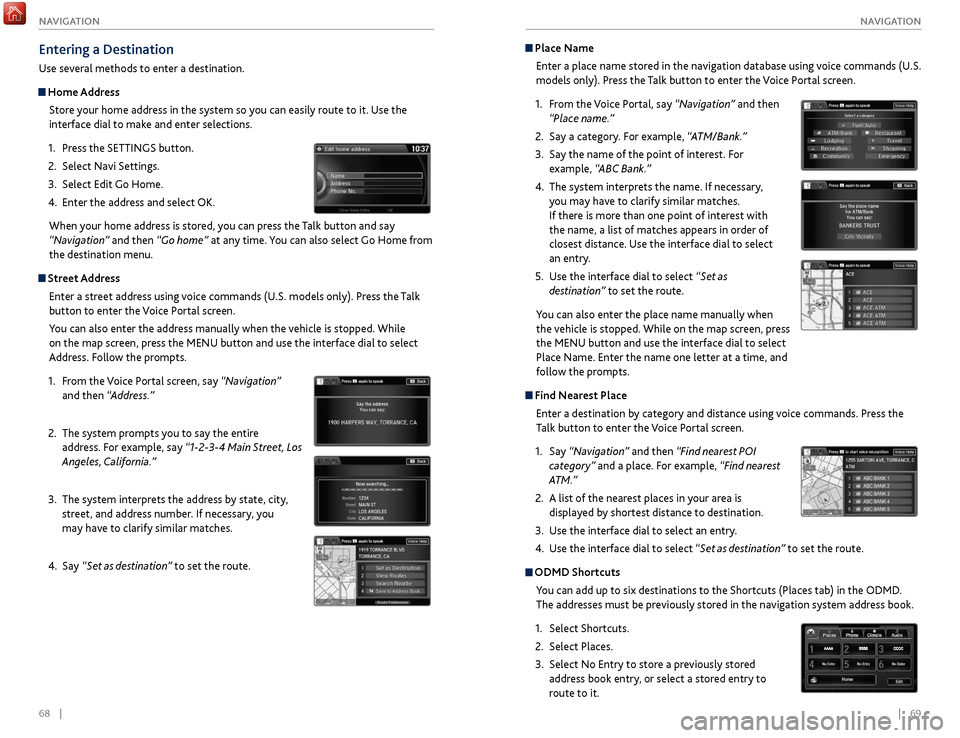
Place Name
Enter a place name stored in the navigation database using voice commands (U.S.
models only). Press the Talk button to enter the Voice Portal screen.
1.
F
rom the Voice Portal, say “Navigation” and then
“Place name.”
2.
Say a category
. For example, “ATM/Bank.”
3.
Say the
name of the point of interest. For
example, “ABC Bank.”
4.
The system interpr
ets the name. If necessary,
you may have to clarify similar matches.
If there is more than one point of interest with
the name, a list of matches appears in order of
closest distance. Use the interface dial to select
an entry.
5.
Use the
interface dial to select “Set as
destination” to set the route.
You can also enter the place name manually when
the vehicle is stopped. While on the map screen, press
the MENU button and use the interface dial to select
Place Name. Enter the name one letter at a time, and
follow the prompts.
Find Nearest Place Enter a destination by category and distance using voice commands. Press the
Talk button to enter the Voice Portal screen.
1.
Say
“Navigation” and then “Find nearest POI
category” and a place. For example, “Find nearest
ATM.”
2.
A list
of the nearest places in your area is
displayed by shortest distance to destination.
3.
Use
the interface dial to select an entry.
4.
Use the
interface dial to select “Set as destination” to set the route.
ODMD Shortcuts
You can add up to six destinations to the Shortcuts (Places tab) in the ODMD.
The addresses must be previously stored in the navigation system address book.
1.
Select Shortcuts.
2.
Select Places.
3.
Select No Entry
to store a previously stored
address book entry, or select a stored entry to
route to it.
Entering a Destination
Use several methods to enter a destination.
Home Address
Store your home address in the system so you can easily route to it. Use the
interface dial to make and enter selections.
1.
Pr
ess the SETTINGS button.
2.
Select
Navi Settings.
3.
Select Edit
Go Home.
4.
Enter
the address and select OK.
When your home address is stored, you can press the Talk
button and say
“Navigation” and then “Go home” at any time. You can also select Go Home from
the destination menu.
Street Address
Enter a street address using voice commands (U.S. models only). Press the Talk
button to enter the Voice Portal screen.
You can also enter the address manually when the vehicle is stopped. While
on the map screen, press the MENU button and use the interface dial to select
Address. Follow the prompts.
1.
F
rom the Voice Portal screen, say “Navigation”
and then “Address.”
2.
The system pr
ompts you to say the entire
address. For example, say “1-2-3-4 Main Street, Los
Angeles, California.”
3.
The system interpr
ets the address by state, city,
street, and address number. If necessary, you
may have to clarify similar matches.
4.
Say
“Set as destination” to set the route.
Page 39 of 75

70 || 71
NAVIGATION
NAVIGATION
Taking a Detour
You can calculate a detour route manually if you encounter a road closure or
other obstacle. Use the interface dial to make and enter selections.
1.
When en r
oute, press the MENU button.
2.
Select Detour
. The system attempts to calculate
a new route by avoiding the next 5 miles (8 km)
while on a freeway or 1 mile (1 km) while on a
surface street.
AcuraLink Real-Time Traffic™*
View traffic flow, incidents, and construction in major metro areas. You can also
route around congestion or incidents when you have a destination set. Use the
interface dial to make and enter selections. Available in the U.S. only.
1.
F
rom the map screen, press the interface dial to
enter the map menu. Select Traffic Incidents.
2.
A list
of incidents on your route appears. Select
the incident you want to avoid.
3.
Select
Avoid. Repeat as necessary to select other
incidents.
4.
Select R
ecalculate Route.
*Requires AcuraLink subscription.
Canceling Your RouteYou can cancel your route at any time.
1.
When en r
oute, press the MENU button.
2.
Select
Cancel Route. The route is cleared and the
map screen returns.
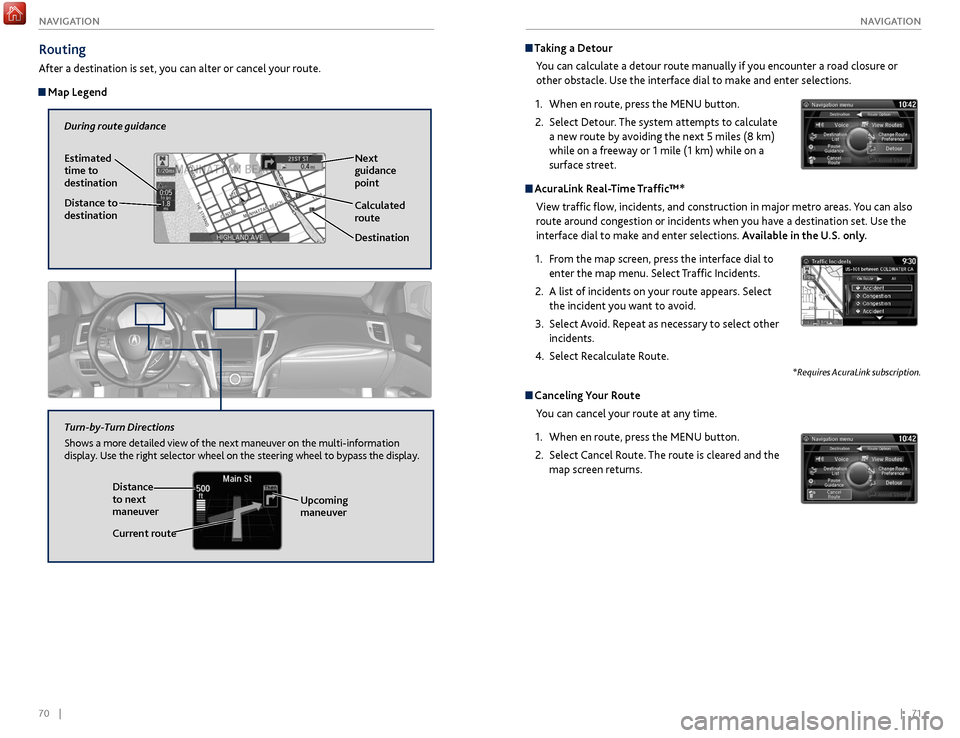
Routing
After a destination is set, you can alter or cancel your route.
Map Legend
During route guidance
Next
guidance
point
Estimated
time to
destination
Distance to
destination
Destination
Calculated
route
Distance
to next
maneuver
Turn-by-Turn Directions
Shows a more detailed view of the next maneuver on the multi-information
display. Use the right selector wheel on the steering wheel to bypass the display.
Upcoming
maneuver
Current route
Page 46 of 75

84 || 85
DRIVING
DRIVING
Cruise Control*
Maintain a constant vehicle speed without having to keep your foot on the
accelerator pedal. Use cruise control on freeways or open roads where you can
travel at a constant speed with little acceleration or deceleration.
Improper use of cruise control can lead to a crash.
Use cruise control only when traveling on open highways in good weather.
WARNING
Setting the Vehicle Speed1.
Press the CRUISE button. The CRUISE MAIN
indicator appears.
2.
Accelerate to the desired speed (above 25 mph/40
km/h). Take your foot off the pedal and press
the SET/- switch to set the speed. The CRUISE
CONTROL indicator appears.
Adjusting the Vehicle Speed Press the RES/+ switch to increase speed, or the
SET/- switch to decrease speed.
Each time you press the button, the vehicle speed is
increased or decreased by about 1 mph (1.6 km/h).
If you keep the button pressed, the vehicle speed
increases or decreases until you release it.
Canceling Cruise ControlPress either the CANCEL button or the CRUISE
button, or the brake pedal. The CRUISE CONTROL
indicator goes off.
After cruise control has been canceled, you can still
resume the prior set speed by pressing RES/+ while
driving at a speed of at least 25 mph (40 km/h).
Press the CRUISE button to turn the system off.
CRUISE button
RES/+ button
SET/- button
CANCEL button
Econ: Maximiz es fuel efficiency .
Normal: Balances fuel efficiency and sportiness for everyday driving.
Sport : Enhances vehicle r esponse and feel through decreased steering assist and
incr eased thr ottle response.
Sport+: Adds to Sport mode and allows incr eased performance when using paddle
shifters (see page 7 8 or page 80).
Vehicle Stability Assist (VSA®)
Also known as Electr onic Stability Contr ol (ESC ), VSA helps to stabilize the vehicle
during cornering if the vehicle turns mor e or less than what was intended. It assists
in maintaining traction on slippery surfaces b y regulating engine output and
selectiv ely appl ying the brak es.
Turning VSA On or Off
VSA is turned on every time y ou turn on the vehicle. If you turn VSA off, your
v ehicle has normal braking and cornering ability , but VSA traction and stability
enhancement become less effectiv e.
Pr ess and hold the VSA
OFF button until you
hear a beep to turn VSA on or off . The VSA OFF
indicator appears when the system is off.
T raction contr ol stops functioning , which
allows the wheels to spin mor e freel y at low
speed. This can be helpful when trying to free
y our vehicle if it is stuck in mud or snow.
Integrated Dynamics System (IDS)
Choose a driving mode for your pr eference based on road conditions, vehicle speed,
and handling.
VSA OFF
button VSA OFF
indicator
The selected mode
briefly appears
in the multi-
information display.
Press IDS to
cycle through
modes.
*if equipped
Page 47 of 75

86 || 87
DRIVING
DRIVING
When in Operation
If a vehicle detected ahead of you slows down
abruptly, or if another vehicle cuts in front of you,
a beep sounds and BRAKE appears on the multi-
information display to alert you.
When a vehicle detected ahead is within ACC with
low speed follow range and stops, your vehicle also
stops. The Stopped message appears on the multi-
information display.
When the vehicle ahead of you starts again, the vehicle icon on the multi-
information display blinks. Press RES/+/SET/– up or down, or press the
accelerator pedal to resume the prior set speed.
Canceling ACCYou can press either the CANCEL button or the
CRUISE button, or press the brake pedal. The ACC
indicator goes off.
Certain conditions may cause ACC
to cancel
automaticall
y. When this happens, a beep sounds
and a message appears on the multi-information
display.
After cruise control has been canceled, you can still resume the prior set speed by
pressing the RES/+ switch.
Press the MAIN button to turn the system off.
Improper use of ACC with LSF can lead to a crash.
Use ACC with LSF only when driving on expressways or freeways and in good
weather conditions.
WARNING
Exiting a vehicle that has been stopped while the ACC with LSF system is
operating can result in the vehicle moving without operator control. Always
make sure Park (P) is selected before exiting the vehicle.
A vehicle that moves without operator control can cause a crash, resulting in
serious injury or death.
Never exit a vehicle when the vehicle is stopped by ACC with LSF.
WARNING
ACC with LSF has limited braking capability and may not stop your vehicle in
time to avoid a collision with a vehicle that quickly stops in front of you.
Always be prepared to apply the brake pedal if the conditions require.
WARNING
Adaptive Cruise Control (ACC) with Low Speed Follow (LSF)*
Helps maintain a constant vehicle speed and a set following interval behind a
vehicle detected ahead of yours. When the vehicle ahead changes speed, ACC
senses the change and accelerates or decelerates to maintain a set interval.
Activating and Setting the Vehicle Speed
1. Press the MAIN button. The ACC indicator appears.
2.
A
ccelerate to the desired speed.
Above 25 mph (40 km/h): Take your foot off the
pedal and press RES/+/SET/- to set the speed.
Below 25 mph (40 km/h) (Low Speed Follow):
Press SET/- to set the speed at 25 mph (40 km/h).
Adjusting the Vehicle Speed
Press the RES/+ switch to increase speed, or the
SET/- switch to decrease speed.
Each time you press the switch up or down, the
vehicle speed is increased or decreased by about
1 mph (1 km/h). If you keep the switch pressed up
or down, the vehicle speed increases or decreases
by 5 mph or 5 km/h until you release it.
Adjusting the Following Interval Press the Interval button to change the following
interval. Each time you press the button, the
following interval setting cycles through short,
middle, long, and extra long following intervals.
Switching to Standard Cruise ControlPress and hold the Interval button.
Interval Short Middle LongExtra Long
Approx.
Gap
(seconds) 1 .1
1.5 2 .12.8
MAIN button
RES/+ switch
SET/- switch
CANCEL button
INTERVAL button
*if equipped
Page 51 of 75

94 || 95
DRIVING
DRIVING
Multi-View Rear Camera
When you shift into Reverse (R), a real-time image of the area behind your vehicle
is shown in the display, along with helpful parking guidelines.
The rear camera view is restricted. You cannot see the corner ends of the bumper or what is underneath
the bumper. Its unique lens also makes objects appear closer or farther than they actually are.
Visually confirm that it is safe to drive before backing up. Certain conditions (such as weather, lighting,
and high temperatures) may also restrict the rear view. Do not rely on the rearview display, which does
not give you all information about conditions at the rear of your vehicle.
Wide view Normal view Top down view
Changing Guidelines
1.
Pr
ess the SETTINGS button.
2.
Select Camera
Settings.
3.
Select
Rear Camera.
4.
Select one of the options.
Fixed Guideline: Guidelines appear when you
shift into Reverse. Select On or Off.
Dynamic Guideline: Guidelines move as you turn
the steering wheel. Select On or Off.
5.
Pr
ess the BACK button to exit the menu.
Press the
interface dial
to toggle
between
views.
Parking Sensor System*
When the system senses an object when you are parking or backing up, an indicator
appears on the upper display and a series of beeps will sound. As you get closer to
the object, the beep rate increases.
Turning the System On or OffPress the parking sensor button. A green indicator
light appears on the button when the system is on.
*if equipped
Display indicators
Parking sensor button
Do not continuously spin the front tires of your vehicle. Continuously spinning
the front tires can cause damage to the transmission and SH-AWD unit.
If the SH-AWD light blinks while driving, it indicates the differential temperature
is too high. If this happens, pull to the side of the road when it is safe, shift to
park, and idle the engine until the indicator goes out.
NOTICE
Super Handling-All Wheel Drive (SH-AWD)*
Controls and transfers varying amounts of engine torque to each wheel depending
on driving conditions.
SH-AWD helps enhance stability in driving situations involving slippery surfaces,
such as on wet, icy, or snowy roads. The system does not help enhance braking. It is
still your responsibility to drive safely when you steer, accelerate, and apply brakes.
Leave sufficient distance in front of you when braking on slippery surfaces.
Page 55 of 75

102 || 103
HANDLING THE UNEXPECTED
HANDLING THE UNEXPECTED
Emergency Engine Stop
The ENGINE START/STOP button may be used to stop the engine due to an
emergency situation even while driving. If you must stop the engine, choose one of
the following operations:
•
Pr
ess and hold the ENGINE START/STOP button for
two seconds, or
•
Firml
y press the ENGINE START/STOP button two
times.
The steering wheel will not lock. The power mode changes to ACCESSORY, unless
the shift lever is in Park, in which case the power mode changes to VEHICLE OFF.
Because turning off the engine also disables the power assist the engine provides to
the steering and braking systems, it will require significantly more physical effort
and time to steer and slow the vehicle. Downshift gears and use both feet on the
brake pedal, if necessary, to slow the vehicle and stop immediately in a safe place.
Do not press the button while driving unless it is absolutely necessary for the
engine to be switched off.
Emergency Towing
Call a professional towing service if you need to tow your vehicle.
All models
Flat bed equipment: The operator loads your vehicle on the back of a truck. This is
the best way to transport your vehicle.
2WD models
Wheel lift equipment: The tow truck uses two pivoting arms that go under the front
tires and lift them off the ground. The rear tires remain on the ground. This is an
acceptable way to tow your vehicle.
NOTICE
Trying to lift or tow your vehicle by the bumpers will cause serious damage. The
bumpers are not designed to support the vehicle’s weight.
Improper towing such as towing behind a motorhome or other motor vehicle can
damage the transmission.
NOTICE
Overheating
Signs your engine is overheating: •
The
temperature gauge needle is at the H mark
•
The engine suddenl
y loses power
•
Steam
or spray comes out from under the hood
•
The message
Engine Temperature Too Hot appears on the display.
1.
Immediatel
y park the vehicle in a safe place. Turn
off all accessories and turn on the hazard warning
lights.
2.
If no steam
or spray is present: Keep the
engine running and open the hood (see page
118).
If steam or spray is present: Turn off the engine
and wait until it subsides. Then, open the hood
(see page 118).
3.
Check that the
cooling fan is operating and stop the engine once the
temperature gauge needle goes down. If the cooling fan is not operating,
immediately stop the engine.
4.
Once
the engine has cooled down, inspect the coolant level and check the
cooling system components for leaks. If the coolant level in the reserve tank
is low, add coolant until it reaches the MAX mark. If there is no coolant in the
reserve tank, make sure the radiator is cool, then cover the radiator cap with a
heavy cloth and open the cap. If necessary, add coolant up to the base of the
filler neck, and put the cap back on.
Once the engine has cooled sufficiently, restart it and check the temperature
gauge. If the temperature needle has gone down, resume driving. If it has not gone
down, contact a dealer for repairs.
Reserve tank MAX
MIN
Steam and spray from an overheated engine can seriously scald you.
Do not open the hood if steam is coming out.
WARNING
Removing the radiator cap while the engine is hot can cause the coolant to
spray out, seriously scalding you.
Always let the engine and radiator cool down before removing the radiator
cap.
WARNING
Continuing to drive with the temperature gauge needle at the H mark may
damage the engine.
NOTICE