Page 143 of 325
142
Navigation
Changing Your Destination
There are several methods you can use to change the route destination.
Find Nearest Place
HENTER button (on map) uSearch Nearby
Search for the nearest place/landmark on the map screen and set it as your
destination. 1.Rotate to select Search
Nearby . Press .
2. Rotate to select a category
type. Press .
3. Rotate to select a place. Press
.
4. Rotate to select Set as
Destination . Press .
5. Move to select Clear Current
Route . Press .
u The route is automatically
recalculated and displayed on
the map screen.
u Rotate to edit the order to
set the location as a new
waypoint. Press .
16 ACURA TLX NAVI-31TZ38100.book 142 ページ 2015年7月29日 水曜日 午後4時1 1分
Page 144 of 325
143
uuChanging Your Destination uSelecting a Destination on the Map
Navigation
Selecting a Destination on the Map
Select a new destination when en route by selecting a location on the map.
1.Scroll the map to position the
cursor over your desired
destination, adjusting the map
scale as necessary. Press .
u If the address displayed is not
the desired location, press the
BACK button and repeat the
procedure.
2. Rotate to select Set as
Destination . Press .
2Calculating the Route P. 115
3.Move to select Clear Current
Route. Press .
u The route is automatically
recalculated and displayed on
the map screen.
u Rotate to edit the order to
set the location as a new
waypoint. Press .
1Selecting a Destination on the Map
If there is more than one icon or street under the map
cursor, you are prompted to select the item from a
list.
Rotate to select an item. Press .
16 ACURA TLX NAVI-31TZ38100.book 143 ページ 2015年7月29日 水曜日 午後4時1 1分
Page 145 of 325
144
uuChanging Your Destination uEntering a New Destination
Navigation
Entering a New Destination
H MENU button (when en route) uDestination
Enter a new destination using the Destinat ion Menu screen even when you are en
route.
1.Rotate to select a method to
enter a new destination.
2 Entering a Destination P. 90
uAfter entering a new
destination, the address is
displayed on the Calculate
Route screen.
2. Rotate to select Set as
Destination . Press .
3. Move to select Clear Current
Route . Press .
u The route is automatically
recalculated and displayed on
the map screen.
u Rotate to edit the order to
set the location as a new
waypoint. Press .
16 ACURA TLX NAVI-31TZ38100.book 144 ページ 2015年7月29日 水曜日 午後4時1 1分
Page 146 of 325

145
Navigation
Resuming Your Trip
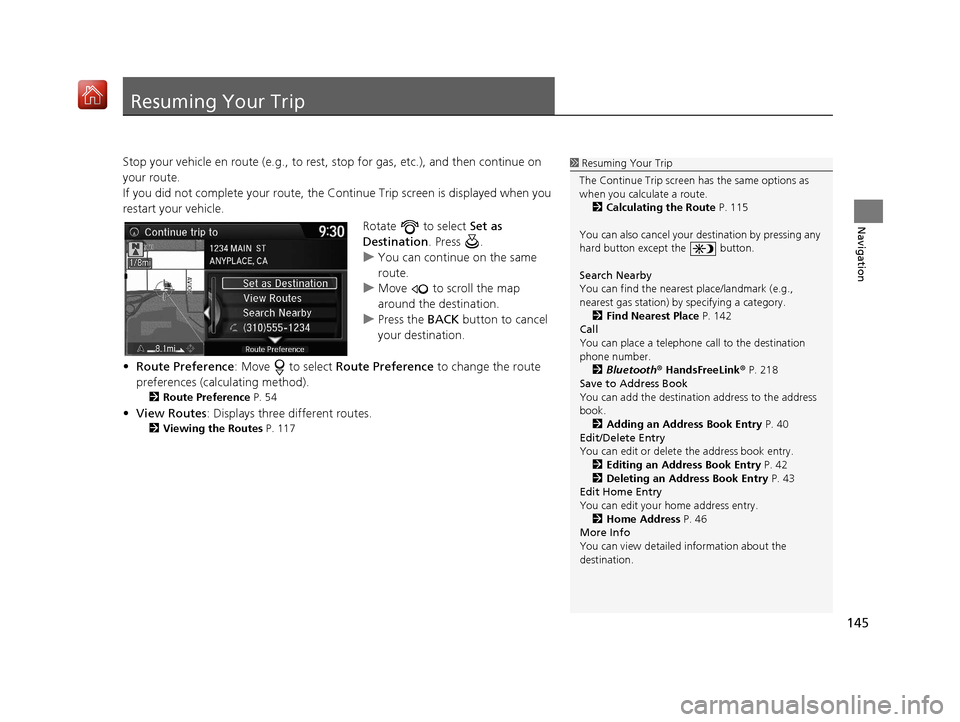
Stop your vehicle en route (e.g., to rest, stop for gas, etc.), and then continue on
your route.
If you did not complete your route, the Co ntinue Trip screen is displayed when you
restart your vehicle.
Rotate to select Set as
Destination . Press .
u You can continue on the same
route.
u Move to scroll the map
around the destination.
u Press the BACK button to cancel
your destination.
• Route Preference : Move to select Route Preference to change the route
preferences (calculating method).
2 Route Preference P. 54
•View Routes : Displays three different routes.
2Viewing the Routes P. 117
1Resuming Your Trip
The Continue Trip screen has the same options as
when you calculate a route. 2 Calculating the Route P. 115
You can also cancel your de stination by pressing any
hard button except the button.
Search Nearby
You can find the nearest place/landmark (e.g.,
nearest gas station) by specifying a category. 2 Find Nearest Place P. 142
Call
You can place a telephone call to the destination
phone number.
2 Bluetooth® HandsFreeLink ® P. 218
Save to Address Book
You can add the destinati on address to the address
book. 2 Adding an Address Book Entry P. 40
Edit/Delete Entry
You can edit or delete the address book entry.
2 Editing an Address Book Entry P. 42
2 Deleting an Address Book Entry P. 43
Edit Home Entry
You can edit your home address entry.
2 Home Address P. 46
More Info
You can view detailed information about the
destination.
16 ACURA TLX NAVI-31TZ38100.book 145 ページ 2015年7月29日 水曜日 午後4時1 1分
Page 150 of 325
149
uuAudio System uUSB Port
Audio
USB Port
Install the iPod or iPhone dock
connector or the USB flash drive to
the USB port.1 USB Port
•Do not leave the iPod or USB flash drive in the
vehicle. Direct sunlight and high temperatures may
damage it.
•Do not connect the iPod or USB flash drive using a
hub.
•Do not use a device such as a card reader or hard
disc drive, as the device or your files may be
damaged.
•We recommend backing up yo ur data before using
the device in your vehicle.
•Displayed messages may vary depending on the
device model and software version.
If the audio system does not recognize the iPod, try
reconnecting it a few times or reboot the device. To
reboot, follow the manufac turer’s instructions
provided with the iPod or visit www.apple.com/ipod.
16 ACURA TLX NAVI-31TZ38100.book 149 ページ 2015年7月29日 水曜日 午後4時1 1分
Page 151 of 325

150
uuAudio System uAuxiliary Input Jack
Audio
Auxiliary Input Jack
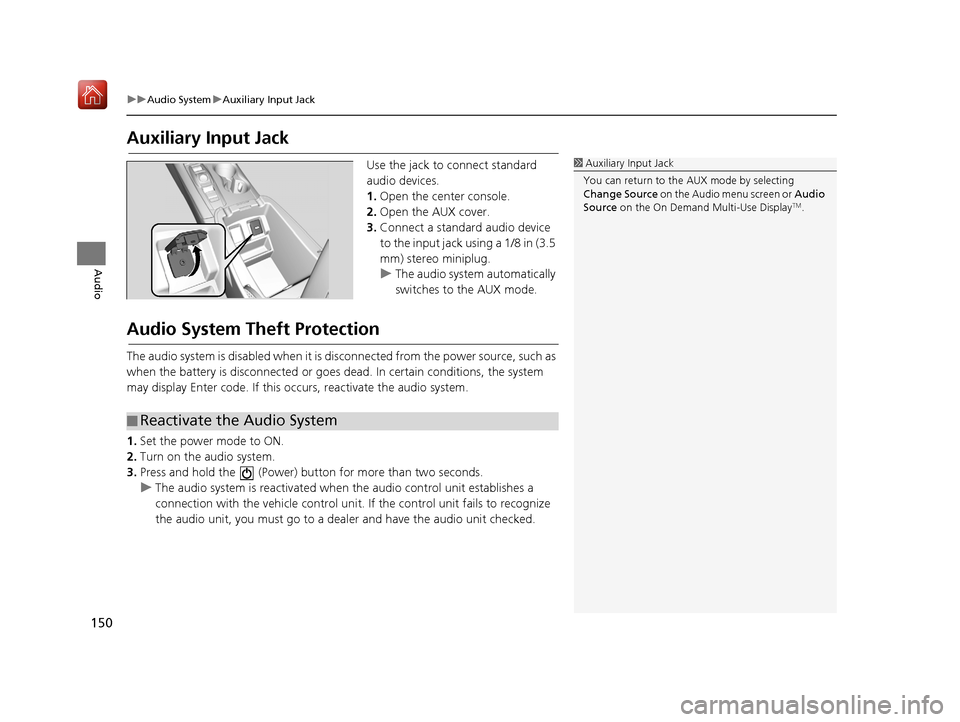
Use the jack to connect standard
audio devices.
1. Open the center console.
2. Open the AUX cover.
3. Connect a standard audio device
to the input jack using a 1/8 in (3.5
mm) stereo miniplug.
u The audio system automatically
switches to the AUX mode.
Audio System Theft Protection
The audio system is disabled when it is di sconnected from the power source, such as
when the battery is disconnected or goes dead. In certain conditions, the system
may display Enter code. If this occurs, reactivate the audio system.
1. Set the power mode to ON.
2. Turn on the audio system.
3. Press and hold the (Power) bu tton for more than two seconds.
u The audio system is reactivated when the audio control unit establishes a
connection with the vehicle control unit. If the control unit fails to recognize
the audio unit, you must go to a deal er and have the audio unit checked.
1Auxiliary Input Jack
You can return to the AUX mode by selecting
Change Source on the Audio menu screen or Audio
Source on the On Demand Multi-Use Display
TM.
■Reactivate the Audio System
16 ACURA TLX NAVI-31TZ38100.book 150 ページ 2015年7月29日 水曜日 午後4時1
1分
Page 156 of 325

155Continued
Audio
Audio Settings
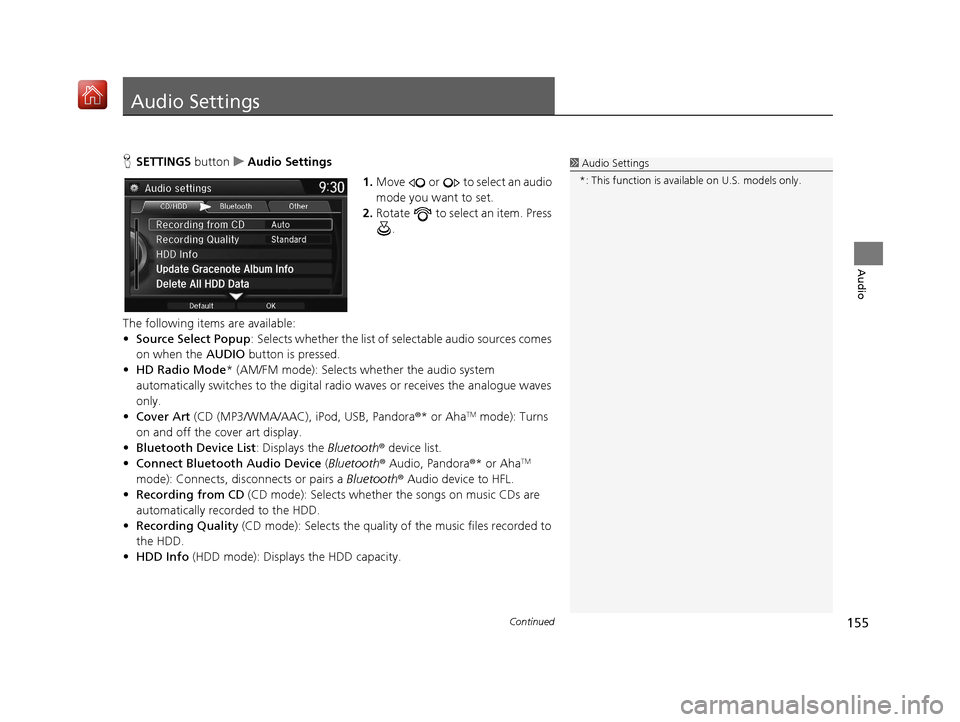
HSETTINGS button uAudio Settings
1.Move or to select an audio
mode you want to set.
2. Rotate to select an item. Press
.
The following items are available:
• Source Select Popup : Selects whether the list of selectable audio sources comes
on when the AUDIO button is pressed.
• HD Radio Mode * (AM/FM mode): Selects whether the audio system
automatically switches to the digital radi o waves or receives the analogue waves
only.
• Cover Art (CD (MP3/WMA/AAC), iPod, USB, Pandora®* or Aha
TM mode): Turns
on and off the cover art display.
• Bluetooth Device List : Displays the Bluetooth® device list.
• Connect Bluetooth Audio Device (Bluetooth® Audio, Pandora®* or Aha
TM
mode): Connects, disconnects or pairs a Bluetooth® Audio device to HFL.
• Recording from CD (CD mode): Selects whether the songs on music CDs are
automatically recorded to the HDD.
• Recording Quality (CD mode): Selects the quality of the music files recorded to
the HDD.
• HDD Info (HDD mode): Displays the HDD capacity.
1Audio Settings
*: This function is availa ble on U.S. models only.
16 ACURA TLX NAVI-31TZ38100.book 155 ページ 2015年7月29日 水曜日 午後4時1 1分
Page 158 of 325
157
uuAudio Settings uAdjusting the Sound
Audio
1. Select More.
2. Select Sound .
3. Use , or other icon to adjust
the setting.
u Use the / icons to turn
the page.
u Select to go back to the
previous screen.
1Adjusting the Sound
Select Off, Low , Mid or High for the SVC setting.
You can also adjust the sound to select on the
On Demand Multi-Use Display
TM.
On Demand Multi-Use DisplayTMOn Demand Multi-Use DisplayTM
16 ACURA TLX NAVI-31TZ38100.book 157 ページ 2015年7月29日 水曜日 午後4時1 1分