Page 8 of 449
7
Quick Reference Guide❙Cargo Area Light (P 170)
❙Seat Belt with Detachable Anchor (P 34)
❙Seat Belt (Installing a Child Seat) (P 57)
❙Seat Belt to Secure a Child Seat (P 58)
❙Side Curtain Airbags (P 46)
❙Ceiling Light (P 169)
❙Seat Belts (P 29)
❙Moonroof Switch (P 143)
❙Map Lights (P 169)
❙Sunglasses Holder (P 176)
❙Sun Visors
❙Vanity Mirrors
❙USB Port (P 187)
❙Auxiliary Input Jack (P 187)
❙Front Seat (P 162)
❙Side Airbags (P 44)
❙Coat Hook (P 175)
❙Grab Handle
❙Rear Seat (P 167)
❙LATCH to Secure a Child Seat (P 55)
❙Accessory Power Socket (P 174)
❙Accessory Power Socket (P 174)
* Not available on all models
Page 186 of 449

185
Features
This chapter describes how to operate technology features.
Audio System*
About Your Audio System ................ 186
USB Port .......................................... 187
Auxiliary Input Jack .......................... 187
Audio System Theft Protection ......... 188
Audio Remote Controls .................... 189
Audio System Basic Operation
*....... 190
Audio/Information Screen ................ 191
Wallpaper Setup .............................. 194
Display Setup ................................... 196
Adjusting the Sound ........................ 197
Playing the AM/FM Radio ................. 198
Playing the SiriusXM ® Radio ............. 200 Playing a CD .................................... 202
Playing an iPod ................................ 205
Playing Pandora
®............................. 208
Playing a USB Flash Drive ................. 210
Playing Bluetooth ® Audio................. 213
Audio Error Messages
*..................... 215
General Information on the Audio System
*............................................ 218
HomeLink ® Universal Transceiver
Training HomeLink ........................... 222
Bluetooth® HandsFreeLink®
Using HFL ........................................ 224
HFL Menus....................................... 226 Compass
*.......................................... 253
* Not available on all models
Page 188 of 449

187
uuAudio System*uUSB Port
Features
USB Port
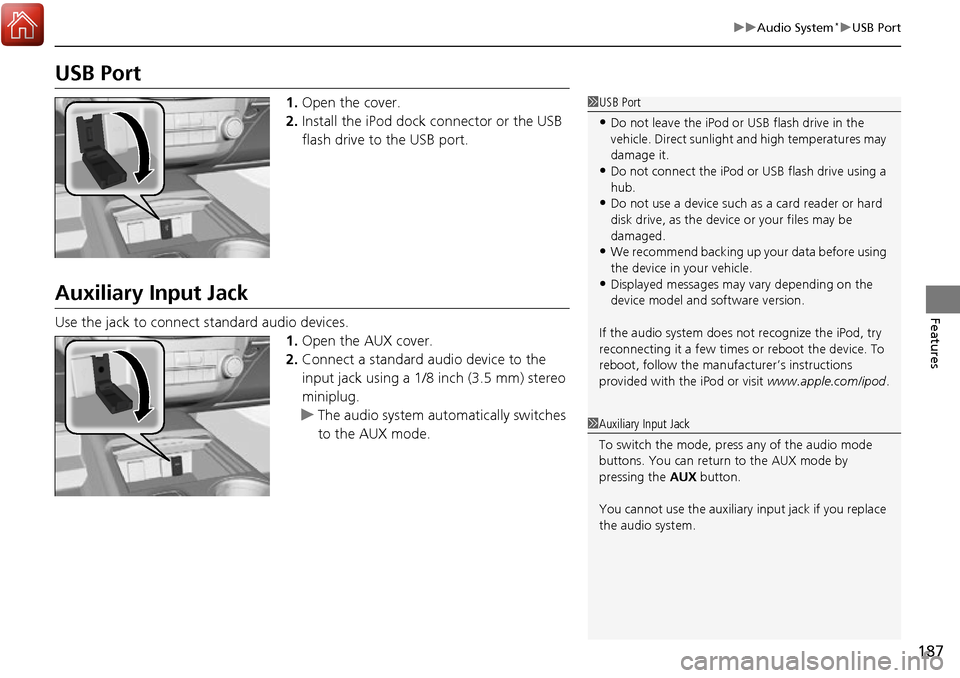
1. Open the cover.
2. Install the iPod dock connector or the USB
flash drive to the USB port.
Auxiliary Input Jack
Use the jack to connect standard audio devices.
1.Open the AUX cover.
2. Connect a standard audio device to the
input jack using a 1/8 inch (3.5 mm) stereo
miniplug.
u The audio system auto matically switches
to the AUX mode.
1 USB Port
•Do not leave the iPod or USB flash drive in the
vehicle. Direct sunlight and high temperatures may
damage it.
•Do not connect the iPod or USB flash drive using a
hub.
•Do not use a device such as a card reader or hard
disk drive, as the device or your files may be
damaged.
•We recommend backing up yo ur data before using
the device in your vehicle.
•Displayed messages may vary depending on the
device model and software version.
If the audio system does not recognize the iPod, try
reconnecting it a few times or reboot the device. To
reboot, follow the manufac turer’s instructions
provided with the iPod or visit www.apple.com/ipod.
1Auxiliary Input Jack
To switch the mode, pres s any of the audio mode
buttons. You can return to the AUX mode by
pressing the AUX button.
You cannot use the auxiliary input jack if you replace
the audio system.
Page 215 of 449

uuAudio System Basic Operation*uPlaying Bluetooth ® Audio
214
Features
1. Make sure that your phone is paired and
linked to HFL.
2. Press the AUX button.
If the phone is not re cognized, another HFL-
compatible phone, which is not compatible
for Bluetooth ® Audio, may be already linked.
■To pause or resume a file
1. Press the SETUP button.
2. Rotate to select Resume/Pause, then press .
Each time you press , the setting sw itches between Pause and Resume.
Press the (pick-up) button on the steering
wheel to receive a call when Bluetooth® Audio
is playing.
2 Bluetooth® HandsFreeLink ® P. 224
Press the (hang-up) bu tton to end the call
and return to Bluetooth® Audio.
■To Play Bluetooth® Audio Files1To Play Bluetooth ® Audio Files
To play the audio files, y ou may need to operate your
phone. If so, follow the phone manufacturer’s
operating instructions.
The pause function may no t be available on some
phones.
If any audio device is conne cted to the auxiliary input
jack, you may need to press the AUX button
repeatedly to select the Bluetooth® Audio system.
Switching to another mode pauses the music playing
from your phone.
■Switching to HFL1 Switching to HFL
If you receive a call while Bluetooth® Audio is in the
pause mode, it will resume play after ending the call.
Button
Button
Page 220 of 449
219
uuGeneral Information on the Audio System*uRecommended CDs
Continued
Features
Recommended CDs
• Use only high-quality CD-R or CD-RW discs labeled for audio use.
• Use only CD-R or CD-RW discs on wh ich the recordings are closed.
• Play only standard round-shaped CDs.
• Some software files may not allow for audio play or text data display.
• Some versions of MP3, WMA or AAC formats may be unsupported.1Recommended CDs
A Dual-disc cannot play on this audio unit. If recorded
under certain conditions, a CD-R or CD-RW may not
play either.
■CDs with MP3, WMA or AAC files
The CD packages or jackets should have one of these marks.
Page 395 of 449
394
Handling the Unexpected
Tools
Types of Tools
1Types of Tools
The tools are stored in the luggage area.
Wheel Nut Wrench/
Jack Handle Jack
Jack Handle Bar
Vehicles with a compact spare tire
Page 397 of 449
396
uuIf a Tire Goes Flat uChanging a Flat Tire*
Handling the Unexpected
1. Open the cargo area floor lid.
2. Take the wheel nut wrench and jack handle
bar out of the cargo area.
3. Unscrew the wing bolt, and remove the
spacer cone. Then, remove the spare tire.
4. Take the jack out of the spare tire area.
■Getting Ready to Replace the Flat Tire
Spare Tire
Page 399 of 449

uuIf a Tire Goes Flat uChanging a Flat Tire*
398
Handling the Unexpected
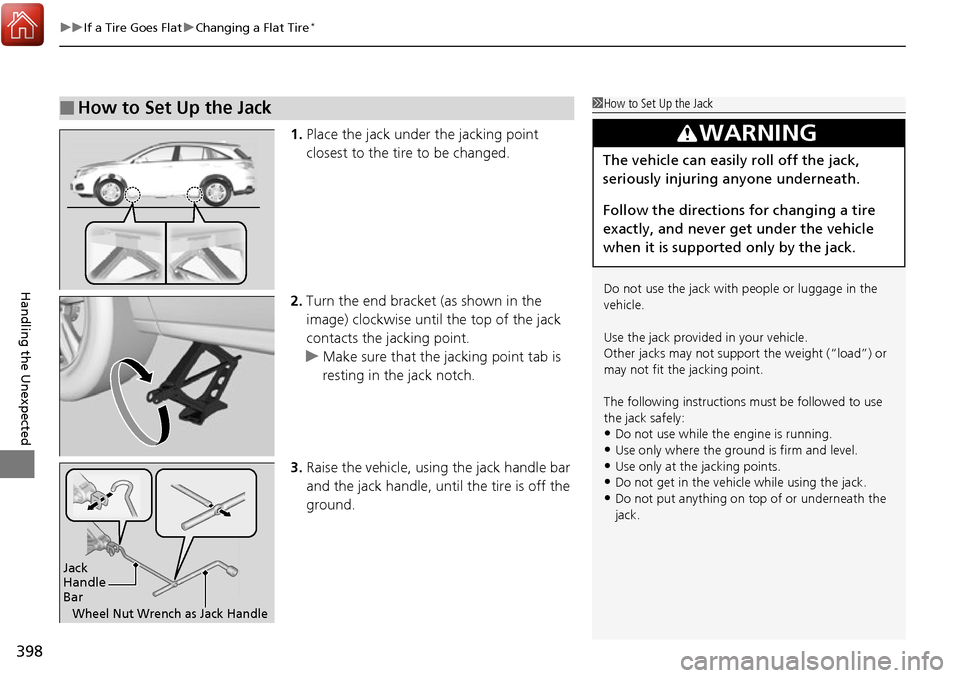
1. Place the jack under the jacking point
closest to the tire to be changed.
2. Turn the end bracket (as shown in the
image) clockwise until the top of the jack
contacts the jacking point.
u Make sure that the jacking point tab is
resting in the jack notch.
3. Raise the vehicle, using the jack handle bar
and the jack handle, until the tire is off the
ground.
■How to Set Up the Jack1How to Set Up the Jack
Do not use the jack with people or luggage in the
vehicle.
Use the jack provided in your vehicle.
Other jacks may not support the weight (“load”) or
may not fit the jacking point.
The following instructions must be followed to use
the jack safely:
•Do not use while the engine is running.
•Use only where the ground is firm and level.
•Use only at the jacking points.•Do not get in the vehicl e while using the jack.
•Do not put anything on top of or underneath the
jack.
3WARNING
The vehicle can easily roll off the jack,
seriously injuring anyone underneath.
Follow the directions for changing a tire
exactly, and never get under the vehicle
when it is supported only by the jack.
Jack
Handle
Bar
Wheel Nut Wrench as Jack Handle