2017 Acura RDX wheel
[x] Cancel search: wheelPage 191 of 449

190
Features
Audio System Basic Operation*
To use the audio system function, the power mode must be in ACCESSORY or ON.
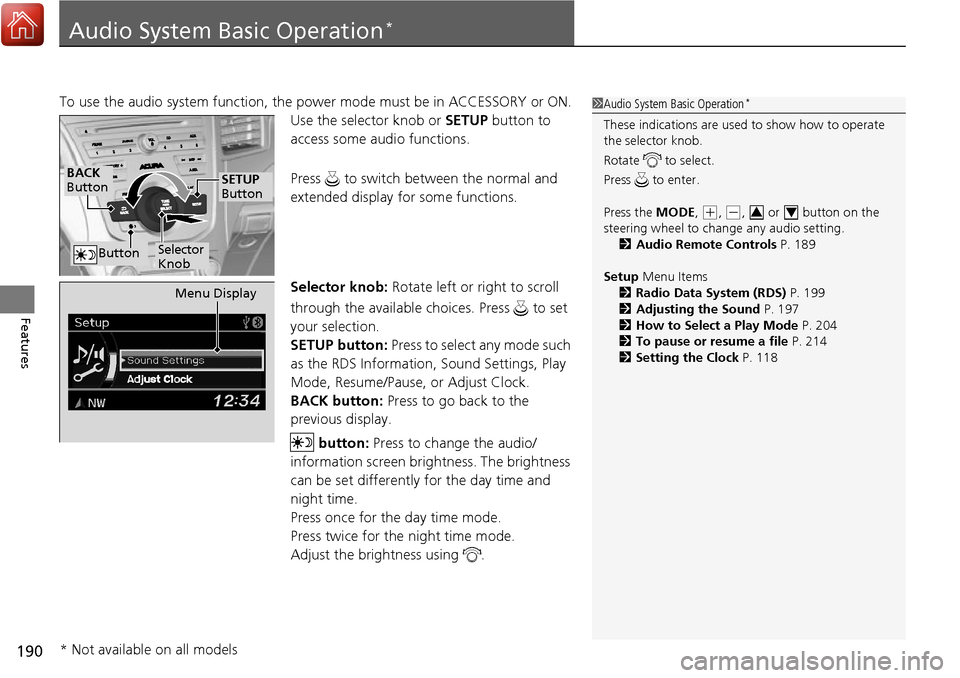
Use the selector knob or SETUP button to
access some audio functions.
Press to switch between the normal and
extended display fo r some functions.
Selector knob: Rotate left or right to scroll
through the available choices. Press to set
your selection.
SETUP button: Press to select any mode such
as the RDS Information, Sound Settings, Play
Mode, Resume/Pause, or Adjust Clock.
BACK button: Press to go back to the
previous display.
button: Press to change the audio/
information screen brightness. The brightness
can be set differently for the day time and
night time.
Press once for the day time mode.
Press twice for the night time mode.
Adjust the brightness using . 1 Audio System Basic Operation*
These indications are used to show how to operate
the selector knob.
Rotate to select.
Press to enter.
Press the MODE,
(+, (-, or button on the
steering wheel to cha nge any audio setting.
2 Audio Remote Controls P. 189
Setup Menu Items
2 Radio Data System (RDS) P. 199
2 Adjusting the Sound P. 197
2 How to Select a Play Mode P. 204
2 To pause or resume a file P. 214
2 Setting the Clock P. 11834
BACK
Button
Selector
Knob
SETUP
Button
Button
Menu Display
* Not available on all models
Page 200 of 449

199
uuAudio System Basic Operation*uPlaying the AM/FM Radio
Features
Provides text data information related to your selected RDS capable FM station.
■RDS information
1.Press the SETUP button and rotate to
select RDS Information .
2. Each time you press , the RDS
Information switches between on and off.
■To find an RDS station from your selected program category
1.Press the CATEGORY bar to display and
select an RDS category.
2. Use SKIP or SCAN to select an RDS station.
■Radio Data System (RDS)1Playing the AM/FM Radio
The ST indicator appears on the display indicating
stereo FM broadcasts.
Stereo reproduction in AM is not available.
Switching the Audio Mode
Pressing the MODE button on the steering wheel.
2 Audio Remote Controls P. 189
You can store 6 AM stations and 12 FM stations into
the preset button memory. FM1 and FM2 let you
store six stations each.
A.SEL function scans and stores up to 6 AM stations
and 12 FM stations with a strong signal into the
preset button memory.
If you do not like the stati ons auto select has stored,
you can manually store your preferred frequencies.
RDS Category
Page 215 of 449

uuAudio System Basic Operation*uPlaying Bluetooth ® Audio
214
Features
1. Make sure that your phone is paired and
linked to HFL.
2. Press the AUX button.
If the phone is not re cognized, another HFL-
compatible phone, which is not compatible
for Bluetooth ® Audio, may be already linked.
■To pause or resume a file
1. Press the SETUP button.
2. Rotate to select Resume/Pause, then press .
Each time you press , the setting sw itches between Pause and Resume.
Press the (pick-up) button on the steering
wheel to receive a call when Bluetooth® Audio
is playing.
2 Bluetooth® HandsFreeLink ® P. 224
Press the (hang-up) bu tton to end the call
and return to Bluetooth® Audio.
■To Play Bluetooth® Audio Files1To Play Bluetooth ® Audio Files
To play the audio files, y ou may need to operate your
phone. If so, follow the phone manufacturer’s
operating instructions.
The pause function may no t be available on some
phones.
If any audio device is conne cted to the auxiliary input
jack, you may need to press the AUX button
repeatedly to select the Bluetooth® Audio system.
Switching to another mode pauses the music playing
from your phone.
■Switching to HFL1 Switching to HFL
If you receive a call while Bluetooth® Audio is in the
pause mode, it will resume play after ending the call.
Button
Button
Page 225 of 449

224
Features
Bluetooth® HandsFreeLink ®
For models with navigation system, see Navigation System Manual for how to
operate Bluetooth ® HandsFreeLink ®.
Bluetooth ® HandsFreeLink ® (HFL) allows you to place and receive phone calls using
your vehicle’s audio system, without handling your cell phone.
Using HFL
(Pick-up) button: Press to go directly to the Phone screen or to answer an
incoming call.
(Hang-up) button: Press to end a call.
(Talk) button: Press to call a number with a stored voice tag.
(Back) button: Press to cancel a command.
PHONE button: Press to go directly to the Phone screen.
Selector knob: Rotate to select an item on the screen, then press .
■HFL Buttons
1Bluetooth ® HandsFreeLink ®
To use HFL, you need a Bluetooth-compatible cell
phone. For a list of compatible phones, pairing
procedures, and special feature capabilities:
•U.S.: Visit www.acura.com/handsfreelink , or call 1-
888-528-7876.
•Canada: Visit www.handsfreelink.ca , or call 1-888-
528-7876.
Voice control tips
•Aim the vents away from the ceiling and close the
windows, as noise coming fr om them may interfere
with the microphone.
•Press and release the button when you want to
call a number using a st ored voice tag. Speak
clearly and naturally after a beep.
•If the microphone picks up vo ices other than yours,
the command may be misinterpreted.
•To change the volume level, use the audio system’s
volume knob or the remote audio controls on the
steering wheel.
State or local laws may pr ohibit the operation of
handheld electronic devi ces while operating a
vehicle.
Models with navigation system
Models without navigation system
Talk Button
Volume upMicrophone
Hang-up Button
Pick-up Button
Volume down
Selector Knob
PHONE Button
Back Button
Page 256 of 449

255
Driving
This chapter discusses driving, refueling, and information on items such as accessories.
Before Driving................................... 256
Towing a Trailer ................................ 261
Off-Highway Driving Guidelines ..... 266
When Driving Starting the Engine .......................... 268
Precautions While Driving................. 273
Automatic Transmission ................... 274
Shifting ............................................ 275
Cruise Control
*................................ 279
Front Sensor Camera*...................... 282
Adaptive Cruise Control (ACC)*....... 284
Lane Departure Warning (LDW)*...... 297Lane Keeping Assist System (LKAS)*..... 301 Vehicle Stability Assist (VSA
®), aka Electronic
Stability Control (ESC), System ........... 309
Blind spot information (BSI) System
*.... 311All-Wheel Drive (AWD) with Intelligent Control System*..................................................... 314Tire Pressure Monitoring System (TPMS) ... 314Tire Pressure Monitoring System (TPMS) - Required Federal Explanation ......... 316
Braking Brake System ................................... 318
Anti-lock Brake System (ABS) ........... 320
Brake Assist System.......................... 321 Collision Mitigation Braking System
TM
(CMBSTM)*..................................... 322
Parking Your Vehicle When Stopped ................................ 330
Parking Sensor System
*................... 331
Cross Traffic Monitor*..................... 335
Multi-View Rear Camera .................. 338
Refueling Fuel Information .............................. 339
How to Refuel ................................. 340
Fuel Economy and CO
2 Emissions .... 341
Accessories and Modifications ........ 342
* Not available on all models
Page 257 of 449

256
Driving
Before Driving
Driving Preparation
Check the following items before you start driving.
• Make sure there are no obstructions on the windows, door mirrors, exterior
lights, or other parts of the vehicle.
u Remove any frost, snow, or ice.
u Remove any snow on the roof, as this can slip down and obstruct your field of
vision while driving. If frozen solid , remove ice once it has softened.
u When removing ice from around the wheel s, be sure not to damage the wheel
or wheel components.
• Make sure the hood is securely closed.
u If the hood opens while driving, your front view will be blocked.
• Make sure the tires are in good condition.
u Check air pressures, and check for damage and excessive wear.
2Checking and Maintaining Tires P. 374
•Make sure there are no people or objects behind or around the vehicle.
u There are blind spots from the inside.
■Exterior Checks1Exterior Checks
NOTICE
When doors are frozen s hut, use warm water around
the door edges to melt any ice. Do not try to force
them open, as this can damage the rubber trim
around the doors. When done, wipe dry to avoid
further freezing.
Do not pour warm water into the key cylinder.
You will be unable to insert the key if the water
freezes in the hole.
Heat from the engine and exhaust can ignite
flammable material s left under the hood, causing a
fire. If you’ve parked y our vehicle for an extended
period, inspect and remove any debris that may have
collected, such as dried grass and leaves that have
fallen or have been carried in for use as a nest by a
small animal. Also check under the hood for leftover
flammable materials after you or someone else has
performed maintenance on your vehicle.
Page 258 of 449

Continued257
uuBefore Driving uDriving Preparation
Driving
• Store or secure all items on board properly.
u Carrying too much cargo, or improperly storing it, can affect your vehicle’s
handling, stability, sto pping distance, and tires, and make it unsafe.
2Maximum Load Limit P. 259
•Do not pile items higher than the seat height.
u They can block your view and may be thrown forward in the event of sudden
braking.
• Do not place anything in the front seat footwells. Make sure to secure the floor
mat.
u An object or unsecured floor mat can in terfere with your brake and accelerator
pedal operation while driving.
• If you have any animals on board, do no t let them move around in the vehicle.
u They may interfere with driv ing and a crash could occur.
• Securely close and lock al l doors and the tailgate.
2Locking/Unlocking the Doors from the Inside P. 128
•Adjust your seating position properly.
u Adjust the head restraint, too.
2Adjusting the Seats P. 162
2 Adjusting the Head Restraints P. 164
•Adjust the mirrors and steering wh eel properly for your driving.
u Adjust them while sitting in the proper driving position.
2 Adjusting the Steering Wheel P. 158
2 Adjusting the Mirrors P. 159
■Interior Checks1Interior Checks
The headlight aim is set by the factory, and does not
need to be adjusted. Howeve r, if you regularly carry
heavy items in the cargo area or tow a trailer, have
the aiming readjusted at a dealer or by a qualified
technician.
Page 265 of 449

264
uuTowing a Trailer uDriving Safely with a Trailer
Driving
Driving Safely with a Trailer
• Have the trailer properly serviced and keep it in good condition.
• Make sure that all the weights and load in the vehicle and trailer are within limits.
2Towing Load Limits P. 261
•Securely attach the hitch, safety chains, and other necessary parts to the trailer.
• Securely store all the items in and on the tr ailer so that they do not shift while
driving.
• Check if the lights and brakes on the trailer are working properly.
• Check the pressures of the traile r tires, including the spare.
• Drive slower than normal.
• Obey posted speed limits for vehicles with trailers.
• Use the
(D position when towing a trailer on level roads.
• Turn more slowly and with a wider turning arc than normal.
• Allow more time and distance for braking.
• Do not brake or turn suddenly.
• Monitor your temperature gauge. If it nears the red (Hot) mark, turn off the
climate control system and reduce speed. Pull to the side of the road safely to cool
down the engine if necessary.
• Shift to the
(S position if the transmission shifts frequently.
■Things You Need To Know Before Towing a Trailer
■Towing Speeds and Gears
■Turning and Braking
■Driving in Hilly Terrain
1Driving Safely with a Trailer
Operating speed when towing a trailer is restricted
up to 100km/h.
Parking
In addition to the normal precautions, place wheel
chocks at each of the trailer’s tires.