Page 148 of 449

147
uuOperating the Switches Around the Steering Wheel uTurn Signals
Continued
Controls
Turn Signals
The turn signals can be used when the power
mode is in ON.
■One-touch turn signal
When you lightly push up or down and release
the turn signal lever, th e exterior turn signals
and turn signal indicator blink three times.
This feature can be used when signaling for a
lane change.
Light Switches
Rotating the light switch turns the lights on
and off, regardless of the power mode
setting.
■High beams
Push the lever forward until you hear a click.
■Low beams
When in high beams, pull the lever back to
return to low beams.
■Flashing the high beams
Pull the lever back, and release it.
Right Turn
Left Turn
■Manual Operation1 Light Switches
If you leave the power mode in VEHICLE OFF (LOCK)
while the lights are on, a chime sounds when the
driver’s door is opened.
Do not leave the lights on when the engine is off
because it will cause the battery to discharge.
High Beams
Flashing the high beams
Low Beams
Turns on parking, side marker,
tail, and rear license plate lights
Turns on headlights, parking, side
marker, tail, and rear license plate
lights
Page 150 of 449

149
uuOperating the Switches Around the Steering Wheel uLight Switches
Controls
The headlights automatically come on when the wipers are used several times within
certain number of intervals while the headlight switch is in
#Y. The headlights
automatically go off a few minutes after the wipers are stopped.
The headlights, all other exterior lights, a nd the instrument panel lights turn off 15
seconds after you set the po wer mode to VEHICLE OFF (LOCK), take the remote with
you, and close the driver’s door.
If you set the power mode to VEHICLE OFF (LOCK) with the headlight switch on, but
do not open the door, the lights turn off after 10 minutes (three minutes, if the
switch is in the
#Y position).
The lights turn on again when you unlock or open the driver’s door. If you unlock
the door, but do not open it within 15 seconds, the lights go off. If you open the
driver’s door, you will hear a lights on reminder chime.
■Headlight Integration with Wiper*
■Automatic Lighting Off Feature
1 Headlight Integration with Wiper*
This feature activates while the headlights are in
#Y. The instrument pane l brightness does not
change when the headlights come on.
If the ambient light is da rk, the automatic lighting
control overrides this feat ure, and the headlights
come on whether or not the wipers cycle several
times.
1 Automatic Lighting Off Feature
You can change the headlight auto off timer setting.
2 Customized Features P. 100, 106
* Not available on all models
Page 152 of 449

151
uuOperating the Switches Around the Steering Wheel uWipers and Washers
Continued
Controls
Wipers and Washers
The windshield wipers and washers can be
used when the power mode is in ON.
■MIST
The wipers run at high speed until you release
the lever.
■Wiper switch (OFF, INT*, LO, HI)
Change the wiper switch setting according to
the amount of rain.
■Adjusting wiper operation
Turn the adjustment ring to adjust wiper
operation.
■Washer
Sprays while you pull the lever toward you.
When you release the le ver for more than one
second, the spray stops, the wipers sweep two
or three more times to clear the windshield,
then stop.
■Front Wiper/Washer1 Wipers and Washers
NOTICE
Do not use the wipers when the windshield is dry.
The windshield will get sc ratched, or the rubber
blades will get damaged.
NOTICE
In cold weather, the blades may freeze to the
windshield, becoming stuck.
Operating the wipers in th is condition may damage
the wipers. Use the defroster to warm the
windshield, then turn the wipers on.
If the vehicle speeds up while the wipers are
operating intermittently, the length of the wipe
interval shortens.
When the vehicle starts moving, the wipers make a
single sweep.
When the vehicle speeds up, the wiper operation’s
shortest delay setting ( ) and the LO setting become
the same.
Turn the washers off if no washer fluid comes out.
The pump may get damaged.
The wiper motor is equipped with a breaker that may
stop motor operation temp orarily to prevent an
overload. Wiper operation will return to normal
within a few minutes, once the circuit has returned to
normal.
Intermittent Time
Adjustment Ring
MIST
INT: Low speed with intermittent
OFF
LO: Low speed wipe
HI: High speed wipe Pull to
use
washer.
Lower speed, fewer sweeps
Higher speed, more sweeps
* Not available on all models
Page 170 of 449

169Continued
Controls
Interior Lights/Interior Convenience Items
Interior Lights
■ON
The interior lights come on regardless of
whether the doors are open or closed.
■Door activated
The interior lights come on in the following
situations:
• When any of the doors are opened.
• You unlock the driver’s door.
• When the power mode is set to VEHICLE
OFF (LOCK).
■OFF
The interior lights remain off regardless of
whether the doors are open or closed.
The map lights can be turned on and off by
pressing the button.
■Interior Light Switches1 Interior Light Switches
In the door activated position, the interior lights fade
out and go off about 30 se conds after the doors are
closed.
The lights go off after 30 seconds in the following
situations:
•When you unlock the driver’s door but do not open
it.
•When you set the power mode to VEHICLE OFF
(LOCK) but do not open a door.
You can change the interi or lights dimming time.
2 Customized Features P. 100, 106
The interior lights go off i mmediately in the following
situations:
•When you lock the driver’s door.
•When you close the driver’s door in ACCESSORY
mode.
•When you set the power mode to ON.
If you leave any of the doors open in VEHICLE OFF
(LOCK) mode, the interior lights go off after about 15
minutes.
Door Activated
Position
Off
Front
Door Activated Position
On
Off
Rear
On
■Map Lights
1
Map Lights
When the interior light swit ch is in the door activated
position and any door is open, the map light will not
go off when you press the button.
Page 191 of 449

190
Features
Audio System Basic Operation*
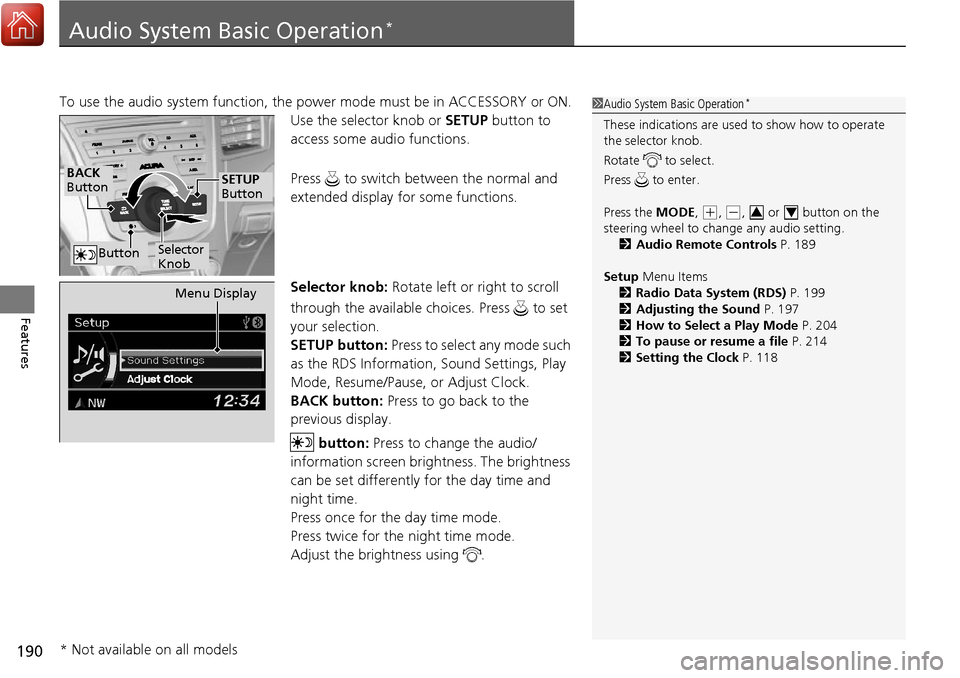
To use the audio system function, the power mode must be in ACCESSORY or ON.
Use the selector knob or SETUP button to
access some audio functions.
Press to switch between the normal and
extended display fo r some functions.
Selector knob: Rotate left or right to scroll
through the available choices. Press to set
your selection.
SETUP button: Press to select any mode such
as the RDS Information, Sound Settings, Play
Mode, Resume/Pause, or Adjust Clock.
BACK button: Press to go back to the
previous display.
button: Press to change the audio/
information screen brightness. The brightness
can be set differently for the day time and
night time.
Press once for the day time mode.
Press twice for the night time mode.
Adjust the brightness using . 1 Audio System Basic Operation*
These indications are used to show how to operate
the selector knob.
Rotate to select.
Press to enter.
Press the MODE,
(+, (-, or button on the
steering wheel to cha nge any audio setting.
2 Audio Remote Controls P. 189
Setup Menu Items
2 Radio Data System (RDS) P. 199
2 Adjusting the Sound P. 197
2 How to Select a Play Mode P. 204
2 To pause or resume a file P. 214
2 Setting the Clock P. 11834
BACK
Button
Selector
Knob
SETUP
Button
Button
Menu Display
* Not available on all models
Page 195 of 449

194
uuAudio System Basic Operation*uWallpaper Setup
Features
Wallpaper Setup
You can change, store, and delete the wa llpaper on the audio/information screen.
See the navigation system manual for how to change the wallpaper.
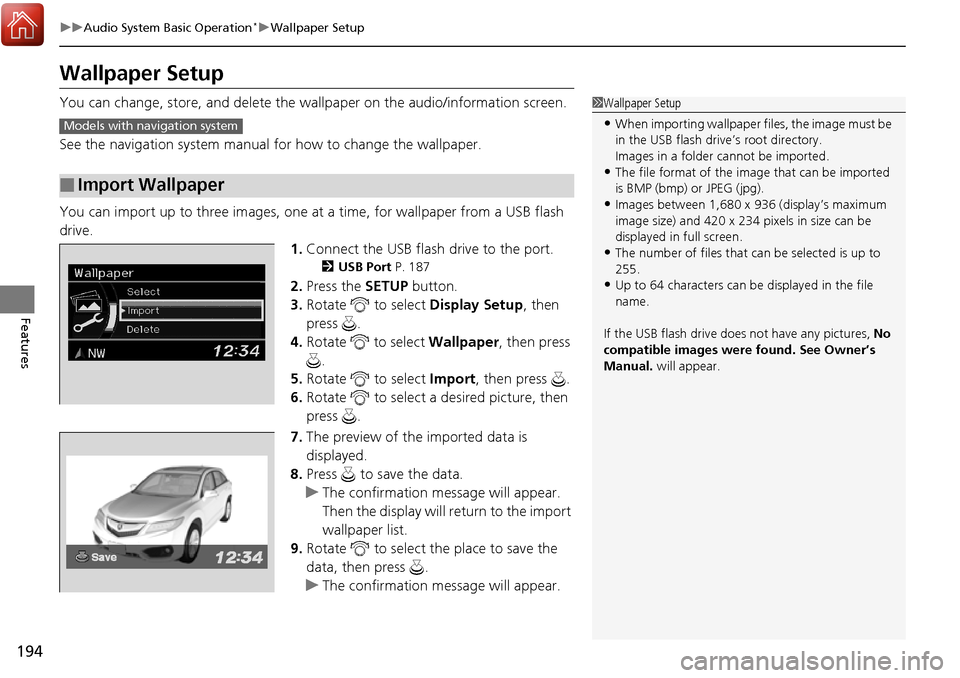
You can import up to three images, one at a time, for wallpaper from a USB flash
drive. 1.Connect the USB flash drive to the port.
2 USB Port P. 187
2.Press the SETUP button.
3. Rotate to select Display Setup, then
press .
4. Rotate to select Wallpaper, then press
.
5. Rotate to select Import, then press .
6. Rotate to select a desired picture, then
press .
7. The preview of the imported data is
displayed.
8. Press to save the data.
u The confirmation message will appear.
Then the display will return to the import
wallpaper list.
9. Rotate to select the place to save the
data, then press .
u The confirmation message will appear.
■Import Wallpaper
1Wallpaper Setup
•When importing wallpaper files, the image must be
in the USB flash drive’s root directory.
Images in a folder cannot be imported.
•The file format of the im age that can be imported
is BMP (bmp) or JPEG (jpg).
•Images between 1,680 x 936 (display’s maximum
image size) and 420 x 234 pixels in size can be
displayed in full screen.
•The number of files that can be selected is up to
255.
•Up to 64 characters can be displayed in the file
name.
If the USB flash drive doe s not have any pictures, No
compatible images were found. See Owner’s
Manual. will appear.
Models with navigation system
Page 235 of 449
uuBluetooth ® HandsFreeLink ®u HFL Menus
234
Features
■To change the pairing code setting
1. Press the PHONE button or the button.
2. Rotate to select Phone Setup, then
press .
3. Rotate to select Connection, then press
.
4. Rotate to select Pairing Code, then
press .
5. Rotate to select Fixed or Random , then
press .1 To change the pairing code setting
The default pairing code is “0000” until you change
the setting.
To create your own, select Fixed, and delete the
current code, then enter a new one.
For a randomly generated pa iring code each time you
pair a phone, select Random .
Page 289 of 449

uuWhen Driving uAdaptive Cruise Control (ACC)*
288
Driving
■There is no vehicle ahead
Your vehicle cruises at the set speed.
■A vehicle ahead is within ACC range and going slower than the set speed
Your vehicle slows down, and maintains the same speed as the speed of the vehicle
ahead to maintain the set following distance.
■A vehicle ahead is within ACC range and going at a steady speed
Your vehicle follows the vehicle ahead of it, keeping a constant distance, without
going beyond the set speed.
■A vehicle ahead goes out of range
ACC accelerates your vehicle to the set speed, and then maintains it.
■When you depress the accelerator pedal
You can temporarily increase th e vehicle speed. In this case, there is no audible or
visual alerts even if a vehicle is in ACC range.
ACC stays on unless you cancel it. Once you release the accelerator pedal, the
system resumes the set speed.
There are times when the vehicle speed will decrease when the accelerator pedal is
lightly applied.
1 When in Operation
You can also set the system to beep when a vehicle
detected in front of you co mes in and goes out of the
ACC detecting range. Change the ACC Forward
Vehicle Detect Beep setting. 2 Customized Features P. 106
Limitations
You may need to use the brake to maintain a safe
distance when using ACC. Additionally, ACC may
not work properly under certain conditions.
2 ACC Conditions and Limitations P. 289