Page 372 of 449
371
uuChecking and Maintaining Wiper Blades uChanging the Front Wiper Blade Rubber
Maintenance
4. Slide the wiper blade out from its holder by
pulling the tabbed end out.
5. Remove the retainers from the rubber blade
that has been removed, and mount to a
new rubber blade.
u Correctly align the rubber protrusion and
the retainer grooves.
6. Slide the new wiper bl ade onto the holder
from the bottom end.
u The tab on the holder should fit in the
indent of the wiper blade.
7. Slide the wiper blade onto the wiper arm,
then push down the lock tab.
8. Lower the passenger side wiper arm first,
then the driver side.
Blade
Top Retainer
Blade
Tab
Indent
Page 384 of 449

383
Maintenance
Battery
Checking the Battery
Check the battery terminals for corrosion monthly.
If your vehicle’s battery is disconnected or goes dead:
• The audio system is disabled.
2 Reactivating the audio system P. 188
•The clock resets.
2 Setting the Clock P. 118
•The navigation system* is disabled.
2 Refer to navigation system manual
Charging the Battery
Disconnect both battery cables to prevent damaging your vehicle’s electrical system.
Always disconnect the negative (–) cable first, and reconnect it last.
1Battery
WARNING: Battery post, terminals,
and related accessories contain lead
and lead compounds.
Wash your hands after handling.
When you find corrosion, cl ean the battery terminals
by applying a baking powder and water solution.
Rinse the terminals with water. Cloth/towel dry the
battery. Coat the terminals with grease to help
prevent future corrosion.
When replacing the battery, the replacement must be
of the same specifications.
Please consult a dealer for more information.
3WARNING
The battery gives off explosive hydrogen
gas during normal operation.
A spark or flame can cause the battery to
explode with enough force to kill or
seriously hurt you.
When conducting any battery
maintenance, wear prot ective clothing and
a face shield, or have a skilled technician do
it.
* Not available on all models
Page 389 of 449

uuCleaning uInterior Care
388
Maintenance
The front floor mats hook over the floor
anchors, which keep the mats from sliding
forward. To remove a mat for cleaning, turn
the anchor knobs to the unlock position.
When reinstalling the mat after cleaning, turn
the knobs to the lock position.
Do not put additional floor mats on top of
the anchored mat.
Vacuum dirt and dust from the leather freq uently. Pay close attention to the pleats
and seams. Clean the leather with a so ft cloth dampened with a 90% water and
10% neutral soap solution. Then buff it with a clean, dry cloth. Remove any dust or
dirt on leather surfaces immediately.
■Floor Mats1 Floor Mats
If you use any floor mats that were not originally
provided with your vehicle, make sure they are
designed for your specific ve hicle, fit correctly, and
are securely anchored by the floor anchors.
Position the rear seat floor mats properly. If they are
not properly positioned, the floor mats can interfere
with the front seat functions.
Lock
Unlock
■Maintaining Genuine Leather
Page 396 of 449

395Continued
Handling the Unexpected
If a Tire Goes Flat
Changing a Flat Tire*
If a tire goes flat while driving, grasp the steering wheel firmly, and brake gradually
to reduce speed. Then, stop in a safe plac e. Replace the flat tire with a compact
spare tire. Go to a dealer as soon as possib le to have the full-size tire repaired or
replaced.
1. Park the vehicle on firm, level, non-slip pery surface and apply the parking brake.
2. Move the shift lever to
(P.
3. Turn on the hazard warning lights and set the power mode to VEHICLE OFF
(LOCK).
1Changing a Flat Tire*
Periodically check the tire pressure of the compact
spare. It should be set to the specified pressure.
Specified Pressure: 60 psi (420 kPa, 4.2 kgf/cm
2)
When driving with the compact spare tire, keep the
vehicle speed under 50 mph (80 km/h). Replace with
a full-size tire as soon as possible.
The compact spare tire and wheel in your vehicle are
specifically for this model. Do not use them with
another vehicle. Do not us e another type of compact
spare tire or wheel with your vehicle.
Do not mount tire chains on a compact spare tire.
If a chain-mounted front tire goes flat, remove one of
the full-size rear tires and replace it with the compact
spare tire. Remove the flat front tire and replace it
with the full-size tire that was removed from the rear.
Mount the tire chains on the front tire.
Do not use a puncture-repairi ng agent on a flat tire,
as it can damage the tire pressure sensor.
* Not available on all models
Page 398 of 449
397
uuIf a Tire Goes Flat uChanging a Flat Tire*
Continued
Handling the Unexpected
5. Place a wheel block or rock in front and rear
of the wheel diagonal to the flat tire.
6. Place the compact spare tire (wheel side up)
under the vehicle body, near the tire that
needs to be replaced.
7. Loosen each wheel nut about one turn
using the wheel nut wrench.
Wheel
Blocks
The tire to be replaced.
Page 399 of 449

uuIf a Tire Goes Flat uChanging a Flat Tire*
398
Handling the Unexpected
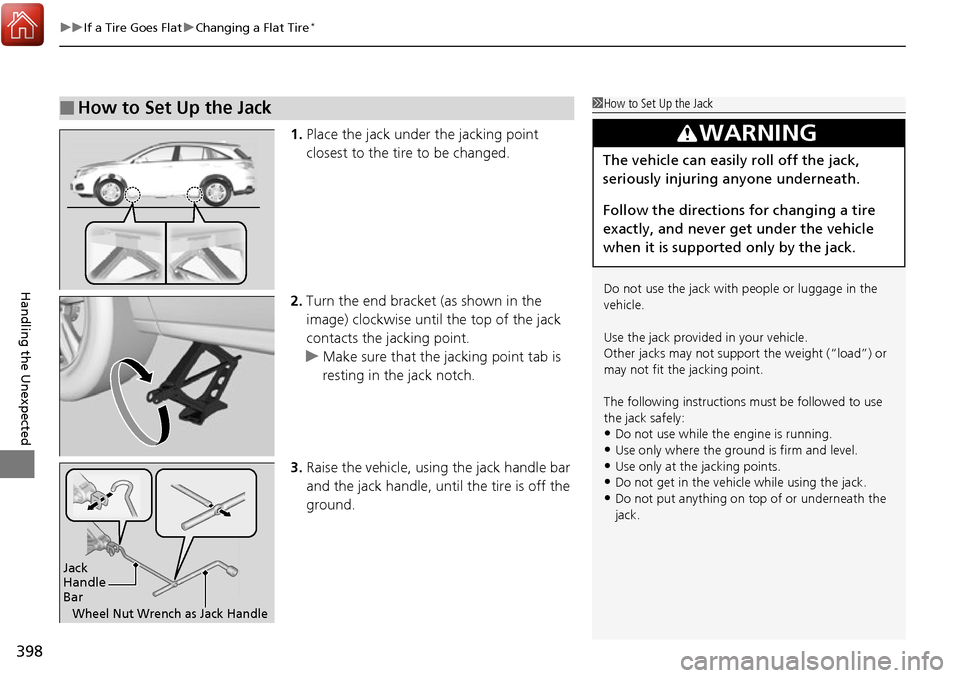
1. Place the jack under the jacking point
closest to the tire to be changed.
2. Turn the end bracket (as shown in the
image) clockwise until the top of the jack
contacts the jacking point.
u Make sure that the jacking point tab is
resting in the jack notch.
3. Raise the vehicle, using the jack handle bar
and the jack handle, until the tire is off the
ground.
■How to Set Up the Jack1How to Set Up the Jack
Do not use the jack with people or luggage in the
vehicle.
Use the jack provided in your vehicle.
Other jacks may not support the weight (“load”) or
may not fit the jacking point.
The following instructions must be followed to use
the jack safely:
•Do not use while the engine is running.
•Use only where the ground is firm and level.
•Use only at the jacking points.•Do not get in the vehicl e while using the jack.
•Do not put anything on top of or underneath the
jack.
3WARNING
The vehicle can easily roll off the jack,
seriously injuring anyone underneath.
Follow the directions for changing a tire
exactly, and never get under the vehicle
when it is supported only by the jack.
Jack
Handle
Bar
Wheel Nut Wrench as Jack Handle
Page 401 of 449

uuIf a Tire Goes Flat uChanging a Flat Tire*
400
Handling the Unexpected
1. Store the jack in its holder. Turn the jack’s
end bracket to lock it in place.
2. Remove the center cap.
3. Place the flat tire face up in the spare tire
well.
4. Remove the spacer cone from the wing bolt
for the spare tire, and insert the wing bolt
for the normal tire back on the bolt. Secure
the flat tire with the wing bolt.
5. Securely store the wheel nut wrench and
jack handle bar back in the cargo area.
If you replace a flat tire with the spare tire, the low tire pressure/TPMS indicator
comes on while you are driving. After driving for a few miles (kilometers), the
indicator will start blinking for a short time and then stay on. CHECK TPMS
SYSTEM/ Tire Pressure Monitor Problem appears on the multi-information
display, but this is normal.
If you replace the tire with a specified regular tire, the warning message on the
multi-information display and the low tire pressure/TPMS indicator will go off after
a few miles (kilometers).
■Storing the Flat Tire1 Storing the Flat Tire
3WARNING
Loose items can fly around the interior in a
crash and can seriously injure the
occupants.
Store the wheel, jack, and tools securely
before driving.Spacer
ConeWing
Bolt
For compact spare tireFor normal tire
■TPMS and the Spare Tire1
TPMS and the Spare Tire
The system cannot monitor th e pressure of the spare
tire. Manually check the spare tire pressure to be sure
that it is correct.
Use the TPMS specific wheels. Each is equipped with
a tire pressure sensor mount ed inside the tire behind
the valve stem.
Page 402 of 449

401
uuIf a Tire Goes Flat uTemporarily Repairing a Flat Tire*
Continued
Handling the Unexpected
Temporarily Repairing a Flat Tire*
If the tire has a large cut or is otherwise severely damaged, you will need to have the
vehicle towed. If the tire only has a small puncture, from a nail for instance, you can
use the temporary tire repair kit so that you can drive to the nearest service station
for a more permanent repair.
If a tire goes flat while driving, grasp the steering wheel firmly, and brake gradually
to reduce speed. Then stop in a safe place.
1. Park the vehicle on a firm, level, and n on-slippery surface and apply the parking
brake.
2. Move the shift lever to
(P.
3. Turn on the hazard warning lights and set the power mode to VEHICLE OFF
(LOCK).
1Temporarily Repairing a Flat Tire*
The kit should not be used in the following situations.
Instead, contact a dealer or a roadside assistant to
have the vehicle towed.
•The tire sealant has expired.
•More than one tire is punctured.•The puncture or cut is larger than 3/16 inch (4mm).
•The tire side wall is da maged or the puncture is
outside the contact area.
•Damage has been caused by driving with the tire
extremely under inflated.
•The tire bead is no longer seated.
•The rim is damaged.
Do not remove a nail or screw that punctured the
tire. If you remove it from the tire, you may not be
able to repair the puncture using the kit.
NOTICE
Do not use a puncture-repairing agent other than the
one provided in the kit that came with your vehicle. If
a different agent is used, you may permanently
damage the tire pressure sensor.
When the puncture is:Kit Use
Smaller than 3/16 inch (4 mm)Yes
Larger than 3/16 inch (4 mm)No
Contact
Area
* Not available on all models