Page 212 of 581

Continued211
uuInterior Lights/Interior Convenience Items uInterior Convenience Items
Controls
The power mode must be in ON to use the
seat heaters and ventilators*.
1. Select .
2. Change the setting with one of the
following:
The Heat/Cool
* level indicators: Select your
desired level setting. The left is for a LO
setting, the center is for a MID setting, and
to the right for a HI setting.
(+/(-: To go up or down one level at a
time.
AUTO: The system automatically selects
the setting most suitable to the ambient
environment.
OFF: Turn off the system.
■Front Seat Heaters and Seat Ventilation*1 Front Seat Heaters and Seat Ventilation*
Do not use the seat heater s and the seat ventilation
even in LO when the engine is off. Under such
conditions, the battery ma y be weakened, making
the engine difficult to start.
3WARNING
Heat induced burns are possible when
using seat heaters.
Persons with a diminished ability to sense
temperature (e.g., persons with diabetes,
lower-limb nerve damage, or paralysis) or
with sensitive skin should not use seat
heaters.
Models with seat ventilation
Models without seat ventilation
* Not available on all models
17 ACURA MDX-31TZ56300.book 211 ページ 2016年5月13日 金曜日 午後7時46分
Page 216 of 581

Continued215
uuClimate Control System uUsing Automatic Climate Control
Controls
1. Select the driver’s or passenger’s side
temperature control icon.
2. Change the temperature setting from the
following:
Temperature bar: Select a point where your
desired temperature setting is.
Farther to the left is for a lower, and to the
right for a higher setting.
3 /4 : To raise or lower the temperature
setting one degree at a time.
While you select and hold 3 /4 , the
temperature decreases or increases.
MAX COOL ON/OFF: To rapidly cool down
the interior. u The A/C indicator comes on. The setting
returns to the previously selected value
when you select it again.
MAX HEAT ON/OFF: To rapidly warm up the
interior.
u The A/C indicator goes off. The setting
returns to the previously selected value
when you select it again.
■Changing the Interior Temperature Setting1 Using Automatic Climate Control
When you set the temperature to the lower or upper
limit, Lo or Hi is displayed.
When you set the MAX COOL or MAX HEAT , MAX
COOL or MAX HEAT is displayed.
If you select the MAX COOL ON/OFF or MAX HEAT
ON/OFF during Auto Idle Stop , the engine restarts
automatically.
Models with Auto Idle Stop
The side you selected.
Temperature Bar
17 ACURA MDX-31TZ56300.book 215 ページ 2016年5月13日 金曜日 午後7時46分
Page 218 of 581

Continued217
uuClimate Control System uUsing Automatic Climate Control
Controls
■SYNC on and off
1.Select SYNC.
2. Select ON for synchronized mode.
u When in synchronized mode, the front
passenger’s side temperature and the
rear passenger compartment become
the same as the driv er’s side settings.
3. Adjust the temperature or change the
mode from the driver’s side.
■Changing the fan speed
1.Select .
2. Change the fan speed with one of the
following:
The fan speed level indicators: Select your
desired speed level. The smaller indicator is
for a slower speed, and the larger for a
faster speed.
(+/(-: To go up or down one level at a
time.
Front Fan AUTO : The system automatically
selects the fan speed most suitable to the
ambient environment.
1 SYNC on and off
When you press the button, the system
synchronizes the driver's and front passenger's
temperature settings.
When the system is not in SYNC mode, the driver's
side temperature, the front passenger’s side
temperature and the rear passenger compartment (if
it is on) can be set separately.
You can also turn off SYNC mode by changing the
front passenger’s side temperature or rear
passenger’s temperature.
1 Changing the fan speed
While the climate control system is in AUTO, Front
Fan AUTO is highlighted.
Fan Speed Level Indicators
17 ACURA MDX-31TZ56300.book 217 ページ 2016年5月13日 金曜日 午後7時46分
Page 223 of 581
uuClimate Control System uRear Climate Control System
222
Controls
■Changing the rear temperature setting
Change the temperature setting from the
following:
3/4 : To raise or lower the temperature
setting one degree at a time.
While you select and hold 3/4 , the
temperature decreases or increases.
■Switching the vent mode Select a desired vent mode icon.
Vent mode: Rear console vents
: Rear console vents and floor vents
: Rear floor vents
1Changing the rear temperature setting
When you set the temperat ure to the lower or upper
limit, Lo or Hi is displayed.
3/4 (Temperature Control) Icon
Vent Mode Icon
17 ACURA MDX-31TZ56300.book 222 ページ 2016年5月13日 金曜日 午後7時46分
Page 233 of 581

232
Features
Audio System Basic Operation
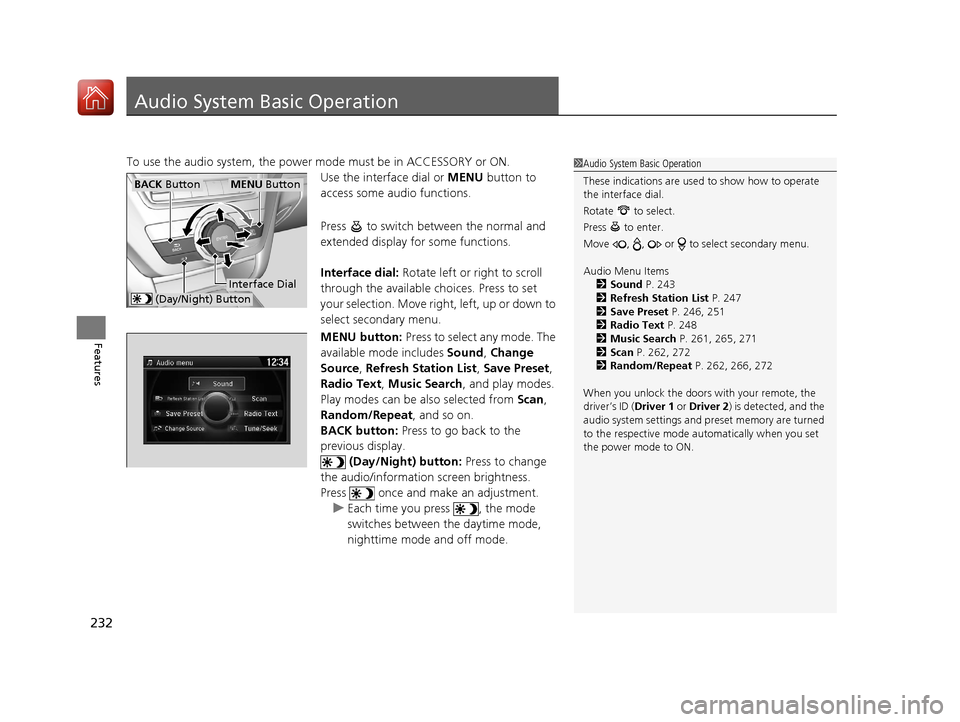
To use the audio system, the power mode must be in ACCESSORY or ON.
Use the interface dial or MENU button to
access some audio functions.
Press to switch between the normal and
extended display fo r some functions.
Interface dial: Rotate left or right to scroll
through the available choices. Press to set
your selection. Move right, left, up or down to
select secondary menu.
MENU button: Press to select any mode. The
available mode includes Sound, Change
Source , Refresh Station List , Save Preset ,
Radio Text, Music Search , and play modes.
Play modes can be also selected from Scan,
Random/Repeat , and so on.
BACK button: Press to go back to the
previous display.
(Day/Night) button: Press to change
the audio/information screen brightness.
Press once and make an adjustment. u Each time you press , the mode
switches between the daytime mode,
nighttime mode and off mode.1Audio System Basic Operation
These indications are used to show how to operate
the interface dial.
Rotate to select.
Press to enter.
Move , , or to select secondary menu.
Audio Menu Items 2 Sound P. 243
2 Refresh Station List P. 247
2 Save Preset P. 246, 251
2 Radio Text P. 248
2 Music Search P. 261, 265, 271
2 Scan P. 262, 272
2 Random/Repeat P. 262, 266, 272
When you unlock the doors with your remote, the
driver’s ID ( Driver 1 or Driver 2) is detected, and the
audio system settings and pr eset memory are turned
to the respective mode automatically when you set
the power mode to ON.
Interface Dial
MENU ButtonBACK Button
(Day/Night) Button
17 ACURA MDX-31TZ56300.book 232 ページ 2016年5月13日 金曜日 午後7時46分
Page 239 of 581

uuAudio System Basic Operation uOn Demand Multi-Use DisplayTM
238
Features
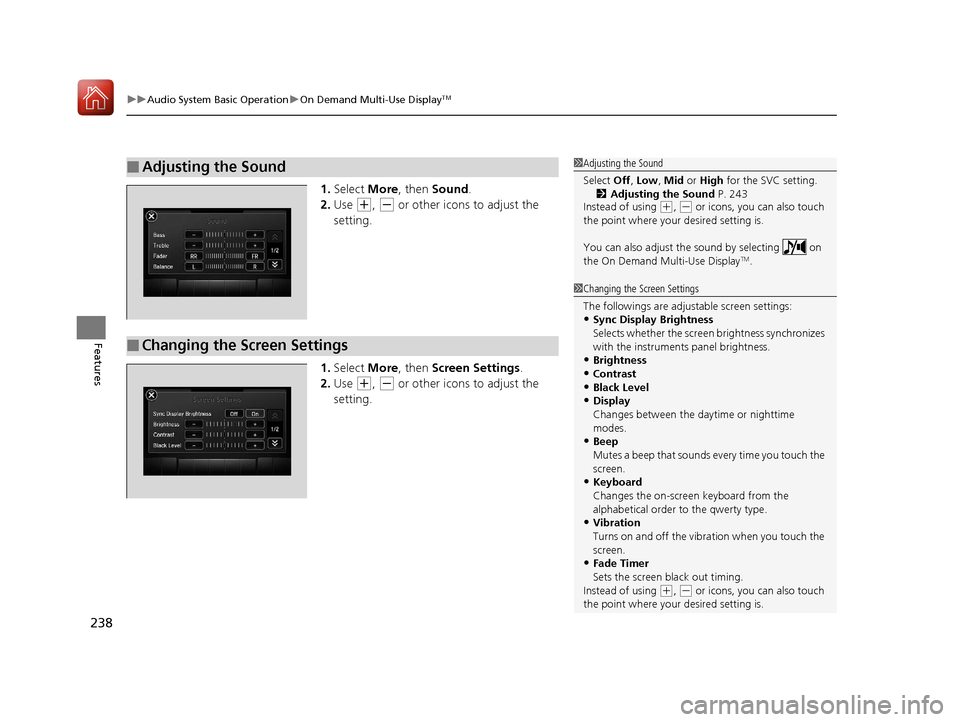
1. Select More, then Sound .
2. Use
(+, (- or other icons to adjust the
setting.
1. Select More, then Screen Settings .
2. Use
(+, (- or other icons to adjust the
setting.
■Adjusting the Sound1 Adjusting the Sound
Select Off, Low , Mid or High for the SVC setting.
2 Adjusting the Sound P. 243
Instead of using
( +, (- or icons, you can also touch
the point where your desired setting is.
You can also adjust the sound by selecting on
the On Demand Multi-Use Display
TM.
■Changing the Screen Settings
1 Changing the Screen Settings
The followings are adjustable screen settings:
•Sync Display Brightness
Selects whether the screen brightness synchronizes
with the instruments panel brightness.
•Brightness
•Contrast
•Black Level•Display
Changes between the da ytime or nighttime
modes.
•Beep
Mutes a beep that sounds every time you touch the
screen.
•Keyboard
Changes the on-screen keyboard from the
alphabetical order to the qwerty type.
•Vibration
Turns on and off the vibration when you touch the
screen.
•Fade Timer
Sets the screen black out timing.
Instead of using
( +, (- or icons, you can also touch
the point where your desired setting is.
17 ACURA MDX-31TZ56300.book 238 ページ 2016年5月13日 金曜日 午後7時46分
Page 242 of 581

Continued241
uuAudio System Basic Operation uAudio/Information Screen
Features
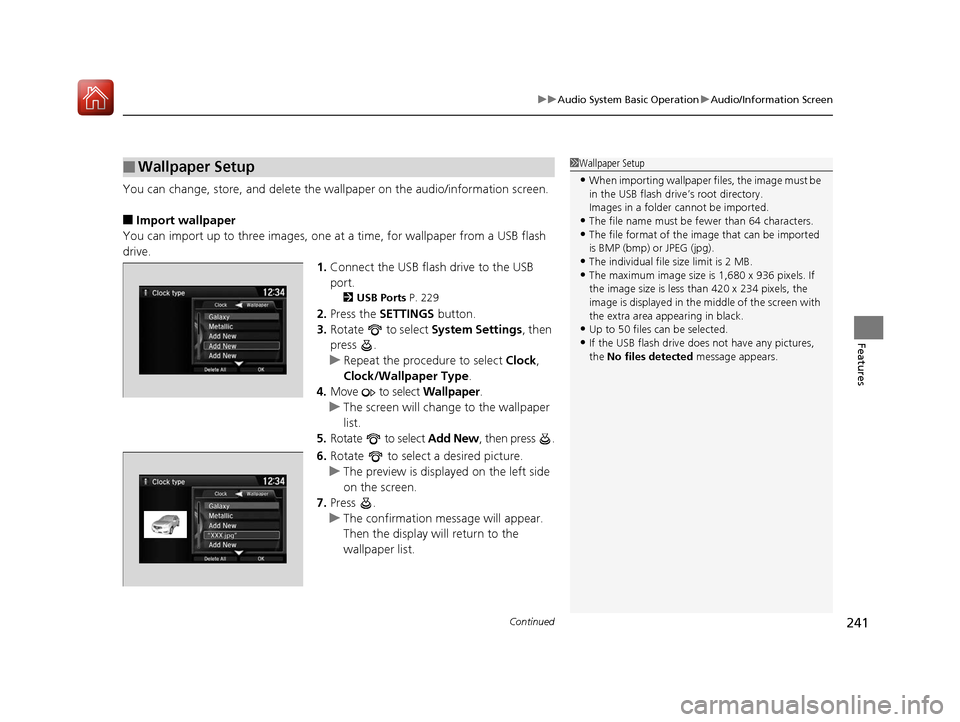
You can change, store, and delete the wa llpaper on the audio/information screen.
■Import wallpaper
You can import up to three images, one at a time, for wallpaper from a USB flash
drive.
1.Connect the USB flash drive to the USB
port.
2 USB Ports P. 229
2.Press the SETTINGS button.
3. Rotate to select System Settings, then
press .
u Repeat the procedure to select Clock,
Clock/Wallpaper Type .
4. Move to select Wallpaper.
u The screen will change to the wallpaper
list.
5. Rotate to select Add New, then press .
6. Rotate to select a desired picture.
u The preview is displayed on the left side
on the screen.
7. Press .
u The confirmation message will appear.
Then the display will return to the
wallpaper list.
■Wallpaper Setup1Wallpaper Setup
•When importing wallpaper files, the image must be
in the USB flash drive’s root directory.
Images in a folder cannot be imported.
•The file name must be fewer than 64 characters.•The file format of the im age that can be imported
is BMP (bmp) or JPEG (jpg).
•The individual file size limit is 2 MB.•The maximum image size is 1,680 x 936 pixels. If
the image size is less than 420 x 234 pixels, the
image is displayed in the middle of the screen with
the extra area appearing in black.
•Up to 50 files can be selected.
•If the USB flash drive doe s not have any pictures,
the No files detected message appears.
17 ACURA MDX-31TZ56300.book 241 ページ 2016年5月13日 金曜日 午後7時46分
Page 250 of 581

249
uuAudio System Basic Operation uPlaying SiriusXM ® Radio
Continued
Features
Playing SiriusXM® Radio
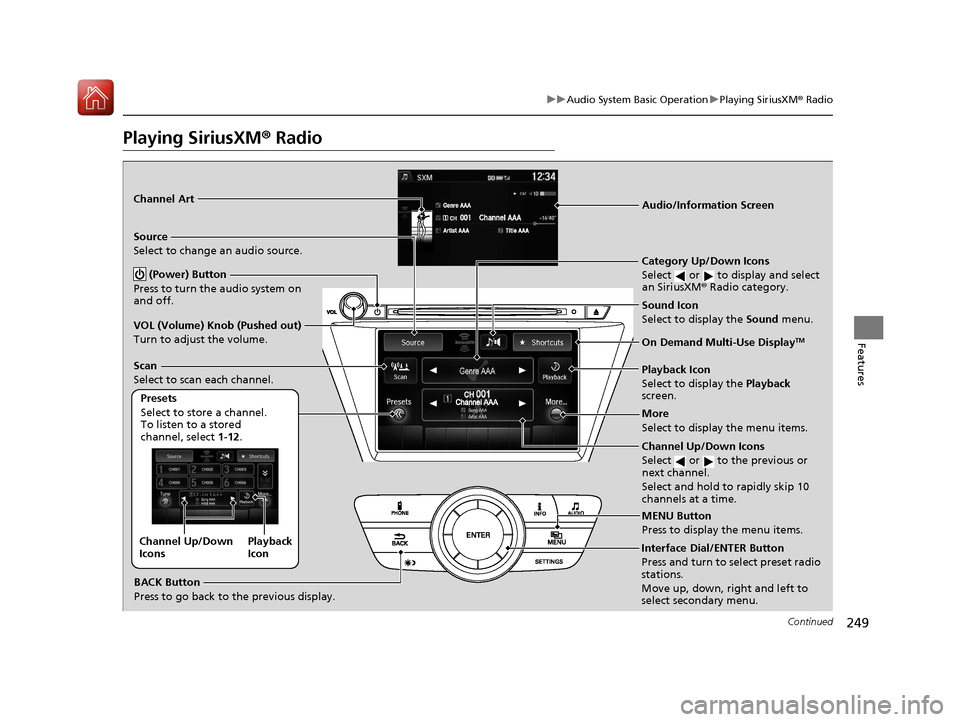
Audio/Information Screen
On Demand Multi-Use Display
TM
Category Up/Down Icons
Select or to display and select
an SiriusXM® Radio category.
MENU Button
Press to display the menu items.
(Power) Button
Press to turn the audio system on
and off.
Source
Select to change an audio source.
Presets
Select to store a channel.
To listen to a stored
channel, select 1-12.
Channel Up/Down Icons
Select or to the previous or
next channel.
Select and hold to rapidly skip 10
channels at a time.
More
Select to display the menu items.
BACK Button
Press to go back to the previous display.
VOL (Volume) Knob (Pushed out)
Turn to adjust the volume.
Interface Dial/ENTER Button
Press and turn to select preset radio
stations.
Move up, down, right and left to
select secondary menu.
Scan
Select to scan each channel.
Sound Icon
Select to display the
Sound menu.
Channel Art
Playback
Icon
Channel Up/Down
Icons
Playback Icon
Select to display the
Playback
screen.
17 ACURA MDX-31TZ56300.book 249 ページ 2016年5月13日 金曜日 午後7時46分