2017 Abarth 124 Spider audio
[x] Cancel search: audioPage 40 of 220

close the cover when the accessory
socket is not in use to prevent foreign
objects and liquids from getting into the
accessory socket;
correctly insert the plug into the
accessory socket;
do not insert the cigarette lighter into
the accessory socket;
noise may occur on the audio
playback depending on the device
connected to the accessory socket;
depending on the device connected
to the accessory socket, the vehicle's
electrical system may be affected,
which could cause the warning light to
illuminate. Disconnect the connected
device and make sure that the problem
is resolved. If the problem is resolved,
disconnect the device from the socket
and switch the ignition off. If the
problem is not resolved, contact an
Abarth Dealership.
IMPORTANT To prevent discharging of
the battery, do not use the socket for
long periods with the engine off or
idling.
BOOT LID
OPENING
47) 48)
IMPORTANT Before opening the boot
lid, remove any snow and ice
accumulation on it. Otherwise, the boot
lid could close under the weight of the
snow and ice resulting in injury.
IMPORTANT Be careful when
opening/closing the boot lid during
strong winds. If a strong gust blows
against the boot lid, it could close
suddenly resulting in injury.
IMPORTANT Fully open the boot lid and
make sure that it stays open. If the boot
lid is only opened partially, it could slam
shut by vibration or wind gusts resulting
in injury.
IMPORTANT When loading or
unloading luggage in the boot, turn off
the engine. Otherwise, you could get
burned by the heat of the exhaust gas.
Using the remote release button
(where provided)
Unlock the doors and boot lid, then
press the electric boot lid opener
fig. 30 and raise it when the latch
releases.
NOTEWith the advanced keylessfunction: a locked boot lid can also be
opened while the key is being carried.
With the advanced keyless function
A locked boot lid can also be opened
while the key is being carried.
When opening the boot lid with the
doors locked, it may require a few
seconds for the boot lid latch to release
after the electric boot lid opener is
pressed.
The boot lid can be closed when the
doors are locked with the key left in the
vehicle. However, to prevent locking the
key in the vehicle, the boot lid can be
opened by pressing the electric boot lid
opener. If the boot lid cannot be
opened despite doing this procedure,
press the electric boot lid opener to fully
open the boot lid after pushing the boot
lid completely closed.
If the vehicle battery is dead or there is
3004030201-12A-001AB
38
GETTING TO KNOW YOUR VEHICLE
Page 54 of 220

WARNING LIGHTS AND MESSAGES
IMPORTANT The indication of the warning light in the instrument panel is indicative and
precautionary and as such must not be considered as exhaustive and/or alternative to the information contained in the
Owner Handbook, which you are advised to read carefully in all cases. Always refer to the information in this chapter
in the event of a failure indication.
IMPORTANTThe instrument panel warning light will stay on until the cause
of the failure is eliminated.
The warning contents can be verified on the audio system. Versions with Radio 7”
Proceed as follows:
if the warning light is turned on, selecticon on the home screen to display the application screen;
select “Warning Guidance” to display the current warnings;
select the applicable warning to view the warning details.
52
KNOWING THE INSTRUMENT PANEL
Page 143 of 220

163)Halogen bulbs contain pressurised
gas, in the case of breakage they may
burst causing glass fragments to be
projected outwards.
164)Only replace bulbs when the engine is
off. Also ensure that the engine is cold, to
prevent the risk of burns.
IMPORTANT
30)Where possible, it is advisable to have
bulbs changed at Abarth Dealership.
Proper operation and direction of the
external lights are essential for driving in
safety and comply with law.
31)Halogen bulbs must be handled
holding the metallic part only. Touching the
transparent part of the bulb with your
fingers may reduce the intensity of the
emitted light and even reduce the lifespan
of the bulb. In the event of accidental
contact, wipe the bulb with a cloth
moistened with alcohol and let the bulb dry
REPLACING FUSES
GENERAL INFORMATION
165) 166) 167) 168) 169)
32) 33)
Fuse location
Fuses are grouped together in two fuse
boxes located on the left side of the
vehicle and under the bonnet.
FUSES ON THE LEFT
SIDE OF THE VEHICLE
Proceed as follows:
make sure the ignition is switched
off, and other switches are off;
open the fuse panel cover
fig. 125 (located near the door);
press retaining clip and remove
protection cover;
pull the fuse straight out with the fuse
puller provided on the fuse block
located in the engine compartment
fig. 126;
inspect the fuse and replace it if it is
blown;
insert a new fuse of the same
amperage rating, and make sure it fits
tightly. If it does not fit tightly, contact an
Abarth Dealership. If you have no spare
fuses, borrow one of the same rating
from a circuit not essential to vehicle
operation, such as the AUDIO or
OUTLET circuit;
reinstall the cover and make sure that
it is securely installed.
IMPORTANT Always replace a fuse with
a genuine FCA fuse or equivalent of the
same rating. Otherwise you may
damage the electric system.12507031601-121-001AB
12607031601-122-001AB
141
Page 146 of 220

DESCRIPTION FUSE RATING PROTECTED COMPONENT
F03 HORN2 7.5 A Horn
F06 — — —
F07 INTERIOR 15 A Overhead light
F09 AUDIO2 15 A Audio system
F10 METER1 10 A Instrument cluster
F11 SRS1 7.5 A Air bag
F12 — — —
F13 RADIO 7.5 A Audio system
F17 AUDIO1 25 A Audio system
F18 A/C MAG 7.5 A Air conditioner
F20 AT 15 A Transmission control system (where provided)
F21 D LOCK 25 A Power door locks
F22 H/L RH 20 A Headlight (RH)
F24 TAIL 20 A Taillights/Number plate lights/Position lights
F25 DRL 15 A Daylight Running Lights
F26 ROOM 25 A Overhead light
F27 FOG 15 A Fog lights
F28 H/CLEAN 20 A Headlight washer (where provided)
F29 STOP 10 A Stop lights/Rear fog light (where provided)
F30 HORN 15 A Horn
F31 H/L LH 20 A Headlight (LH)
F33 HAZARD 15 A Hazard warning flashers/Direction indicators lights
F36 WIPER 20 A Windshield wipers
144
IN CASE OF EMERGENCY
Page 177 of 220

rinse and wring out the microfibre
cloth, and pass over the covered area
treated in the previous point again;
leave it to dry and brush it gently with
a soft brush.
WARNING
213)Do not spray water into the vehicle
cabin. Spraying water into the vehicle cabin
is dangerous as electrical devices such as
the audio and switches could get wet
resulting in a malfunction or vehicle fire.
214)If a seat belt appears frayed or has
abrasions, have it replaced by a
Dealership. If a seat belts is used under
such a condition, it cannot function at its
full capacity which could result in serious
injury or death.
215)Use a mild detergent to remove
soiling from a seat belt. If organic solvents
are used for cleaning the seat belts or they
become stained or bleached, there is the
possibility of them becoming weakened
and as a result, they may not function at
their full capacity which could cause
serious injury or death.
216)Never use flammable products, such
as petrol ether or rectified petrol to clean
the inside of the car. The electrostatic
charges which are generated by rubbing
during the cleaning operation may cause a
fire.217)Do not keep aerosol cans in the car:
they might explode. Aerosol cans must not
be exposed to a temperature exceeding
50°C. When the vehicle is exposed to
sunlight, the internal temperature can
greatly exceed this value.
218)There must be no obstacles on the
floor underneath the pedals; make sure
that mats are always flat and do not
interfere with the pedals.IMPORTANT
53)Never use alcohol, petrols and
derivatives to clean the dashboard and
instrument panel lens.
54)Do not use “hard” synthetic brushes as
they could damage the fabric beyond
repair. Do not perform partial, localised
restorations that could cause “aesthetic”
differences between treated and untreated
areas. Do not use alcohol or ketone-based
solvents.
175
Page 195 of 220

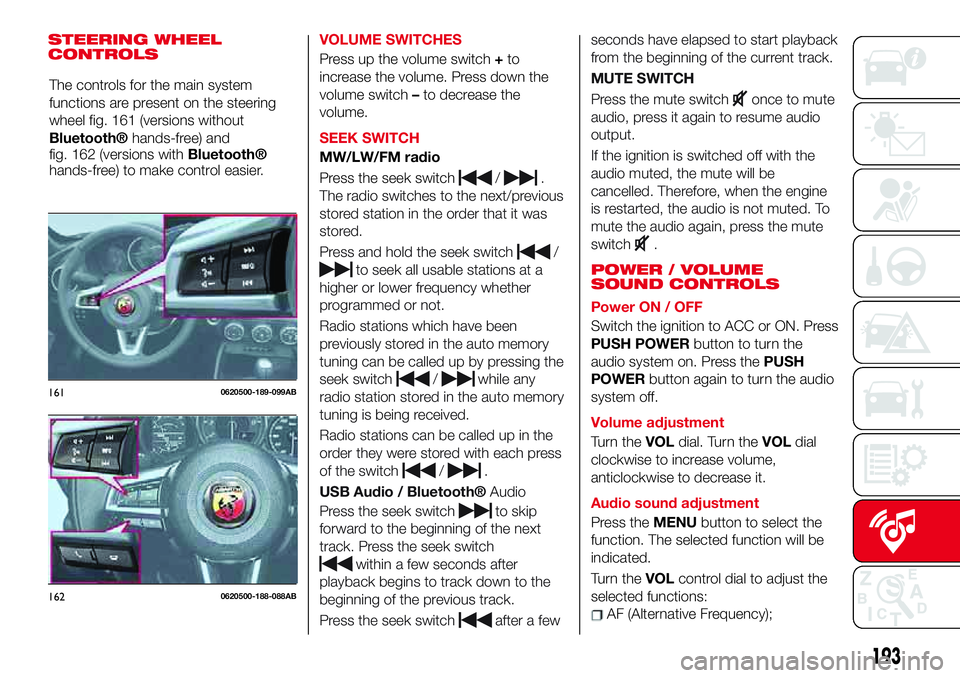
STEERING WHEEL
CONTROLSVOLUME SWITCHES
Press up the volume switch+to
increase the volume. Press down the
volume switch–to decrease the
volume.
SEEK SWITCH
MW/LW/FM radio
Press the seek switch
/.
The radio switches to the next/previous
stored station in the order that it was
stored.
Press and hold the seek switch
/
to seek all usable stations at a
higher or lower frequency whether
programmed or not.
Radio stations which have been
previously stored in the auto memory
tuning can be called up by pressing the
seek switch
/while any
radio station stored in the auto memory
tuning is being received.
Radio stations can be called up in the
order they were stored with each press
of the switch
/.
USB Audio /
Bluetooth®Audio
Press the seek switch
to skip
forward to the beginning of the next
track. Press the seek switch
within a few seconds after
playback begins to track down to the
beginning of the previous track.
Press the seek switch
after a fewseconds have elapsed to start playback
from the beginning of the current track.
MUTE SWITCH
Press the mute switch
once to mute
audio, press it again to resume audio
output.
If the ignition is switched off with the
audio muted, the mute will be
cancelled. Therefore, when the engine
is restarted, the audio is not muted. To
mute the audio again, press the mute
switch
.
POWER / VOLUME
SOUND CONTROLS
Power ON / OFF
Switch the ignition to ACC or ON. Press
PUSH POWERbutton to turn the
audio system on. Press thePUSH
POWERbutton again to turn the audio
system off.
Volume adjustment
Turn theVOLdial. Turn theVOLdial
clockwise to increase volume,
anticlockwise to decrease it.
Audio sound adjustment
Press theMENUbutton to select the
function. The selected function will be
indicated.
Turn theVOLcontrol dial to adjust the
selected functions:
AF (Alternative Frequency);
1610620500-189-099AB
1620620500-188-088AB
193
The controls for the main system
functions are present on the steering
wheel fig. 161 (versions without
Bluetooth®hands-free) and
fig. 162 (versions withBluetooth®
hands-free) to make control easier.
Page 196 of 220

REG (Regional Programme);
ALC (Automatic volume adjustment);
BASS (Low pitch sound);
TREB (Treble sound);
FADE (Front/back volume balance);
BAL (Left/right volume balance);
BEEP (Audio operation sound);
12Hr < > 24Hr (12 Hr/24 Hr time
adjustment).
CLOCK
Setting the time
The clock can be set at any time when
the ignition is switched to ACC or ON.
To adjust the time, press the clock
buttonFM/AMfor about 2 seconds
until a beep is heard. The clock's
current time will flash.
Time adjustment
To adjust the time, press the
hour/minute set button
/
while the clock's current time is
flashing.
The hours advance while the hour set
button
is pressed. The minutes
advance while the minute
set
button is pressed.
Press the clock buttonFM/AMagain
to start the clock.
OPERATING THE RADIO
Radio ON: press a band selector
button FM/AM to turn the radio on.
Band selection: press the band
selector buttonFM/AMto switch the
bands as follows: M1–FM2–MW/LW
Manual tuning: select the station by
pressing the tuning button
/
lightly.
Seek tuning: press tuning button
/. The search stops when a
station is found.
Scan tuning: press and hold the scan
buttonMEDIAto automatically sample
strong stations. Scanning stops at each
station for about 5 seconds. To hold a
station, press and hold the scan button
MEDIA again during this interval.
Preset channel tuning
The 6 preset channels can be used to
store 6 MW/LW and 12 FM stations.
To set a channel first select MW/LW,
FM1, or FM2. Tune to the desired
station.
Press a channel preset button for
about 2 seconds until a beep is heard.
The preset channel number or station
frequency will be displayed. The station
is now held in the memory.
Repeat this operation for the other
stations and bands you want to store.
To tune one in the memory, selectMW/LW, FM1, or FM2 and then press
its channel preset button. The station
frequency or the channel number will be
displayed.
AUX / USB / iPod MODE
Auxiliary jack / USB port
Audio can be heard from the vehicle's
speakers by connecting a commercially
available portable audio unit to the
auxiliary jack. A commercially-available,
non-impedance (3.5 Ø) stereo mini plug
lead is required. In addition, audio can
be played from the vehicle audio device
by connecting a USB device or an iPod
to the USB port.
How to use AUX mode
Switch the ignition to ACC or ON, press
the power/volume dial to turn the audio
system on and press theMEDIA
button of the audio unit to change to
the AUX mode.
How to use USB mode
This unit does not support a USB
3.0 device. In addition, other devices
may not be supported depending on
the model or OS version.
Playback
Switch the ignition to ACC or ON, press
the power/volume dial to turn the audio
system on and press theMEDIA
194
MULTIMEDIA
Page 197 of 220

button to switch to the USB mode and
start playback.
Track search
Press the track up button
once to
skip forward to the beginning of the
next track.
Press the track down button
within a few seconds after
playback begins to track down to the
beginning of the previous track.
Press the track down button
after
a few seconds have elapsed to start
playback from the beginning of the
current track.
How to use iPod mode
An iPod may not be compatible
depending on the model or OS version.
In this case, an error message is
displayed.
NOTE The iPod functions on the iPod
cannot be operated while it is
connected to the unit because the unit
controls the iPod functions.Track search
Press the track up button
once to
skip forward to the beginning of the
next track.
Press the track down button
within a few seconds (depends
on iPod software version) after playback
begins to track down to the beginning
of the previous track.
Press the track down button
after
a few seconds (depends on iPod
software version) have elapsed to start
playback from the beginning of the
current track.
Category search: press the category
down button5to select the previous
category and press the category up
button6to select the next category.
The types of categories include Playlist,
Artist, Album, Song, Podcast, Genre,
Composer, and Audio book.
List search: press the list down button
to select the previous list and press
the list up button
to select the next
list. When the selected category is
Song or Audio book, there is no list.
Bluetooth® HANDS FREE
Device pairing
To use
Bluetooth®audio and
Hands-Free, the device equipped with
Bluetooth®hastobepairedtothe
unit using the following procedure. A
maximum of seven devices including
Bluetooth®audio devices and
hands-free mobile phones can be
paired.
NOTE The
Bluetooth®system may
not operate for 1 or 2 minutes after the
ignition is switched to ACC or ON.
However, this does not indicate a
problem. If the
Bluetooth®system
does not connect automatically after
1 or 2 minutes have elapsed, make
sure that the
Bluetooth®setting on
the device is normal and attempt to
reconnect the
Bluetooth®device from
the vehicle side.
Pairing code setting
The 4-digit pairing code setting for
registration of your cell phone (pairing)
can be set beforehand. The initial
setting value is “0000”.
Proceed as follows:
1: press the pick-up button or talk
button with a short press;
2Say: [Beep] “Setup”
3Prompt: “Select one of the
following: Pairing options, confirmation
prompts, language, passcode, select
phone or select music player.”
195