2017.75 VAUXHALL CROSSLAND X change time
[x] Cancel search: change timePage 108 of 245
106LightingLightingExterior lighting.......................... 106
Light switch .............................. 106
Automatic light control .............107
High beam ............................... 107
Headlight flash ......................... 107
Headlight range adjustment ....108
Daytime running lights .............108
Adaptive forward lighting .........108
Hazard warning flashers ..........109
Turn and lane-change signals . 110
Front fog lights ......................... 110
Rear fog light ........................... 110
Parking lights ........................... 111
Reversing lights .......................111
Misted light covers ...................111
Interior lighting ........................... 111
Instrument panel illumination control ..................................... 111
Interior lights ............................ 112
Reading lights .......................... 112
Sunvisor lights ......................... 112
Lighting features ........................113
Centre console lighting ............113
Entry lighting ............................ 113Exit lighting.............................. 113
Battery discharge protection ....113Exterior lighting
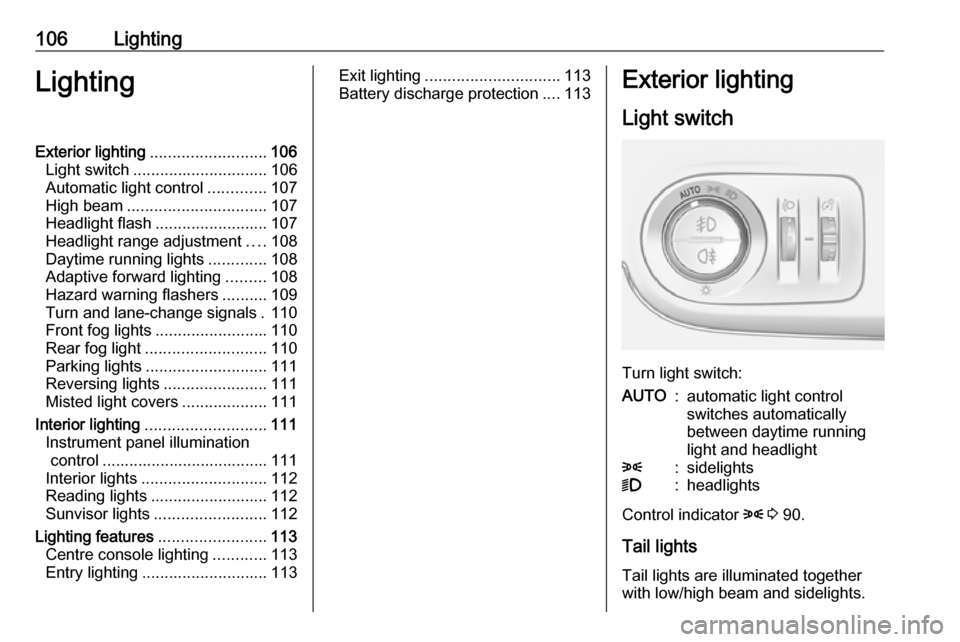
Light switch
Turn light switch:
AUTO:automatic light control
switches automatically
between daytime running
light and headlight8:sidelights9:headlights
Control indicator 8 3 90.
Tail lights Tail lights are illuminated together
with low/high beam and sidelights.
Page 112 of 245

110LightingWhen braking in an emergency, the
hazard warning flashers are switched
on automatically depending on the
force of deceleration. They are
switched off automatically the first
time you accelerate.
Turn and lane-change signalslever up:right turn signallever down:left turn signalIf the lever is moved past the
resistance point, the turn signal is
switched on constantly. When the
steering wheel moves back, the turn
signal is automatically deactivated.
For three flashes, e.g. when changing
lanes, press the lever until resistance
is felt and then release.
If you forget to cancel the turn and
lane-change signals for more than
twenty seconds, the volume of the
audible signal will increase if the
speed is above 40 mph.
Front fog lights
Operated by pressing >.
Light switch in position AUTO:
switching on front fog lights will switch headlights on automatically.
Rear fog light
Operated by pressing ø
.
Light switch in position AUTO:
switching on rear fog light will switch
headlights on automatically.
Light switch in position 8: rear fog
light can only be switched on with
front fog lights.
Page 162 of 245

160Driving and operatingThe state of the system is stored
when switching off the ignition.
The system is automatically
deactivated when towing an
electrically connected trailer.
Fault In the event of a fault, B flashes for a
few moments in the instrument panel,
accompanied by F and a
display message. Contact a dealer or a qualified workshop to have the
system checked.
Panoramic view system
This system allows views of the
vehicle's surroundings to be
displayed as a nearly 180° picture in
the Info display, like a bird's eye view.
The system uses: ● rear camera, installed in the tailgate
● ultrasonic parking sensors in the rear bumper
The screen in the Info display is
divided into two parts: on the right
there is a view from above the vehicle,and on the left there is the view from
the rear displayed. The parking
sensors complete the information on
the view from above the vehicle.
Activation Panoramic view system is activated
by:
● engaging reverse gear
● driving up to 6 mph
Functionality
Different views can be selected in the left part of the display. Change the
type of view at any time during a
manoeuvre by pressing the touch
field in the left lower zone of the
display:
● Rear view
● Auto mode
● Zoom view
● 180° view
The display is immediately updated
with the type of view selected.
AUTO mode is activated by default. In
this mode, the system selects the
best view, standard or zoom, to
display according to the information
from the parking sensors.
The state of the system is not kept in
memory when the ignition is switched
off.
Page 164 of 245

162Driving and operatingDeactivation
Panoramic view system is
deactivated when:
● driving faster than 6 mph
● seven seconds after disengaging
reverse gear
● by pressing the icon q in the left
upper corner of the touch screen
● opening the tailgate
General information9 Warning
The panoramic view system does
not replace driver vision. It will not display children, pedestrians,
cyclists, crossing traffic, animals,
or any other objects outside of the camera view area, e. g. below the
bumper, or underneath the
vehicle.
Do not drive or park the vehicle
using only the panoramic view
system.
Always check the surrounding of
the vehicle before driving.
Displayed images may be further
or closer than they appear. The
area displayed is limited and
objects that are close to either
edge of the bumper or under the
bumper are not displayed on the
screen.
System limitations
Caution
For optimal operation of the
system, it is important to keep the
lense of the camera in the tailgate between the number plate lightsalways clean. Rinse the lense with water and wipe with a soft cloth.
Do not clean the lense with a
steam-jet or high-pressure jet
cleaner.
The panoramic view system may not
operate properly when:
● The surrounding is dark.
● The sun or the beam of headlights is shining directly into
the camera lenses.
● During nighttime driving.
● Weather limits visibility, such as fog, rain, or snow.
● The camera lenses are blocked by snow, ice, slush, mud, dirt.
● The vehicle is towing a trailer.
● The vehicle had an accident.
● There are extreme temperature changes.
Rear view camera The rear view camera assists the
driver when reversing by displaying a
view of the area behind the vehicle.
The view of the camera is displayed
in the Info-Display.9 Warning
The rear view camera does not
replace driver vision. Note that
objects that are outside the
camera's field of view and the
Page 167 of 245

Driving and operating165The system can not operate when no
lane marking is detected.
System limitations The system performance may not
operate properly when:
● Vehicle speed is below 37 mph.
● Driving on winding or hilly roads.
● During nighttime driving.
● Weather limits visibility, such as fog, rain, or snow.
● The sensor in the windscreen is blocked by snow, ice, slush, mud,dirt, windscreen damage or
affected by foreign items, e.g.
stickers.
● The sun is shining directly into the camera lens.
● Close vehicles ahead.
● Banked roads.
● Road edges.
● Roads with poor lane markings.
● Sudden lighting changes.Driver alert
Driver alert monitores the driving time above a vehicle speed of 65 km/h.
It is recommended to take a break as soon as feeling tired or at least every
two hours.
The system includes a driving time
alert.
Driving time alert
The driver gets notified by a pop-up
reminder symbol ˇ in the Driver
Information Centre simultaneously with a sound alert if the driver has not taken a break after two hours of
driving at a speed above 65 km/h. The
alert is repeated hourly until the
vehicle is stopped, no matter how
vehicle speed evolves.
The counting of driving time alert is
reset when the ignition has been
switched off for a few minutes.
Deactivation or activation The system can be deactivated or
activated in the personalisation menu
3 99.Driver drowsiness detection alert is
reset when the ignition has been
switched off for a few minutes.
Page 171 of 245

Driving and operating169715/2007 (in the version respectively
applicable), taking into consideration
the vehicle weight in running order, as
specified by the regulation.
The figures are provided only for the
purpose of comparison between different vehicle variants and mustnot be taken as a guarantee for the
actual fuel consumption of a
particular vehicle. Additional
equipment may result in higher
results than the stated consumption and CO 2 figures. Furthermore, fuel
consumption is dependent on personal driving style as well as road
and traffic conditions.Trailer hitch
General information
The factory-fitted towing equipment is folded up under the rear bumper
fascia.
Entrust retrofitting of towing
equipment to a workshop. It may be
necessary to make changes that
affect the cooling system, heat
shields or other equipment. Only use
towing equipment that has been
approved for your vehicle.
To avoid vehicle damage, the power
tailgate cannot be operated with the
radio remote control when a trailer is
electrically connected.
The bulb outage detection function for
trailer brake light cannot detect a
partial bulb outage, e.g. in case of four times five watt bulbs, the function onlydetects lamp outage when only a
single five Watt lamp remains or none
remain.
Fitting of towing equipment could
cover the opening of the towing eye.
If this is the case use the coupling ball
bar for towing.Driving characteristics and
towing tips
Before attaching a trailer, lubricate
the coupling ball. However, do not do
so if a stabiliser, which acts on the
coupling ball, is being used to reduce snaking movements.
During trailer towing do not exceed a speed of 50 mph. A maximum speed
of 60 mph is only appropriate if an oscillation damper is used and the
permissible gross trailer weight does
not exceed the vehicle's curb weight.
For trailers with low driving stability
and caravan trailers, the use of an
oscillation damper is strongly
recommended.
If the trailer starts snaking, drive more
slowly, do not attempt to correct the
steering and brake sharply if
necessary.
When driving downhill, drive in the
same gear as if driving uphill and
drive at a similar speed.
Adjust tyre pressure to the value
specified for full load 3 228.
Page 177 of 245

Vehicle care175Caution
When transporting the vehicle on
a train or on a recovery vehicle, the
mud flaps might be damaged.
Vehicle storage
Storage for a long period of time
If the vehicle is to be stored for several months:
● Wash and wax the vehicle.
● Have the wax in the engine compartment and underbody
checked.
● Clean and preserve the rubber seals.
● Fill up fuel tank completely.
● Change the engine oil.
● Drain the washer fluid reservoir.
● Check the coolant antifreeze and
corrosion protection.
● Adjust tyre pressure to the value specified for full load.
● Park the vehicle in a dry, wellventilated place. Engage first or
reverse gear or set selector lever
to P. Prevent the vehicle from
rolling.
● Do not apply the parking brake.
● Open the bonnet, close all doors and lock the vehicle.
● Disconnect the clamp from the negative terminal of the vehicle
battery. Beware that all systems
are not functional, e.g. anti-theft
alarm system.
Putting back into operation
When the vehicle is to be put back into
operation:
● Connect the clamp to the negative terminal of the vehicle
battery. Activate the electronics
of the power windows.
● Check tyre pressure.
● Fill up the washer fluid reservoir.
● Check the engine oil level.
● Check the coolant level.
● Fit the number plate if necessary.End-of-life vehicle recovery
Information on end-of-life vehicle
recovery centres and the recycling of
end-of-life vehicles is available on our website, where legally required. Only
entrust this work to an authorised
recycling centre.
Page 186 of 245

184Vehicle care
2.Lift the retainer, then pull the plug
connector backwards.
3. Fold down the retainer and remove the bulb from the reflectorhousing.
4. Replace the bulb and push it into the reflector housing by setting
the lug into position.
5. Fold up the retainer and hold in position.
6. Attach the plug connector to the bulb and fix it with the retainer.
7. Fit the cap and rotate clockwise.
Sidelight/Daytime running light
In case of defective LEDs, have them replaced by a workshop.
LED headlights Headlights for low and high beam,
sidelights, daytime running lights and turn signal lights are designed as
LEDs and can not be changed.
Have lights repaired by a workshop in
case of failure.
Fog lights
The bulbs are accessible from the
underside of the vehicle.
1. Turn the bulb holder anti- clockwise and remove it from the
reflector housing.