Page 95 of 245

Instruments and controls93Information displays
Driver Information Centre
The Driver Information Centre is
located in the instrument cluster.
Depending on the version and the
instrument cluster, the Driver
Information Centre is available as
Baselevel or Midlevel display.
Driver Information Centre indicates: ● overall and trip odometer
● digital speed indication
● trip/fuel information menu
● gear shift indication
● service information
● vehicle and warning messages
● driver assistance messages
● pop-up messages
Selecting menus and functions
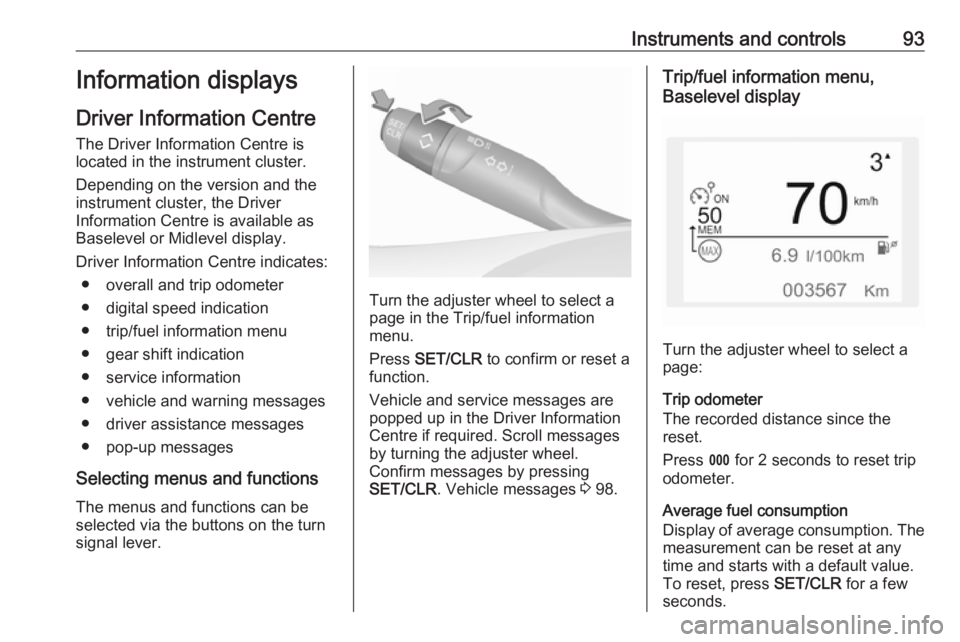
The menus and functions can be selected via the buttons on the turnsignal lever.
Turn the adjuster wheel to select a
page in the Trip/fuel information
menu.
Press SET/CLR to confirm or reset a
function.
Vehicle and service messages are popped up in the Driver Information
Centre if required. Scroll messages by turning the adjuster wheel.
Confirm messages by pressing
SET/CLR . Vehicle messages 3 98.
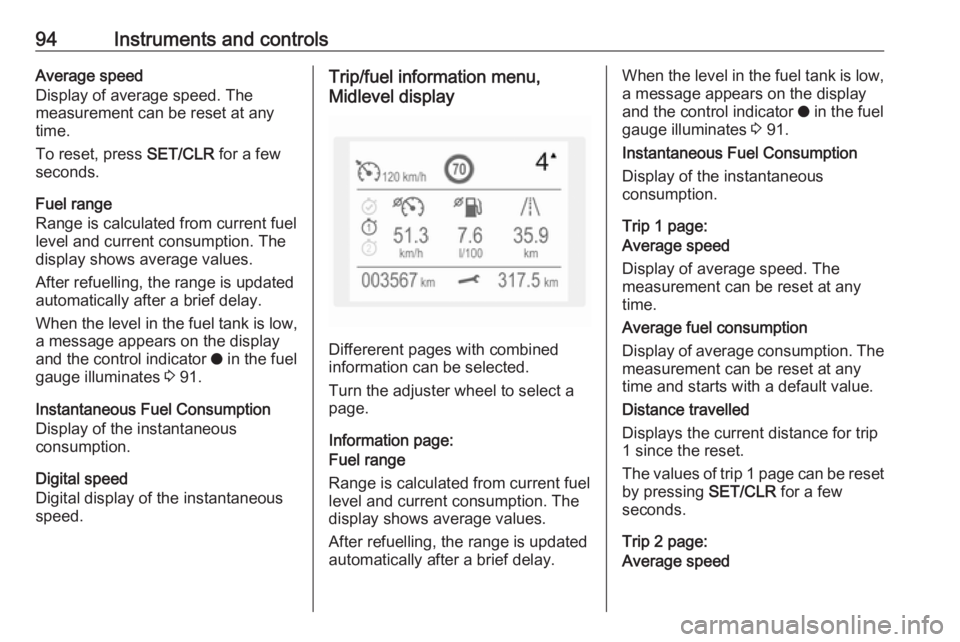
Trip/fuel information menu,
Baselevel display
Turn the adjuster wheel to select a
page:
Trip odometer
The recorded distance since the reset.
Press L for 2 seconds to reset trip
odometer.
Average fuel consumption
Display of average consumption. The measurement can be reset at any
time and starts with a default value.
To reset, press SET/CLR for a few
seconds.
Page 96 of 245

94Instruments and controlsAverage speed
Display of average speed. The
measurement can be reset at any
time.
To reset, press SET/CLR for a few
seconds.
Fuel range
Range is calculated from current fuel
level and current consumption. The
display shows average values.
After refuelling, the range is updated
automatically after a brief delay.
When the level in the fuel tank is low,
a message appears on the display
and the control indicator o in the fuel
gauge illuminates 3 91.
Instantaneous Fuel Consumption
Display of the instantaneous
consumption.
Digital speed
Digital display of the instantaneous
speed.Trip/fuel information menu,
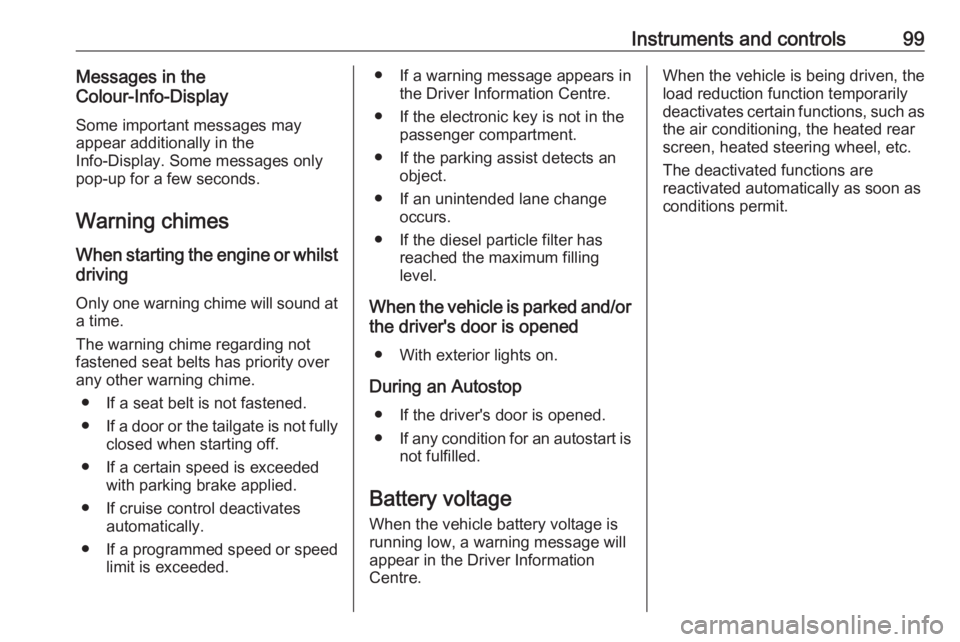
Midlevel display
Differerent pages with combined
information can be selected.
Turn the adjuster wheel to select a
page.
Information page:
Fuel range
Range is calculated from current fuel
level and current consumption. The
display shows average values.
After refuelling, the range is updated
automatically after a brief delay.
When the level in the fuel tank is low,
a message appears on the display
and the control indicator o in the fuel
gauge illuminates 3 91.
Instantaneous Fuel Consumption
Display of the instantaneous
consumption.
Trip 1 page:
Average speed
Display of average speed. The
measurement can be reset at any
time.
Average fuel consumption
Display of average consumption. The measurement can be reset at any
time and starts with a default value.
Distance travelled
Displays the current distance for trip
1 since the reset.
The values of trip 1 page can be reset
by pressing SET/CLR for a few
seconds.
Trip 2 page:
Average speed
Page 101 of 245

Instruments and controls99Messages in the
Colour-Info-Display
Some important messages may
appear additionally in the
Info-Display. Some messages only
pop-up for a few seconds.
Warning chimes When starting the engine or whilst
driving
Only one warning chime will sound at
a time.
The warning chime regarding not
fastened seat belts has priority over
any other warning chime.
● If a seat belt is not fastened.
● If a door or the tailgate is not fully
closed when starting off.
● If a certain speed is exceeded with parking brake applied.
● If cruise control deactivates automatically.
● If a programmed speed or speed
limit is exceeded.● If a warning message appears in the Driver Information Centre.
● If the electronic key is not in the passenger compartment.
● If the parking assist detects an object.
● If an unintended lane change occurs.
● If the diesel particle filter has reached the maximum filling
level.
When the vehicle is parked and/or the driver's door is opened
● With exterior lights on.
During an Autostop ● If the driver's door is opened.
● If any condition for an autostart is
not fulfilled.
Battery voltage When the vehicle battery voltage is
running low, a warning message will
appear in the Driver Information
Centre.When the vehicle is being driven, the
load reduction function temporarily
deactivates certain functions, such as the air conditioning, the heated rear
screen, heated steering wheel, etc.
The deactivated functions are
reactivated automatically as soon as
conditions permit.
Page 111 of 245

Lighting109Headlight range adjustment
Manual headlight range
adjustment
To adapt headlight range to the
vehicle load to prevent dazzling: turn
thumb wheel ? to required position.
0:front seats occupied1:all seats occupied2:all seats occupied and load
compartment laden3:driver's seat occupied and load
compartment ladenDaytime running lights
Daytime running lights increases
visibility of the vehicle during daylight.
They are switched on automatically
during daytime when engine is
running.
The system switches between
daytime running lights and low beam automatically, depending on the
lighting conditions.
Adaptive forward lighting
The Adaptive forward lighting
functions are only available with Fulll
LED headlights.
LED headlights for low and high beam
ensure better visibility under all
conditions.
Operation is the same as for halogen headlights.
Adaptive forward lighting functions
are active automatically with light
switch in position AUTO. Adaptive
forward lighting includes following
functions:● cornering lights
● high beam assist
● automatic headlight levelling
Cornering light
When turning off, depending on the
steering angle and the turn signal light, particular LEDs are triggered
which illuminate the direction of
travel. It is activated up to a speed of
40 km/h.
High beam assist This feature allows high beam to
function as the main driving light at
night and when vehicle speed
exceeds 25 km/h.
Page 113 of 245

Lighting111When braking in an emergency, the
hazard warning flashers are switched
on automatically depending on the
force of deceleration. They are
switched off automatically the first
time you accelerate.
Turn and lane-change signalslever up:right turn signallever down:left turn signalIf the lever is moved past the
resistance point, the turn signal is
switched on constantly. When the
steering wheel moves back, the turn
signal is automatically deactivated.
For three flashes, e.g. when changing
lanes, press the lever until resistance
is felt and then release.
If you forget to cancel the turn and
lane-change signals for more than
twenty seconds, the volume of the
audible signal will increase if the
speed is above 60 km/h.
Front fog lights
Operated by pressing >.
Light switch in position AUTO:
switching on front fog lights will switch headlights on automatically.
Rear fog light
Operated by pressing ø
.
Light switch in position AUTO:
switching on rear fog light will switch
headlights on automatically.
Light switch in position 8: rear fog
light can only be switched on with
front fog lights.
Page 114 of 245

112LightingThe vehicle rear fog light is
deactivated when towing a trailer or a
plug is connected with the socket, e.
g. when a bicycle carrier is used.
Parking lights
When the vehicle is parked, the
parking lights on one side can be
activated:
1. Switch off ignition.
2. Move turn signal lever all the way up (right parking lights) or down
(left parking lights).
Confirmed by a signal and the
corresponding turn signal control
indicator.
Reversing lights
The reversing light comes on when
the ignition is on and reverse gear is
selected.
Misted light covers
The inside of the light housing may
mist up briefly in poor, wet and cold weather conditions, in heavy rain or
after washing. The mist disappears
quickly by itself; to help switch on the
headlights.Interior lighting
Instrument panel illumination control
Brightness of the following lights can
be adjusted in position AUTO when
the light sensor detects night
conditions, or in position 8 or 9:
● instrument panel illumination
● Info-Display
● illuminated switches and operation elements
Turn thumb wheel A and hold until
the desired brightness is obtained.
Page 126 of 245
124Climate controlAir vents
Adjustable air vents Centre air vents in the instrument
panel
Direct the flow of air by tilting and
swivelling the slats.
To close the vent, swivel the slats
inwards.
Outer air vents in the instrument
panel
Direct the flow of air by tilting and
swivelling the slats.
To close the vent, swivel the slats
outwards.
Centre air vent on top of the
instrument panel
Close air flow by turning the thumb
wheel to the front.
Page 131 of 245

Driving and operating1290:ignition off: Some functions
remain active until key is
removed or driver's door is
opened, provided the ignition was
on previously1:ignition on power mode: Ignition
is on, diesel engine is preheating. Control indicators illuminate and
most electrical functions are
operable2:engine start: Release key after
after engine has been started
Steering wheel lock
Remove key from ignition switch and
turn steering wheel until it engages.
9 Danger
Never remove the key from
ignition switch during driving as
this will cause steering wheel lock.
Power button
Electronic key must be inside the
vehicle.
Engine start
Operate clutch pedal (manual
transmission) or brake pedal
(automatic transmission) and press
Start/Stop . Release button after
starting procedure begins. Diesel
engine starts after preheating.Ignition on power mode without
starting the engine
Press Start/Stop without operating
clutch or brake pedal. Control
indicators illuminate and most
electrical functions are operable.Engine and ignition off
Press Start/Stop briefly in each mode
or when engine is running and vehicle
is stationary. Some functions remain
active until driver's door is opened,
provided the ignition was on
previously.Emergency shut off during driving
Press Start/Stop for five seconds
3 131. Steering wheel locks as soon
as vehicle is stationary.
Steering wheel lock
The steering wheel lock activates
automatically when:
● The vehicle is stationary.
● The ignition has been switched off.
To release steering wheel lock, open
and close driver's door and switch on accessory mode or start the engine
directly.