2017.5 VAUXHALL MOVANO_B manual transmission
[x] Cancel search: manual transmissionPage 172 of 259
170Driving and operatingIn the case of trailer loads of
1200 kg or more, the vertical coupling load should not be less than 50 kg.
Rear axle load When the trailer is coupled and the
towing vehicle fully loaded (including all occupants), the permissible rear
axle load (see identification plate or
vehicle documents) must not be
exceeded.
Towing equipmentCaution
When operating without a trailer,
remove the coupling ball bar.
Towing equipment audible
warning
For vehicles fitted with towing
equipment, when connected to a
trailer the pitch of the audible warning
changes upon operation of the turn
signals.
The pitch of the audible warning will
change if a turn signal light on the
trailer or the towing vehicle fails.
Trailer stability assist
If the system detects snaking
movements, engine power is reduced
and the vehicle/trailer combination is
selectively braked until the snaking ceases. While the system is working,keep steering wheel as still as
possible.
Trailer stability assist (TSA) is a
function of the Electronic Stability
Program (ESP) 3 155.Auxiliary features
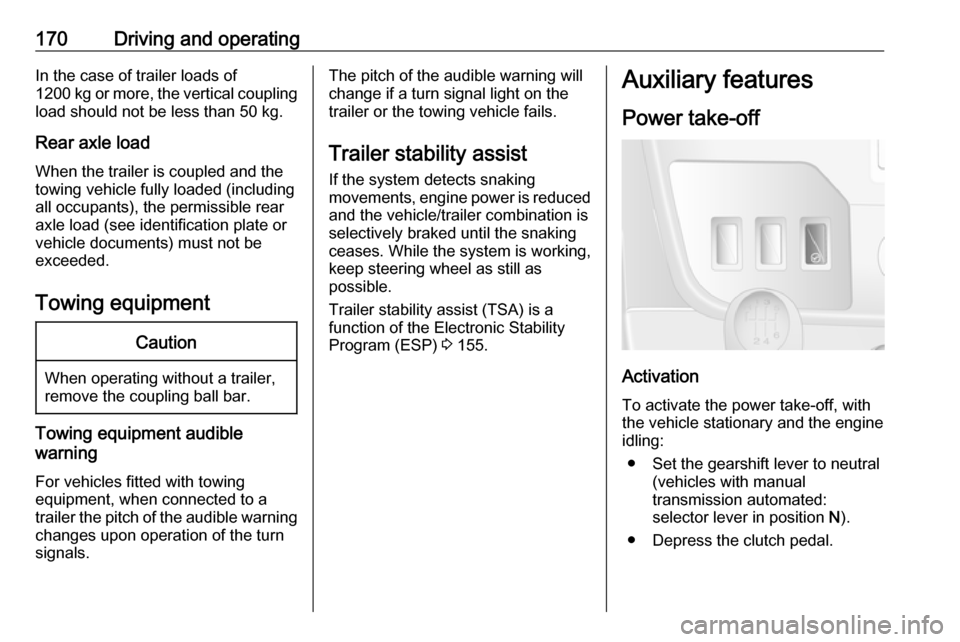
Power take-off
Activation
To activate the power take-off, with
the vehicle stationary and the engine
idling:
● Set the gearshift lever to neutral (vehicles with manual
transmission automated:
selector lever in position N).
● Depress the clutch pedal.
Page 173 of 259
Driving and operating171● Press switch on the instrumentpanel; LED in switch illuminates
after approx. two seconds.
● Release the clutch pedal.
The engine idle speed increases to
1,200 rpm.Caution
During operation of the power
take-off, never move the selector
lever out of neutral (vehicles with
manual transmission automated:
selector lever in position N), to
avoid damage to the transmission.
If a gear change becomes
necessary, i.e. to adjust the driving
speed, the power take-off must always be deactivated first.
Deactivation
To deactivate the power take-off: ● Depress the clutch pedal.
● Press switch on the instrument panel; LED in switch
extinguishes after approx.
two seconds.
● Release the clutch pedal.
Fault
If the LED in the switch does not
illuminate when attempting to activate the power take-off and/or the system
does not operate:
Gradually release the clutch pedal.
- or - ● Set the gearshift lever to neutral (vehicles with manual
transmission automated:
selector lever in position N).
● Depress the clutch pedal.
● Press switch on the instrument panel; LED in switch illuminatesafter approx. two seconds.
● Release the clutch pedal.
Then repeat the above procedure.
Notice
The power take-off function is not
available when control indicator A
3 95, C 3 96 or W 3 97 is
illuminated.
Page 205 of 259
Vehicle care203Do not remove foreign bodies from
the tyres.
Tyre damage exceeding four mm or
that is at the tyre's sidewall near the
rim cannot be repaired with the tyre repair kit.9 Warning
Do not drive faster than 50 mph.
Do not use for a lengthy period.
Steering and handling may be
affected.
If the vehicle has a flat tyre:
Apply the parking brake and engage
neutral (manual transmission) or N
(manual transmission automated).
The tyre repair kit is located under the
front seat. Slide seat forwards fully
and fold backrest down to access kit.
1. Take the tyre repair kit out from under the front seat.
2. Remove the compressor.
3. Remove the power supply lead(s)
and air hose from the stowage
compartments on the underside
of the compressor.
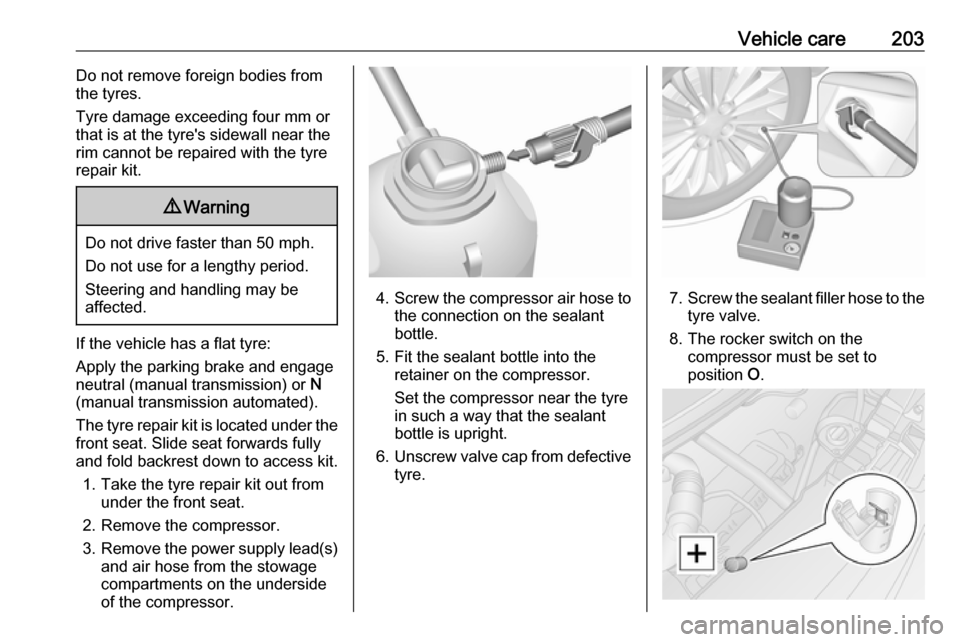
4. Screw the compressor air hose to
the connection on the sealant
bottle.
5. Fit the sealant bottle into the retainer on the compressor.
Set the compressor near the tyre
in such a way that the sealant
bottle is upright.
6. Unscrew valve cap from defective
tyre.7. Screw the sealant filler hose to the
tyre valve.
8. The rocker switch on the compressor must be set to
position O.
Page 208 of 259

206Vehicle careWheel changingSome vehicles are equipped with a
tyre repair kit instead of a spare wheel
3 202.
Make the following preparations and
observe the following information:
● Park the vehicle on a level, firm and non-slippery surface. The
front wheels must be in the
straight-ahead position.
● Apply the parking brake and engage first gear or reverse gear
(manual transmission) or N
(manual transmission
automated).
● Switch off the air suspension system 3 138.
● Remove the spare wheel 3 208.
● Never change more than one wheel at a time.
● Use the jack only to change wheels in case of puncture, not
for seasonal winter or summer
tyre change.
● The jack is maintenance-free.● If the ground on which the vehicle
is standing is soft, a solid board
(max. 1 cm thick) should be
placed under the jack.
● No people or animals may be in the vehicle when it is jacked-up.
● Never crawl under a jacked-up vehicle.
● Do not start the engine when the vehicle is raised on the jack.
● Clean wheel bolts/nuts and their threads before mounting thewheel.9 Warning
Do not grease wheel bolt, wheel
nut and wheel nut cone.
1. Remove the wheel cover using the hook supplied. Vehicle tools
3 196.
Depending on vehicle, first
remove the bolt/nut covers by
hand then remove the wheel
cover, or press wheel cover at the points indicated by the arrows and
turn to release.
Rear-wheel drive, with twin rear
wheels: Remove the tyre valve
extender from the inner rear
wheel.
2. Install the wheel wrench (depending on vehicle, attach
wheel wrench to adapters)
ensuring that it locates securely
and loosen each wheel bolt/nut by half a turn.
Page 213 of 259
Vehicle care211Jump starting
The jump start terminal is located in
the engine compartment.
A vehicle with a discharged vehicle
battery can be started using jump
leads and the vehicle battery of
another vehicle.
Do not start with a quick charger.9 Warning
Be extremely careful when starting
with jump leads. Any deviation
from the following instructions can
lead to injuries or damage caused
by battery explosion or damage to the electrical systems of both
vehicles.
9 Warning
Avoid contact of the battery with
eyes, skin, fabrics and painted
surfaces. The fluid contains
sulphuric acid which can cause
injuries and damage in the event
of direct contact.
Caution
The air suspension system must
be switched off prior to jump
starting.
Air suspension 3 138.
● Never expose the vehicle battery
to naked flames or sparks.
● A discharged vehicle battery can already freeze at a temperature
of 0 °C. Defrost the frozen vehicle
battery before connecting jump leads.
● Wear eye protection and protective clothing when
handling a vehicle battery.
● Use a booster battery with the same voltage (12 volts). Its
capacity (Ah) must not be much
less than that of the discharged
vehicle battery.
● Use jump leads with insulated terminals and a cross section of
at least 25 mm 2
.
● Do not disconnect the discharged
battery from the vehicle.
● Switch off all unnecessary electrical consumers.
● Switch off the air suspension system 3 138.
● Do not lean over the vehicle battery during jump starting.
● Do not allow the terminals of one
lead to touch those of the other
lead.
● The vehicles must not come into contact with each other during
the jump starting process.
● Apply the parking brake and engage neutral (manual
transmission) or N (manual
transmission automated).
Page 215 of 259
Vehicle care213far away from the discharged
vehicle battery as possible,
however at least 60 cm.
Route the leads so that they cannot
catch on rotating parts in the engine
compartment.
To start the engine: 1. Start the engine of the vehicle providing the jump start.
2. After five minutes, start the other engine. Start attempts should be
made for no longer than
15 seconds at an interval of
one minute.
3. Allow both engines to idle for approx. three minutes with the
leads connected.
4. Switch on electrical consumers (e.g. headlights, heated rear
window) of the vehicle receiving
the jump start.
5. Reverse above sequence exactly when removing leads.Towing
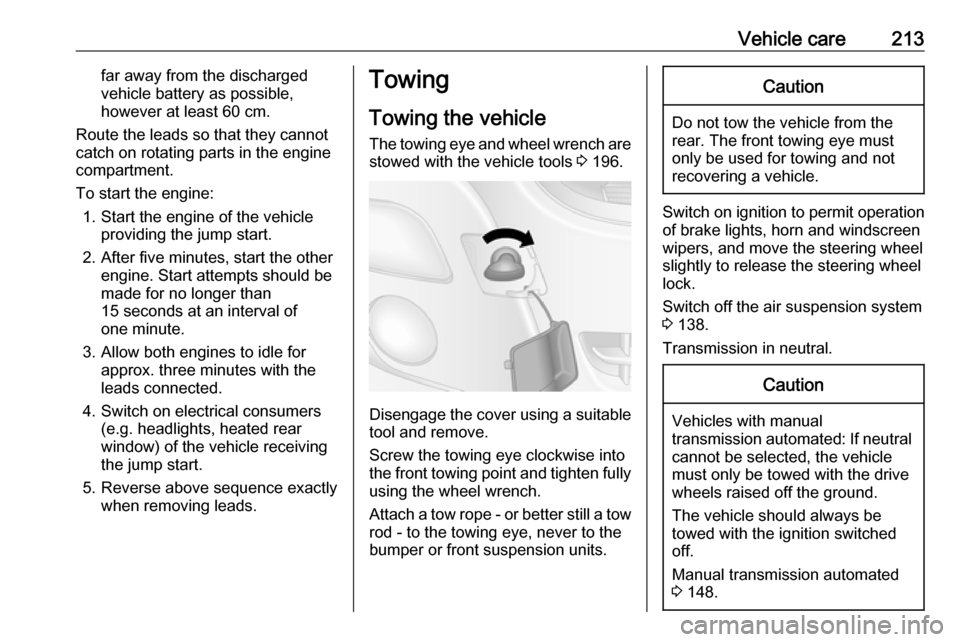
Towing the vehicle The towing eye and wheel wrench are
stowed with the vehicle tools 3 196.
Disengage the cover using a suitable
tool and remove.
Screw the towing eye clockwise into
the front towing point and tighten fully using the wheel wrench.
Attach a tow rope - or better still a tow
rod - to the towing eye, never to the
bumper or front suspension units.
Caution
Do not tow the vehicle from the
rear. The front towing eye must
only be used for towing and not
recovering a vehicle.
Switch on ignition to permit operation
of brake lights, horn and windscreen
wipers, and move the steering wheel
slightly to release the steering wheel
lock.
Switch off the air suspension system 3 138.
Transmission in neutral.
Caution
Vehicles with manual
transmission automated: If neutral cannot be selected, the vehiclemust only be towed with the drive
wheels raised off the ground.
The vehicle should always be
towed with the ignition switched
off.
Manual transmission automated
3 148.
Page 255 of 259

253Lighting features.........................113
Light switch ................................ 106
Limited-slip rear axle ..................157
Load compartment .................22, 73
Load compartment fuse box ......194
Load compartment grille ...............77
Load compartment lighting .........111
Loading information .....................79
Low fuel ....................................... 98
Luggage floor net .........................73
M
Malfunction indicator light ............95
Manual adjustment ......................34
Manual anti-dazzle ......................36
Manual door locks ........................21
Manual mode ............................. 150
Manual transmission............. 16, 148
Manual transmission automated ......................... 16, 148
Manual windows ..........................37
Messages ................................... 101
Mirror adjustment ........................... 8
Mirrors .................................... 34, 36
Misted light covers .....................110
N New vehicle running-in ..............132
Number plate light .....................190O
Object detection systems ...........161
Odometer ..................................... 88
Oil ............................................... 175
Oil, engine .......................... 219, 223
Oil level ......................................... 90
Oil pressure .................................. 98
Outside temperature ....................84
Overcab storage ..........................73
Overhead console .......................72
Overrun cut-off ........................... 134
P Parking ................................ 18, 137
Parking assist ............................ 161
Parking brake ............................ 153
Parking ticket holder .....................39
Particulate filter ........................... 140
Pedals......................................... 131
Performing work ........................174
Pollen filter ................................. 128
Power door locks ..........................25
Power outlets ............................... 85
Power side step ............................ 27
Power sliding door ........................27
Power steering fluid ....................177
Power take-off ............................ 170
Power windows ............................ 37
Preheating ........................... 97, 133
Puncture ............................. 202, 206R
Radio Frequency Identification (RFID) ..................................... 248
Radio remote control ...................20
Rain sensor .................................. 83
Reading lights ............................ 112
Rear air conditioning system .....120
Rear bench seat storage ..............72
Rear courtesy light...................... 111
Rear doors ................................... 30
Rear fog light ............................... 99
Rear fog lights ....................106, 110
Rear heating system .................. 118
Rear reading light .......................112
Rear reversing lens ......................38
Rear seats ................................... 48
Bus ............................................ 48
Installing .................................... 48
Rear seat access ......................48
Removing .................................. 48
Rear storage ................................. 73
Rear view camera ...................... 163
Rear windows .............................. 38
Recommended fluids and lubricants ........................ 219, 223
Refuelling ................................... 167 Registered trademarks ...............247
Remote control ............................. 20
Retractable parking brake ..........153
Reversing lights .........................110