2017.5 OPEL CASCADA door lock
[x] Cancel search: door lockPage 55 of 263

Seats, restraints53Lift release lever and fold backrest
forwards. The seat slides
automatically forwards to the stop.
To restore, lift backrest to upright
position and engage. The seat slides
automatically backwards to the
original position.
In case the head restraint of the
folded backrest is blocked by the
upper windscreen frame, allow the
seat to move backwards or
downwards slightly 3 53, or set
head restraint to lowest position
3 47.
Safety function
If the power seat encounters
resistance while sliding forwards or
rearwards, it is immediately stopped
and moved in the opposite direction.
Note
Do not sit on the seat while seat is
moving.
Power disconnection
If seat remains in forward position
with opened door for more than
10 minutes, power adjustment isdisconnected. In this event, close and
open the door or switch on ignition and operate power adjustment again.
Overload
If the folding function is electrically
overloaded, the power supply is
automatically cut-off for a short time.
Power seat adjustment9 Warning
Care must be taken when
operating the power seats. There
is a risk of injury, particularly for
children. Objects could become
trapped.
Keep a close watch on the seats
when adjusting them. Vehicle
passengers should be informed
accordingly.
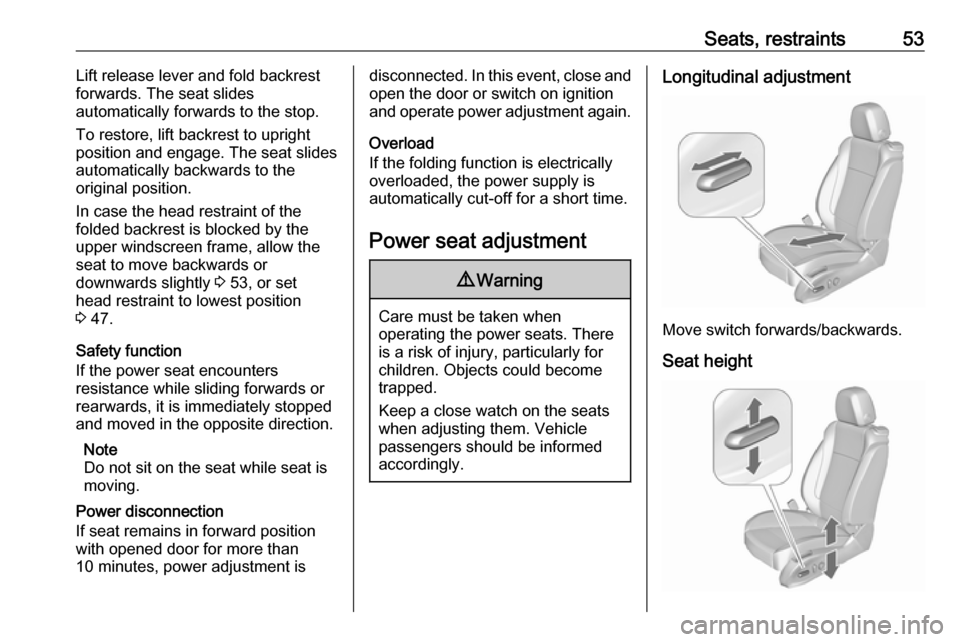
Longitudinal adjustment
Move switch forwards/backwards.
Seat height
Page 58 of 263

56Seats, restraintsSeat belts
The seat belts are locked during hardacceleration or deceleration of the
vehicle holding the occupants in the
seat position. Therefore the risk of
injury is considerably reduced.
9 Warning
Fasten seat belt before each trip.
In the event of an accident, people
not wearing seat belts endanger their fellow occupants and
themselves.
Seat belts are designed to be used by only one person at a time. Child
restraint system 3 64.
Periodically check all parts of the belt
system for damage, soiling and
proper functionality.
Have damaged components replaced by a workshop. After an accident,
have the belts and triggered belt
pretensioners replaced by a
workshop.
Note
Make sure that the belts are not
damaged by shoes or sharp-edged objects or trapped. Prevent dirt from getting into the belt retractors.
Seat belt presenter
The seat belt presenter is a comfort feature that enables the front
passengers to fasten the seat belts
conveniently by bringing the belts to
the front.
The presenter comes out when:
● The respective door is closed and ignition is switched on.
● The ignition is on and the door is closed.
The presenter retracts when: ● The respective door is opened again.
● The key is removed from ignition switch.
● The respective latch plate is inserted into the buckle.
Page 80 of 263

78Instruments and controlsInstruments and
controlsControls ....................................... 79
Steering wheel adjustment ........79
Steering wheel controls .............79
Heated steering wheel ...............79
Horn ........................................... 80
Windscreen wiper/washer .........80
Outside temperature ..................81
Clock ......................................... 82
Power outlets ............................. 83
Cigarette lighter ......................... 84
Ashtrays .................................... 84
Warning lights, gauges and indi‐ cators ........................................... 85
Instrument cluster ......................85
Speedometer ............................. 85
Odometer .................................. 85
Trip odometer ............................ 85
Tachometer ............................... 86
Fuel gauge ................................ 86
Engine coolant temperature gauge ....................................... 86
Service display .......................... 87
Control indicators ......................88
Turn signal ................................. 89Seat belt reminder.....................89
Airbag, belt tensioners and roll bars .......................................... 89
Airbag deactivation ....................90
Charging system .......................90
Malfunction indicator light ..........90
Brake and clutch system ...........90
Operate pedal ............................ 90
Electric parking brake ................91
Electric parking brake fault ........91
Antilock brake system (ABS) .....91
Upshift ....................................... 91
Power steering .......................... 92
Lane departure warning ............92
Electronic Stability Control off ...92
Electronic Stability Control and Traction Control system ...........92
Traction Control system off .......92
Preheating ................................. 92
Diesel particle filter ....................92
AdBlue ....................................... 93
Tyre pressure monitoring system ...................................... 93
Engine oil pressure ....................93
Low fuel ..................................... 94
Immobiliser ................................ 94
Exterior light .............................. 94
High beam ................................. 94
High beam assist .......................94
Adaptive forward lighting ...........94Fog light ..................................... 94
Rear fog light ............................. 94
Cruise control ............................ 94
Vehicle detected ahead .............95
Door open .................................. 95
Information displays .....................95
Driver Information Centre ..........95
Graphic-Info-Display, Colour- Info-Display .............................. 99
Vehicle messages ......................101
Warning chimes .......................102
Battery voltage ........................ 102
Vehicle personalisation ..............103
Telematics service .....................107
OnStar ..................................... 107
Page 107 of 263

Instruments and controls105●Comfort settings
Chime volume : Changes the
volume of warning chimes.
Personalization by driver :
Activates or deactivates the
personalisation function.
● Park assist / Collision detection
Park assist : Activates or
deactivates the ultrasonic
sensors. Activation is selectable
with or without attached trailer
coupling.
Side blind zone alert : Changes
the settings for the side blind spot alert system.
● Exterior ambient lighting
Duration upon exit of vehicle :
Activates or deactivates and
changes the duration of exit
lighting.
Exterior lighting by unlocking :
Activates or deactivates the
welcome lighting.
● Power door locks
Auto door lock : Activates or
deactivates the automatic door
unlocking function after switchingoff ignition. Activates or
deactivates the automatic door
locking function after driving-off.
Stop door lock if door open :
Activates or deactivates the
automatic door locking function
while a door is open.
Delayed door lock : Activates or
deactivates the delayed door
locking function.
● Remote locking, unlocking,
starting
Remote unlock feedback :
Activates or deactivates the
hazard warning flasher feedback whilst unlocking.
Remote door unlock : Changes
the configuration to unlock only
the driver's door or the whole
vehicle whilst unlocking.
Auto relock doors : Activates or
deactivates the automatic relock
function after unlocking without
opening the vehicle.
● Restore factory settings
Restore factory settings : Resets
all settings to the default settings.Settings in the Colour-Info-
Display
Navi 950/Navi 650/CD 600
Press CONFIG on the Infotainment
system faceplate to enter the
Configuration menu.
Turn the multifunction knob to scroll
upwards or downwards in the list.
Press the multifunction knob
(Navi 950 / Navi 650: press the outer
ring) to select a menu item.
● Sport Mode Profile
● Languages
● Time and Date
● Radio Settings
Page 109 of 263

Instruments and controls107Side Blind Zone Alert: Activates
or deactivates the side blind spot alert system.
● Lighting
Vehicle Locator Lights : Activates
or deactivates the entry lighting.
Exit Lighting : Activates or
deactivates and changes the
duration of exit lighting.
● Power Door Locks
Open Door Anti Lock Out :
Activates or deactivates the
automatic door locking function
while a door is open.
Auto Door Lock : Activates or
deactivates the automatic door
unlocking function after switching
off ignition. Activates or
deactivates the automatic door
locking function after driving-off.
Delay Door Lock : Activates or
deactivates the delayed door
locking function.
● Remote Lock/Unlock/Start
Remote Lock Feedback :
Activates or deactivates thehazard warning flasher feedback
whilst locking.
Remote Unlock Feedback :
Activates or deactivates the
hazard warning flasher feedback whilst unlocking.
Remote Door Unlock : Changes
the configuration to unlock only
the driver's door or the whole
vehicle whilst unlocking.
Relock Remotely Unlocked
Doors : Activates or deactivates
the automatic relock function
after unlocking without opening
the vehicle.
● Return to Factory Settings? :
Resets all settings to the default settings.Telematics service
OnStar
OnStar is a personal connectivity and service assistant with integrated
Wi-Fi hotspot. The OnStar service is available 24 hours a day, seven days
a week.
Note
OnStar is not available for all
markets. For further information,
contact your workshop.
Note
In order to be available and
operational, OnStar needs a valid
OnStar subscription, functioning
vehicle electrics, mobile service and
GPS satellite link.
To activate the OnStar services and
set up an account, press Z and speak
with an advisor.
Page 125 of 263

Lighting123Lighting features
Entry lighting Welcome lighting
The following lights are switched on
for a short time by unlocking the
vehicle with the radio remote control:
● headlights
● tail lights
● number plate lights
● instrument panel light
● interior lights
● puddle lights
Some functions work only in the dark and facilitates locating the vehicle.
The lighting switches off immediately
when the ignition key is turned to
position 1 3 137.
The following lights will additionally
switch on when the driver's door is
opened:
● illumination of some switches
● Driver Information Centre● door pocket lights
● console lights
Activation, deactivation and duration of this function can be changed in the
Info-Display. Vehicle personalisation
3 103.
The settings can be saved for the key being used 3 23.
Exit lighting
The following lights switch on if the
key is removed from the ignition
switch:
● interior lights
● instrument panel light (only when
it is dark)
● door and console lights
● puddle lights
They will switch off automatically after
a delay and will be activated again if
the driver's door is opened.
Headlights, tail lights and number
plate lights illuminate the surrounding
area for an adjustable time after
leaving the vehicle.Path lighting
Headlights, tail lights and number
plate lights illuminate the surrounding area for an adjustable time after
leaving the vehicle.
Activating
1. Switch off ignition
2. Remove ignition key
3. Open driver's door
4. Pull turn signal lever
5. Close driver's door
If the driver's door is not closed, the
lights switch off after two minutes.
Page 139 of 263

Driving and operating137Starting and operating
New vehicle running-in
Do not brake unnecessarily hard for
the first few journeys.
During the first drive, smoke may
occur because of wax and oil
evaporating off the exhaust system.
Park the vehicle in the open for a
while after the first drive and avoid
inhaling the fumes.
During the running-in period fuel and
engine oil consumption may be
higher and the cleaning process of
the diesel particle filter may take
place more often. Autostop may be
inhibited to allow for charging the
vehicle battery.
Diesel particle filter 3 142.Ignition switch positions0:ignition off1:steering wheel lock released,
ignition off2:ignition on, for diesel engine:
preheating3:starting
Retained power off
The following electronic systems can
work until the driver's door is opened
or for a maximum of 10 minutes after
the ignition is switched off:
● power windows
● power outlets
Starting the engine
Manual transmission: operate clutch.
Automatic transmission: operate
brake and move the selector lever to
P or N.
Do not operate the accelerator pedal. Diesel engine: turn the key to position2 for preheating until control
indicator ! extinguishes.
Turn the key briefly to position 3 and
release: an automatic procedure
operates the starter with a short delay
as long as the engine is running, see
'Automatic Starter Control'.
Page 148 of 263

146Driving and operatingThe vehicle must be parked on a levelsurface.
The filler neck for AdBlue is located behind the fuel filler flap, which islocated at right rear side of the
vehicle.
The fuel filler flap can only be opened
if the vehicle is unlocked.
1. Remove key from ignition switch.2. Close all doors to avoid ammonia fumes entering the interior of the
vehicle.
3. Release the fuel filler flap by pushing the flap 3 180.
4. Unscrew protective cap from the
filler neck.
5. Open AdBlue canister.
6. Mount one end of the hose on the
canister and screw the other end
on the filler neck.
7. Lift the canister until it is empty, or
until the flow from the canister has stopped. This can take up to five
minutes.
8. Place the canister on the ground to empty the hose, wait 15
seconds.
9. Unscrew the hose from the filler neck.
10. Mount the protective cap and turn
clockwise until it engages.
Note
Dispose of AdBlue canister
according to environmental
requirements. Hose can be reused
after flushing with clear water before
AdBlue dries out.Automatic transmission
The automatic transmission permits
automatic gearshifting (automatic
mode) or manual gearshifting
(manual mode).
Manual shifting is possible in manual
mode by tapping the selector lever
3 148.
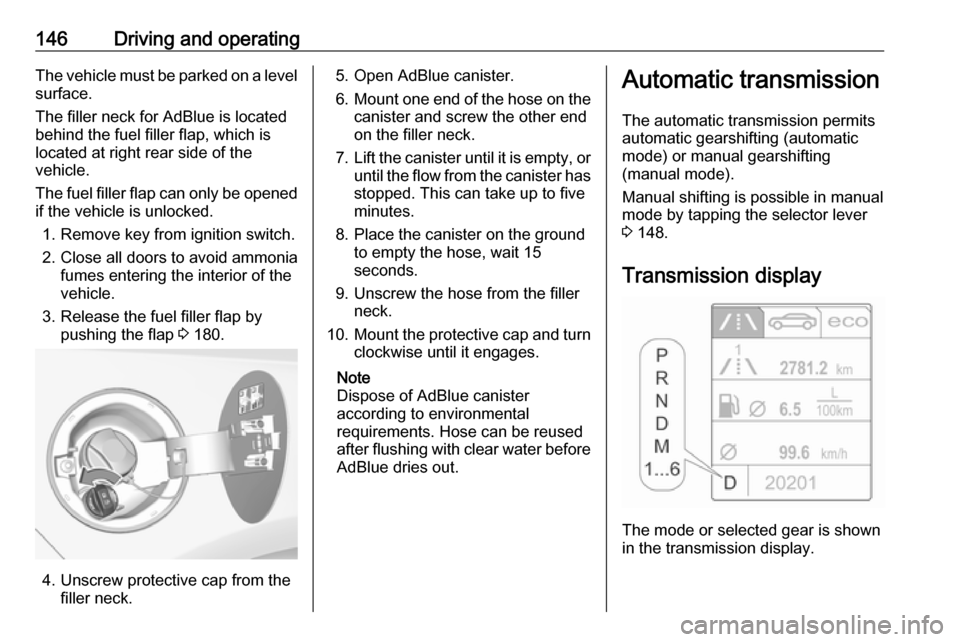
Transmission display
The mode or selected gear is shown
in the transmission display.