2017.5 OPEL AMPERA E tow
[x] Cancel search: towPage 191 of 265

Driving and operating189
Traffic signs, which will be detected,
are:
Limit and no passing signs ● speed limit
● no passing
● end of speed limit
● end of no passingRoad signs
Beginning and end of:
● city regions (country-specific)● motorways
● A-roads
● play streetsAdd on signs ● additional hints to traffic signs
● restriction of trailer towing
● tractor constraints
● wet warning
● ice warning
● time constraints
● distance constraints
● direction arrows
Speed limit signs and no passing
signs are displayed in the Driver
Information Centre until the next
speed limit sign or end of speed limit
is detected or up to a defined sign
timeout.
Indication of multiple signs on the
display is possible.
An exclamation mark in a frame
indicates that there is an additional
sign detected which cannot be clearly
identified by the system.
The system performance depends on the lighting conditions.
Display indication Information about the currently valid
traffic signs is available on the
designated traffic sign assistant page
in the Driver Information Centre.
Additionally, the currently valid speed limit is displayed permanently in the
lower line of the Driver Information
Centre. In case a speed limit with add
on sign is available, a + symbol is
displayed in this area.
Page 211 of 265

Driving and operating209● IEC 62196-2
● IEC 62196-3
● ISO 15118
Ensure that all local electrical code/ standards are being met for a
10 ampere continuous load. Always
follow the charging equipment
installation instructions. Contact a
workshop for more information.9 Warning
If the capacity of the electrical
circuit or AC socket is not known,
only use the lowest charge level
until the circuit capacity has been
inspected by a qualified
electrician. Using a charge level
that exceeds either the electrical
circuit or the AC outlet capacity
may start a fire or damage the
electrical circuit.
Towing
General information
The vehicle is neither designed nor
intended to tow a trailer or another vehicle.
Page 212 of 265

210Vehicle careVehicle careGeneral Information...................210
Accessories and vehicle modifications .......................... 210
Lifting the vehicle .....................211
Vehicle storage ........................211
Vehicle checks ........................... 213
Performing work ......................213
Bonnet ..................................... 213
Cooling system ........................214
Washer fluid ............................ 216
Brakes ..................................... 216
Brake fluid ............................... 217
Vehicle battery ......................... 217
Wiper blade replacement ........219
Headlight aiming ......................219
Bulb replacement .......................220
Halogen bulbs ......................... 220
Xenon headlights .....................220
Front turn signal lights .............220
Tail lights ................................. 221
Side turn signal lights ..............221
Number plate light ...................221
Electrical system ........................222
High voltage devices and wiring ...................................... 222Electrical system overload .......222
Fuses ....................................... 223
Engine compartment fuse box . 224
Instrument panel fuse box .......227
Vehicle tools .............................. 230
Tools ........................................ 230
Wheels and tyres .......................230
Tyres ....................................... 230
Winter tyres ............................. 231
Tyre designations ....................231
Tyre pressure .......................... 231
Tyre pressure monitoring system .................................... 233
Tread depth ............................. 235
Changing tyre and wheel size . 235
Wheel covers ........................... 236
Tyre chains .............................. 236
Jump starting ............................. 237
Towing ....................................... 239
Towing the vehicle ...................239
Towing another vehicle ...........240
Appearance care .......................240
Exterior care ............................ 240
Interior care ............................. 242General Information
Accessories and vehicle modifications
We recommend the use of genuine
parts and accessories and factory
approved parts specific for your
vehicle type. We cannot assess or
guarantee reliability of other products
- even if they have a regulatory or
otherwise granted approval.
Any modification, conversion or other changes made to standard vehicle
specifications (including, without
limitation, software modifications,
modifications of the electronic control
units) may invalidate the warranty
offered by Opel. Furthermore, such
changes may affect driver assistance systems and cause the vehicle to no
longer conform to the operating
permit, impacting the validity of your
vehicle registration.
Page 221 of 265

Vehicle care219● See the Owner's Manual forfurther information.
● Explosive gas may be present in the vicinity of the vehicle battery.
Post-crash label
The post-crash label is located in the
door frame 3 152.
Wiper blade replacement 1. Lift the wiper arm
2. Press button to disengage the wiper blade and remove.
3. Lower wiper arm carefully.
Wiper blade on the rear window
1. Pull the cover until it disengages.
2. Slide the cover toward the wiper blade tip to unhook it from the
blade assembly.
3. Remove the cover.
4. Lift the wiper arm.
5. Push the release lever (2) to disengage the hook and push the
wiper arm (1) out of the blade
assembly (3).
6. Push the new blade assembly securely on the wiper arm until the
release lever clicks into place.
7. After wiper blade replacement, ensure that the cover hook slides
into the slot in the blade assembly.
8. Snap the cover down to secure.
Headlight aiming Headlight aim has been preset and
should need no further adjustment.
When driving in countries where the
traffic drives on the opposite side of the road, it is not necessary to adjust
the low beam.
If the vehicle is damaged in a crash,
the headlight aim may be affected. If
adjustment to the low beam is
necessary, seek the assistance of a
workshop.
Page 232 of 265

230Vehicle careNumberUsage48Electric steering column
lock49Auxiliary jack50Steering wheel controls51Steering wheel controls
backlighting52Smartphone remote func‐
tion module53Auxiliary power outlet54–55Logistic56–57–58Logistics relay59–60Accessory/Retained
accessory power relay
To reinstall the door, insert the bottom tab first, then push the door back into its original location.
Vehicle tools
Tools
Open the floor cover of the load
compartment 3 61.
The towing eye and a screwdriver are
located under a cover in the load
compartment.
Wheels and tyres
Tyre condition, wheel condition Drive over edges slowly and at right
angles if possible. Driving over sharp
edges can cause tyre and wheel
damage. Do not trap tyres on the kerb when parking.
Regularly check the wheels for
damage. Seek the assistance of a
workshop in the event of damage or
unusual wear.
Tyres
Self-sealing tyres This vehicle may have self-sealing
tyres. These tyres have a material
inside that can seal punctures up to
6 mm in the tread area.
The tyre may lose air pressure if the
sidewall is damaged or the tread
puncture is too large. If the Tyre
pressure monitoring system indicates the tyre pressure is low, inspect thetyre for damage and inflate it to the
recommended pressure. If the tyre is
Page 241 of 265

Vehicle care239Route the leads so that they cannot
catch on rotating parts in the engine
compartment.
To start the vehicle: 1. Start the engine of the vehicle providing the jump.
2. After five minutes, press POWER m to switch on the
vehicle.
After the instrument cluster
initialises, the vehicle will use
power from the high voltage
battery to charge the 12-volt
battery.
3. Switch on electrical consumers (e.g. headlights, heated rear
window) of the vehicle receiving
the jump start.
4. Reverse above sequence exactly when removing leads.Towing
Towing the vehicleCaution
Incorrect towing of a disabled
vehicle may cause damage to the
vehicle. The disabled vehicle
should only be towed on a flatbed
car carrier.
Ensure the vehicle is only towed
by well trained technicians.
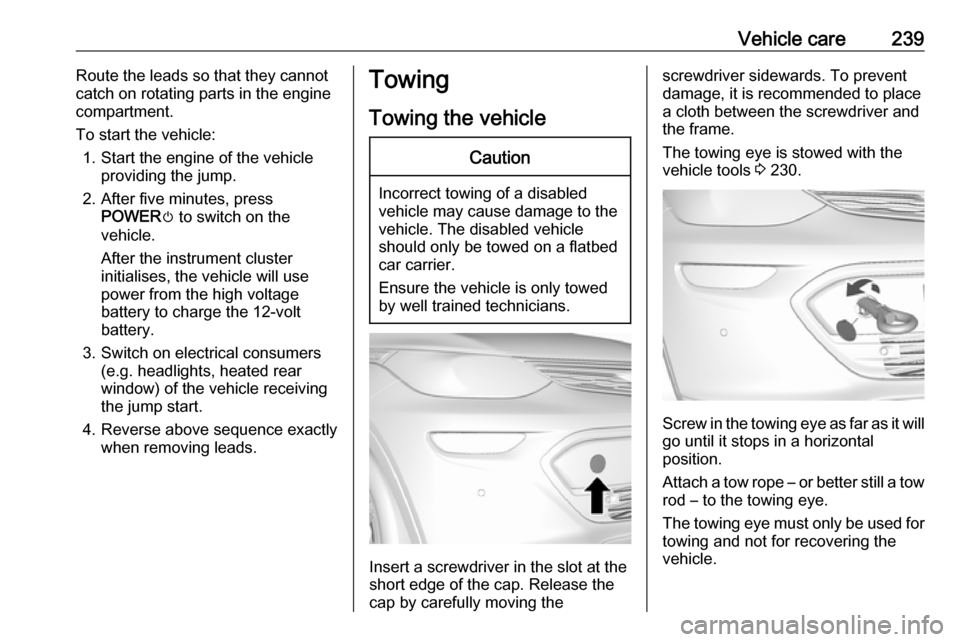
Insert a screwdriver in the slot at the
short edge of the cap. Release the
cap by carefully moving the
screwdriver sidewards. To prevent
damage, it is recommended to place
a cloth between the screwdriver and
the frame.
The towing eye is stowed with the vehicle tools 3 230.
Screw in the towing eye as far as it will
go until it stops in a horizontal
position.
Attach a tow rope – or better still a tow
rod – to the towing eye.
The towing eye must only be used for towing and not for recovering the
vehicle.
Page 242 of 265

240Vehicle careSwitch on the vehicle to release
steering wheel lock and to permit
operation of brake lights, horn and
windscreen wiper.
Set the shift lever of the electric drive unit to N.Caution
Drive slowly. Do not drive jerkily.
Excessive tractive force can
damage the vehicle.
When the vehicle is not running, considerably more force is needed to
brake and steer.
To prevent the entry of exhaust gases from the towing vehicle, switch on the
air recirculation and close the
windows.
Seek the assistance of a workshop.
After towing, unscrew the towing eye.
Insert cap at the bottom and close.
Towing another vehicle The vehicle is neither designed nor
intended to tow a trailer or another
vehicle.
Appearance care
Exterior care
Locks The locks are lubricated at the factoryusing a high quality lock cylinder
grease. Use de-icing agent only when
absolutely necessary, as this has a
degreasing effect and impairs lock function. After using a de-icing agent, have the locks regreased by a
workshop.
Washing The paintwork of your vehicle is
exposed to environmental influences.
Wash and wax your vehicle regularly. When using automatic vehicle
washes, select a programme that
includes waxing.
Do not apply waxes or polishes to uncoated plastic, vinyl, rubber,
decals, simulated wood, or flat paint
as damage can occur.Bird droppings, dead insects, resin,
pollen and the like should be cleaned
off immediately, as they contain
aggressive constituents which can
cause paint damage.
If using a vehicle wash, comply with
the vehicle wash manufacturer's
instructions. The windscreen wiper and rear window wiper must be
switched off. Remove antenna and
external accessories such as roof
racks etc.
If you wash your vehicle by hand,
make sure that the insides of the
wheel housings are also thoroughly
rinsed out.
Clean edges and folds on opened
doors and the bonnet as well as the
areas they cover.
Clean bright metal mouldings with a
cleaning solution approved for
aluminium to avoid damages.
Page 262 of 265

260Recommended fluids andlubricants ................................ 244
Regenerative braking ...........77, 160
Regional ..................................... 123
Regionalisation ........................... 123
Registered trademarks ...............253
Retained power off .....................151
Reversing lights .........................103
Ride control systems ..................162
Ring tone Changing the ring tone ............137
Ring tone volume ....................116
Roof load ...................................... 63
Roof rack ..................................... 63
S Safety belts ................................... 43
Seat adjustment ............................. 5 Seat belt ........................................ 6
Seat belt reminder .......................78
Seat belts ..................................... 43 Seat heating Seat heating, front .....................42
Seat heating, rear .....................43
Seat position ................................ 39
Self-sealing tyres ........................230
Service ............................... 147, 243
Service display ............................ 78
Service information ....................243
Service vehicle soon .................... 80Side airbag system ......................49
Side blind spot alert ....................181
Sidelights ...................................... 99
Side turn signal lights ................221
Smartphone ................................ 126
Phone projection .....................132
Smartphone remote function ........26
Software acknowledgement .......251
Software update ......................... 253
Speech recognition .....................133
Speed dial numbers ...................137
Speed limiter......................... 82, 165
Speedometer ............................... 75
Sport mode .................................. 81
Starting and operating ................149
Starting and stopping the vehicle 151
Starting off ................................... 14
Station search............................. 121
Steering wheel adjustment ......7, 66
Steering wheel audio controls ....108
Steering wheel controls ...............66
Storage ......................................... 58
Storage compartments .................58
Sunvisor lights ........................... 104
Sun visors .................................... 36
Switching the Infotainment system on ................................ 110
Symbols ......................................... 3
System settings .......................... 117T
Tail lights ................................... 221
Temporary charge mode cancel. 197
Temporary charge mode override ................................... 197
Theft-deterrent feature ..............107
Three-point seat belt .................... 44
Tone settings .............................. 115
Tools .......................................... 230
Total vehicle range .......................78
Touch beep volume ....................116
Towing ................................ 209, 239
Towing another vehicle .............240
Towing the vehicle .....................239
TP volume .................................. 116
Traction Control system ............. 162
Traction Control system off........... 81
Traffic sign assistant .............82, 188
Tread depth ............................... 235
Turn and lane-change signals ...102
Turn signal ................................... 78
Tyre chains ................................ 236
Tyre designations ......................231
Tyre pressure ............................ 231
Tyre pressure monitoring system ............................... 81, 233
Tyre pressures ........................... 250
Tyres .......................................... 230