Page 85 of 265

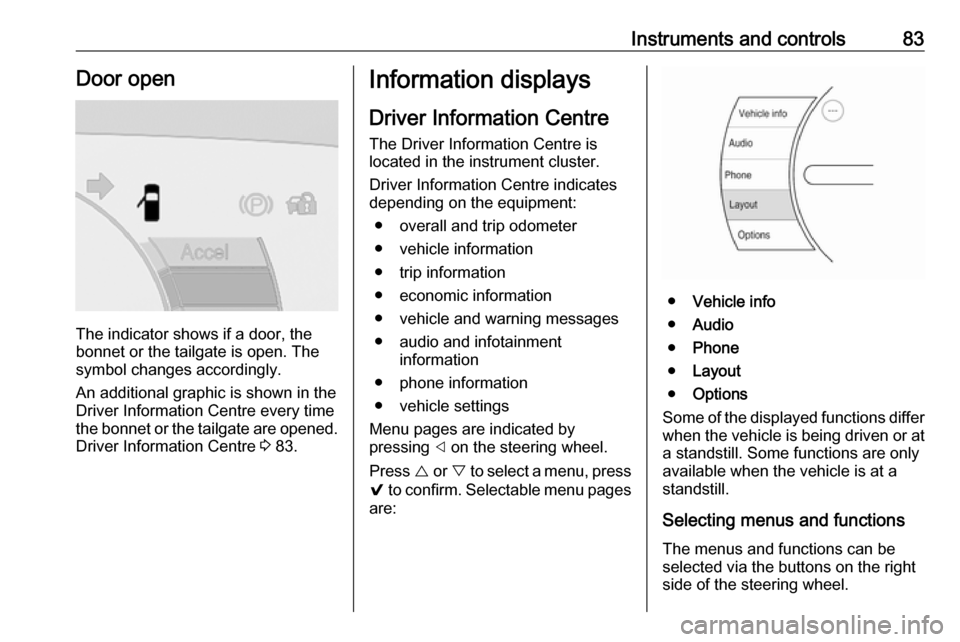
Instruments and controls83Door open
The indicator shows if a door, the
bonnet or the tailgate is open. The
symbol changes accordingly.
An additional graphic is shown in the
Driver Information Centre every time
the bonnet or the tailgate are opened. Driver Information Centre 3 83.
Information displays
Driver Information Centre
The Driver Information Centre is
located in the instrument cluster.
Driver Information Centre indicates
depending on the equipment:
● overall and trip odometer
● vehicle information
● trip information
● economic information
● vehicle and warning messages
● audio and infotainment information
● phone information
● vehicle settings
Menu pages are indicated by
pressing ] on the steering wheel.
Press { or } to select a menu, press
9 to confirm. Selectable menu pages
are:
● Vehicle info
● Audio
● Phone
● Layout
● Options
Some of the displayed functions differ
when the vehicle is being driven or at a standstill. Some functions are only
available when the vehicle is at a
standstill.
Selecting menus and functions The menus and functions can be
selected via the buttons on the right
side of the steering wheel.
Page 93 of 265

Instruments and controls91Some important messages may
appear additionally in the Info display.
Some messages only pop-up for a
few seconds.
Warning chimes
When starting the propulsion
system or whilst driving
Only one warning chime will sound at a time.
The warning chime regarding not
fastened seat belts has priority over
any other warning chime.
● If seat belt is not fastened.
● If a door or the tailgate is not fully
closed when starting off.
● If a certain speed is exceeded with parking brake applied.
● If approaching a vehicle ahead too rapidly.
● If a programmed speed or speed
limit is exceeded.
● If a warning message appears in the Driver Information Centre.
● If the electronic key is not in the passenger compartment.● If the parking assist detects anobject.
● If an unintended lane change occurs.
● If safety function of the power tailgate detects obstacles in the
moving area.
When the vehicle is parked and/or the driver's door is opened
● With exterior lights on.
Battery voltage When the vehicle battery voltage is
running low, a warning message will
appear in the Driver Information
Centre.
1. Switch off any electrical consumers which are not requiredfor a safe drive, e.g. seat heating,
heated rear window or other main consumers.
2. Charge the vehicle battery by driving continuously for a while or
by using a charging device.The warning message will disappear
after the vehicle has been started
twice without a voltage drop.
If the vehicle battery cannot be
recharged, have the cause of the fault
remedied by a workshop.
Page 197 of 265

Driving and operating195
3. Open the tailgate. Lift the rearfloor storage cover and remove
the charge cord.
4. Plug the charge cord into the electrical outlet. Electrical
requirements 3 208.
Verify the charge cord status.
Charge cord 3 205.
Select the appropriate charge
level. See "Charge limit selection" in Programmable charging
3 197.5. Plug in the vehicle plug of the
charge cord into the charge port
on the vehicle. Verify that the
charging status indicator
illuminates on top of the
instrument panel and an audible
beep occurs. Charging status
3 204.
6. Once charging, the vehicle plug will be locked to the charge port
and cannot be disconnected while
charging is active.
Stop charging 1. To stop charging, when inside the
vehicle, use the Stop button on
the Charging screen. See
"Temporary charge mode
override and cancel” in Programmable charging 3 197.
Additionally, the stop charge button on the radio remote control may also be used. Press and hold
5 on the radio remote control.
This will also unlock the vehicle
plug.
2. Unplug the vehicle plug of the charge cord from the vehicle.
3. Close the charge port door by pressing firmly in the centre until it
engages.
4. Unplug the charge cord from the electrical outlet.
5. Place the charge cord into the storage compartment.
Page 223 of 265
Vehicle care221Tail lights
The tail light assembly in the rear
bumper
The tail light assembly is located in
the rear bumper. The bulbs are
accessible from the underside of the
vehicle.
● (1) Rear fog light (driver side) / reversing light (passenger side)
● (2) Turn signal light
● (3) Tail/brake light
1. Turn the bulb holder anticlockwise
and remove it from the reflector.
2. Pull the bulb straight from the bulb
holder.
3. Replace bulb.
4. Insert the bulb holder into the reflector and rotate clockwise.
In case of failure, have LEDs replaced by a workshop.
Tail light assembly in the tailgate The lights of the tail light assembly in
the tailgate are LEDs and have to be
replaced by a workshop.
Side turn signal lights
Have bulbs replaced by a workshop.Number plate light
1. Insert screwdriver in recess of the
cover, press to the side and
release spring.
Page 228 of 265
226Vehicle careNumberUsage1–2Power window rear3–4Rechargeable energy
storage system 15–6–7Left high‐beam headlight8Right high‐beam headlight9Left low‐beam headlight10Right low‐beam headlight11Horn12–13Front wiper motor driver14Tailgate15Front wiper motor co-driver16Electronic brake control
module supply electronicsNumberUsage17Rear wiper18Tailgate19Seat module front20Washer21HID light22Linear power module23Electronic brake control
module supply motor24Seat module rear25Powertrain26Transmission range control
module27Aero shutter28Auxiliary oil pump29E-booster motor source30Front power windows31In-panel bussed electrical
centreNumberUsage32Rear window defogger33Heated exterior rear view
mirror34Pedestrian friendly alert
function35–36–37Current sensor38Rain sensor39–40E-booster (ECU)41Power line communication
module42Infant occupant sensing43Window switch44Rechargeable energy
storage system45Vehicle integration control
module