Page 86 of 291

84Storage● Expand the parts of the foldedmat, so that first part is raised up
at second row backrest.
● When folding down second row backrests, the mat expands
automatically and covers the
space between both seat rows.
● To allow one seat in the third row
to be raised up, fold mat in half
lengthways.
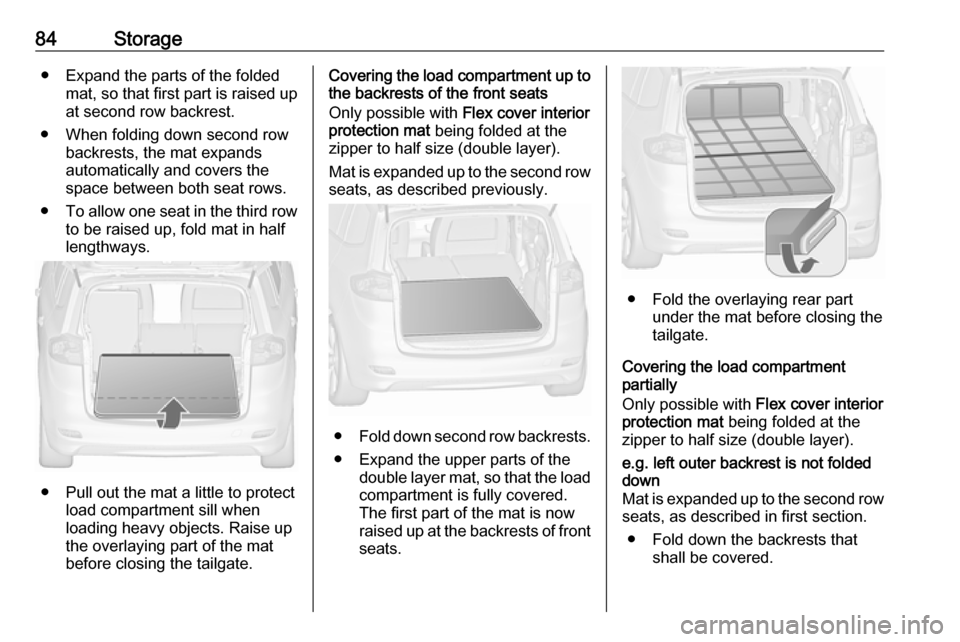
● Pull out the mat a little to protect load compartment sill when
loading heavy objects. Raise up
the overlaying part of the mat
before closing the tailgate.
Covering the load compartment up to the backrests of the front seats
Only possible with Flex cover interior
protection mat being folded at the
zipper to half size (double layer).
Mat is expanded up to the second row
seats, as described previously.
● Fold down second row backrests.
● Expand the upper parts of the double layer mat, so that the loadcompartment is fully covered.
The first part of the mat is now
raised up at the backrests of front
seats.
● Fold the overlaying rear part under the mat before closing the
tailgate.
Covering the load compartment
partially
Only possible with Flex cover interior
protection mat being folded at the
zipper to half size (double layer).
e.g. left outer backrest is not folded
down
Mat is expanded up to the second row seats, as described in first section.
● Fold down the backrests that shall be covered.
Page 87 of 291
Storage85
● Open the zipper behind theraised up backrest.
● Pull out the mat until the first part
is flat on the load compartment floor.
● Raise up lengthways the part that
is opened by the zipper, and fold
it to the centre.● Expand the upper part of double layer mat over the folded
backrests.
● Fold the overlaying rear part under the mat before closing the
tailgate.
Proceed in the same way when one
outer backrest and the centre
backrest are not folded down.
e.g. only centre backrest is folded down
Mat is expanded up to the second row seats, as described in first section.
● Fold down centre backrest to be covered.
● Open the zipper from both sidesbehind the left and right backrest.
● Pull out the mat until the first part
is flat on the load compartment floor.
● Raise up lengthways both parts that are opened by the zipper,and fold them to the centre.
Page 173 of 291

Driving and operating171The settings of the systems are
adapted to a comfort driving style:
● Damping of shock absorbers reacts more softly.
● Accelerator pedal reacts with standard settings.
● Steering support is in standard mode.
● Shift points of automatic transmission occur in a comfort
mode.
Normal mode
All settings of the systems are
adapted to standard values.
Drive mode control
Within each manual selected driving
mode SPORT, TOUR or Normal, the
Drive Mode Control (DMC) detects
and analyses continuously the real
driving characteristics, responses by
the driver, and the active dynamic
state of the vehicle. If necessary, the
control unit of DMC automatically
changes the settings within the
selected driving mode or, whenrecognising greater variations, the
driving mode is changed for the
length of variation.
If, for example, Normal mode is
selected and DMC detects a sporty
driving behaviour, DMC changes
several settings of the Normal mode
into sporty settings. The DMC
changes to SPORT mode in case of
very sporty driving behaviour.
If, for example, TOUR mode is
selected and whilst driving on a
winding road a sudden hard brake is
necessary, DMC will detect the
dynamic vehicle condition and
changes the settings for suspension
to SPORT mode to increase vehicle
stability.
When the driving characteristic or the dynamic vehicle state returns to
former state, DMC will change the
settings to the preselected driving
mode.
Personalised settings in the Sport
mode
The driver can select the functions of
the SPORT mode when SPORT is
pressed.Select the relevant settings in
Settings in the Info-Display.
Info-Display 3 121.
Vehicle personalisation 3 124.
Page 244 of 291
242Vehicle care9Warning
Do not drive faster than 50 mph.
Do not use for a lengthy period.
Steering and handling may be
affected.
If you have a flat tyre:
Apply the parking brake and engage
first gear, reverse gear or P.
The tyre repair kit is on the left side in
the load compartment behind a cover.
1. Take the tyre repair kit from the compartment.
2. Remove the compressor.
3. Remove the electrical connection cable and air hose from the
stowage compartments on the
underside of the compressor.
4. Screw the compressor air hose to
the connection on the sealant
bottle.
5. Fit the sealant bottle into the retainer on the compressor.
Set the compressor near the tyre
in such a way that the sealant
bottle is upright.
6. Unscrew valve cap from defective
tyre.
7. Screw the filler hose to the tyre valve.
8. The switch on the compressor must be set to J.
Page 272 of 291
270Technical dataVehicle dimensionsLength [mm]4666Width with folded exterior mirrors [mm]1928Width with two exterior mirrors [mm]2100Height (without antenna) [mm]1620 - 1710Length of load compartment floor with folded third row [mm]1094Length of load compartment with folded second and third row [mm]1842Load compartment width [mm]1057Load compartment height at tailgate [mm]840Wheelbase [mm]2760Turning circle diameter [m]11.9