2016 YAMAHA YZ450F ignition
[x] Cancel search: ignitionPage 29 of 362

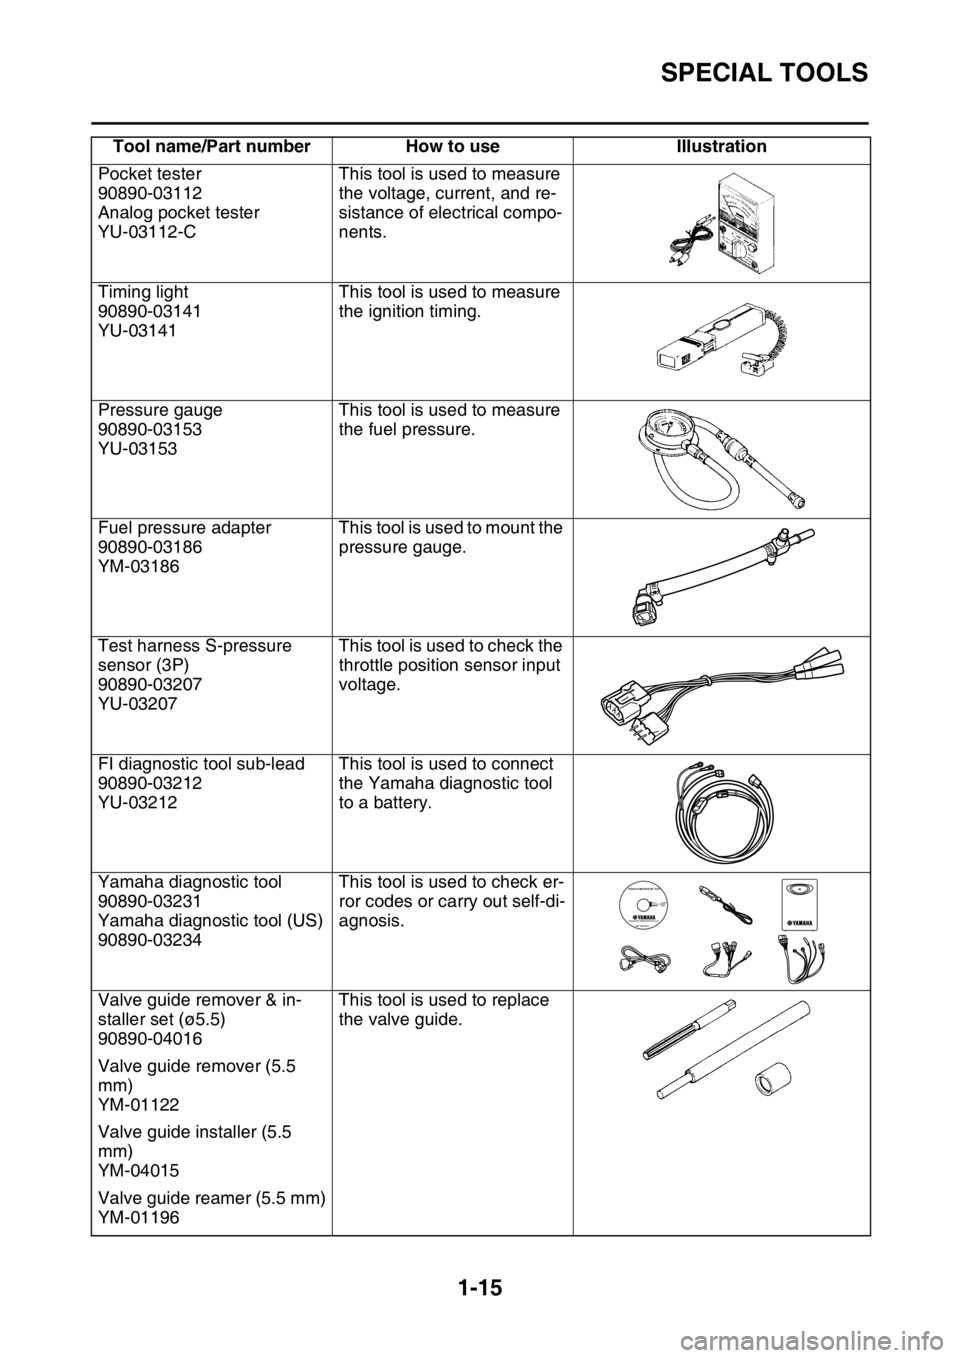
SPECIAL TOOLS
1-15
Pocket tester
90890-03112
Analog pocket tester
YU-03112-CThis tool is used to measure
the voltage, current, and re-
sistance of electrical compo-
nents.
Timing light
90890-03141
YU-03141This tool is used to measure
the ignition timing.
Pressure gauge
90890-03153
YU-03153This tool is used to measure
the fuel pressure.
Fuel pressure adapter
90890-03186
YM-03186This tool is used to mount the
pressure gauge.
Test harness S-pressure
sensor (3P)
90890-03207
YU-03207This tool is used to check the
throttle position sensor input
voltage.
FI diagnostic tool sub-lead
90890-03212
YU-03212This tool is used to connect
the Yamaha diagnostic tool
to a battery.
Yamaha diagnostic tool
90890-03231
Yamaha diagnostic tool (US)
90890-03234This tool is used to check er-
ror codes or carry out self-di-
agnosis.
Valve guide remover & in-
staller set (ø5.5)
90890-04016This tool is used to replace
the valve guide.
Valve guide remover (5.5
mm)
YM-01122
Valve guide installer (5.5
mm)
YM-04015
Valve guide reamer (5.5 mm)
YM-01196Tool name/Part number How to use Illustration
Page 31 of 362

SPECIAL TOOLS
1-17
Crankcase separating tool
90890-04152
YU-A9642This tool is used to remove
the crankshaft.
Ignition checker
90890-06754
Oppama pet-4000 spark
checker
YM-34487This tool is used to check the
spark performance of the ig-
nition coil.
Digital tachometer
90890-06760
YU-39951-BThis tool is used to measure
the engine speed.
Three bond No.1215®
90890-85505This sealant (Bond) is used
for crankcase mating sur-
face, etc. Tool name/Part number How to use Illustration
Page 32 of 362

CONTROL FUNCTIONS
1-18
EASB111029
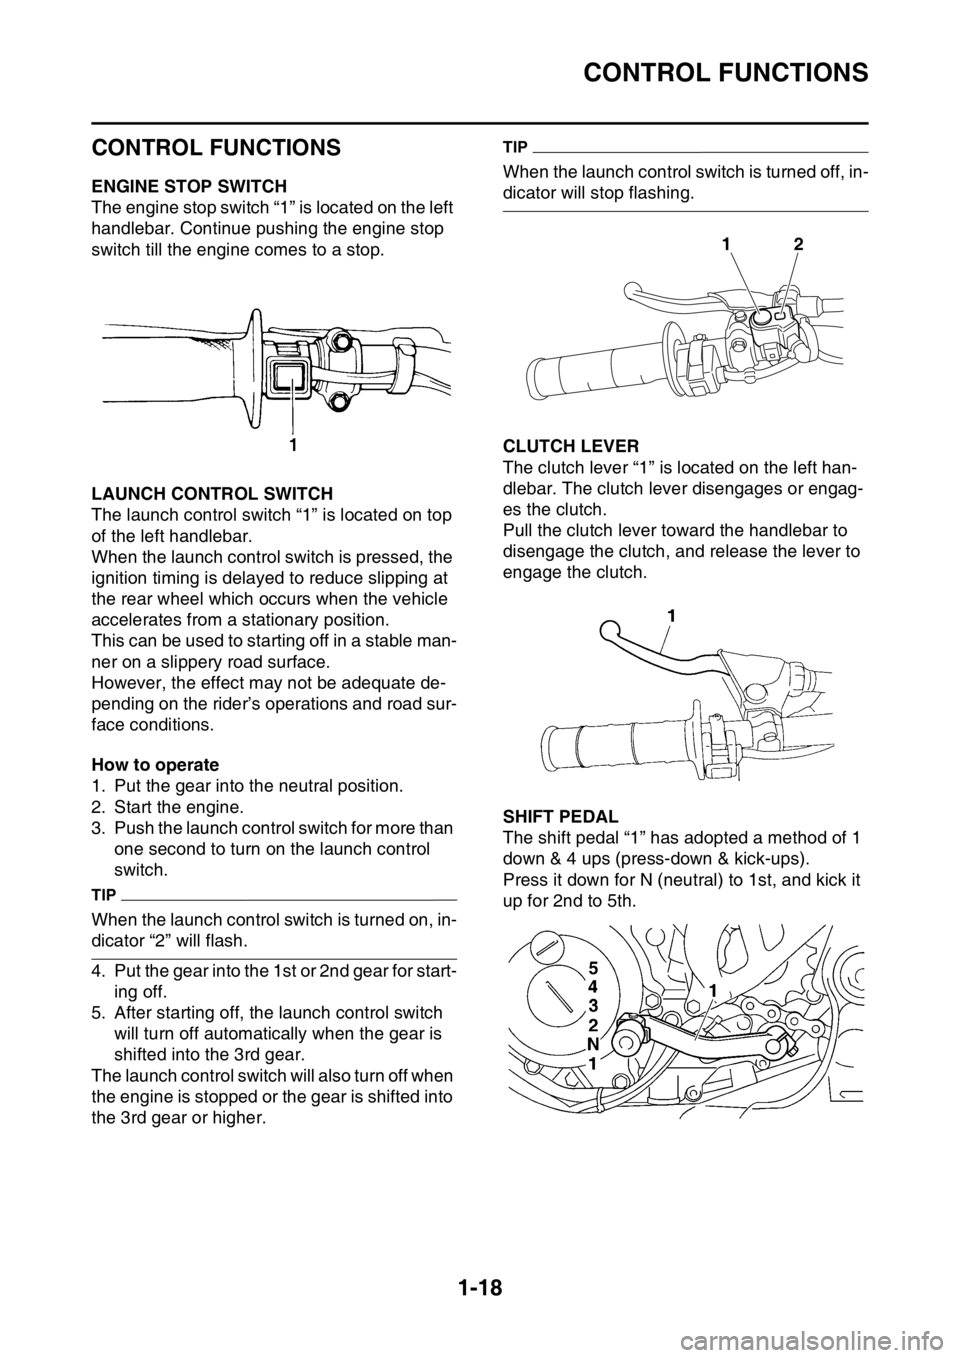
CONTROL FUNCTIONS
EASB111030ENGINE STOP SWITCH
The engine stop switch “1” is located on the left
handlebar. Continue pushing the engine stop
switch till the engine comes to a stop.
EASB111031LAUNCH CONTROL SWITCH
The launch control switch “1” is located on top
of the left handlebar.
When the launch control switch is pressed, the
ignition timing is delayed to reduce slipping at
the rear wheel which occurs when the vehicle
accelerates from a stationary position.
This can be used to starting off in a stable man-
ner on a slippery road surface.
However, the effect may not be adequate de-
pending on the rider’s operations and road sur-
face conditions.
How to operate
1. Put the gear into the neutral position.
2. Start the engine.
3. Push the launch control switch for more than
one second to turn on the launch control
switch.
TIP
When the launch control switch is turned on, in-
dicator “2” will flash.
4. Put the gear into the 1st or 2nd gear for start-
ing off.
5. After starting off, the launch control switch
will turn off automatically when the gear is
shifted into the 3rd gear.
The launch control switch will also turn off when
the engine is stopped or the gear is shifted into
the 3rd gear or higher.
TIP
When the launch control switch is turned off, in-
dicator will stop flashing.
EASB111032CLUTCH LEVER
The clutch lever “1” is located on the left han-
dlebar. The clutch lever disengages or engag-
es the clutch.
Pull the clutch lever toward the handlebar to
disengage the clutch, and release the lever to
engage the clutch.
EASB111033SHIFT PEDAL
The shift pedal “1” has adopted a method of 1
down & 4 ups (press-down & kick-ups).
Press it down for N (neutral) to 1st, and kick it
up for 2nd to 5th.
12
Page 52 of 362

ELECTRICAL SPECIFICATIONS
2-11
EASB111054
ELECTRICAL SPECIFICATIONS
Voltage
System voltage 12 V
Ignition system
Ignition system TCI
Advancer type Digital
Ignition timing (B.T.D.C.) 10.0 ° at 2000 r/min
Engine control unit
Model/manufacturer B110/YAMAHA (USA) (CAN)
B111/YAMAHA (EUR) (JPN) (AUS) (NZL)
(ZAF)
Ignition coil
Minimum ignition spark gap 6.0 mm (0.24 in)
Primary coil resistance 2.16–2.64
Secondary coil resistance 8.64–12.96 k
Spark plug cap
Resistance 10.00 k
AC magneto
Standard output 14.0 V, 95 W at 5000 r/min
Stator coil resistance 0.624–0.936
Rectifier/regulator
Regulator type Semi conductor-short circuit
No load regulated voltage 14.1–14.9 V
Rectifier capacity (DC) 23.0 A
Page 56 of 362

TIGHTENING TORQUES
2-15
Primary drive gear nut
M20 1 100 Nm (10 m·kgf, 72 ft·lbf)
Clutch spring bolt
M6 6 10 Nm (1.0 m·kgf, 7.2 ft·lbf)
Clutch boss nut
M20 1 75 Nm (7.5 m·kgf, 54 ft·lbf)
Drive sprocket nut M20 1 75 Nm (7.5 m·kgf, 54 ft·lbf)Use a
lock
washer.
Drive axle oil seal stopper bolt
M6 2 10 Nm (1.0 m·kgf, 7.2 ft·lbf)
Segment
M8 1 30 Nm (3.0 m·kgf, 22 ft·lbf)
Shift guide bolt
M6 2 10 Nm (1.0 m·kgf, 7.2 ft·lbf)
Stopper lever bolt
M6 1 10 Nm (1.0 m·kgf, 7.2 ft·lbf)
Shift pedal bolt M6 1 12 Nm (1.2 m·kgf, 8.7 ft·lbf)
Rotor nut
M12 1 65 Nm (6.5 m·kgf, 47 ft·lbf)
Stator screw
M5 3 8 Nm (0.8 m·kgf, 5.8 ft·lbf)
Crankshaft position sensor bolt
M6 2 10 Nm (1.0 m·kgf, 7.2 ft·lbf)
AC magneto lead holder bolt
M5 1 8 Nm (0.8 m·kgf, 5.8 ft·lbf)
Coolant temperature sensor
M10 1 16 Nm (1.6 m·kgf, 12 ft·lbf)
Neutral switch bolt
M5 2 3.5 Nm (0.35 m·kgf, 2.5 ft·lbf)
Intake air temperature sensor screw
M5 1 1.5 Nm (0.15 m·kgf, 1.1 ft·lbf)
Rectifier/regulator bolt
M6 2 7 Nm (0.7 m·kgf, 5.1 ft·lbf)
ECU bolt
M5 2 3.8 Nm (0.38 m·kgf, 2.8 ft·lbf)
Ignition coil bolt
M6 2 7 Nm (0.7 m·kgf, 5.1 ft·lbf)
Throttle position sensor screw
M5 2 3.4 Nm (0.34 m·kgf, 2.5 ft·lbf)
Intake air pressure sensor screw
M6 1 5 Nm (0.5 m·kgf, 3.6 ft·lbf) ITEMThread
sizeQ’ty TIGHTENING TORQUES RemarksE
LT
LT
LT
LT
LT
LT
LT
Page 84 of 362

CHECKING THE WHEEL BEARINGS ..................................................... 3-34
CHECKING AND ADJUSTING THE STEERING HEAD .......................... 3-35
LUBRICATING THE LEVERS .................................................................. 3-36
LUBRICATING THE PEDAL .................................................................... 3-36
ELECTRICAL SYSTEM.................................................................................. 3-37
CHECKING THE SPARK PLUG .............................................................. 3-37
CHECKING THE IGNITION TIMING ........................................................ 3-37
Page 91 of 362

PRE-OPERATION INSPECTION AND MAINTENANCE
3-7
EASB111066
PRE-OPERATION INSPECTION AND MAINTENANCE
Before riding for break-in operation, practice or a race, make sure the machine is in good operating
condition.
Before using this machine, check the following points.
EASB111067GENERAL INSPECTION AND MAINTENANCE
TIP
Perform usual maintenance enough so that, in the race course, a confirmation of that and simple set-
ting adjustments may only be left, in order to get enough time to use effectively.ITEM inspect Page
CoolantCheck that coolant is filled up to the radiator cap.
Check the cooling system for leakage.3-8 – 10
FuelCheck that a fresh gasoline is filled in the fuel tank.
Check the fuel line for leakage.1-21
Engine oilCheck that the oil level is correct. Check the crank-
case and oil line for leakage.3-14 – 16
Gear shifter and clutchCheck that gears can be shifted correctly in order and
that the clutch operates smoothly.3-10 – 11
Throttle grip/HousingCheck that the throttle grip operation and free play
are correctly adjusted. Lubricate the throttle grip and
housing, if necessary.3-11 – 12
BrakesCheck the play of front brake and effect of front and
rear brake.3-22 – 28
Drive chainCheck drive chain slack and alignment. Check that
the drive chain is lubricated properly.3-28 – 29
4-66 – 67
WheelsCheck for excessive wear and tire pressure. Check
for loose spokes and have no excessive play.3-34
SteeringCheck that the handlebar can be turned smoothly and
have no excessive play.3-35 – 36
Front forks and rear
shock absorberCheck that they operate smoothly and there is no oil
leakage.3-29 – 33
Cables (wires)Check that the clutch and throttle cables move
smoothly. Check that they are not caught when the
handlebars are turned or when the front forks travel
up and down.—
Exhaust pipeCheck that the exhaust pipe is tightly mounted and
has no cracks.3-14
Rear wheel sprocketCheck that the rear wheel sprocket tightening bolt is
not loose.4-8 – 9
Lubrication Check for smooth operation. Lubricate if necessary. 3-12, 3-36
Bolts and nutsCheck the chassis and engine for loose bolts and
nuts.1-24 – 25
Lead connectorsCheck that the AC magneto, ECU and ignition coil are
connected tightly.1-10 – 12
SettingsIs the machine set suitably for the condition of the rac-
ing course and weather or by taking into account the
results of test runs before racing? Are inspection and
maintenance completely done?10-1 – 8
Page 101 of 362

ENGINE
3-17
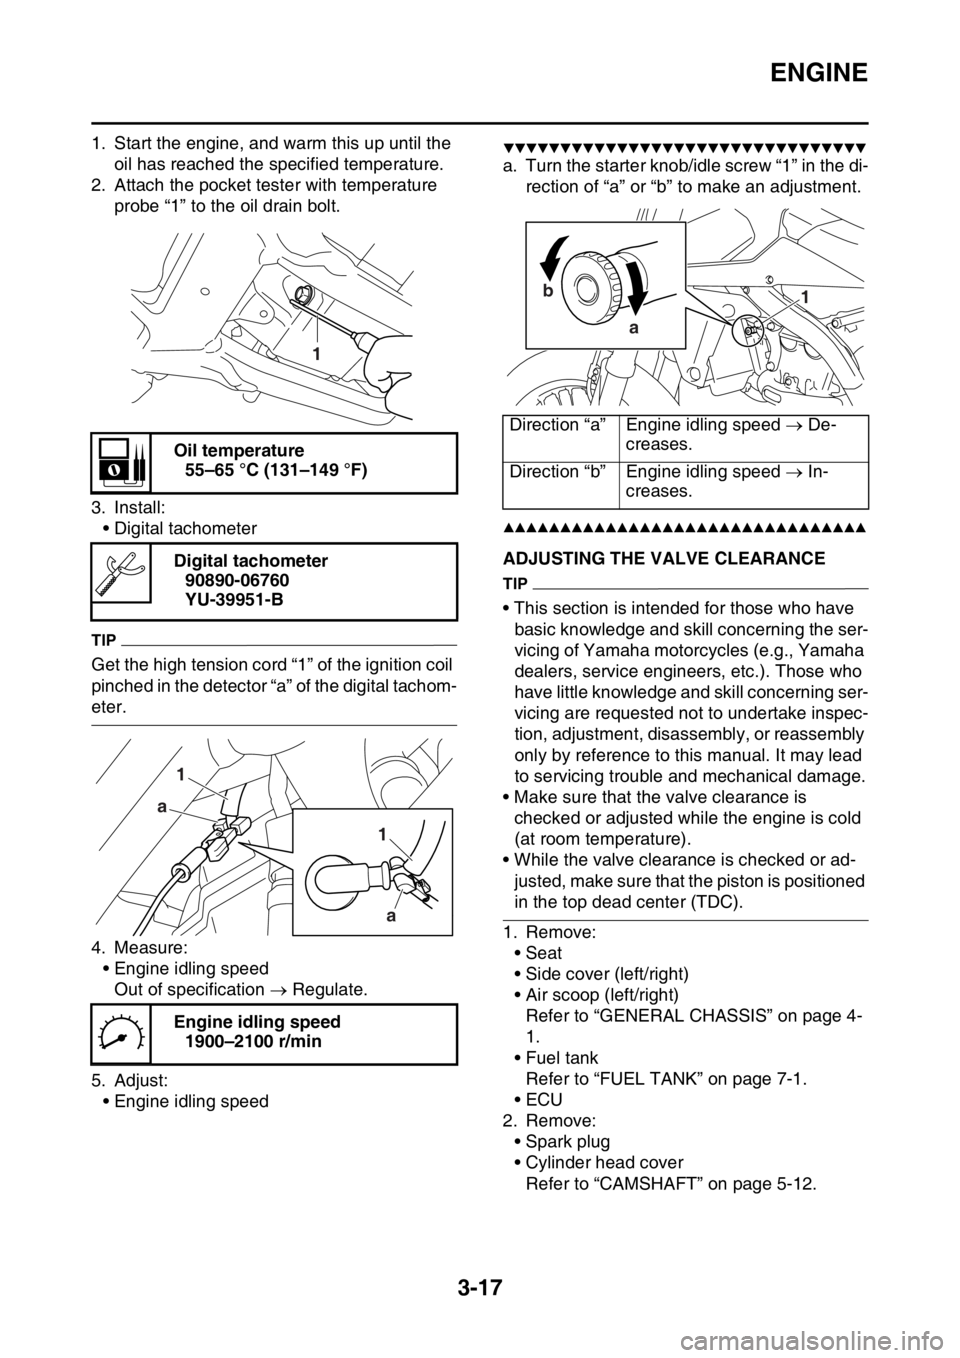
1. Start the engine, and warm this up until the
oil has reached the specified temperature.
2. Attach the pocket tester with temperature
probe “1” to the oil drain bolt.
3. Install:
• Digital tachometer
TIP
Get the high tension cord “1” of the ignition coil
pinched in the detector “a” of the digital tachom-
eter.
4. Measure:
• Engine idling speed
Out of specification Regulate.
5. Adjust:
• Engine idling speed
▼▼▼▼▼▼▼▼▼▼▼▼▼▼▼▼▼▼▼▼▼▼▼▼▼▼▼▼▼▼▼▼
a. Turn the starter knob/idle screw “1” in the di-
rection of “a” or “b” to make an adjustment.
▲▲▲▲▲▲▲▲▲▲▲▲▲▲▲▲▲▲▲▲▲▲▲▲▲▲▲▲▲▲▲▲
EASB111087ADJUSTING THE VALVE CLEARANCE
TIP
• This section is intended for those who have
basic knowledge and skill concerning the ser-
vicing of Yamaha motorcycles (e.g., Yamaha
dealers, service engineers, etc.). Those who
have little knowledge and skill concerning ser-
vicing are requested not to undertake inspec-
tion, adjustment, disassembly, or reassembly
only by reference to this manual. It may lead
to servicing trouble and mechanical damage.
• Make sure that the valve clearance is
checked or adjusted while the engine is cold
(at room temperature).
• While the valve clearance is checked or ad-
justed, make sure that the piston is positioned
in the top dead center (TDC).
1. Remove:
• Seat
• Side cover (left/right)
• Air scoop (left/right)
Refer to “GENERAL CHASSIS” on page 4-
1.
• Fuel tank
Refer to “FUEL TANK” on page 7-1.
•ECU
2. Remove:
• Spark plug
• Cylinder head cover
Refer to “CAMSHAFT” on page 5-12. Oil temperature
55–65 °C (131–149 °F)
Digital tachometer
90890-06760
YU-39951-B
Engine idling speed
1900–2100 r/min
1
1 1
a a
Direction “a” Engine idling speed De-
creases.
Direction “b” Engine idling speed In-
creases.
1 b
a