Page 119 of 172
8-19
8
3. If the level is low, add sufficient oil of therecommended type to raise it to the
specified level. NOTICE: Be sure no for-
eign material enters the differential
gear case.
[ECB00412]
4. Check the gasket for damage, and re- place it if necessary.
5. Install the differential gear oil filler bolt and its gasket, and then tighten the bolt
to the specified torque. Changing the differential gear oil
1. Park the vehicle on a level surface.
2. Place an oil pan under the differential
gear case to collect the used oil.
3. Remove the differential gear oil filler bolt,
the differential gear oil drain bolt and their
gasket to drain the oil.1. Differential gear oil filler bolt
2. Gasket
3. Differential gear oil
4. Correct oil level
1
2
3
4
Tightening torque:Differential gear oil filler bolt:23 Nm (2.3 m·kgf, 17 ft·lbf)1. Differential gear oil drain bolt
2. Gasket
12
UB427AE0.book Page 19 Monday, May 18, 2015 9:17 AM
Page 120 of 172

8-20
8
4. Install the differential gear oil drain boltand its new gasket, and then tighten the
bolt to the specified torque.
5. Refill the differential gear case with the recommended oil. NOTICE: Be sure no
foreign material enters the differential
gear case.
[ECB00412]
6. Check the oil filler bolt gasket for dam- age, and replace it if necessary.
7. Install the differential gear oil filler bolt and its gasket, and then tighten the bolt
to the specified torque. 8. Check for oil leakage. If oil leakage is
found, check for the cause.
EBU32990CoolantThe coolant level should be checked before
each ride.
Checking the coolant level1. Park the vehicle on a level surface.
2. Check the coolant level in the coolant reservoir when the engine is cold as the
coolant level varies with engine tempera-
ture.TIPThe coolant should be between the minimum
and maximum level marks.
Tightening torque:Differential gear oil drain bolt:9.8 Nm (0.98 m·kgf, 7.1 ft·lbf)
Recommended oil: SAE 80 API GL-4 Hypoid gear oil
Oil quantity: 0.18 L (0.19 US qt, 0.16 Imp.qt)
Tightening torque:Differential gear oil filler bolt:23 Nm (2.3 m·kgf, 17 ft·lbf)
UB427AE0.book Page 20 Monday, May 18, 2015 9:17 AM
Page 128 of 172
8-28
8
13. Thoroughly apply Yamaha foam air filteroil or other quality liquid foam air filter oil
(not spray type) to the sponge material.
The sponge material should be wet but
not dripping.
14. Pull the sponge material over its frame.
15. Install the air filter element holder.
16. Install the air filter element.
17. Fit the holders on the air filter case cover onto the projections on the air filter case,
and then install the air filter case cover by
hooking the holders onto the cover. 18. Install cover A, then cover B in their orig-
inal positions by installing the quick fas-
tener screws.1. Holder
2. Projection
1
2
1. Cover A
1
UB427AE0.book Page 28 Monday, May 18, 2015 9:17 AM
Page 134 of 172
8-34
8
WARNING
EWB02721Improper maintenance can result in loss of
braking ability. Observe these precau-
tions:
Insufficient brake fluid may allow air to
enter the brake system, reducing brak-
ing performance.
Clean the filler cap before removing. Use
only DOT 4 brake fluid from a sealed
container.
Use only the specified brake fluid; other-
wise, the rubber seals may deteriorate,
causing leakage.
Refill with the same type of brake fluid.
Adding a brake fluid other than DOT 4
may result in a harmful chemical reac-
tion.
Be careful that water does not enter the
brake fluid reservoir when refilling. Wa-
ter will significantly lower the boiling
point of the fluid and may result in vapor
lock.
NOTICEECB01161Brake fluid may damage painted surfaces
or plastic parts. Always clean up spilled
fluid immediately.
1. Minimum level markSpecified brake fluid: DOT 4
1
UB427AE0.book Page 34 Monday, May 18, 2015 9:17 AM
Page 135 of 172

8-35
8
As the brake pads wear, it is normal for the
brake fluid level to gradually go down. A low
brake fluid level may indicate worn brake
pads and/or brake system leakage; therefore,
be sure to check the brake pads for wear and
the brake system for leakage. If the brake fluid
level goes down suddenly, have a Yamaha
dealer check the cause before further riding.EBU32520Brake fluid replacementComplete fluid replacement should be done
only by trained Yamaha service personnel.
Have a Yamaha dealer replace the following
components during pe riodic maintenance or
when they are damaged or leaking.
Replace the oil seals every two years.
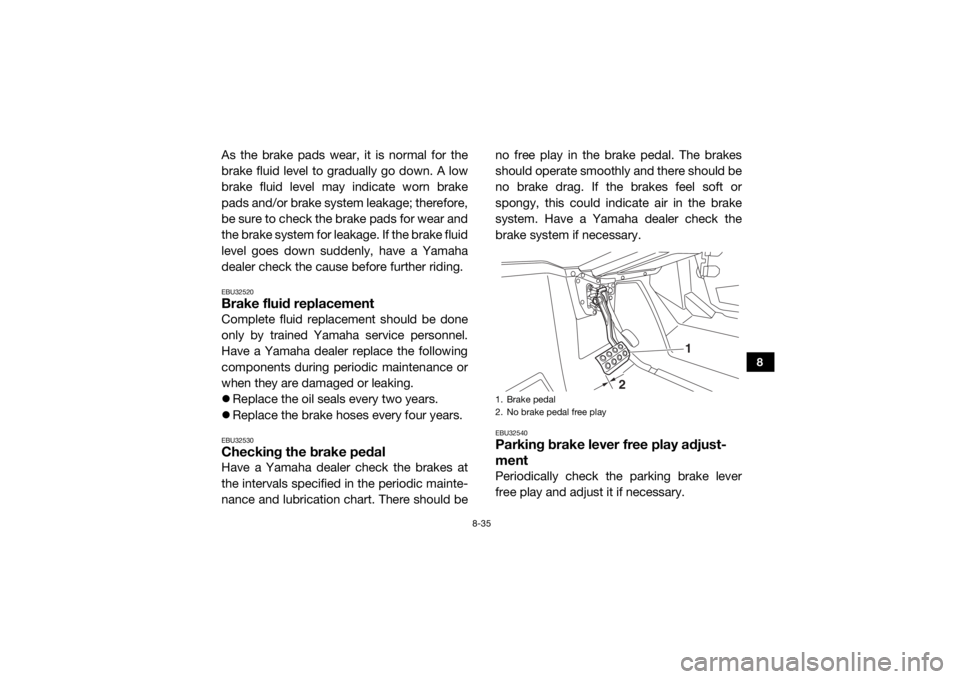
Replace the brake hoses every four years.EBU32530Checking the brake pedalHave a Yamaha dealer check the brakes at
the intervals specified in the periodic mainte-
nance and lubrication chart. There should be no free play in the brake pedal. The brakes
should operate smoothly
and there should be
no brake drag. If the brakes feel soft or
spongy, this could indicate air in the brake
system. Have a Yamaha dealer check the
brake system if necessary.
EBU32540Parking brake lever free play adjust-
mentPeriodically check the parking brake lever
free play and adjust it if necessary.1. Brake pedal
2. No brake pedal free play
1
2
UB427AE0.book Page 35 Monday, May 18, 2015 9:17 AM
Page 142 of 172

8-42
8
tilled water. However, the battery lead con-
nections need to be checked and, if
necessary, tightened.
WARNING
EWB03410Avoid battery contact with skin, eyes, or
clothing. Shield eyes when working near
batteries. Keep out of reach of children.
You could be poisoned or severely burned
by the sulfuric acid in battery electrolyte. In
case of accidental contact with battery
electrolyte:
EXTERNAL: Flush with water.
INTERNAL: Drink large quantities of water
or milk. Follow with milk of magnesia,
beaten egg, or vegetable oil. Get prompt
medical attention.
EYES: Flush with water for 15 minutes and
get prompt medical attention.
WARNING
EWB03420Batteries may produce explosive gases.
Ventilate when charging or using in a
closed space. Keep batteries away from
sparks, flames, cigarettes, or other sourc-
es of ignition. To remove the battery
1. Turn the key to “ ” (off).
2. Remove the hood. (See page 8-10 for hood removal and installation proce-
dures.)
3. Remove the air intake duct panel by re-
moving the quick fastener screws.
UB427AE0.book Page 42 Monday, May 18, 2015 9:17 AM
Page 150 of 172
8-50
8
4. Unhook the headlight bulb holder.5. Wait for the headlight bulb to cool before
touching or removing it. Remove the
burnt-out bulb by pulling it out.
6. Place a new headlight bulb into position, and then secure it with the bulb holder.
NOTICE: Do not touch the glass part of
the headlight bulb to keep it free from
oil, otherwise the transparency of the
glass, the luminosity of the bulb, and
the bulb life will be adversely affected.
Thoroughly clean off any dirt and fin-
gerprints on the headlight bulb using a
cloth moistened with alcohol or thin-
ner.
[ECB00652]
1. Headlight coupler
1. Headlight bulb holder
11
UB427AE0.book Page 50 Monday, May 18, 2015 9:17 AM
Page 158 of 172

9-2
9
5. Rinse the vehicle off immediately with
clean water and dry all surfaces with a
clean chamois towel or soft, absorbent
cloth.
6. Clean the seats with a vinyl upholstery
cleaner to keep the covers pliable and
glossy.
7. Automotive-type wax may be applied to
all painted and chrome-plated surfaces.
Avoid combination cleaner-waxes. Many
contain abrasives which may scratch the
paint or protective finish. When finished,
start the engine and let it idle for several
minutes.EBU32740StorageLong term storage (60 days or more) of your
vehicle will require some preventive proce-
dures to guard against deterioration. Make
any necessary repairs before storing the vehi-
cle. After thoroughly cleaning the vehicle, prepare
for storage as follows:
1. Fill the fuel tank with fresh fuel and add the specified amount of Yamaha Fuel
Stabilizer and Conditioner or equivalent
product. Operate the vehicle for at least 5
minutes to distribute treated fuel through
the fuel system.
2. Remove the spark plug, pour about one tablespoon of SAE 10W-40 or 20W-50
motor oil in the spark plug hole and install
the spark plug. Ground the spark plug
wire and turn the engine over several
times to coat the cylinder wall with oil.
3. Lubricate all control cables.
4. Block up the frame to raise all wheels off the ground.
Specified amount:1 oz of stabilizer to each gallon of fuel (or
7.5 ml of stabilizer to each liter of fuel)
UB427AE0.book Page 2 Monday, May 18, 2015 9:17 AM